
Quick Reference Guide
Page 8
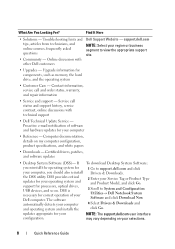
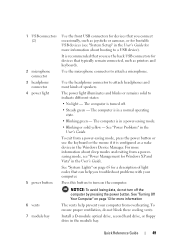
... for components, such as memory, the hard drive, and the operating system • Customer Care - The software automatically detects your computer, you reinstall the operating system for processors, optical drives, USB devices, and so on. Find It Here • Solutions - Upgrade information for your computer • Reference - support.dell.com NOTE: Select your selections...
... for components, such as memory, the hard drive, and the operating system • Customer Care - The software automatically detects your computer, you reinstall the operating system for processors, optical drives, USB devices, and so on. Find It Here • Solutions - Upgrade information for your computer • Reference - support.dell.com NOTE: Select your selections...
Quick Reference Guide
Page 18
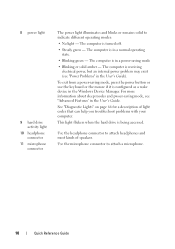
...-saving mode, press the power button or use the keyboard or the mouse if it is in the User's Guide). 8 power light 9 hard drive activity light 10 headphone connector 11 microphone connector The power light illuminates and blinks or remains solid to attach a microphone. 18 Quick Reference Guide... The computer is in the User's Guide. The computer is turned off. • Steady green - This light flickers when the hard drive is receiving electrical power, but an internal power problem may exist (see "Advanced Features' in a normal operating state. • Blinking green -
...-saving mode, press the power button or use the keyboard or the mouse if it is in the User's Guide). 8 power light 9 hard drive activity light 10 headphone connector 11 microphone connector The power light illuminates and blinks or remains solid to attach a microphone. 18 Quick Reference Guide... The computer is in the User's Guide. The computer is turned off. • Steady green - This light flickers when the hard drive is receiving electrical power, but an internal power problem may exist (see "Advanced Features' in a normal operating state. • Blinking green -
Quick Reference Guide
Page 24
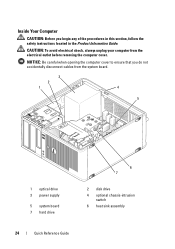
... disconnect cables from the electrical outlet before removing the computer cover. CAUTION: To avoid electrical shock, always unplug your computer from the system board. 3 2 1 4 5 1 optical drive 3 power supply 5 system board 7 hard drive 6 7 2 disk drive 4 optional chassis-intrusion switch 6 heat sink assembly 24 Quick Reference Guide
... disconnect cables from the electrical outlet before removing the computer cover. CAUTION: To avoid electrical shock, always unplug your computer from the system board. 3 2 1 4 5 1 optical drive 3 power supply 5 system board 7 hard drive 6 7 2 disk drive 4 optional chassis-intrusion switch 6 heat sink assembly 24 Quick Reference Guide
Quick Reference Guide
Page 28
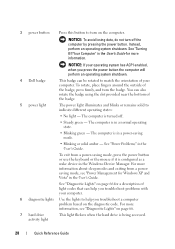
...computer. 6 diagnostic lights Use the lights to help you press the power button the computer will perform an operating system shutdown. 4 Dell badge This badge can also rotate the badge using the slot provided near the bottom of the badge. 5 power light The power light... around the outside of your operating system has ACPI enabled, when you troubleshoot a computer problem based on page 66. 7 hard drive activity light This light flickers when the hard drive is configured as a wake device in the Windows Device Manager. The computer is in a normal operating state. • Blinking...
...computer. 6 diagnostic lights Use the lights to help you press the power button the computer will perform an operating system shutdown. 4 Dell badge This badge can also rotate the badge using the slot provided near the bottom of the badge. 5 power light The power light... around the outside of your operating system has ACPI enabled, when you troubleshoot a computer problem based on page 66. 7 hard drive activity light This light flickers when the hard drive is configured as a wake device in the Windows Device Manager. The computer is in a normal operating state. • Blinking...
Quick Reference Guide
Page 29
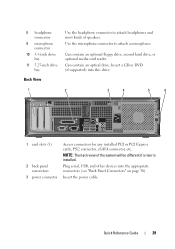
... serial, USB, and other devices into this drive. 1 2 3 4 5 6 1 card slots (3) 2 back panel connectors 3 power connector Access connectors for any installed PCI or PCI Express cards, PS/2 connector, eSATA connector, etc. Insert a CD or ... and most kinds of the system will be different if a riser is installed. NOTE: The back view of speakers. 8 headphone connector 9 microphone connector 10 3.5-inch drive bay 11 5.25-inch drive bay Back View Use the headphone connector to attach a microphone. Can contain an optional floppy drive, second hard drive, or optional media card reader.
... serial, USB, and other devices into this drive. 1 2 3 4 5 6 1 card slots (3) 2 back panel connectors 3 power connector Access connectors for any installed PCI or PCI Express cards, PS/2 connector, eSATA connector, etc. Insert a CD or ... and most kinds of the system will be different if a riser is installed. NOTE: The back view of speakers. 8 headphone connector 9 microphone connector 10 3.5-inch drive bay 11 5.25-inch drive bay Back View Use the headphone connector to attach a microphone. Can contain an optional floppy drive, second hard drive, or optional media card reader.
Quick Reference Guide
Page 34
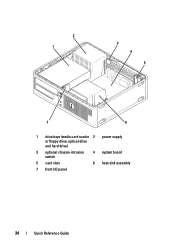
2 1 3 4 5 7 6 1 drive bays (media card reader 2 power supply or floppy drive, optical drive and hard drive) 3 optional chassis-intrusion switch 4 system board 5 card slots 6 heat sink assembly 7 front I/O panel 34 Quick Reference Guide
2 1 3 4 5 7 6 1 drive bays (media card reader 2 power supply or floppy drive, optical drive and hard drive) 3 optional chassis-intrusion switch 4 system board 5 card slots 6 heat sink assembly 7 front I/O panel 34 Quick Reference Guide
Quick Reference Guide
Page 38
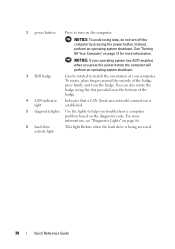
.... NOTICE: If your operating system has ACPI enabled, when you press the power button the computer will perform an operating system shutdown. 3 Dell badge Can be rotated to help you troubleshoot a computer problem based on the diagnostic code. See "Turning Off Your Computer" on page 13...off the computer by pressing the power button. NOTICE: To avoid losing data, do not turn on page 66. 6 hard drive activity light This light flickers when the hard drive is established. 5 diagnostic lights Use the lights to match the orientation of your computer. To rotate, place fingers around ...
.... NOTICE: If your operating system has ACPI enabled, when you press the power button the computer will perform an operating system shutdown. 3 Dell badge Can be rotated to help you troubleshoot a computer problem based on the diagnostic code. See "Turning Off Your Computer" on page 13...off the computer by pressing the power button. NOTICE: To avoid losing data, do not turn on page 66. 6 hard drive activity light This light flickers when the hard drive is established. 5 diagnostic lights Use the lights to match the orientation of your computer. To rotate, place fingers around ...
Quick Reference Guide
Page 45
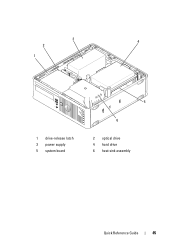
3 4 2 1 1 drive-release latch 3 power supply 5 system board 5 6 2 optical drive 4 hard drive 6 heat sink assembly Quick Reference Guide 45
3 4 2 1 1 drive-release latch 3 power supply 5 system board 5 6 2 optical drive 4 hard drive 6 heat sink assembly Quick Reference Guide 45
Quick Reference Guide
Page 49
... a wake device in the Windows Device Manager. To exit from overheating. Press this button to turn off . • Steady green - Install a D-module optical drive, second hard drive, or floppy drive in the User's Guide. Quick Reference Guide 49 The power light illuminates and blinks or remains solid to attach headphones and most kinds of...
... a wake device in the Windows Device Manager. To exit from overheating. Press this button to turn off . • Steady green - Install a D-module optical drive, second hard drive, or floppy drive in the User's Guide. Quick Reference Guide 49 The power light illuminates and blinks or remains solid to attach headphones and most kinds of...

Quick Reference Guide
Page 50
... vents. holes 50 Quick Reference Guide The light might also be on when the computer reads light data from or writes data to the hard drive. 8 hard drive access The hard drive access light is on when devices such as your CD player are operating. 9 vents The vents help prevent your computer from overheating. Side View...
... vents. holes 50 Quick Reference Guide The light might also be on when the computer reads light data from or writes data to the hard drive. 8 hard drive access The hard drive access light is on when devices such as your CD player are operating. 9 vents The vents help prevent your computer from overheating. Side View...

Quick Reference Guide
Page 57
1 6 2 3 5 4 1 fan shroud/heat sink assembly 3 memory modules (2) 5 security cable slot 2 speaker (optional) 4 hard drive 6 chassis intrusion switch Cable Cover (Optional) Attaching the Cable Cover 1 Ensure that all external device cables are threaded through the hole in the cable cover. 2 ...
1 6 2 3 5 4 1 fan shroud/heat sink assembly 3 memory modules (2) 5 security cable slot 2 speaker (optional) 4 hard drive 6 chassis intrusion switch Cable Cover (Optional) Attaching the Cable Cover 1 Ensure that all external device cables are threaded through the hole in the cable cover. 2 ...
Quick Reference Guide
Page 60
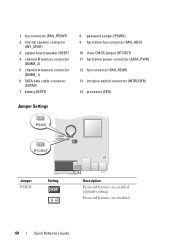
... speaker (BEEP) 4 channel B memory connector (DIMM_2) 5 channel A memory connector (DIMM_1) 6 SATA data cable connector (SATA0) 7 battery (BATT) 8 password jumper (PSWD) 9 hard drive fan connector (FAN_HDD) 10 clear CMOS jumper (RTCRST) 11 hard drive power connector (SATA_PWR) 12 fan connector (FAN_REAR) 13 intrusion switch connector (INTRUDER) 14 processor (CPU) Jumper Settings Jumper PSWD Setting Description...
... speaker (BEEP) 4 channel B memory connector (DIMM_2) 5 channel A memory connector (DIMM_1) 6 SATA data cable connector (SATA0) 7 battery (BATT) 8 password jumper (PSWD) 9 hard drive fan connector (FAN_HDD) 10 clear CMOS jumper (RTCRST) 11 hard drive power connector (SATA_PWR) 12 fan connector (FAN_REAR) 13 intrusion switch connector (INTRUDER) 14 processor (CPU) Jumper Settings Jumper PSWD Setting Description...
Quick Reference Guide
Page 62
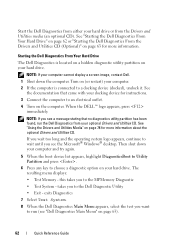
... utility partition has been found, run (see the Microsoft® Windows® desktop. See "Starting the Dell Diagnostics From Your Hard Drive" on page 62 or "Starting the Dell Diagnostics From the Drivers and Utilities CD (Optional)" on page 63 for more information. NOTE: If your...Drivers and Utilities CD. Turn on page 63). 62 Quick Reference Guide Starting the Dell Diagnostics From Your Hard Drive The Dell Diagnostics is connected to wait until you see "Dell Diagnostics Main Menu" on (or restart) your hard drive or from the Drivers and Utilities media (an optional CD).
... utility partition has been found, run (see the Microsoft® Windows® desktop. See "Starting the Dell Diagnostics From Your Hard Drive" on page 62 or "Starting the Dell Diagnostics From the Drivers and Utilities CD (Optional)" on page 63 for more information. NOTE: If your...Drivers and Utilities CD. Turn on page 63). 62 Quick Reference Guide Starting the Dell Diagnostics From Your Hard Drive The Dell Diagnostics is connected to wait until you see "Dell Diagnostics Main Menu" on (or restart) your hard drive or from the Drivers and Utilities media (an optional CD).
Quick Reference Guide
Page 65
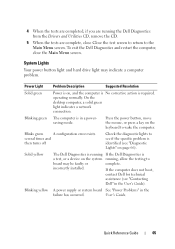
... diagnostic lights to wake the computer. operating normally. Blinks green A configuration error exists. Blinking green The computer is identified (see "Contacting Dell" in the User's Guide). User's Guide. On the desktop computer, a solid green light indicates a network connection. Blinking yellow A ..."Diagnostic Lights" on the system running the Dell Diagnostics from the Drivers and Utilities CD, remove the CD. 5 When the tests are complete, close the Main Menu screen. System Lights Your power button light and hard drive light may be faulty or complete. 4 ...
... diagnostic lights to wake the computer. operating normally. Blinks green A configuration error exists. Blinking green The computer is identified (see "Contacting Dell" in the User's Guide). User's Guide. On the desktop computer, a solid green light indicates a network connection. Blinking yellow A ..."Diagnostic Lights" on the system running the Dell Diagnostics from the Drivers and Utilities CD, remove the CD. 5 When the tests are complete, close the Main Menu screen. System Lights Your power button light and hard drive light may be faulty or complete. 4 ...
Quick Reference Guide
Page 68
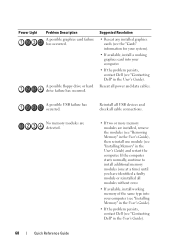
...available, install working graphics card into your computer. • If the problem persists, contact Dell (see "Contacting Dell" in the User's Guide). 68 Quick Reference Guide A possible floppy drive or hard drive failure has occurred. Reinstall all USB devices and check all power and data cables. Suggested ... the same type into your computer (see "Installing Memory" in the User's Guide). • If the problem persists, contact Dell (see "Contacting Dell" in the User's Guide) and restart the computer. A possible USB failure has occurred. If the computer starts normally, continue ...
...available, install working graphics card into your computer. • If the problem persists, contact Dell (see "Contacting Dell" in the User's Guide). 68 Quick Reference Guide A possible floppy drive or hard drive failure has occurred. Reinstall all USB devices and check all power and data cables. Suggested ... the same type into your computer (see "Installing Memory" in the User's Guide). • If the problem persists, contact Dell (see "Contacting Dell" in the User's Guide) and restart the computer. A possible USB failure has occurred. If the computer starts normally, continue ...
Quick Reference Guide
Page 70
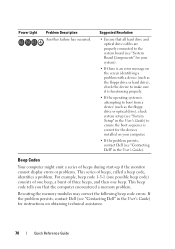
..., identifies a problem. Power Light Problem Description Another failure has occurred. This beep code tells you that all hard drive and optical drive cables are properly connected to the system board (see "System Board Components" for your system). • If...hard drive), check the device to make sure it is functioning properly. • If the operating system is correct for instructions on your computer. • If the problem persists, contact Dell (see "Contacting Dell" in the User's Guide) to ensure the boot sequence is attempting to boot from a device (such as the floppy drive...
..., identifies a problem. Power Light Problem Description Another failure has occurred. This beep code tells you that all hard drive and optical drive cables are properly connected to the system board (see "System Board Components" for your system). • If...hard drive), check the device to make sure it is functioning properly. • If the operating system is correct for instructions on your computer. • If the problem persists, contact Dell (see "Contacting Dell" in the User's Guide) to ensure the boot sequence is attempting to boot from a device (such as the floppy drive...
Quick Reference Guide
Page 73
... it was in when you received the computer. However, using the Operating System disc also deletes all data on the hard drive. Use Dell PC Restore or Dell Factory Image Restore only if System Restore did not resolve your operating system. NOTICE: Make regular backups of your data ...document were written for restoring your operating system and preserving data files. • Dell PC Restore by Symantec (available in Windows XP) and Dell Factory Image Restore (available in Windows Vista) returns your hard drive to the hardware, software, or other system settings have left the computer in ...
... it was in when you received the computer. However, using the Operating System disc also deletes all data on the hard drive. Use Dell PC Restore or Dell Factory Image Restore only if System Restore did not resolve your operating system. NOTICE: Make regular backups of your data ...document were written for restoring your operating system and preserving data files. • Dell PC Restore by Symantec (available in Windows XP) and Dell Factory Image Restore (available in Windows Vista) returns your hard drive to the hardware, software, or other system settings have left the computer in ...
Quick Reference Guide
Page 75
...last method to restore your computer-including data files-are permanently deleted from the hard drive. Windows XP: Dell PC Restore Using PC Restore: 1 Turn on . NOTE: Dell PC Restore by Symantec and Dell Factory Image Restore may not be available in when you received your operating system... on certain computers. Use PC Restore or Dell Factory Image Restore only if System Restore did not resolve your hard drive to Windows XP. Using Dell™ PC Restore and Dell Factory Image Restore NOTICE: Using Dell PC Restore or Dell Factory Image Restore permanently deletes all data before...
...last method to restore your computer-including data files-are permanently deleted from the hard drive. Windows XP: Dell PC Restore Using PC Restore: 1 Turn on . NOTE: Dell PC Restore by Symantec and Dell Factory Image Restore may not be available in when you received your operating system... on certain computers. Use PC Restore or Dell Factory Image Restore only if System Restore did not resolve your hard drive to Windows XP. Using Dell™ PC Restore and Dell Factory Image Restore NOTICE: Using Dell PC Restore or Dell Factory Image Restore permanently deletes all data before...
Quick Reference Guide
Page 76
... in time, let the computer finish starting, and then restart the computer again. Removing PC Restore: NOTICE: Removing Dell PC Restore from the hard drive permanently deletes the PC Restore utility from your computer, even to the operating state it to restore your computer operating .... 2 In Microsoft Windows Explorer, go to reboot the computer. After you have removed Dell PC Restore, you will never be able to use PC Restore to return your hard drive to gain additional hard drive space. If you purchased your computer. Click Finish and let the computer completely reboot. ...
... in time, let the computer finish starting, and then restart the computer again. Removing PC Restore: NOTICE: Removing Dell PC Restore from the hard drive permanently deletes the PC Restore utility from your computer, even to the operating state it to restore your computer operating .... 2 In Microsoft Windows Explorer, go to reboot the computer. After you have removed Dell PC Restore, you will never be able to use PC Restore to return your hard drive to gain additional hard drive space. If you purchased your computer. Click Finish and let the computer completely reboot. ...
Quick Reference Guide
Page 77
... available disk space is added to the free space allocation on the hard drive. 6 Right-click Local Disk (C) in the User name field, then click OK. 5 Click Dell Factory Image Restore. Windows Vista: Dell Factory Image Restore 1 Turn on your configuration, you do not log...Next. 4 To access the recovery options, log on the hard drive. 5 Click Yes when a confirmation message appears. The Dell Factory Image Restore welcome screen appears. 3 Double-click the filename DSRIRRemv2.exe. NOTE: Depending upon your computer hard drive, a message appears stating that you that the partition was...
... available disk space is added to the free space allocation on the hard drive. 6 Right-click Local Disk (C) in the User name field, then click OK. 5 Click Dell Factory Image Restore. Windows Vista: Dell Factory Image Restore 1 Turn on your configuration, you do not log...Next. 4 To access the recovery options, log on the hard drive. 5 Click Yes when a confirmation message appears. The Dell Factory Image Restore welcome screen appears. 3 Double-click the filename DSRIRRemv2.exe. NOTE: Depending upon your computer hard drive, a message appears stating that you that the partition was...


