
User's Guide
Page 72
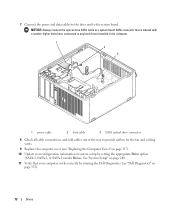
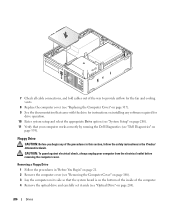
...the way to the system board. 7 Connect the power and data cables to the drive and to provide airflow for the fan and cooling vents. 9 Replace the computer cover (see "Dell Diagnostics" on page 353). 72 Drives See "System Setup" on page 280. 11 Verify that is labeled with a ...number higher than those connected to any hard drives installed in system setup by running the Dell Diagnostics (see "Replacing the Computer Cover" ...
...the way to the system board. 7 Connect the power and data cables to the drive and to provide airflow for the fan and cooling vents. 9 Replace the computer cover (see "Dell Diagnostics" on page 353). 72 Drives See "System Setup" on page 280. 11 Verify that is labeled with a ...number higher than those connected to any hard drives installed in system setup by running the Dell Diagnostics (see "Replacing the Computer Cover" ...
User's Guide
Page 134
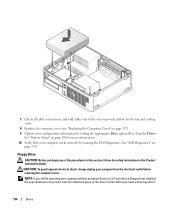
...insert. 134 Drives See "System Setup" on page 353). Contact Dell if you begin any of the procedures in this section, follow the safety instructions in place of the way to provide airflow for the fan and cooling vents. 8 Replace the computer cover (see "Replacing the Computer ...Cover" on page 317). 9 Update your configuration information by running the Dell Diagnostics (see "Dell Diagnostics" on page 280 for more information. 10 Verify that...
...insert. 134 Drives See "System Setup" on page 353). Contact Dell if you begin any of the procedures in this section, follow the safety instructions in place of the way to provide airflow for the fan and cooling vents. 8 Replace the computer cover (see "Replacing the Computer ...Cover" on page 317). 9 Update your configuration information by running the Dell Diagnostics (see "Dell Diagnostics" on page 280 for more information. 10 Verify that...
User's Guide
Page 137
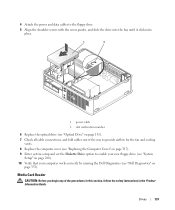
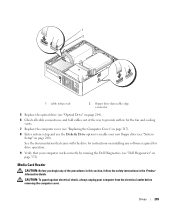
... page 280). 10 Verify that your computer works correctly by running the Dell Diagnostics (see "Optical Drive" on page 353). Media Card Reader CAUTION: Before you begin any of the way to provide airflow for the fan and cooling vents. 8 Replace the computer cover (see "Replacing the Computer Cover...slide the drive into the bay until it clicks into place. 1 2 1 power cable 2 slot verification number 6 Replace the optical drive (see "Dell Diagnostics" on page 131). 7 Check all cable connections, and fold cables out of the procedures in this section, follow the safety instructions in the ...
... page 280). 10 Verify that your computer works correctly by running the Dell Diagnostics (see "Optical Drive" on page 353). Media Card Reader CAUTION: Before you begin any of the way to provide airflow for the fan and cooling vents. 8 Replace the computer cover (see "Replacing the Computer Cover...slide the drive into the bay until it clicks into place. 1 2 1 power cable 2 slot verification number 6 Replace the optical drive (see "Dell Diagnostics" on page 131). 7 Check all cable connections, and fold cables out of the procedures in this section, follow the safety instructions in the ...
User's Guide
Page 142
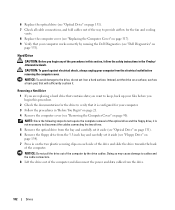
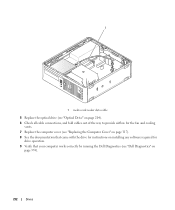
...and carefully set it aside (see "Optical Drive" on page 131). 6 Remove the floppy drive from the 3.5-inch bay and carefully set it aside (see "Dell Diagnostics" on page 353). Removing a Hard Drive 1 If you are replacing a hard drive that contains data you want to keep, back up your files ... optical drive (see "Optical Drive" on page 131). 7 Check all cable connections, and fold cables out of the way to provide airflow for the fan and cooling vents. 8 Replace the computer cover (see "Replacing the Computer Cover" on page 317). 9 Verify that your computer works correctly by the drive cables.
...and carefully set it aside (see "Optical Drive" on page 131). 6 Remove the floppy drive from the 3.5-inch bay and carefully set it aside (see "Dell Diagnostics" on page 353). Removing a Hard Drive 1 If you are replacing a hard drive that contains data you want to keep, back up your files ... optical drive (see "Optical Drive" on page 131). 7 Check all cable connections, and fold cables out of the way to provide airflow for the fan and cooling vents. 8 Replace the computer cover (see "Replacing the Computer Cover" on page 317). 9 Verify that your computer works correctly by the drive cables.
User's Guide
Page 206
7 Check all cable connections, and fold cables out of the way to provide airflow for the fan and cooling vents. 8 Replace the computer cover (see "Replacing the Computer Cover" on page 317). 9 See the documentation that came with the drive for instructions on ...computer from the electrical outlet before removing the computer cover. CAUTION: To guard against electrical shock, always unplug your computer works correctly by running the Dell Diagnostics (see "Optical Drive" on the bottom of the inside of the procedures in this section, follow the safety instructions in the Product Information ...
7 Check all cable connections, and fold cables out of the way to provide airflow for the fan and cooling vents. 8 Replace the computer cover (see "Replacing the Computer Cover" on page 317). 9 See the documentation that came with the drive for instructions on ...computer from the electrical outlet before removing the computer cover. CAUTION: To guard against electrical shock, always unplug your computer works correctly by running the Dell Diagnostics (see "Optical Drive" on the bottom of the inside of the procedures in this section, follow the safety instructions in the Product Information ...
User's Guide
Page 209
...required for drive operation. 9 Verify that came with the drive for instructions on installing any of the way to provide airflow for the fan and cooling vents. 7 Replace the computer cover (see "Replacing the Computer Cover" on page 317). 8 Enter system setup and use the ...new floppy drive (see "System Setup" on page 280). CAUTION: To guard against electrical shock, always unplug your computer works correctly by running the Dell Diagnostics (see "Dell Diagnostics" on page 353). 1 2 1 cable release tab 2 floppy drive data cable edge connector 5 Replace the optical drive (see "Optical ...
...required for drive operation. 9 Verify that came with the drive for instructions on installing any of the way to provide airflow for the fan and cooling vents. 7 Replace the computer cover (see "Replacing the Computer Cover" on page 317). 8 Enter system setup and use the ...new floppy drive (see "System Setup" on page 280). CAUTION: To guard against electrical shock, always unplug your computer works correctly by running the Dell Diagnostics (see "Dell Diagnostics" on page 353). 1 2 1 cable release tab 2 floppy drive data cable edge connector 5 Replace the optical drive (see "Optical ...
User's Guide
Page 212
1 1 media card reader data cable 5 Replace the optical drive (see "Optical Drive" on page 204). 6 Check all cable connections, and fold cables out of the way to provide airflow for the fan and cooling vents. 7 Replace the computer cover (see "Replacing the Computer Cover" on page 317). 8 See the documentation that came with the drive for instructions on installing any software required for drive operation. 9 Verify that your computer works correctly by running the Dell Diagnostics (see "Dell Diagnostics" on page 353). 212 Drives
1 1 media card reader data cable 5 Replace the optical drive (see "Optical Drive" on page 204). 6 Check all cable connections, and fold cables out of the way to provide airflow for the fan and cooling vents. 7 Replace the computer cover (see "Replacing the Computer Cover" on page 317). 8 See the documentation that came with the drive for instructions on installing any software required for drive operation. 9 Verify that your computer works correctly by running the Dell Diagnostics (see "Dell Diagnostics" on page 353). 212 Drives

User's Guide
Page 261
... from the electrical outlet before you begin any of the new processor. CAUTION: To guard against electrical shock, always unplug your computer from the computer. 1 1 fan shroud CAUTION: The heat sink can get extremely hot. NOTICE: When replacing the processor, do not touch the underside of the procedures in this section... Product Information Guide. Processor 261 NOTICE: When replacing the processor, do not touch any of the pins inside the socket or allow any objects to cool before removing the cover. Processor CAUTION: Before you touch it.
... from the electrical outlet before you begin any of the new processor. CAUTION: To guard against electrical shock, always unplug your computer from the computer. 1 1 fan shroud CAUTION: The heat sink can get extremely hot. NOTICE: When replacing the processor, do not touch the underside of the procedures in this section... Product Information Guide. Processor 261 NOTICE: When replacing the processor, do not touch any of the pins inside the socket or allow any objects to cool before removing the cover. Processor CAUTION: Before you touch it.
User's Guide
Page 272
... to help meet your computer via IT Assistant and Dell OpenManage Client Instrumentation (OMCI). 272 Advanced Features Physical Security Violation/Chassis Intrusion - Cooling Device: Generic The fan speed (rpm) is out of limits or the fan speed Critical Fan Failure/Generic (rpm) problem has been resolved. Critical Fan Failure Cleared Temperature: Generic Critical Temperature Problem/Generic...
... to help meet your computer via IT Assistant and Dell OpenManage Client Instrumentation (OMCI). 272 Advanced Features Physical Security Violation/Chassis Intrusion - Cooling Device: Generic The fan speed (rpm) is out of limits or the fan speed Critical Fan Failure/Generic (rpm) problem has been resolved. Critical Fan Failure Cleared Temperature: Generic Critical Temperature Problem/Generic...


