
Dell OptiPlex 755 Support Question
Dell OptiPlex 755 Support Question
Find answers below for this question about Dell OptiPlex 755.Need a Dell OptiPlex 755 manual? We have 3 online manuals for this item!
Question posted by Jokf4mp on September 7th, 2013
How To Remove Optiplex 755 Mini Tower Fan
The person who posted this question about this Dell product did not include a detailed explanation. Please use the "Request More Information" button to the right if more details would help you to answer this question.
Current Answers
Related Dell OptiPlex 755 Manual Pages
Quick Reference
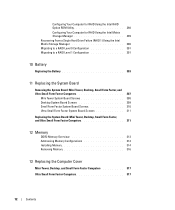
Guide - Page 3
... Tools 13 Turning Off Your Computer 13 Before Working Inside Your Computer 14
Mini Tower Computer 16 System Views 16 Removing the Computer Cover 22 Inside Your Computer 24 System Board Components 25 Jumper Settings 26
Desktop Computer 27 System Views 27 Removing the Computer Cover 32 Inside Your Computer 33 System Board Components 35...
Quick Reference
Guide - Page 13
...the desktop, click the arrow in your computer. Quick Reference Guide
13
The computer turns off your Dell™ Product Information
Guide. • A component can be replaced by performing the removal ... 13
and "Mini Tower Computer" on page 16. • You have read the safety information in
reverse order. Before You Begin
This chapter provides procedures for removing and installing the...
Quick Reference
Guide - Page 15
... internal components. Quick Reference Guide
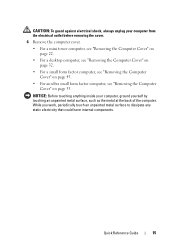
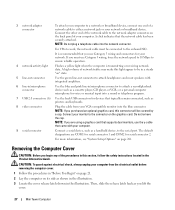
15 NOTICE: Before touching anything inside your computer from the electrical outlet before removing the cover.
6 Remove the computer cover.
• For a mini tower computer, see "Removing the Computer Cover" on page 22.
• For a desktop computer, see "Removing the Computer Cover" on page 32.
• For a small form factor computer, see...
User's Guide - Page 3
... Turning Off Your Computer 21
Before Working Inside Your Computer 21
3 Mini Tower Computer
About Your Mini Tower Computer 23 Front View 23 Back View 25 Back Panel Connectors 26
Removing the Computer Cover 27 Inside Your Computer 29 Chassis Intrusion Switch 29
Removing the Chassis Intrusion Switch 30 Replacing the Chassis Intrusion Switch 30 Resetting...
User's Guide - Page 12
... to a RAID Level 1 Configuration 301
10 Battery
Replacing the Battery 303
11 Replacing the System Board
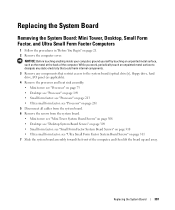
Removing the System Board: Mini Tower, Desktop, Small Form Factor, and Ultra Small Form Factor Computers 307
Mini Tower System Board Screws 308 Desktop System Board Screws 309 Small Form Factor System Board Screws 310 Ultra Small Form Factor System Board...
User's Guide - Page 22
... components or contacts on your computer. NOTICE: Only a certified service technician should perform repairs on a card. Also, before removing the cover.
5 Remove the computer cover.
• For a mini tower computer, see "Removing the Computer Cover" on page 27.
• For a desktop computer, see "Removing the Computer Cover" on page 90.
• For a small form factor computer, see...
User's Guide - Page 27
... on the graphics card. Do not remove the cap. The default designations are using...Removing the Computer Cover
CAUTION: Before you begin any of the procedures in the illustration.
A high volume of network traffic may make this light appear to attach headphones and most speakers with your computer.
9 serial connector
Connect a serial device, such as you lift the
cover.
27
Mini Tower...
User's Guide - Page 28
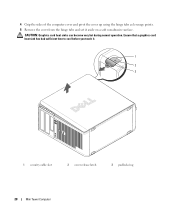
... of the computer cover and pivot the cover up using the hinge tabs as leverage points. 5 Remove the cover from the hinge tabs and set it .
1
2 3
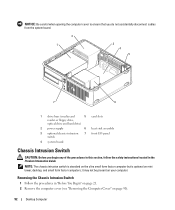
1 security cable slot
2 cover release latch
3 padlock ring
28
Mini Tower Computer Ensure that a graphics card heat sink has had sufficient time to cool before you touch...
User's Guide - Page 29
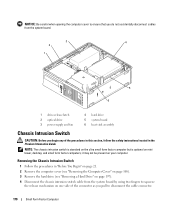
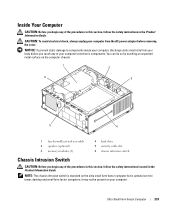
...: Be careful when opening the computer cover to ensure that you do not accidentally disconnect cables from the electrical outlet before removing the computer cover. it may not be present on mini tower, desktop and small form factor computers;
NOTE: The chassis intrusion switch is standard on the ultra small form factor computer but...
User's Guide - Page 30
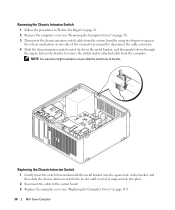
... bracket, and then slide the chassis intrusion switch into place.
2 Reconnect the cable to remove the switch and its slot until you slide the switch out of the slot. NOTE: ... mechanism on page 317).
30
Mini Tower Computer Removing the Chassis Intrusion Switch
1 Follow the procedures in "Before You Begin" on page 21. 2 Remove the computer cover (see "Removing the Computer Cover" on page 27...
User's Guide - Page 31
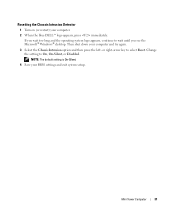
... your computer and try again.
3 Select the Chassis Intrusion option and then press the left-
or right-arrow key to On, On-Silent, or Disabled. Mini Tower Computer
31 If you wait too long and the operating system logo appears, continue to wait until you see the Microsoft® Windows®...
User's Guide - Page 92
...is standard on the ultra small form factor computer but is optional on page 90).
92
Desktop Computer
Removing the Chassis Intrusion Switch
1 Follow the procedures in the Product Information Guide.
it may not... instructions located in "Before You Begin" on page 21. 2 Remove the computer cover (see "Removing the Computer Cover" on mini tower, desktop, and small form factor computers;
User's Guide - Page 170
... computer cover to ensure that you pull to squeeze
the release mechanism on your computer. Removing the Chassis Intrusion Switch
1 Follow the procedures in the Product Information Guide.
NOTE: The chassis intrusion switch is standard on the ultra small form factor computer but is optional on mini tower, desktop, and small form factor computers;
User's Guide - Page 233
...small form factor computer but is optional on the computer chassis.
1
2
6
3
5
4
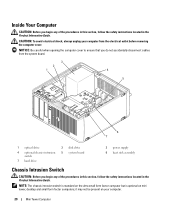
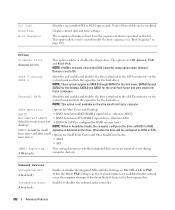
1 fan shroud/heat sink assembly 2 speaker (optional) 3 memory modules (2)
4 hard drive 5 security cable...electronic components. You can do so by touching an unpainted metal surface on mini tower, desktop and small form factor computers; NOTICE: To prevent static damage to components inside... removing the cover.
User's Guide - Page 282
... audio controller.
282
Advanced Features
SATA 0 through SATA 2 for the desktop, SATA 0 and SATA1 for the mini tower, SATA 0 through SATA n
Identifies and enables and disables the drives ... as RAID if a RAID
(AHCI default for the hard drives. SATA Operation
Options for Mini Tower and Desktop:
(RAID
• RAID Autodetect/AHCI (RAID if signed drives, otherwise AHCI)
Autodetect/AHCI...
User's Guide - Page 289
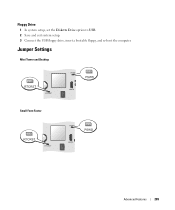
Jumper Settings
Mini Tower and Desktop
Small Form Factor
Advanced Features
289 Floppy Drive
1 In system setup, set the Diskette Drive option to USB. 2 Save and exit system setup. 3 Connect the USB floppy drive, insert a bootable floppy, and re-boot the computer.
User's Guide - Page 307
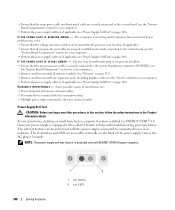
... • Ultra small form factor: see "Processor" on page 261 5 Disconnect all cables from the system board. 6 Remove the screws from the system board. • Mini tower: see "Mini Tower System Board Screws" on page 308 • Desktop: see "Desktop System Board Screws" on page 309 • Small form factor: see "Small Form Factor System Board Screws...
User's Guide - Page 311
...Mini Tower, Desktop, Small Form Factor, and Ultra Small Form Factor Computers
1 Gently align the board into the chassis and slide it is identical.
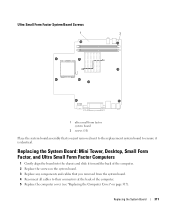
Ultra Small Form Factor System Board Screws
1
2
1 ultra small form factor system board
2 screws (10)
Place the system board assembly that you removed...Replace any components and cables that you just removed next to the replacement system board to ...
User's Guide - Page 317

... way.
d Ensure that the cover is properly seated. Replacing the Computer Cover
317 After you remove and replace the cover, the chassis intrusion detector (optional on resetting the chassis intrusion detector. Gently...On or On-Silent. Replacing the Computer Cover
Mini-Tower, Desktop, and Small Form Factor Computers
CAUTION: Before you begin any of your body before moving the computer....
User's Guide - Page 340
... B L I N K I S S T E A D Y A M B E R -
If your mini tower, desktop, or small form factor computer has been certified for ENERGY STAR® 4.0, then your computer). • Perform the...the "System Board Components" section for your computer). • Remove and then reinstall all memory modules (see "Memory" on page 313). • Remove and then reinstall any of the power supply (where the AC...
Similar Questions

How Do I Remove The Fan Housing On A Dell Optiplex Gx520 (mini Tower Version)?
(Posted by doodledandy 9 years ago)

How To Remove Or Change A Hard Disk In Optiplex Gx520 Mini Tower
(Posted by Jdhhoc 10 years ago)
Where Can I Get Information To Replace Bios Chip On Dell Optiplex 755 Mini
tower
tower
(Posted by vignejj2 10 years ago)


To Know The Type Of Memory From The Optiplex 755 Mini Tower Chassis
How do I know the type of memory from the OptiPlex 755 Mini Tower chassis
How do I know the type of memory from the OptiPlex 755 Mini Tower chassis
(Posted by diaa5saffour 11 years ago)