
Dell OptiPlex 755 Support Question
Dell OptiPlex 755 Support Question
Find answers below for this question about Dell OptiPlex 755.Need a Dell OptiPlex 755 manual? We have 3 online manuals for this item!
Question posted by Garjhb on October 10th, 2013
Can My Optiplex 755 Mini-tower Lay On Its Side
The person who posted this question about this Dell product did not include a detailed explanation. Please use the "Request More Information" button to the right if more details would help you to answer this question.
Current Answers
Related Dell OptiPlex 755 Manual Pages
Quick Reference
Guide - Page 3
... 13 Recommended Tools 13 Turning Off Your Computer 13 Before Working Inside Your Computer 14
Mini Tower Computer 16 System Views 16 Removing the Computer Cover 22 Inside Your Computer 24 System Board Components 25 Jumper Settings 26
Desktop Computer 27 System Views 27 Removing the Computer Cover 32 Inside Your Computer 33...
Quick Reference
Guide - Page 13
... procedures in this document may require the following conditions exist: • You have performed the steps in "Turning Off Your Computer" on page 13
and "Mini Tower Computer" on page 16. • You have read the safety information in
reverse order. Before You Begin
This chapter provides procedures for removing and installing...
Quick Reference
Guide - Page 15
NOTICE: Before touching anything inside your computer from the electrical outlet before removing the cover.
6 Remove the computer cover.
• For a mini tower computer, see "Removing the Computer Cover" on page 22.
• For a desktop computer, see "Removing the Computer Cover" on page 32.
• For a small form factor computer, see "Removing the Computer...
Quick Reference
Guide - Page 16
Insert a CD or DVD (if supported) into this drive.
16
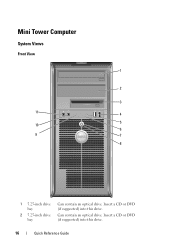
Quick Reference Guide Can contain an optical drive. Insert a CD or DVD (if supported) into this drive. Mini Tower Computer
System Views
Front View
1
2
3
11
4
10
5
6
9
7
8
1 5.25-inch drive bay
2 5.25-inch drive bay
Can contain an optical drive.
User's Guide - Page 12
... the System Board
Removing the System Board: Mini Tower, Desktop, Small Form Factor, and Ultra Small Form Factor Computers 307
Mini Tower System Board Screws 308 Desktop System Board Screws 309 Small Form Factor System...310 Ultra Small Form Factor System Board Screws 311 Replacing the System Board: Mini Tower, Desktop, Small Form Factor, and Ultra Small Form Factor Computers 311
12 Memory
DDR2...
User's Guide - Page 22
... your computer and all attached devices from the electrical outlet before removing the cover.
5 Remove the computer cover.
• For a mini tower computer, see "Removing the Computer Cover" on page 27.
• For a desktop computer, see "Removing the Computer Cover" on page 90.
• For a small form factor computer, see "Removing the Computer...
User's Guide - Page 27
...before removing the computer cover.
1 Follow the procedures in "Before You Begin" on page 21. 2 Lay the computer on its side as shown in the illustration. 3 Locate the cover release latch shown in...for serial connector 2. If you lift the
cover.
27
Mini Tower Computer
CAUTION: To guard against electrical shock, always unplug your computer from your network or broadband device.
User's Guide - Page 29
CAUTION: To avoid electrical shock, always unplug your computer.
29
Mini Tower Computer
it may not be present on mini tower, desktop and small form factor computers; NOTICE: Be careful when opening the computer cover to ensure that you do not accidentally disconnect cables from the electrical ...
User's Guide - Page 31
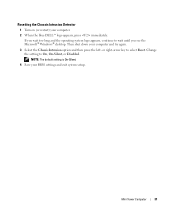
...right-arrow key to On, On-Silent, or Disabled.
Change the setting to select Reset. Mini Tower Computer
31 Resetting the Chassis Intrusion Detector
1 Turn on (or restart) your BIOS settings and ... appears, continue to wait until you see the Microsoft® Windows® desktop.
Then shut down your computer and try again.
3 Select the Chassis Intrusion option and then press the left-
User's Guide - Page 92
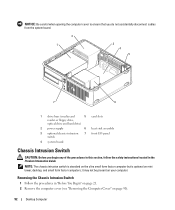
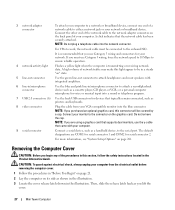
..." on your computer. Removing the Chassis Intrusion Switch
1 Follow the procedures in the Product Information Guide. it may not be present on page 90).
92
Desktop Computer NOTE: The chassis intrusion switch is standard on the ultra small form factor computer but is optional on mini tower, desktop, and small form factor computers;
User's Guide - Page 170
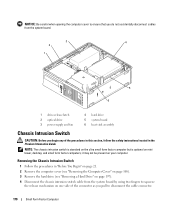
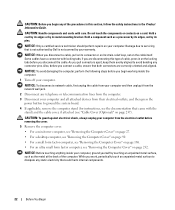
... on one side of the procedures in this section, follow the safety instructions located in the Product Information Guide. it may not be present on mini tower, desktop, and small form factor computers; Removing the Chassis Intrusion Switch
1 Follow the procedures in "Before You Begin" on page 21. 2 Remove the computer cover (see...
User's Guide - Page 233
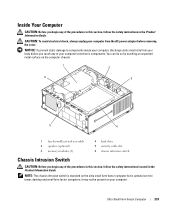
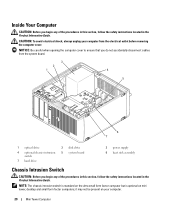
it may not be present on mini tower, desktop and small form factor computers; Inside Your Computer
CAUTION: Before you touch any of your computer's electronic components. CAUTION: To avoid electrical shock, always unplug ...
User's Guide - Page 282
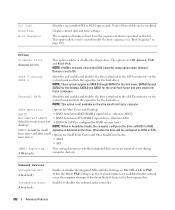
... boot from the next device in this list.
SATA Operation
Options for Mini Tower and Desktop:
(RAID
• RAID Autodetect/AHCI (RAID if signed drives, otherwise AHCI)
Autodetect/AHCI • RAID Autodetect/ATA (RAID if signed drives, otherwise ATA)
default for mini-tower and • RAID On (SATA is configured for RAID on the drive...
User's Guide - Page 289
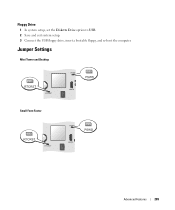
Floppy Drive
1 In system setup, set the Diskette Drive option to USB. 2 Save and exit system setup. 3 Connect the USB floppy drive, insert a bootable floppy, and re-boot the computer. Jumper Settings
Mini Tower and Desktop
Small Form Factor
Advanced Features
289
User's Guide - Page 307
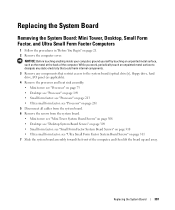
... lift the board up and away. Replacing the System Board
Removing the System Board: Mini Tower, Desktop, Small Form Factor, and Ultra Small Form Factor Computers
1 Follow the procedures in ... board. 6 Remove the screws from the system board. • Mini tower: see "Mini Tower System Board Screws" on page 308 • Desktop: see "Desktop System Board Screws" on page 309 • Small form factor: ...
User's Guide - Page 311
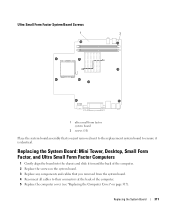
... to their connectors at the back of the computer. 5 Replace the computer cover (see "Replacing the Computer Cover" on page 317). Replacing the System Board: Mini Tower, Desktop, Small Form Factor, and Ultra Small Form Factor Computers
1 Gently align the board into the chassis and slide it toward the back of the computer...
User's Guide - Page 317

... Information Guide. 1 Ensure that all cables are left inside your computer, discharge static electricity from your body before moving the computer. Replacing the Computer Cover
Mini-Tower, Desktop, and Small Form Factor Computers
CAUTION: Before you begin any of the procedures in this section, follow the safety instructions in the Product Information Guide...
User's Guide - Page 319
For details about your computer's specifications:
• For a mini tower computer, see "Mini Tower Computer Specifications" on page 35. • For a desktop computer, see "Desktop Computer Specifications" on page 97. • For a small form factor computer, see "Small Form Factor Computer Specifications" on page 175. • For an ultra small ...
User's Guide - Page 340
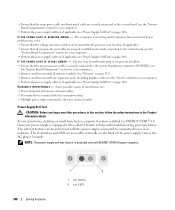
...internal power problem may be performed with ENERGY STAR 4.0 power supplies.
340
Solving Problems
1
2
1 test button 2 test LED E L I M I N A T E I S S T E A D Y A M B E R -
I F T H E P O W E R L I G H T I S B L I N K I N G A M B E R - If your mini tower, desktop, or small form factor computer has been certified for ENERGY STAR® 4.0, then your power supply is set to match the...
User's Guide - Page 341
... printer's manufacturer. Replace the power supply or contact Dell (see "Contacting Dell" on page 219
3 Connect your computer:
• For the mini tower, see "Power Supply" on page 79
• For the desktop, see "Power Supply" on page 155 • For the small form factor, see "Power Supply" on page 370).
-
For a USB...
Similar Questions

Where Is The Service Tag Located On The Optiplex 360 Mini-tower Chassis
(Posted by Arkarex1 10 years ago)

How To Remove Hard Drive From Dell Optiplex Gx280 Mini Tower
(Posted by NS0DD 10 years ago)

Where Can I Get Information To Replace Bios Chip On Dell Optiplex 755 Mini
tower
tower
(Posted by vignejj2 10 years ago)

To Know The Type Of Memory From The Optiplex 755 Mini Tower Chassis
How do I know the type of memory from the OptiPlex 755 Mini Tower chassis
How do I know the type of memory from the OptiPlex 755 Mini Tower chassis
(Posted by diaa5saffour 11 years ago)