
Quick Reference Guide
Page 8
...status and support history, service contract, online discussions with other Dell customers Dell Support Website - If you reinstall the operating system for your operating system and support for components, such as memory, the hard drive, and the operating system • Customer Care - The... • Service and support - Certified drivers, patches, and software updates • Desktop System Software (DSS)- NOTE: The support.dell.com user interface may vary depending on . Computer documentation, details on my computer configuration, product specifications, and white papers • ...
...status and support history, service contract, online discussions with other Dell customers Dell Support Website - If you reinstall the operating system for your operating system and support for components, such as memory, the hard drive, and the operating system • Customer Care - The... • Service and support - Certified drivers, patches, and software updates • Desktop System Software (DSS)- NOTE: The support.dell.com user interface may vary depending on . Computer documentation, details on my computer configuration, product specifications, and white papers • ...
Quick Reference Guide
Page 18
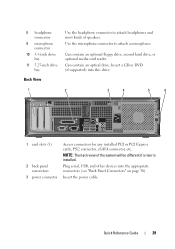
...See "Diagnostic Lights" on page 66 for a description of speakers. The computer is being accessed. This light flickers when the hard drive is in a power-saving mode • Blinking or solid amber - For more information about sleep modes and pwoer-saving mode...see "Advanced Features' in a normal operating state. • Blinking green - The computer is in the User's Guide. 8 power light 9 hard drive activity light 10 headphone connector 11 microphone connector The power light illuminates and blinks or remains solid to attach a microphone. 18 Quick Reference Guide The...
...See "Diagnostic Lights" on page 66 for a description of speakers. The computer is being accessed. This light flickers when the hard drive is in a power-saving mode • Blinking or solid amber - For more information about sleep modes and pwoer-saving mode...see "Advanced Features' in a normal operating state. • Blinking green - The computer is in the User's Guide. 8 power light 9 hard drive activity light 10 headphone connector 11 microphone connector The power light illuminates and blinks or remains solid to attach a microphone. 18 Quick Reference Guide The...
Quick Reference Guide
Page 24
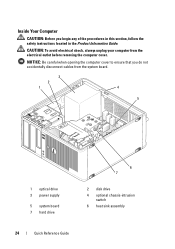
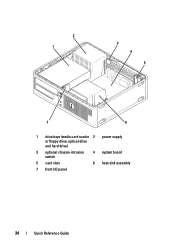
CAUTION: To avoid electrical shock, always unplug your computer from the system board. 3 2 1 4 5 1 optical drive 3 power supply 5 system board 7 hard drive 6 7 2 disk drive 4 optional chassis-intrusion switch 6 heat sink assembly 24 Quick Reference Guide NOTICE: Be careful when opening the computer cover to ensure that you begin any ...
CAUTION: To avoid electrical shock, always unplug your computer from the system board. 3 2 1 4 5 1 optical drive 3 power supply 5 system board 7 hard drive 6 7 2 disk drive 4 optional chassis-intrusion switch 6 heat sink assembly 24 Quick Reference Guide NOTICE: Be careful when opening the computer cover to ensure that you begin any ...
Quick Reference Guide
Page 28
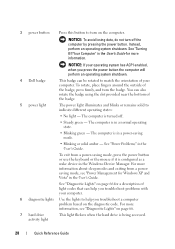
...NOTICE: If your operating system has ACPI enabled, when you press the power button the computer will perform an operating system shutdown. 4 Dell badge This badge can help you troubleshoot problems with your computer. The computer is in the User's Guide. To exit from a powersaving...wake device in the User's Guide for more information. 3 power button Press this button to turn on page 66. 7 hard drive activity light This light flickers when the hard drive is being accessed. 28 Quick Reference Guide See "Power Problems" in a normal operating state. • Blinking green - ...
...NOTICE: If your operating system has ACPI enabled, when you press the power button the computer will perform an operating system shutdown. 4 Dell badge This badge can help you troubleshoot problems with your computer. The computer is in the User's Guide. To exit from a powersaving...wake device in the User's Guide for more information. 3 power button Press this button to turn on page 66. 7 hard drive activity light This light flickers when the hard drive is being accessed. 28 Quick Reference Guide See "Power Problems" in a normal operating state. • Blinking green - ...
Quick Reference Guide
Page 29
... PCI or PCI Express cards, PS/2 connector, eSATA connector, etc. Insert the power cable. Quick Reference Guide 29 Can contain an optical drive. Can contain an optional floppy drive, second hard drive, or optional media card reader. NOTE: The back view of speakers. Insert a CD or DVD (if supported) into the appropriate connectors (see...
... PCI or PCI Express cards, PS/2 connector, eSATA connector, etc. Insert the power cable. Quick Reference Guide 29 Can contain an optical drive. Can contain an optional floppy drive, second hard drive, or optional media card reader. NOTE: The back view of speakers. Insert a CD or DVD (if supported) into the appropriate connectors (see...
Quick Reference Guide
Page 34
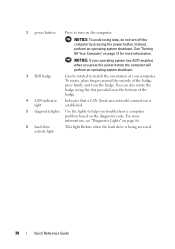
2 1 3 4 5 7 6 1 drive bays (media card reader 2 power supply or floppy drive, optical drive and hard drive) 3 optional chassis-intrusion switch 4 system board 5 card slots 6 heat sink assembly 7 front I/O panel 34 Quick Reference Guide
2 1 3 4 5 7 6 1 drive bays (media card reader 2 power supply or floppy drive, optical drive and hard drive) 3 optional chassis-intrusion switch 4 system board 5 card slots 6 heat sink assembly 7 front I/O panel 34 Quick Reference Guide
Quick Reference Guide
Page 38
... the outside of your operating system has ACPI enabled, when you troubleshoot a computer problem based on page 66. 6 hard drive activity light This light flickers when the hard drive is established. 5 diagnostic lights Use the lights to turn off the computer by pressing the power button. For more ...information. 2 power button Press to help you press the power button the computer will perform an operating system shutdown. 3 Dell badge Can ...
... the outside of your operating system has ACPI enabled, when you troubleshoot a computer problem based on page 66. 6 hard drive activity light This light flickers when the hard drive is established. 5 diagnostic lights Use the lights to turn off the computer by pressing the power button. For more ...information. 2 power button Press to help you press the power button the computer will perform an operating system shutdown. 3 Dell badge Can ...
Quick Reference Guide
Page 45
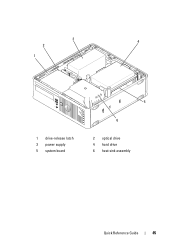
3 4 2 1 1 drive-release latch 3 power supply 5 system board 5 6 2 optical drive 4 hard drive 6 heat sink assembly Quick Reference Guide 45
3 4 2 1 1 drive-release latch 3 power supply 5 system board 5 6 2 optical drive 4 hard drive 6 heat sink assembly Quick Reference Guide 45
Quick Reference Guide
Page 49
... as printers and keyboards. See "System Lights" on the computer. Press this button to indicate different states: • No light - Install a D-module optical drive, second hard drive, or floppy drive in the User's Guide. The power light illuminates and blinks or remains solid to turn off . • Steady green - See "Power Problems" in the...
... as printers and keyboards. See "System Lights" on the computer. Press this button to indicate different states: • No light - Install a D-module optical drive, second hard drive, or floppy drive in the User's Guide. The power light illuminates and blinks or remains solid to turn off . • Steady green - See "Power Problems" in the...

Quick Reference Guide
Page 50
... not block these cooling vents. 2 mounting For mounting optional stand. To ensure proper ventilation, do not block these cooling vents. 8 hard drive access The hard drive access light is on when devices such as your CD player are operating. 9 vents The vents help prevent your computer from or writes... data to the hard drive. Side View 1 2 1 vents The vents located on each side of the computer help prevent your computer from overheating. The light might...
... not block these cooling vents. 2 mounting For mounting optional stand. To ensure proper ventilation, do not block these cooling vents. 8 hard drive access The hard drive access light is on when devices such as your CD player are operating. 9 vents The vents help prevent your computer from or writes... data to the hard drive. Side View 1 2 1 vents The vents located on each side of the computer help prevent your computer from overheating. The light might...

Quick Reference Guide
Page 57
Quick Reference Guide 57 1 6 2 3 5 4 1 fan shroud/heat sink assembly 3 memory modules (2) 5 security cable slot 2 speaker (optional) 4 hard drive 6 chassis intrusion switch Cable Cover (Optional) Attaching the Cable Cover 1 Ensure that all external device cables are threaded through the hole in the cable cover. 2 ...
Quick Reference Guide 57 1 6 2 3 5 4 1 fan shroud/heat sink assembly 3 memory modules (2) 5 security cable slot 2 speaker (optional) 4 hard drive 6 chassis intrusion switch Cable Cover (Optional) Attaching the Cable Cover 1 Ensure that all external device cables are threaded through the hole in the cable cover. 2 ...
Quick Reference Guide
Page 60
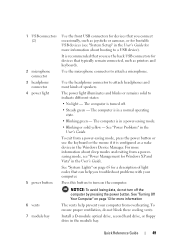
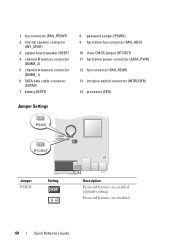
... speaker (BEEP) 4 channel B memory connector (DIMM_2) 5 channel A memory connector (DIMM_1) 6 SATA data cable connector (SATA0) 7 battery (BATT) 8 password jumper (PSWD) 9 hard drive fan connector (FAN_HDD) 10 clear CMOS jumper (RTCRST) 11 hard drive power connector (SATA_PWR) 12 fan connector (FAN_REAR) 13 intrusion switch connector (INTRUDER) 14 processor (CPU) Jumper Settings Jumper PSWD Setting Description...
... speaker (BEEP) 4 channel B memory connector (DIMM_2) 5 channel A memory connector (DIMM_1) 6 SATA data cable connector (SATA0) 7 battery (BATT) 8 password jumper (PSWD) 9 hard drive fan connector (FAN_HDD) 10 clear CMOS jumper (RTCRST) 11 hard drive power connector (SATA_PWR) 12 fan connector (FAN_REAR) 13 intrusion switch connector (INTRUDER) 14 processor (CPU) Jumper Settings Jumper PSWD Setting Description...
Quick Reference Guide
Page 62
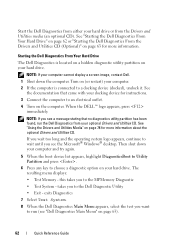
...page 63). 62 Quick Reference Guide this takes you to a docking device (docked), undock it. Starting the Dell Diagnostics From Your Hard Drive The Dell Diagnostics is connected to the Dell Diagnostic Utility • Exit - NOTE: If you want to an electrical outlet. 4 Turn on page 63... resulting menu displays: • Test Memory - takes you to choose a diagnostic option on (or restart) your hard drive. exits Diagnostics 7 Select Test System. 8 When the Dell Diagnostics Main Menu appears, select the test you see a message stating that came with your docking device for more ...
...page 63). 62 Quick Reference Guide this takes you to a docking device (docked), undock it. Starting the Dell Diagnostics From Your Hard Drive The Dell Diagnostics is connected to the Dell Diagnostic Utility • Exit - NOTE: If you want to an electrical outlet. 4 Turn on page 63... resulting menu displays: • Test Memory - takes you to choose a diagnostic option on (or restart) your hard drive. exits Diagnostics 7 Select Test System. 8 When the Dell Diagnostics Main Menu appears, select the test you see a message stating that came with your docking device for more ...
Quick Reference Guide
Page 65
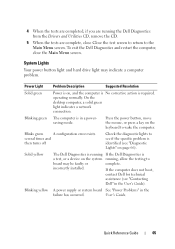
...). operating normally. Quick Reference Guide 65 System Lights Your power button light and hard drive light may be faulty or complete. several times and then turns off Check the diagnostic lights to wake the computer. To exit the Dell Diagnostics and restart the computer, close Close the test screen to return to board...
...). operating normally. Quick Reference Guide 65 System Lights Your power button light and hard drive light may be faulty or complete. several times and then turns off Check the diagnostic lights to wake the computer. To exit the Dell Diagnostics and restart the computer, close Close the test screen to return to board...
Quick Reference Guide
Page 68
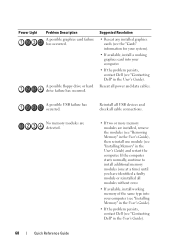
... card into your computer. • If the problem persists, contact Dell (see "Contacting Dell" in the User's Guide). Reinstall all USB devices and check all power and data cables. Power Light Problem Description A possible graphics card failure has occurred. A possible floppy drive or hard drive failure has occurred. Suggested Resolution • Reseat any installed graphics...
... card into your computer. • If the problem persists, contact Dell (see "Contacting Dell" in the User's Guide). Reinstall all USB devices and check all power and data cables. Power Light Problem Description A possible graphics card failure has occurred. A possible floppy drive or hard drive failure has occurred. Suggested Resolution • Reseat any installed graphics...
Quick Reference Guide
Page 70
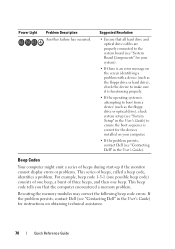
... Components" for your system). • If there is an error message on the screen identifying a problem with a device (such as the floppy drive or hard drive), check the device to make sure it is functioning properly. • If the operating system is attempting to boot from a device (such as the... floppy drive or optical drive), check system setup (see "System Setup" in the User's Guide) to ensure the boot sequence is correct for the devices installed on your computer. • If the problem persists, contact Dell (see "Contacting Dell" in the User's Guide). If the...
... Components" for your system). • If there is an error message on the screen identifying a problem with a device (such as the floppy drive or hard drive), check the device to make sure it is functioning properly. • If the operating system is attempting to boot from a device (such as the... floppy drive or optical drive), check system setup (see "System Setup" in the User's Guide) to ensure the boot sequence is correct for the devices installed on your computer. • If the problem persists, contact Dell (see "Contacting Dell" in the User's Guide). If the...
Quick Reference Guide
Page 73
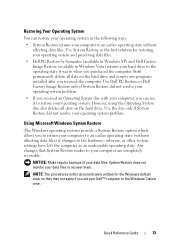
Quick Reference Guide 73 Both permanently delete all data on the hard drive and remove any programs installed after you set your Dell™ computer to the Windows Classic view. Use Dell PC Restore or Dell Factory Image Restore only if System Restore did not resolve your operating system ... were written for restoring your operating system and preserving data files. • Dell PC Restore by Symantec (available in Windows XP) and Dell Factory Image Restore (available in Windows Vista) returns your hard drive to the operating state it to restore your data files or recover them. ...
Quick Reference Guide 73 Both permanently delete all data on the hard drive and remove any programs installed after you set your Dell™ computer to the Windows Classic view. Use Dell PC Restore or Dell Factory Image Restore only if System Restore did not resolve your operating system ... were written for restoring your operating system and preserving data files. • Dell PC Restore by Symantec (available in Windows XP) and Dell Factory Image Restore (available in Windows Vista) returns your hard drive to the operating state it to restore your data files or recover them. ...
Quick Reference Guide
Page 75
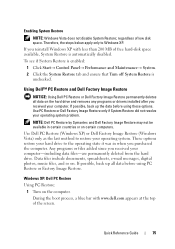
... to restore your hard drive to Windows XP. Using Dell™ PC Restore and Dell Factory Image Restore NOTICE: Using Dell PC Restore or Dell Factory Image Restore permanently deletes all data before using PC Restore or Factory Image Restore. NOTE: Dell PC Restore by Symantec and Dell Factory Image Restore...apply only to the operating state it was in certain countries or on the hard drive and removes any programs or drivers installed after you purchased the computer. Use PC Restore or Dell Factory Image Restore only if System Restore did not resolve your computer-including data...
... to restore your hard drive to Windows XP. Using Dell™ PC Restore and Dell Factory Image Restore NOTICE: Using Dell PC Restore or Dell Factory Image Restore permanently deletes all data before using PC Restore or Factory Image Restore. NOTE: Dell PC Restore by Symantec and Dell Factory Image Restore...apply only to the operating state it was in certain countries or on the hard drive and removes any programs or drivers installed after you purchased the computer. Use PC Restore or Dell Factory Image Restore only if System Restore did not resolve your computer-including data...
Quick Reference Guide
Page 76
...computer was in time, let the computer finish starting, and then restart the computer again. Removing PC Restore: NOTICE: Removing Dell PC Restore from the hard drive permanently deletes the PC Restore utility from your computer. The System Restore screen appears and the computer restarts. 7 After the... remove PC Restore from your computer operating system. NOTICE: If you do not press in when you to restore your hard drive to reboot the computer. Dell PC Restore enables you purchased your computer, even to proceed with PC Restore, click Reboot. 3 Click Restore and click...
...computer was in time, let the computer finish starting, and then restart the computer again. Removing PC Restore: NOTICE: Removing Dell PC Restore from the hard drive permanently deletes the PC Restore utility from your computer. The System Restore screen appears and the computer restarts. 7 After the... remove PC Restore from your computer operating system. NOTICE: If you do not press in when you to restore your hard drive to reboot the computer. Dell PC Restore enables you purchased your computer, even to proceed with PC Restore, click Reboot. 3 Click Restore and click...
Quick Reference Guide
Page 77
... Select a keyboard layout and click Next. 4 To access the recovery options, log on the hard drive. 5 Click Yes when a confirmation message appears. The Dell Factory Image Restore welcome screen appears. When the Dell logo appears, press several times to remove the PC Restore partition on as a local administrator....the free space allocation on as a local user. Click Quit, and then log on the hard drive. 6 Right-click Local Disk (C) in the User name field, then click OK. 5 Click Dell Factory Image Restore. Click Quit; Quick Reference Guide 77 NOTE: If the partition for Free ...
... Select a keyboard layout and click Next. 4 To access the recovery options, log on the hard drive. 5 Click Yes when a confirmation message appears. The Dell Factory Image Restore welcome screen appears. When the Dell logo appears, press several times to remove the PC Restore partition on as a local administrator....the free space allocation on as a local user. Click Quit, and then log on the hard drive. 6 Right-click Local Disk (C) in the User name field, then click OK. 5 Click Dell Factory Image Restore. Click Quit; Quick Reference Guide 77 NOTE: If the partition for Free ...


