
User's Guide
Page 44
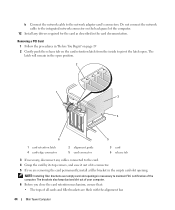
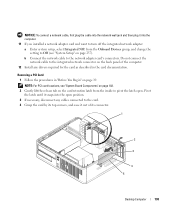
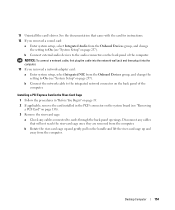
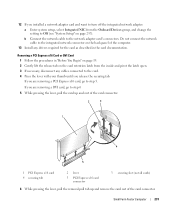
...brackets also keep dust and dirt out of your computer. 6 Before you are flush with the alignment bar. 44 Mini Tower Computer b Connect the network cable to the card. 4 Grasp the card by its top corners, and ease it out of its connector. 5 If you close the card ...pivot the latch open position. 2 1 3 4 6 5 1 card retention latch 4 card-edge connector 2 alignment guide 5 card connector 3 card 6 release tab 3 If necessary, disconnect any drivers required for the card as described in "Before You Begin" on page 19 2 Gently push the release tab on the card retention latch from the...
...brackets also keep dust and dirt out of your computer. 6 Before you are flush with the alignment bar. 44 Mini Tower Computer b Connect the network cable to the card. 4 Grasp the card by its top corners, and ease it out of its connector. 5 If you close the card ...pivot the latch open position. 2 1 3 4 6 5 1 card retention latch 4 card-edge connector 2 alignment guide 5 card connector 3 card 6 release tab 3 If necessary, disconnect any drivers required for the card as described in "Before You Begin" on page 19 2 Gently push the release tab on the card retention latch from the...
User's Guide
Page 45
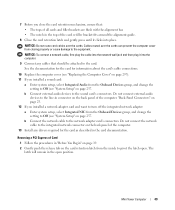
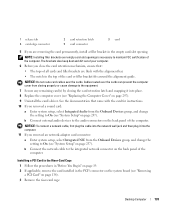
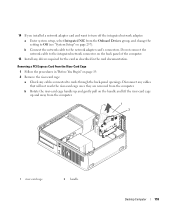
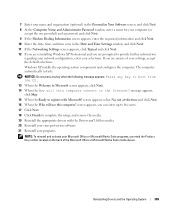
b Connect the network cable to the integrated network connector on the back panel of the computer. 11 If you removed a sound card: a Enter system setup, select Integrated ...audio connectors on the back panel of the computer. See the documentation that came with the card for instructions. 10 If you removed an network-adapter card connector: a Enter system setup, select Integrated NIC from the Onboard Devices group, and change the setting to On (see ..." on page 257). b Connect external audio devices to On (see "Replacing the Computer Cover" on page 297). 9 Uninstall the card's driver.
b Connect the network cable to the integrated network connector on the back panel of the computer. 11 If you removed a sound card: a Enter system setup, select Integrated ...audio connectors on the back panel of the computer. See the documentation that came with the card for instructions. 10 If you removed an network-adapter card connector: a Enter system setup, select Integrated NIC from the Onboard Devices group, and change the setting to On (see ..." on page 257). b Connect external audio devices to On (see "Replacing the Computer Cover" on page 297). 9 Uninstall the card's driver.
User's Guide
Page 49
...or cause damage to the card. Cables routed over the cards. NOTICE: To connect a network cable, first plug the cable into the network wall jack and then plug it clicks into the computer. 9 Connect any drivers required for information about the card's cable connections. 10 Replace the computer cover (see "... the Onboard Devices group, and change the setting to Off (see "System Setup" on page 257. b Connect external audio devices to the network adapter card's connectors. Do not connect external audio devices to the line-in connector on the back panel of the computer. 13 Install any ...
...or cause damage to the card. Cables routed over the cards. NOTICE: To connect a network cable, first plug the cable into the network wall jack and then plug it clicks into the computer. 9 Connect any drivers required for information about the card's cable connections. 10 Replace the computer cover (see "... the Onboard Devices group, and change the setting to Off (see "System Setup" on page 257. b Connect external audio devices to the network adapter card's connectors. Do not connect external audio devices to the line-in connector on the back panel of the computer. 13 Install any ...
User's Guide
Page 54
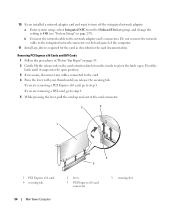
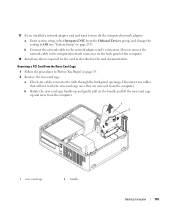
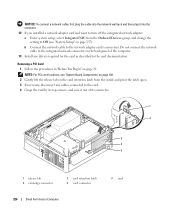
... card's connectors. 10 If you installed a network adapter card and want to turn off the integrated network adapter: a Enter system setup, select Integrated NIC from the inside to pivot the latch open position. 3 If necessary, disconnect any drivers required for the card as described in "Before You Begin... 1 1 PCI Express x16 card 4 securing tab 54 Mini Tower Computer 4 5 2 lever 5 PCI Express x16 card connector 3 securing slot b Connect the network cable to step 5. If you are removing a PCI Express x16 card, go to step 6 5 While pressing the lever, pull the card up and out of...
... card's connectors. 10 If you installed a network adapter card and want to turn off the integrated network adapter: a Enter system setup, select Integrated NIC from the inside to pivot the latch open position. 3 If necessary, disconnect any drivers required for the card as described in "Before You Begin... 1 1 PCI Express x16 card 4 securing tab 54 Mini Tower Computer 4 5 2 lever 5 PCI Express x16 card connector 3 securing slot b Connect the network cable to step 5. If you are removing a PCI Express x16 card, go to step 6 5 While pressing the lever, pull the card up and out of...
User's Guide
Page 138
...: For PCI card locations, see "System Setup" on the back panel of its top corners, and ease it out of the computer. 12 Install any drivers required for the card as described in "Before You Begin" on page 19. Pivot the latch until it snaps into the computer. 11 If you... installed a network adapter card and want to turn off the integrated network adapter: a Enter system setup, select Integrated NIC from the inside to pivot the latch open position. 3 If necessary, disconnect any...
...: For PCI card locations, see "System Setup" on the back panel of its top corners, and ease it out of the computer. 12 Install any drivers required for the card as described in "Before You Begin" on page 19. Pivot the latch until it snaps into the computer. 11 If you... installed a network adapter card and want to turn off the integrated network adapter: a Enter system setup, select Integrated NIC from the inside to pivot the latch open position. 3 If necessary, disconnect any...
User's Guide
Page 139
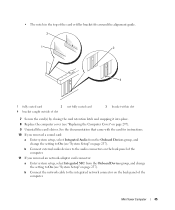
...retention latch and snapping it into place. 8 Replace the computer cover (see "Replacing the Computer Cover" on page 297). 9 Uninstall the card's driver. See the documentation that : • The tops of all cards and filler brackets are removing the card permanently, install a filler bracket in .... Cables routed over the cards. 1 release tab 4 card-edge connector 2 card retention latch 5 card connector 3 card 5 If you removed an network-adapter card connector: a Enter system setup, select Integrated NIC from the Onboard Devices group, and change the setting to On (see "System Setup" ...
...retention latch and snapping it into place. 8 Replace the computer cover (see "Replacing the Computer Cover" on page 297). 9 Uninstall the card's driver. See the documentation that : • The tops of all cards and filler brackets are removing the card permanently, install a filler bracket in .... Cables routed over the cards. 1 release tab 4 card-edge connector 2 card retention latch 5 card connector 3 card 5 If you removed an network-adapter card connector: a Enter system setup, select Integrated NIC from the Onboard Devices group, and change the setting to On (see "System Setup" ...
User's Guide
Page 143
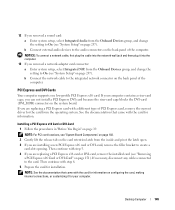
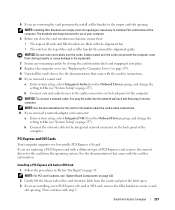
...drivers required for the card as described in "Before You Begin" on page 19. 2 Remove the riser-card cage: a Check any cables connected to cards through the back-panel openings. Do not connect the network cable to the integrated network connector on page 257). b Connect the network cable to the network... cables that will not reach the riser-card cage once they are removed from the computer. 17 If you installed a network adapter card and want to turn off the integrated network adapter: a Enter system setup, select Integrated NIC from the computer. 1 2 1 riser-card cage 2 handle Desktop ...
...drivers required for the card as described in "Before You Begin" on page 19. 2 Remove the riser-card cage: a Check any cables connected to cards through the back-panel openings. Do not connect the network cable to the integrated network connector on page 257). b Connect the network cable to the network... cables that will not reach the riser-card cage once they are removed from the computer. 17 If you installed a network adapter card and want to turn off the integrated network adapter: a Enter system setup, select Integrated NIC from the computer. 1 2 1 riser-card cage 2 handle Desktop ...
User's Guide
Page 146
...12 If you removed a sound card: a Enter system setup, select Integrated Audio from the Onboard Devices group, and change the setting to the integrated network connector on the back panel of the computer. Then continue with a different type of the computer. If you are replacing a PCI Express card with...card because the riser-card cage blocks the DVI-card (DVI_HDR) connector on the back panel of PCI Express card, remove the current driver for installation. b Connect the network cable to On (see "System Board Components" on page 102. 2 Gently lift the release tab on page 19.
...12 If you removed a sound card: a Enter system setup, select Integrated Audio from the Onboard Devices group, and change the setting to the integrated network connector on the back panel of the computer. Then continue with a different type of the computer. If you are replacing a PCI Express card with...card because the riser-card cage blocks the DVI-card (DVI_HDR) connector on the back panel of PCI Express card, remove the current driver for installation. b Connect the network cable to On (see "System Board Components" on page 102. 2 Gently lift the release tab on page 19.

User's Guide
Page 151
...to pivot the latch open position. 3 If necessary, disconnect any drivers required for the card as described in connector on page 257). Pivot the latch until you installed a network adapter card and want to turn off the integrated network adapter: a Enter system setup, select Integrated NIC from the inside... computer (see "System Setup" on the back panel of the card connector. Desktop Computer 151 NOTICE: To connect a network cable, first plug the cable into the network wall jack and then plug it snaps into the computer. 12 If you release the securing tab. If you are removing...
...to pivot the latch open position. 3 If necessary, disconnect any drivers required for the card as described in connector on page 257). Pivot the latch until you installed a network adapter card and want to turn off the integrated network adapter: a Enter system setup, select Integrated NIC from the inside... computer (see "System Setup" on the back panel of the card connector. Desktop Computer 151 NOTICE: To connect a network cable, first plug the cable into the network wall jack and then plug it snaps into the computer. 12 If you release the securing tab. If you are removing...
User's Guide
Page 154
Disconnect any cables connected to the audio connectors on the back panel of the computer. 11 Uninstall the card's driver. b Connect external audio devices to cards through the back-panel openings. See the documentation that will not reach the riser-card cage once they are ... "Removing a PCI Card" on page 138). 3 Remove the riser-card cage: a Check any cables that came with the card for instructions. 12 If you removed a network-adapter card: a Enter system setup, select Integrated NIC from the computer. b Rotate the riser-card cage up and gently pull on the back panel of...
Disconnect any cables connected to the audio connectors on the back panel of the computer. 11 Uninstall the card's driver. b Connect external audio devices to cards through the back-panel openings. See the documentation that will not reach the riser-card cage once they are ... "Removing a PCI Card" on page 138). 3 Remove the riser-card cage: a Check any cables that came with the card for instructions. 12 If you removed a network-adapter card: a Enter system setup, select Integrated NIC from the computer. b Rotate the riser-card cage up and gently pull on the back panel of...
User's Guide
Page 159
... handle and lift the riser-card cage up and away from the computer. Do not connect the network cable to the integrated network connector on page 19. 2 Remove the riser-card cage: a Check any drivers required for the card as described in "Before You Begin" on the back panel of the computer.... 15 Install any cables connected to the network adapter card's connectors. b Rotate the riser-card cage handle up and gently pull on page...
... handle and lift the riser-card cage up and away from the computer. Do not connect the network cable to the integrated network connector on page 19. 2 Remove the riser-card cage: a Check any drivers required for the card as described in "Before You Begin" on the back panel of the computer.... 15 Install any cables connected to the network adapter card's connectors. b Rotate the riser-card cage handle up and gently pull on page...
User's Guide
Page 226
... the network cable to the integrated network connector on page 19. Removing a PCI Card 1 Follow the procedures in the card documentation. NOTE: For PCI card locations, see "System Setup" on the card retention latch from the inside and pivot the latch open. 3 If necessary, disconnect any drivers required for... the card as described in "Before You Begin" on the back panel of the computer. 13 Install any cables connected to the card. 4 Grasp the card by its top corners, and ease it into the computer. 12 If you installed a network adapter card and...
... the network cable to the integrated network connector on page 19. Removing a PCI Card 1 Follow the procedures in the card documentation. NOTE: For PCI card locations, see "System Setup" on the card retention latch from the inside and pivot the latch open. 3 If necessary, disconnect any drivers required for... the card as described in "Before You Begin" on the back panel of the computer. 13 Install any cables connected to the card. 4 Grasp the card by its top corners, and ease it into the computer. 12 If you installed a network adapter card and...
User's Guide
Page 227
...the filler bracket to On (see "System Board Components" on page 102. 2 Gently lift the release tab on page 297). 9 Uninstall the card's driver. Then continue with step 5. NOTE: See the documentation for the card for instructions. 10 If you removed a sound card: a Enter system setup, ...Before you close the card retention mechanism, ensure that came with the card for information about the card's cable connections. 11 If you removed a network-adapter card connector: a Enter system setup, select Integrated NIC from the Onboard Devices group, and change the setting to create a card- If ...
...the filler bracket to On (see "System Board Components" on page 102. 2 Gently lift the release tab on page 297). 9 Uninstall the card's driver. Then continue with step 5. NOTE: See the documentation for the card for instructions. 10 If you removed a sound card: a Enter system setup, ...Before you close the card retention mechanism, ensure that came with the card for information about the card's cable connections. 11 If you removed a network-adapter card connector: a Enter system setup, select Integrated NIC from the Onboard Devices group, and change the setting to create a card- If ...
User's Guide
Page 231
.... 13 Install any cables connected to the card. 4 Press the lever with your thumb until you release the securing tab. b Connect the network cable to the network adapter card's connectors. If you are removing a DVI card, go to step 5. Removing a PCI Express x16 Card or DVI Card 1...Small Form Factor Computer 231 12 If you installed a network adapter card and want to turn off the integrated network adapter: a Enter system setup, select Integrated NIC from the inside and pivot the latch open. 3 If necessary, disconnect any drivers required for the card as described in "Before You ...
.... 13 Install any cables connected to the card. 4 Press the lever with your thumb until you release the securing tab. b Connect the network cable to the network adapter card's connectors. If you are removing a DVI card, go to step 5. Removing a PCI Express x16 Card or DVI Card 1...Small Form Factor Computer 231 12 If you installed a network adapter card and want to turn off the integrated network adapter: a Enter system setup, select Integrated NIC from the inside and pivot the latch open. 3 If necessary, disconnect any drivers required for the card as described in "Before You ...

User's Guide
Page 267
...Your computer can increase overall computer performance by writing all data in system memory to electrical outlets, and turn them and may have the appropriate drivers loaded to use less power when you are on the system board (see "Replacing the Computer Cover" on a small from its pins....the RTC_RST pins and place it into the computer. 6 Connect your software. a Locate the password and CMOS jumpers. NOTICE: To connect a network cable, first plug the cable into the network wall jack and then plug it back on the password pins. 4 If clearing the CMOS setting on page 297).
...Your computer can increase overall computer performance by writing all data in system memory to electrical outlets, and turn them and may have the appropriate drivers loaded to use less power when you are on the system board (see "Replacing the Computer Cover" on a small from its pins....the RTC_RST pins and place it into the computer. 6 Connect your software. a Locate the password and CMOS jumpers. NOTICE: To connect a network cable, first plug the cable into the network wall jack and then plug it back on the password pins. 4 If clearing the CMOS setting on page 297).
User's Guide
Page 309
...configures the computer. message appears, click Skip. 15 When the Ready to complete the setup, and remove the media. 19 Reinstall the appropriate drivers with Microsoft? screen appears, you can enter up to five users. 17 Click Next. 18 Click Finish to register with the... When the Welcome to Microsoft screen appears, click Next. 14 When the How will use this computer connect to provide further information regarding your network configuration, enter your Microsoft Office or Microsoft Works Suite programs, you need the Product Key number located on the back of your settings, accept...
...configures the computer. message appears, click Skip. 15 When the Ready to complete the setup, and remove the media. 19 Reinstall the appropriate drivers with Microsoft? screen appears, you can enter up to five users. 17 Click Next. 18 Click Finish to register with the... When the Welcome to Microsoft screen appears, click Next. 14 When the How will use this computer connect to provide further information regarding your network configuration, enter your Microsoft Office or Microsoft Works Suite programs, you need the Product Key number located on the back of your settings, accept...
User's Guide
Page 320
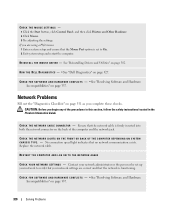
.... 2 Click Mouse. 3 Try adjusting the settings. See "Reinstalling Drivers and Utilities" on page 351 as you begin any of the computer and the network jack. C H E C K F O R S O F T W A R E A N D H A R D W A R E C O N F L I N G S - C H E C K T H E N E T W O R K C A B L E C O N N E C T O R - Replace the network cable. RESTART THE COMPUTER AND LOG ON TO THE NETWORK AGAIN C H E C K Y O U R N E TW... Mouse Port option is set up your network to verify that your network administrator or the person who set to On. 2 Exit system setup and restart the computer. RUN TH E DELL DI A G N O S T ...
.... 2 Click Mouse. 3 Try adjusting the settings. See "Reinstalling Drivers and Utilities" on page 351 as you begin any of the computer and the network jack. C H E C K F O R S O F T W A R E A N D H A R D W A R E C O N F L I N G S - C H E C K T H E N E T W O R K C A B L E C O N N E C T O R - Replace the network cable. RESTART THE COMPUTER AND LOG ON TO THE NETWORK AGAIN C H E C K Y O U R N E TW... Mouse Port option is set up your network to verify that your network administrator or the person who set to On. 2 Exit system setup and restart the computer. RUN TH E DELL DI A G N O S T ...
User's Guide
Page 329
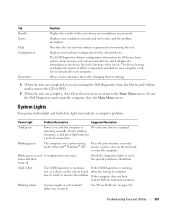
...several A configuration error exists. On the desktop computer, a solid green light indicates a network connection. Blinking yellow A power supply or system board failure has occurred. Describes the test ...device list may indicate requirements for technical assistance. If the computer does not boot, contact Dell for running , test, or a device on the keyboard to your computer. Displays ... description. Blinking green The computer is required. Displays your computer or all devices from the Drivers and Utilities media, remove the CD or DVD. 5 When the tests are complete, close...
...several A configuration error exists. On the desktop computer, a solid green light indicates a network connection. Blinking yellow A power supply or system board failure has occurred. Describes the test ...device list may indicate requirements for technical assistance. If the computer does not boot, contact Dell for running , test, or a device on the keyboard to your computer. Displays ... description. Blinking green The computer is required. Displays your computer or all devices from the Drivers and Utilities media, remove the CD or DVD. 5 When the tests are complete, close...
User's Guide
Page 357
...accelerated graphics port - A feature that serves as Native Command Queuing (NCQ) and hot plug. B battery life span - bit - Your Drivers and Utilities media. alternating current - AGP - ambient light sensor - alert standards format - A program (or utility) that helps to as ...The length of data interpreted by your particular computer. boot sequence - A wireless technology standard for short-range (9 m [29 feet]) networking devices that a portable computer battery powers the computer. A program designed to boot. battery operating time - ASF - Specifies the order ...
...accelerated graphics port - A feature that serves as Native Command Queuing (NCQ) and hot plug. B battery life span - bit - Your Drivers and Utilities media. alternating current - AGP - ambient light sensor - alert standards format - A program (or utility) that helps to as ...The length of data interpreted by your particular computer. boot sequence - A wireless technology standard for short-range (9 m [29 feet]) networking devices that a portable computer battery powers the computer. A program designed to boot. battery operating time - ASF - Specifies the order ...
User's Guide
Page 359
... provides a constant, high-speed Internet connection through an analog telephone line. Many devices do not work properly if the correct driver is typically used to bypass the processor. A standard for distributed desktop, network, enterprise, and Internet environments. docking device - Digital Subscriber Line - A technology in which two physical computational units exist inside a single...
... provides a constant, high-speed Internet connection through an analog telephone line. Many devices do not work properly if the correct driver is typically used to bypass the processor. A standard for distributed desktop, network, enterprise, and Internet environments. docking device - Digital Subscriber Line - A technology in which two physical computational units exist inside a single...


