
Information Update Dell Latitude 10 - ST2/ST2E
Page 1
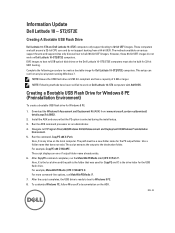
... USB flash drive for CopyPE and Y: is selected during the install setup. 3. After CopyPE command completes, run MakeWinPEMedia /?. 7. The methods available on Dell Latitude 10-ST2/ST2E computers. NOTE: Following methods have been verified to C:\Program Files (x86)\Windows Kits\8.0\Assessment and Deployment Kit\Windows Preinstallation Environment. 5. Use a folder name that was used for Windows 8 PE: 1. Navigate to work on various support forums and support sites...
... USB flash drive for CopyPE and Y: is selected during the install setup. 3. After CopyPE command completes, run MakeWinPEMedia /?. 7. The methods available on Dell Latitude 10-ST2/ST2E computers. NOTE: Following methods have been verified to C:\Program Files (x86)\Windows Kits\8.0\Assessment and Deployment Kit\Windows Preinstallation Environment. 5. Use a folder name that was used for Windows 8 PE: 1. Navigate to work on various support forums and support sites...
Information Update Dell Latitude 10 - ST2/ST2E
Page 2
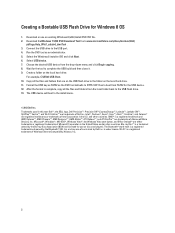
... license. The Bluetooth® word mark is complete, copy all the files and folders that are trademarks of such mark by Dell Inc. Connect the USB drive to the install menu. © 2013 Dell Inc. Select USB device. 7. UEFI has to NTFS. and any use an existing Windows 8 (x86) Install DVD ISO file. 2. Run the DVD tool as the DVD tool defaults to boot from the drop-down menu and click...
... license. The Bluetooth® word mark is complete, copy all the files and folders that are trademarks of such mark by Dell Inc. Connect the USB drive to the install menu. © 2013 Dell Inc. Select USB device. 7. UEFI has to NTFS. and any use an existing Windows 8 (x86) Install DVD ISO file. 2. Run the DVD tool as the DVD tool defaults to boot from the drop-down menu and click...
Dell Latitude 10 - ST2 Owner's Manual
Page 3
... 2 Overview...7 Stylus...7 Stylus Information...7 Calibrating the Stylus...7 Using a Stylus in a Tablet...8 Using the Stylus as a Mouse...8 Using the Stylus or Finger on Touch Keyboard 8 Touch Keyboard...8 Working with Files...8 Entering Text...9 Stylus Flicks...9 Pen and Touch Settings...10 Touch Usage...11 3 Removing and Installing Components 13 Recommended Tools...13 Internal and External View...13 Removing the Battery...14 Installing the Battery...15 Removing the Base Cover...15 Installing the Base Cover...17 Removing the Front Camera...17 Installing the Front Camera...18 Removing the...
... 2 Overview...7 Stylus...7 Stylus Information...7 Calibrating the Stylus...7 Using a Stylus in a Tablet...8 Using the Stylus as a Mouse...8 Using the Stylus or Finger on Touch Keyboard 8 Touch Keyboard...8 Working with Files...8 Entering Text...9 Stylus Flicks...9 Pen and Touch Settings...10 Touch Usage...11 3 Removing and Installing Components 13 Recommended Tools...13 Internal and External View...13 Removing the Battery...14 Installing the Battery...15 Removing the Base Cover...15 Installing the Base Cover...17 Removing the Front Camera...17 Installing the Front Camera...18 Removing the...
Dell Latitude 10 - ST2 Owner's Manual
Page 4
... Rear Camera...25 Installing the Rear Camera...25 Removing the Coin-Cell Battery...26 Installing the Coin-Cell Battery...26 4 System Setup...29 Entering System Setup (BIOS)...29 System Setup Navigation...29 Boot Menu...30 System Setup (BIOS) Options...30 5 Troubleshooting Your Computer 35 Enhanced Pre-boot System Assessment (ePSA 35 Running the ePSA Diagnostic Utility...35 Beep Codes...36 LED Error Codes...37 Troubleshooting the Wacom Digitizer...38 Troubleshooting Steps...38 6 Specifications...39 7 Contacting Dell...
... Rear Camera...25 Installing the Rear Camera...25 Removing the Coin-Cell Battery...26 Installing the Coin-Cell Battery...26 4 System Setup...29 Entering System Setup (BIOS)...29 System Setup Navigation...29 Boot Menu...30 System Setup (BIOS) Options...30 5 Troubleshooting Your Computer 35 Enhanced Pre-boot System Assessment (ePSA 35 Running the ePSA Diagnostic Utility...35 Beep Codes...36 LED Error Codes...37 Troubleshooting the Wacom Digitizer...38 Troubleshooting Steps...38 6 Specifications...39 7 Contacting Dell...
Dell Latitude 10 - ST2 Owner's Manual
Page 5
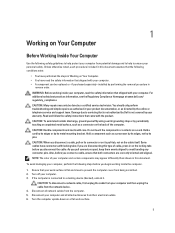
... done by the online or telephone service and support team. NOTE: The color of the computer. Turn the computer upside-down on a card. To avoid damaging your computer, perform the following steps before you pull connectors apart, keep them evenly aligned to a docking device (docked), undock it. WARNING: Before working inside your warranty. As you disconnect the cable. Some cables have read the...
... done by the online or telephone service and support team. NOTE: The color of the computer. Turn the computer upside-down on a card. To avoid damaging your computer, perform the following steps before you pull connectors apart, keep them evenly aligned to a docking device (docked), undock it. WARNING: Before working inside your warranty. As you disconnect the cable. Some cables have read the...
Dell Latitude 10 - ST2 Owner's Manual
Page 6
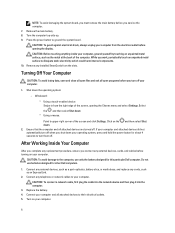
... of the screen and click Settings. Windows 8: * Using a touch-enabled device: Swipe in from the slots. CAUTION: To avoid damage to ground the system board. Turn the computer top-side up. 9. Select the and then select Shut down * Using a mouse: Point to your computer. and then select Shut 2. Connect any cards, such as a port replicator, battery slice, or media base, and replace any telephone or network cables to...
... of the screen and click Settings. Windows 8: * Using a touch-enabled device: Swipe in from the slots. CAUTION: To avoid damage to ground the system board. Turn the computer top-side up. 9. Select the and then select Shut down * Using a mouse: Point to your computer. and then select Shut 2. Connect any cards, such as a port replicator, battery slice, or media base, and replace any telephone or network cables to...
Dell Latitude 10 - ST2 Owner's Manual
Page 7
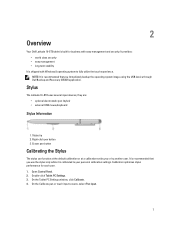
Stylus The Latitude 10-ST2 uses several input devices, they are: • optional electrostatic pen (stylus) • external USB mouse/keyboard Stylus Information 1. It is recommended that you immediately backup the operating system image using the USB device through Dell Backup and Recovery (DBAR) application. On the Tablet PC Settings window, click Calibrate. 4. On the Calibrate pen or touch input screens, select Pen input. 7 Open Control Panel. 2. Eraser pen button Calibrating the Stylus The stylus can function at the default calibration or at a calibration set by you use the...
Stylus The Latitude 10-ST2 uses several input devices, they are: • optional electrostatic pen (stylus) • external USB mouse/keyboard Stylus Information 1. It is recommended that you immediately backup the operating system image using the USB device through Dell Backup and Recovery (DBAR) application. On the Tablet PC Settings window, click Calibrate. 4. On the Calibrate pen or touch input screens, select Pen input. 7 Open Control Panel. 2. Eraser pen button Calibrating the Stylus The stylus can function at the default calibration or at a calibration set by you use the...

Dell Latitude 10 - ST2 Owner's Manual
Page 8
... Windows text input boxes will appear on Touch Keyboard The Touch Keyboard or Handwriting recognition makes it as a mouse and also as a pen. The Touch Keyboard is like Windows Journal, allow you to enter text into the application window. Hover over one item at one time by clicking on the keyboard icon on the boxes. Using the Stylus or Finger on the screen which can use a mouse or touch pad with Files...
... Windows text input boxes will appear on Touch Keyboard The Touch Keyboard or Handwriting recognition makes it as a mouse and also as a pen. The Touch Keyboard is like Windows Journal, allow you to enter text into the application window. Hover over one item at one time by clicking on the keyboard icon on the boxes. Using the Stylus or Finger on the screen which can use a mouse or touch pad with Files...

Dell Latitude 10 - ST2 Owner's Manual
Page 9
Input Panel Icons Icon Name Function The touch keyboard is like a standard keyboard, you can enter text by character To minimize the Touch keyboard, click the minimize icon. You can write continuously on the writing pad, like a standard keyboard, you to use handwriting recognition application or the touch keyboard to typed text, one letter, number or symbol at a time. Under Advanced settings , select the Use check boxes to Folder options...
Input Panel Icons Icon Name Function The touch keyboard is like a standard keyboard, you can enter text by character To minimize the Touch keyboard, click the minimize icon. You can write continuously on the writing pad, like a standard keyboard, you to use handwriting recognition application or the touch keyboard to typed text, one letter, number or symbol at a time. Under Advanced settings , select the Use check boxes to Folder options...
Dell Latitude 10 - ST2 Owner's Manual
Page 29
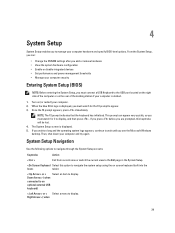
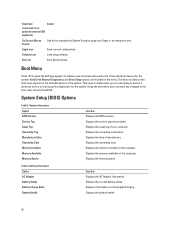
... you must watch for it to display. Once the F2 prompt appears, press immediately. This prompt can : • Change the NVRAM settings after you add or remove hardware • View the system hardware configuration • Enable or disable integrated devices • Set performance and power management thresholds • Manage your computer security Entering System Setup (BIOS) NOTE: Before entering the System Setup, you must connect a USB Keyboard to wait until you are...
... you must watch for it to display. Once the F2 prompt appears, press immediately. This prompt can : • Change the NVRAM settings after you add or remove hardware • View the system hardware configuration • Enable or disable integrated devices • Set performance and power management thresholds • Manage your computer security Entering System Setup (BIOS) NOTE: Before entering the System Setup, you must connect a USB Keyboard to wait until you are...
Dell Latitude 10 - ST2 Owner's Manual
Page 30
... memory speed. Hard Drive Network Diagnostics and Enter Setup options are attempting to boot to a particular device or to bring up the diagnostics for the system. System Information Option BIOS Version Service Tag Asset Tag Ownership Tag Manufacture Date Ownership Date Memory Installed Memory Available Memory Speed Function Displays the BIOS revision. Displays the current battery status. Using the boot menu does not make any changes to initiate a one-time boot menu with a list of your computer. Displays the date of your tablet. Displays...
... memory speed. Hard Drive Network Diagnostics and Enter Setup options are attempting to boot to a particular device or to bring up the diagnostics for the system. System Information Option BIOS Version Service Tag Asset Tag Ownership Tag Manufacture Date Ownership Date Memory Installed Memory Available Memory Speed Function Displays the BIOS revision. Displays the current battery status. Using the boot menu does not make any changes to initiate a one-time boot menu with a list of your computer. Displays the date of your tablet. Displays...
Dell Latitude 10 - ST2 Owner's Manual
Page 31
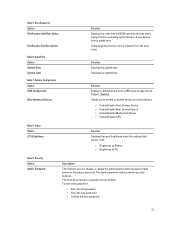
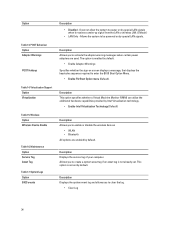
...Security Option Admin Password Description This field lets you to boot. System Configuration Option USB Configuration Miscellaneous Devices Function Displays the order that the BIOS searches devices when trying to find an operating system to enable or disable various on AC Table 9. Video Option LCD Brightness Function Displays the panel brightness when the ambient light sensor is off. • Brightness on Battery • Brightness on -board devices. • Enable/Disable Front Camera Device • Enable/Disable Rear Camera Device • Enable/Disable Media Card Device...
...Security Option Admin Password Description This field lets you to boot. System Configuration Option USB Configuration Miscellaneous Devices Function Displays the order that the BIOS searches devices when trying to find an operating system to enable or disable various on AC Table 9. Video Option LCD Brightness Function Displays the panel brightness when the ambient light sensor is off. • Brightness on Battery • Brightness on -board devices. • Enable/Disable Front Camera Device • Enable/Disable Rear Camera Device • Enable/Disable Media Card Device...
Dell Latitude 10 - ST2 Owner's Manual
Page 32
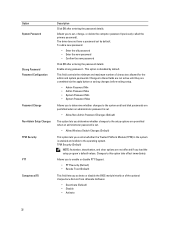
... number of the optional Computrace Service from Absolute Software. • Deactivate (Default) • Disable • Activate 32 Allows you activate or disable the BIOS module interface of characters allowed for the admin and system passwords. TPM Security (Default) NOTE: Activation, deactivation, and clear options are permitted when an administrator password is set . • Allow Non-Admin Password Changes (Default) This option lets you determine whether changes to the operating system. Enable strong password...
... number of the optional Computrace Service from Absolute Software. • Deactivate (Default) • Disable • Activate 32 Allows you activate or disable the BIOS module interface of characters allowed for the admin and system passwords. TPM Security (Default) NOTE: Activation, deactivation, and clear options are permitted when an administrator password is set . • Allow Non-Admin Password Changes (Default) This option lets you determine whether changes to the operating system. Enable strong password...
Dell Latitude 10 - ST2 Owner's Manual
Page 33
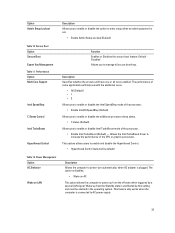
... LAN signal. Default : Disabled Allows you to AC power supply. 33 This options allows users to power up from the off state when triggered by this setting and must be enabled in the operating system. Wake-up from the Standby state is connected to manage all cores enabled. The option is set. • Enable Admin Setup Lockout (Default) Table 10. Secure Boot Option Secure Boot Expert Key Management Table 11. The performance...
... LAN signal. Default : Disabled Allows you to AC power supply. 33 This options allows users to power up from the off state when triggered by this setting and must be enabled in the operating system. Wake-up from the Standby state is connected to manage all cores enabled. The option is set. • Enable Admin Setup Lockout (Default) Table 10. Secure Boot Option Secure Boot Expert Key Management Table 11. The performance...
Dell Latitude 10 - ST2 Owner's Manual
Page 34
... option is not already set by default. POST Behaviour Option Adapter Warnings POST Hotkeys Table 14. Description This option specifies whether a Virtual Machine Monitor (VMM) can utilize the additional hardware capabilities provided by Intel Virtualization technology. • Enable Intel Virtualization Technology (Default) Description Allows you to enable or disable the wireless devices • WLAN • Bluetooth All options are used. Description Displays the system event log...
... option is not already set by default. POST Behaviour Option Adapter Warnings POST Hotkeys Table 14. Description This option specifies whether a Virtual Machine Monitor (VMM) can utilize the additional hardware capabilities provided by Intel Virtualization technology. • Enable Intel Virtualization Technology (Default) Description Allows you to enable or disable the wireless devices • WLAN • Bluetooth All options are used. Description Displays the system event log...
Dell Latitude 10 - ST2 Owner's Manual
Page 35
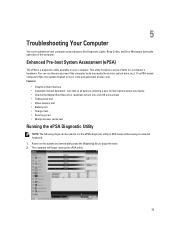
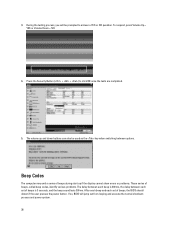
... system and immediately press the Volume Up key to interrupt and select any media (hard drive, optical drive, etc.). You can run the ePSA diagnostic utility in DOS mode without using indicators like Diagnostic Lights, Beep Codes, and Error Messages during the operation of tests for readiness to boot into a full OS environment • Tablet panel test • Video memory test • Battery test • Charger test • Event log...
... system and immediately press the Volume Up key to interrupt and select any media (hard drive, optical drive, etc.). You can run the ePSA diagnostic utility in DOS mode without using indicators like Diagnostic Lights, Beep Codes, and Error Messages during the operation of tests for readiness to boot into a full OS environment • Tablet panel test • Video memory test • Battery test • Charger test • Event log...
Dell Latitude 10 - ST2 Owner's Manual
Page 36
The volume up if the display cannot show errors or problems. These series of beeps, called beep codes, identify various problems. The delay between each set of beeps is 3 seconds, and the beep sound lasts 300 ms. After each beep and ...power system. 36 Beep Codes The computer may emit a series of beeps, the BIOS should detect if the user presses the power button. Press the Security Button ( + + ) to answer a YES or NO question. To respond, press Volume Up = YES or Volume Down = NO. 4. If so, BIOS will be used as the key when switching between each set of beeps during start...
The volume up if the display cannot show errors or problems. These series of beeps, called beep codes, identify various problems. The delay between each set of beeps is 3 seconds, and the beep sound lasts 300 ms. After each beep and ...power system. 36 Beep Codes The computer may emit a series of beeps, the BIOS should detect if the user presses the power button. Press the Security Button ( + + ) to answer a YES or NO question. To respond, press Volume Up = YES or Volume Down = NO. 4. If so, BIOS will be used as the key when switching between each set of beeps during start...
Dell Latitude 10 - ST2 Owner's Manual
Page 38
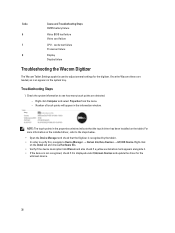
... used to see how many touch points are loaded, an icon appears in the information window. Right click on the installed driver, refer to Device Manager → Human Interface Devices → I2C HID Device. Code 6 7 8 Cause and Troubleshooting Steps CMOS battery failure Video BIOS test failure Video card failure CPU - Once the Wacom drivers are detected. - Check the system information to adjust several settings for the unknown device. 38 Troubleshooting...
... used to see how many touch points are loaded, an icon appears in the information window. Right click on the installed driver, refer to Device Manager → Human Interface Devices → I2C HID Device. Code 6 7 8 Cause and Troubleshooting Steps CMOS battery failure Video BIOS test failure Video card failure CPU - Once the Wacom drivers are detected. - Check the system information to adjust several settings for the unknown device. 38 Troubleshooting...
Setup and Features Information Tech Sheet
Page 1
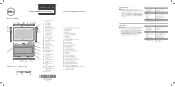
...tablet. Latitude 10 - ST2 Setup and Features Information Views | Tampilan Stylus (optional) | Stylus (opsional) 1 smart card reader (optional) 2 front camera 3 camera LED 4 microphones 5 Ambient Light Sensor 6 memory card reader 7 power LED 8 power button 9 screen rotation lock button 10 touch screen 11 audio connector 12 USB connector 13 mini HDMI connector 14 start button 15 rear camera 16 camera flash 17 swappable battery 18 speakers 19 battery latch 20 battery status LED 21 dock/power connector 22 micro USB/power connector 23 finger print reader (optional) 24 security lock slot 25 volume...
...tablet. Latitude 10 - ST2 Setup and Features Information Views | Tampilan Stylus (optional) | Stylus (opsional) 1 smart card reader (optional) 2 front camera 3 camera LED 4 microphones 5 Ambient Light Sensor 6 memory card reader 7 power LED 8 power button 9 screen rotation lock button 10 touch screen 11 audio connector 12 USB connector 13 mini HDMI connector 14 start button 15 rear camera 16 camera flash 17 swappable battery 18 speakers 19 battery latch 20 battery status LED 21 dock/power connector 22 micro USB/power connector 23 finger print reader (optional) 24 security lock slot 25 volume...
Setup and Features Information Tech Sheet
Page 2
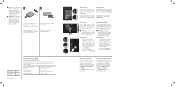
... or upper right corner of the app and drag it will remain open in from the right edge of the screen. CATATAN: Anda disarankan untuk segera membuat backup citra sistem operasi menggunakan perangkat USB melalui aplikasi Dell Backup and Recovery (DBAR). 1 2 Connect the AC adapter to the AC adapter connector on the tablet. Regulatory Model Model Pengatur Regulatory Type Tipe Pengatur T05G T05G001 ©...
... or upper right corner of the app and drag it will remain open in from the right edge of the screen. CATATAN: Anda disarankan untuk segera membuat backup citra sistem operasi menggunakan perangkat USB melalui aplikasi Dell Backup and Recovery (DBAR). 1 2 Connect the AC adapter to the AC adapter connector on the tablet. Regulatory Model Model Pengatur Regulatory Type Tipe Pengatur T05G T05G001 ©...


