Quick Reference Guide
Page 11
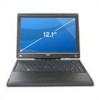
...'s main battery bay (see "Front other items controlled by Dell QuickSet View" on page 22). Find It Here • Information on tablet features and Dell QuickSet Help functionality, network activity, the Power To view Dell QuickSet Help, press the Management Wizard, hotkeys, and QuickSet tablet settings button (see "Removing the Battery" on page 13), or right...
...'s main battery bay (see "Front other items controlled by Dell QuickSet View" on page 22). Find It Here • Information on tablet features and Dell QuickSet Help functionality, network activity, the Power To view Dell QuickSet Help, press the Management Wizard, hotkeys, and QuickSet tablet settings button (see "Removing the Battery" on page 13), or right...

Quick Reference Guide
Page 12
...Information Guide. 1 Unpack the accessories box. 2 Set aside the contents of the accessories box, which you will need to complete the setup of your Tablet-PC is closed when you have ordered. 3 Connect the AC adapter to the AC adapter connector on the computer and to the electrical outlet. 4 ...Open the computer display and press the power button to turn on page 13). About Your Tablet-PC NOTICE: To avoid damaging your display, ensure that your computer. The accessories box also contains user documentation and any ...
...Information Guide. 1 Unpack the accessories box. 2 Set aside the contents of the accessories box, which you will need to complete the setup of your Tablet-PC is closed when you have ordered. 3 Connect the AC adapter to the AC adapter connector on the computer and to the electrical outlet. 4 ...Open the computer display and press the power button to turn on page 13). About Your Tablet-PC NOTICE: To avoid damaging your display, ensure that your computer. The accessories box also contains user documentation and any ...

Quick Reference Guide
Page 13
Front View 1 2 18 17 16 15 3 14 13 4 12 5 11 10 6 9 7 8 1 grip 2 display 3 ambient light sensor (with Dual-bulb 4 device status lights CCFL LCD option only) 5 digital array microphone 6 biometric reader 7 touch pad 8 touch pad buttons 9 track stick buttons 10 keyboard 11 track stick 12 rotating hinge 13 digital array microphone 15 Windows® security button 14 power button 16 screen rotate button 17 QuickSet tablet settings button 18 e-mail application shortcut button Quick Reference Guide 13
Front View 1 2 18 17 16 15 3 14 13 4 12 5 11 10 6 9 7 8 1 grip 2 display 3 ambient light sensor (with Dual-bulb 4 device status lights CCFL LCD option only) 5 digital array microphone 6 biometric reader 7 touch pad 8 touch pad buttons 9 track stick buttons 10 keyboard 11 track stick 12 rotating hinge 13 digital array microphone 15 Windows® security button 14 power button 16 screen rotate button 17 QuickSet tablet settings button 18 e-mail application shortcut button Quick Reference Guide 13

Quick Reference Guide
Page 15
Right Side View 12 3 4 5 67 8 1 wireless radio on/off switch 3 USB connector 5 Secure Digital (SD) card slot 7 microphone connector 2 Wi-Fi Catcher™ button 4 ExpressCard slot 6 headphones connector 8 security cable slot Back View 1 2 3 45 6 1 AC adapter connector 3 tablet back button 5 network connector 7 rotating hinge 9 pen tether slot 78 9 2 video connector 4 scroll control button 6 powered USB connector 8 tablet grip Quick Reference Guide 15
Right Side View 12 3 4 5 67 8 1 wireless radio on/off switch 3 USB connector 5 Secure Digital (SD) card slot 7 microphone connector 2 Wi-Fi Catcher™ button 4 ExpressCard slot 6 headphones connector 8 security cable slot Back View 1 2 3 45 6 1 AC adapter connector 3 tablet back button 5 network connector 7 rotating hinge 9 pen tether slot 78 9 2 video connector 4 scroll control button 6 powered USB connector 8 tablet grip Quick Reference Guide 15
Quick Reference Guide
Page 24
... software includes installation instructions in an environment similar to get a response by pressing a key on a CD or DVD. C H E C K T H E S O F T W A R E D O C U M E N T A T I Z A R D - TURN THE TABLET-PC OFF - A program is no longer responding. 4 Click End Task. Windows Vista 1 Click Start → Control Panel→ Programs→ Use an older program with...so that it runs in its documentation, or on your keyboard or touching your finger, press and hold the power button for an earlier Windows operating system R U N T H E P R O G R A M C O M P A T I B I L I T Y W I O N -
... software includes installation instructions in an environment similar to get a response by pressing a key on a CD or DVD. C H E C K T H E S O F T W A R E D O C U M E N T A T I Z A R D - TURN THE TABLET-PC OFF - A program is no longer responding. 4 Click End Task. Windows Vista 1 Click Start → Control Panel→ Programs→ Use an older program with...so that it runs in its documentation, or on your keyboard or touching your finger, press and hold the power button for an earlier Windows operating system R U N T H E P R O G R A M C O M P A T I B I L I T Y W I O N -
Quick Reference Guide
Page 25
... installed on your keyboard or touching your display with the pen or your finger, press and hold the power button for information. • Ensure that your Tablet-PC meets the minimum hardware requirements needed to run the software. BACK UP YOUR FILES IMMEDIATELY USE A VIRUS-...8226; If necessary, uninstall and then reinstall the program. 3 In the welcome screen, click Next. 4 Follow the instructions on Dell™ computers. NOTICE: The Dell Diagnostics works only on the screen. NOTE: You must use the optical drive in the Product Information Guide. Quick Reference Guide 25
... installed on your keyboard or touching your display with the pen or your finger, press and hold the power button for information. • Ensure that your Tablet-PC meets the minimum hardware requirements needed to run the software. BACK UP YOUR FILES IMMEDIATELY USE A VIRUS-...8226; If necessary, uninstall and then reinstall the program. 3 In the welcome screen, click Next. 4 Follow the instructions on Dell™ computers. NOTICE: The Dell Diagnostics works only on the screen. NOTE: You must use the optical drive in the Product Information Guide. Quick Reference Guide 25

Quick Reference Guide
Page 28
... to select tests based on your Tablet-PC. Option Express Test Extended Test Custom Test Symptom Tree Function Performs a quick test of devices in the system. Dell Diagnostics Main Menu 1 After the Dell Diagnostics loads and the Main Menu appears, click the button for the option you select Extended ... to run a complete test on a symptom of devices in the system. 7 When the Dell Diagnostics Main Menu appears, select the test you want . Performs a thorough check of devices in the Tablet-PC. This typically can take an hour or more thorough check of the problem you select ...
... to select tests based on your Tablet-PC. Option Express Test Extended Test Custom Test Symptom Tree Function Performs a quick test of devices in the system. Dell Diagnostics Main Menu 1 After the Dell Diagnostics loads and the Main Menu appears, click the button for the option you select Extended ... to run a complete test on a symptom of devices in the system. 7 When the Dell Diagnostics Main Menu appears, select the test you want . Performs a thorough check of devices in the Tablet-PC. This typically can take an hour or more thorough check of the problem you select ...
User's Guide
Page 2
... that helps you how to hardware or loss of Dell Inc. Trademarks used in this text: Dell, the DELL logo, Latitude, TravelLite, Wi-Fi Catcher, and ExpressCharge, are trademarks of your Tablet-PC. Blu-ray Disc is a trademark of Intel Corporation; and the Windows Vista start button are registered trademarks of Zvetco Biometrics, LLC; Model PP12S...
... that helps you how to hardware or loss of Dell Inc. Trademarks used in this text: Dell, the DELL logo, Latitude, TravelLite, Wi-Fi Catcher, and ExpressCharge, are trademarks of your Tablet-PC. Blu-ray Disc is a trademark of Intel Corporation; and the Windows Vista start button are registered trademarks of Zvetco Biometrics, LLC; Model PP12S...

User's Guide
Page 30
... stops responding, press and hold the power button until the Tablet-PC turns off your Tablet-PC by performing a Microsoft® Windows® operating system shutdown rather than by a backlit ring which may take several seconds). Access Dell QuickSet to access the Windows Task Manager dialog box or ...a login screen, the same way you turn off completely (which is in notebook mode. Rotate the hinge to landscape mode. See "Using Tablet Buttons" on page 86). NOTICE: To avoid...
... stops responding, press and hold the power button until the Tablet-PC turns off your Tablet-PC by performing a Microsoft® Windows® operating system shutdown rather than by a backlit ring which may take several seconds). Access Dell QuickSet to access the Windows Task Manager dialog box or ...a login screen, the same way you turn off completely (which is in notebook mode. Rotate the hinge to landscape mode. See "Using Tablet Buttons" on page 86). NOTICE: To avoid...

User's Guide
Page 60
can hold the pen in your left hand, manipulate the scroll control and back buttons with your left hand, or use a left-hand finger to operate the tablet buttons and display. • Left-handed use a right-hand finger to operate the tablet buttons and display. 60 Setting Up and Using Your Tablet-PC You can hold the pen in your right hand or use : Hold the Tablet-PC on your right forearm with your right hand on the grip.
can hold the pen in your left hand, manipulate the scroll control and back buttons with your left hand, or use a left-hand finger to operate the tablet buttons and display. • Left-handed use a right-hand finger to operate the tablet buttons and display. 60 Setting Up and Using Your Tablet-PC You can hold the pen in your right hand or use : Hold the Tablet-PC on your right forearm with your right hand on the grip.

User's Guide
Page 61
...from portrait to landscape in several different ways: • Press the screen rotate tablet button to rotate the screen 90-degrees clockwise. • Right-click the QuickSet icon in the Notification area, click Tablet Settings→ Display, then choose the orientation you want from the Screen Orientation ... Windows Vista, click Start → Control Panel→ Mobile PC→ Tablet PC Settings→ Display. • In Windows XP, click Start→ Control Panel→ Printers and Other Hardware→ Tablet and Pen Settings and then click the Display tab. Setting Up and Using ...
...from portrait to landscape in several different ways: • Press the screen rotate tablet button to rotate the screen 90-degrees clockwise. • Right-click the QuickSet icon in the Notification area, click Tablet Settings→ Display, then choose the orientation you want from the Screen Orientation ... Windows Vista, click Start → Control Panel→ Mobile PC→ Tablet PC Settings→ Display. • In Windows XP, click Start→ Control Panel→ Printers and Other Hardware→ Tablet and Pen Settings and then click the Display tab. Setting Up and Using ...

User's Guide
Page 62
...; To select objects, press and release the scroll control when it is in Tablet Mode In tablet mode, you can control your Tablet-PC using the following methods: • Using the scroll control • Using the back button • Using the tablet buttons • Using the pen • Using touch Using the Scroll Control • To...
...; To select objects, press and release the scroll control when it is in Tablet Mode In tablet mode, you can control your Tablet-PC using the following methods: • Using the scroll control • Using the back button • Using the tablet buttons • Using the pen • Using touch Using the Scroll Control • To...

User's Guide
Page 64
... clockwise 90 degrees. • If you press and hold the screen rotate button a second time, or use the pen to view and configure options for the Tablet-PC and the pen through Dell QuickSet. QUICKSET TABLET SETTINGS BUTTON Press this button to wake the Tablet-PC. To access QuickSet, click the QuickSet icon in notebook mode. The...
... clockwise 90 degrees. • If you press and hold the screen rotate button a second time, or use the pen to view and configure options for the Tablet-PC and the pen through Dell QuickSet. QUICKSET TABLET SETTINGS BUTTON Press this button to wake the Tablet-PC. To access QuickSet, click the QuickSet icon in notebook mode. The...

User's Guide
Page 65
...; In Windows Vista, click Start → Control Panel→ Mobile PC→ Tablet PC Settings→ Set tablet buttons to the back button, the tablet settings button, the e-mail application shortcut button, and the scroll control (Windows Vista). Using the Pen Ejecting and Storing the Pen Press and release the pen to eject it , insert the pen...
...; In Windows Vista, click Start → Control Panel→ Mobile PC→ Tablet PC Settings→ Set tablet buttons to the back button, the tablet settings button, the e-mail application shortcut button, and the scroll control (Windows Vista). Using the Pen Ejecting and Storing the Pen Press and release the pen to eject it , insert the pen...
User's Guide
Page 71
... the Brightness Meter on your screen. • Enable or disable the appearance of your Tablet-PC. To reinstall QuickSet and the tablet button drivers, go to settings and controls for customizing your Tablet-PC you easy access to support.dell.com. Accessing Management Tasks and User Information You can start QuickSet by either clicking, double...
... the Brightness Meter on your screen. • Enable or disable the appearance of your Tablet-PC. To reinstall QuickSet and the tablet button drivers, go to settings and controls for customizing your Tablet-PC you easy access to support.dell.com. Accessing Management Tasks and User Information You can start QuickSet by either clicking, double...

User's Guide
Page 95
.... that is the standard position with the display raised above the keyboard and touch pad. Using Your Tablet-PC With a Projector 95 Tablet To use either your finger or the digitizer pen. In tablet position, the display image has a portrait orientation. See "Using Tablet Buttons" on page 62 for more information on the Screen Rotate...
.... that is the standard position with the display raised above the keyboard and touch pad. Using Your Tablet-PC With a Projector 95 Tablet To use either your finger or the digitizer pen. In tablet position, the display image has a portrait orientation. See "Using Tablet Buttons" on page 62 for more information on the Screen Rotate...

User's Guide
Page 96
...projector's menu options or other features to display user activity that is displayed normally by the projector. See "Using Tablet Buttons" on the Screen Rotate button. • Use the projector's menu options or other features to specify default display settings. In clone mode, .... Considerations for more information on the Tablet-PC display. NOTE: When you initially connect the Tablet-PC to a projector, the Microsoft Windows operating system asks you can change the Tablet-PC display to landscape orientation. See "Using Tablet Buttons" on all displays (mirrored). To enable...
...projector's menu options or other features to display user activity that is displayed normally by the projector. See "Using Tablet Buttons" on the Screen Rotate button. • Use the projector's menu options or other features to specify default display settings. In clone mode, .... Considerations for more information on the Tablet-PC display. NOTE: When you initially connect the Tablet-PC to a projector, the Microsoft Windows operating system asks you can change the Tablet-PC display to landscape orientation. See "Using Tablet Buttons" on all displays (mirrored). To enable...

User's Guide
Page 139
... both the power connector on the Screen Rotate button. If only part of the display is readable CONNECT AN EXTERNAL MONITOR - 1 Shut down your Tablet-PC and connect an external monitor to the Tablet-PC. 2 Turn on . - Contact Dell (see "Contacting Dell" on the keyboard, move the mouse, or... press the power button to resume normal operation. • If the power light is off...
... both the power connector on the Screen Rotate button. If only part of the display is readable CONNECT AN EXTERNAL MONITOR - 1 Shut down your Tablet-PC and connect an external monitor to the Tablet-PC. 2 Turn on . - Contact Dell (see "Contacting Dell" on the keyboard, move the mouse, or... press the power button to resume normal operation. • If the power light is off...
Quick Reference Card
Page 1
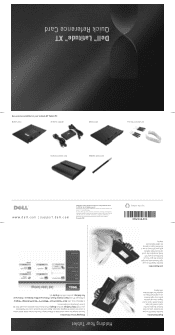
... hand on the grip, and the scroll control and back button within reach of Dell Inc. Reproduction in the Notification area. Microsoft, Windows, and Windows Vista are trademarks of your Latitude XT Tablet-PC: Dell™ Latitude™ XT Quick Reference Card Press the screen rotate tablet button to operate the tablet buttons and display. In Windows XP, click Start➞Control...
... hand on the grip, and the scroll control and back button within reach of Dell Inc. Reproduction in the Notification area. Microsoft, Windows, and Windows Vista are trademarks of your Latitude XT Tablet-PC: Dell™ Latitude™ XT Quick Reference Card Press the screen rotate tablet button to operate the tablet buttons and display. In Windows XP, click Start➞Control...

Quick Reference Card
Page 2
... the rotating hinge clockwise 180 degrees until it clicks but no further (do not pull out completely). To close to Tablet Mode A 1. Click the radio button for the Tablet-PC and the pen through Dell QuickSet. Calibrating the Pen 1. Lift the display until you want to close the active window. To switch off the...
... the rotating hinge clockwise 180 degrees until it clicks but no further (do not pull out completely). To close to Tablet Mode A 1. Click the radio button for the Tablet-PC and the pen through Dell QuickSet. Calibrating the Pen 1. Lift the display until you want to close the active window. To switch off the...


