Quick Reference Guide
Page 3
Contents Resources 5 Finding Information 5 Setting Up Your Computer 12 About Your Tablet-PC 12 Front View 13 Left Side View 14 Right Side View 15 Back View 15 Bottom View 16 Pen View 17 Using a Battery 17 Battery Performance 18 Checking the Battery Charge 19 Charging the Battery 21 Removing the Battery 22 Storing a Battery 23 Troubleshooting 23 Lockups and Software Problems 23 Dell Diagnostics 25 Index 31 Contents 3
Contents Resources 5 Finding Information 5 Setting Up Your Computer 12 About Your Tablet-PC 12 Front View 13 Left Side View 14 Right Side View 15 Back View 15 Bottom View 16 Pen View 17 Using a Battery 17 Battery Performance 18 Checking the Battery Charge 19 Charging the Battery 21 Removing the Battery 22 Storing a Battery 23 Troubleshooting 23 Lockups and Software Problems 23 Dell Diagnostics 25 Index 31 Contents 3

Quick Reference Guide
Page 12
... contains user documentation and any cards or connect the computer to turn on and shut down your computer. About Your Tablet-PC NOTICE: To avoid damaging your display, ensure that your Tablet-PC is in the Product Information Guide. 1 Unpack the accessories box. 2 Set aside the contents of the accessories box, which... the computer display and press the power button to a docking device or other external device, such as PC Cards, drives, or batteries) that you travel. 12 Quick Reference Guide
... contains user documentation and any cards or connect the computer to turn on and shut down your computer. About Your Tablet-PC NOTICE: To avoid damaging your display, ensure that your Tablet-PC is in the Product Information Guide. 1 Unpack the accessories box. 2 Set aside the contents of the accessories box, which... the computer display and press the power button to a docking device or other external device, such as PC Cards, drives, or batteries) that you travel. 12 Quick Reference Guide

Quick Reference Guide
Page 13
Front View 1 2 18 17 16 15 3 14 13 4 12 5 11 10 6 9 7 8 1 grip 2 display 3 ambient light sensor (with Dual-bulb 4 device status lights CCFL LCD option only) 5 digital array microphone 6 biometric reader 7 touch pad 8 touch pad buttons 9 track stick buttons 10 keyboard 11 track stick 12 rotating hinge 13 digital array microphone 15 Windows® security button 14 power button 16 screen rotate button 17 QuickSet tablet settings button 18 e-mail application shortcut button Quick Reference Guide 13
Front View 1 2 18 17 16 15 3 14 13 4 12 5 11 10 6 9 7 8 1 grip 2 display 3 ambient light sensor (with Dual-bulb 4 device status lights CCFL LCD option only) 5 digital array microphone 6 biometric reader 7 touch pad 8 touch pad buttons 9 track stick buttons 10 keyboard 11 track stick 12 rotating hinge 13 digital array microphone 15 Windows® security button 14 power button 16 screen rotate button 17 QuickSet tablet settings button 18 e-mail application shortcut button Quick Reference Guide 13

Quick Reference Guide
Page 15
Right Side View 12 3 4 5 67 8 1 wireless radio on/off switch 3 USB connector 5 Secure Digital (SD) card slot 7 microphone connector 2 Wi-Fi Catcher™ button 4 ExpressCard slot 6 headphones connector 8 security cable slot Back View 1 2 3 45 6 1 AC adapter connector 3 tablet back button 5 network connector 7 rotating hinge 9 pen tether slot 78 9 2 video connector 4 scroll control button 6 powered USB connector 8 tablet grip Quick Reference Guide 15
Right Side View 12 3 4 5 67 8 1 wireless radio on/off switch 3 USB connector 5 Secure Digital (SD) card slot 7 microphone connector 2 Wi-Fi Catcher™ button 4 ExpressCard slot 6 headphones connector 8 security cable slot Back View 1 2 3 45 6 1 AC adapter connector 3 tablet back button 5 network connector 7 rotating hinge 9 pen tether slot 78 9 2 video connector 4 scroll control button 6 powered USB connector 8 tablet grip Quick Reference Guide 15

User's Guide
Page 11
...the Wireless Switch 195 Installing the Wireless Switch 197 12 Dell™ D/Bay 199 About the Dell D/Bay 199 Setting Up and Using the D/Bay 199 Removing and Installing Devices When the Tablet-PC Is Turned Off 200 Removing and Installing Devices While the Tablet-PC Is Running 201 13 Media Base (Optional ... View 204 Back View 204 Top View 208 Setting Up Your Media Base 209 Securing the Media Base 210 Docking Your Tablet-PC to the Media Base 211 Undocking Your Tablet-PC From the Media Base . . . 212 Installing the Optical Drive in the Media Base . . . . . 213 Removing the Optical ...
...the Wireless Switch 195 Installing the Wireless Switch 197 12 Dell™ D/Bay 199 About the Dell D/Bay 199 Setting Up and Using the D/Bay 199 Removing and Installing Devices When the Tablet-PC Is Turned Off 200 Removing and Installing Devices While the Tablet-PC Is Running 201 13 Media Base (Optional ... View 204 Back View 204 Top View 208 Setting Up Your Media Base 209 Securing the Media Base 210 Docking Your Tablet-PC to the Media Base 211 Undocking Your Tablet-PC From the Media Base . . . 212 Installing the Optical Drive in the Media Base . . . . . 213 Removing the Optical ...
User's Guide
Page 12
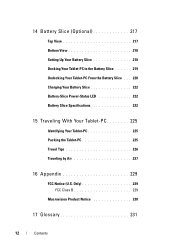
14 Battery Slice (Optional 217 Top View 217 Bottom View 218 Setting Up Your Battery Slice 218 Docking Your Tablet-PC to the Battery Slice 219 Undocking Your Tablet-PC From the Battery Slice . . . 220 Charging Your Battery Slice 222 Battery-Slice Power-Status LED 222 Battery Slice Specifications 222 15 Traveling With Your Tablet-PC 225 Identifying Your Tablet-PC 225 Packing the Tablet-PC 225 Travel Tips 226 Traveling by Air 227 16 Appendix 229 FCC Notice (U.S. Only 229 FCC Class B 229 Macrovision Product Notice 230 17 Glossary 231 12 Contents
14 Battery Slice (Optional 217 Top View 217 Bottom View 218 Setting Up Your Battery Slice 218 Docking Your Tablet-PC to the Battery Slice 219 Undocking Your Tablet-PC From the Battery Slice . . . 220 Charging Your Battery Slice 222 Battery-Slice Power-Status LED 222 Battery Slice Specifications 222 15 Traveling With Your Tablet-PC 225 Identifying Your Tablet-PC 225 Packing the Tablet-PC 225 Travel Tips 226 Traveling by Air 227 16 Appendix 229 FCC Notice (U.S. Only 229 FCC Class B 229 Macrovision Product Notice 230 17 Glossary 231 12 Contents

User's Guide
Page 27
Front View 1 2 18 17 16 15 3 14 13 4 12 5 11 10 6 9 7 8 1 grip 2 display 3 ambient light sensor (with Dual-bulb 4 device status lights CCFL LCD option only) 5 digital array microphone 6 biometric reader About Your Tablet-PC 27 2 About Your Tablet-PC NOTICE: To avoid damaging your display, ensure that your Tablet-PC is in notebook mode and that the display is closed when you travel.
Front View 1 2 18 17 16 15 3 14 13 4 12 5 11 10 6 9 7 8 1 grip 2 display 3 ambient light sensor (with Dual-bulb 4 device status lights CCFL LCD option only) 5 digital array microphone 6 biometric reader About Your Tablet-PC 27 2 About Your Tablet-PC NOTICE: To avoid damaging your display, ensure that your Tablet-PC is in notebook mode and that the display is closed when you travel.

User's Guide
Page 28
... touch pad 9 track stick buttons 11 track stick 13 digital array microphone 15 Windows® security button 17 QuickSet tablet settings button 8 touch pad buttons 10 keyboard 12 rotating hinge 14 power button 16 screen rotate button 18 e-mail application shortcut button G RI P - DEVICE STATUS... LIGHTS 28 About Your Tablet-PC Depending on page 88). D IS PL A Y - For more information about your display, see "Adjusting...
... touch pad 9 track stick buttons 11 track stick 13 digital array microphone 15 Windows® security button 17 QuickSet tablet settings button 8 touch pad buttons 10 keyboard 12 rotating hinge 14 power button 16 screen rotate button 18 e-mail application shortcut button G RI P - DEVICE STATUS... LIGHTS 28 About Your Tablet-PC Depending on page 88). D IS PL A Y - For more information about your display, see "Adjusting...

User's Guide
Page 34
... WLAN cards and internal cards with Bluetooth wireless technology (see "Dell Wi-Fi Catcher™ Network Locator" on page 109). Right Side View 12 3 4 5 67 8 1 wireless radio on /off switch 2 Wi-Fi Catcher™ button B A C K L I T W I - When moved toward the back of the Tablet-PC, the switch is on. 1 2 1 wireless radio on /off ; when...
... WLAN cards and internal cards with Bluetooth wireless technology (see "Dell Wi-Fi Catcher™ Network Locator" on page 109). Right Side View 12 3 4 5 67 8 1 wireless radio on /off switch 2 Wi-Fi Catcher™ button B A C K L I T W I - When moved toward the back of the Tablet-PC, the switch is on. 1 2 1 wireless radio on /off ; when...
User's Guide
Page 44
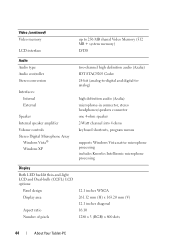
... microphone processing Display Both LED backlit thin-and-light LCD and Dual-bulb (CCFL) LCD options: Panel design Display area Aspect ratio Number of pixels 12.1 inches WXGA 261.12 mm (H) x 163.20 mm (V) 12.1 inches diagonal 16:10 1280 x 3 (RGB) x 800 dots 44 About Your...
... microphone processing Display Both LED backlit thin-and-light LCD and Dual-bulb (CCFL) LCD options: Panel design Display area Aspect ratio Number of pixels 12.1 inches WXGA 261.12 mm (H) x 163.20 mm (V) 12.1 inches diagonal 16:10 1280 x 3 (RGB) x 800 dots 44 About Your...
User's Guide
Page 103
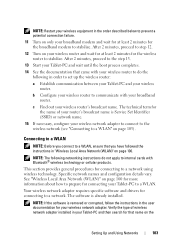
...configure your wireless network adapter to connect to the wireless network (see "Connecting to a WLAN" on page 103). After 2 minutes, proceed to step 12. 12 Turn on your wireless router and wait for at least 2 minutes for the wireless router to stabilize. NOTE: The following in order to set up... the wireless router: a Establish communication between your Tablet-PC and your wireless router. Connecting to a WLAN NOTE: Before you connect to a WLAN, ensure that name on the Setting Up and Using ...
...configure your wireless network adapter to connect to the wireless network (see "Connecting to a WLAN" on page 103). After 2 minutes, proceed to step 12. 12 Turn on your wireless router and wait for at least 2 minutes for the wireless router to stabilize. NOTE: The following in order to set up... the wireless router: a Establish communication between your Tablet-PC and your wireless router. Connecting to a WLAN NOTE: Before you connect to a WLAN, ensure that name on the Setting Up and Using ...
User's Guide
Page 157
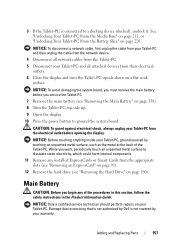
...a docking device (docked), undock it. NOTICE: Before touching anything inside your Tablet-PC, ground yourself by your Tablet-PC from the appropriate slots (see "Removing an ExpressCard" on page 91). 12 Remove the hard drive (see "Removing the Main Battery" on page 220.... Main Battery CAUTION: Before you begin any installed ExpressCards or Smart Cards from the electrical outlet before you work surface. Adding and Replacing Parts 157 3 If the Tablet-PC is connected to servicing that is not authorized by Dell...
...a docking device (docked), undock it. NOTICE: Before touching anything inside your Tablet-PC, ground yourself by your Tablet-PC from the appropriate slots (see "Removing an ExpressCard" on page 91). 12 Remove the hard drive (see "Removing the Main Battery" on page 220.... Main Battery CAUTION: Before you begin any installed ExpressCards or Smart Cards from the electrical outlet before you work surface. Adding and Replacing Parts 157 3 If the Tablet-PC is connected to servicing that is not authorized by Dell...
User's Guide
Page 199
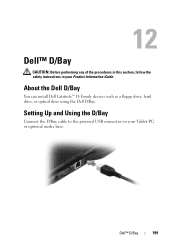
12 Dell™ D/Bay CAUTION: Before performing any of the procedures in this section, follow the safety instructions in your Tablet-PC or optional media base. Setting Up and Using the D/Bay Connect the D/Bay cable to the powered USB connector on your Product Information Guide. About the Dell D/Bay You can install Dell Latitude™ D-Family devices such as a floppy drive, hard drive, or optical drive using the Dell D/Bay. Dell™ D/Bay 199
12 Dell™ D/Bay CAUTION: Before performing any of the procedures in this section, follow the safety instructions in your Tablet-PC or optional media base. Setting Up and Using the D/Bay Connect the D/Bay cable to the powered USB connector on your Product Information Guide. About the Dell D/Bay You can install Dell Latitude™ D-Family devices such as a floppy drive, hard drive, or optical drive using the Dell D/Bay. Dell™ D/Bay 199

Quick Reference Card
Page 2
...not pull out completely). Press the WWAN antenna to the base. 2. Lift the display of the pen. To rapidly scroll through Dell QuickSet. Touch mode remains active until you feel the display assembly engage securely in the exact center of the calibration markers. Follow ... and Windows Explorer, and to enter touch mode. To launch context- Click Control Tablet PC Settings Pen, and then Input Settings. 1 2 3 1 Erase pen button 2 Right-click pen button 3 Replaceable pen tip 12 1 Pen - Use the screen rotate button to change the display orientation from portrait...
...not pull out completely). Press the WWAN antenna to the base. 2. Lift the display of the pen. To rapidly scroll through Dell QuickSet. Touch mode remains active until you feel the display assembly engage securely in the exact center of the calibration markers. Follow ... and Windows Explorer, and to enter touch mode. To launch context- Click Control Tablet PC Settings Pen, and then Input Settings. 1 2 3 1 Erase pen button 2 Right-click pen button 3 Replaceable pen tip 12 1 Pen - Use the screen rotate button to change the display orientation from portrait...

Multi-Touch Gestures Upgrade Tech Sheet
Page 6
... select your operating system and driver language using Windows Vista®, a User Account Control window opens. 12 Click Allow to close this window and start the installation. 4 Dell Latitude XT Multi-Touch Gestures Upgrade NOTE: Wait for the download to complete before continuing. 10 Close your Internet ...browser and all other applications that are using the drop-down menus. 7 Click the icon that is beside the Input Device Drivers option on your Tablet-PC....
... select your operating system and driver language using Windows Vista®, a User Account Control window opens. 12 Click Allow to close this window and start the installation. 4 Dell Latitude XT Multi-Touch Gestures Upgrade NOTE: Wait for the download to complete before continuing. 10 Close your Internet ...browser and all other applications that are using the drop-down menus. 7 Click the icon that is beside the Input Device Drivers option on your Tablet-PC....


