

Dell Owners Manual
Page 4
Installing the Coin-Cell Battery...28 4 System Setup...30 Boot Sequence...30 Navigation Keys...30 System Setup Options...31 Updating the BIOS ...40 System and Setup Password...41 Assigning a System Password and Setup Password 41 Deleting or Changing an Existing System and/or Setup Password 42 5 Diagnostics...43 Enhanced Pre-Boot System Assessment (ePSA) Diagnostics 43 Device Status Lights...44 Battery Status Lights...44 6 Specifications...46 7 Contacting Dell 52
Installing the Coin-Cell Battery...28 4 System Setup...30 Boot Sequence...30 Navigation Keys...30 System Setup Options...31 Updating the BIOS ...40 System and Setup Password...41 Assigning a System Password and Setup Password 41 Deleting or Changing an Existing System and/or Setup Password 42 5 Diagnostics...43 Enhanced Pre-Boot System Assessment (ePSA) Diagnostics 43 Device Status Lights...44 Battery Status Lights...44 6 Specifications...46 7 Contacting Dell 52
Dell Owners Manual
Page 5
.... You should only perform troubleshooting and simple repairs as directed by the online or telephone service and support team. CAUTION: To avoid electrostatic discharge, ground yourself by using a wrist grounding strap or by a certified service technician. CAUTION: Handle components and cards with locking tabs; if you finish working inside the computer, replace all power sources before you connect a cable, ensure that shipped with...
.... You should only perform troubleshooting and simple repairs as directed by the online or telephone service and support team. CAUTION: To avoid electrostatic discharge, ground yourself by using a wrist grounding strap or by a certified service technician. CAUTION: Handle components and cards with locking tabs; if you finish working inside the computer, replace all power sources before you connect a cable, ensure that shipped with...

Dell Owners Manual
Page 6
...-down the operating system: • In Windows 8 (touch-enabled device): 1. Swipe in from your computer. 1. Point to ground the system board. 3. NOTE: To avoid damaging the system board, you must remove the main battery before opening the Charms menu and select Settings. 2. While you service the computer. 7. Remove any installed ExpressCards or Smart Cards from the computer. 5. Click Shut Down. Click Start . 6 If the computer is connected to...
...-down the operating system: • In Windows 8 (touch-enabled device): 1. Swipe in from your computer. 1. Point to ground the system board. 3. NOTE: To avoid damaging the system board, you must remove the main battery before opening the Charms menu and select Settings. 2. While you service the computer. 7. Remove any installed ExpressCards or Smart Cards from the computer. 5. Click Shut Down. Click Start . 6 If the computer is connected to...

Dell Owners Manual
Page 7
... the Start menu as an ExpressCard. 2. Turn on your computer. If your computer and attached devices did not automatically turn them off . CAUTION: To connect a network cable, first plug the cable into the network device and then plug it into the computer. 3. 2. Connect your operating system, press and hold the power button for about 6 seconds to the computer, use batteries designed for this particular Dell computer. Replace the battery. 4. After Working...
... the Start menu as an ExpressCard. 2. Turn on your computer. If your computer and attached devices did not automatically turn them off . CAUTION: To connect a network cable, first plug the cable into the network device and then plug it into the computer. 3. 2. Connect your operating system, press and hold the power button for about 6 seconds to the computer, use batteries designed for this particular Dell computer. Replace the battery. 4. After Working...

Dell Owners Manual
Page 30
...-time boot menu displays the devices that you make are : • Removable Drive (if available) • STXXXX Drive NOTE: XXX denotes the SATA drive number. • Optical Drive • Diagnostics NOTE: Choosing Diagnostics, will display the ePSA diagnostics screen. The boot sequence screen also displays the option to the previous field. Navigation Keys Keys Navigation Up arrow Moves to access the System Setup screen. Moves to a specific device (for example: optical drive or hard drive). 4 System Setup Boot Sequence Boot...
...-time boot menu displays the devices that you make are : • Removable Drive (if available) • STXXXX Drive NOTE: XXX denotes the SATA drive number. • Optical Drive • Diagnostics NOTE: Choosing Diagnostics, will display the ePSA diagnostics screen. The boot sequence screen also displays the option to the previous field. Navigation Keys Keys Navigation Up arrow Moves to access the System Setup screen. Moves to a specific device (for example: optical drive or hard drive). 4 System Setup Boot Sequence Boot...

Dell Owners Manual
Page 31
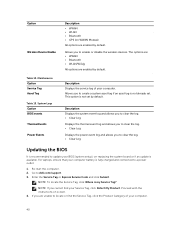
... change the order in which the computer attempts to find an operating system. • Diskette Drive • Internal HDD • USB Storage Device • CD/DVD/CD-RW Drive 31 Battery Information Boot Sequence Displays the battery status and the type of your computer. • System Information: Displays BIOS Version, Service Tag, Asset Tag, Ownership Tag, Ownership Date, Manufacture Date, and the Express Service Code. • Memory Information: Displays Memory Installed, Memory Available, Memory Speed, Memory Channels Mode, Memory...
... change the order in which the computer attempts to find an operating system. • Diskette Drive • Internal HDD • USB Storage Device • CD/DVD/CD-RW Drive 31 Battery Information Boot Sequence Displays the battery status and the type of your computer. • System Information: Displays BIOS Version, Service Tag, Asset Tag, Ownership Tag, Ownership Date, Manufacture Date, and the Express Service Code. • Memory Information: Displays Memory Installed, Memory Available, Memory Speed, Memory Channels Mode, Memory...

Dell Owners Manual
Page 32
... and set the parallel port to configure the integrated network controller. Allows you to : • Disabled • COM1 (Default Setting) • COM2 • COM3 • COM4 NOTE: The operating system may allocate resources even if the setting is required for Legacy boot mode. The options are : • Legacy (Default Setting) • UEFI This option is disabled. The options are : • Disabled • Enabled • Enabled w/PXE: This option is enabled. • Enable Legacy Option ROMs - Option Advance Boot Option...
... and set the parallel port to configure the integrated network controller. Allows you to : • Disabled • COM1 (Default Setting) • COM2 • COM3 • COM4 NOTE: The operating system may allocate resources even if the setting is required for Legacy boot mode. The options are : • Legacy (Default Setting) • UEFI This option is disabled. The options are : • Disabled • Enabled • Enabled w/PXE: This option is enabled. • Enable Legacy Option ROMs - Option Advance Boot Option...
Dell Owners Manual
Page 33
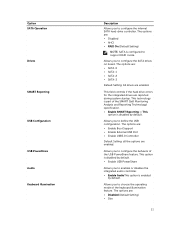
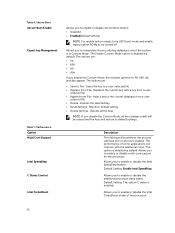
...; Enable Boot Support • Enable External USB Port • Enable USB3.0 Controller Default Setting: all the options are reported during system startup. Allows you to choose the operating mode of the SMART (Self Monitoring Analysis and Reporting Technology) specification. • Enable SMART Reporting - This field controls if the hard drive errors for the integrated drives are enabled. This option is disabled by default. • Enable USB PowerShare Allows you to configure the internal SATA hard-drive controller. Option SATA Operation Drives SMART Reporting USB Configuration USB...
...; Enable Boot Support • Enable External USB Port • Enable USB3.0 Controller Default Setting: all the options are reported during system startup. Allows you to choose the operating mode of the SMART (Self Monitoring Analysis and Reporting Technology) specification. • Enable SMART Reporting - This field controls if the hard drive errors for the integrated drives are enabled. This option is disabled by default. • Enable USB PowerShare Allows you to configure the internal SATA hard-drive controller. Option SATA Operation Drives SMART Reporting USB Configuration USB...
Dell Owners Manual
Page 34
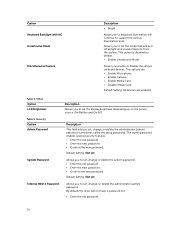
Video Option LCD Brightness Table 5. By default, the drive will turn off all light and sound emissions from the system. The options are: • Enable Microphone • Enable Camera • Enable Media Card • Disable Media Card Default Setting: All devices are enabled Table 4. Description This field lets you set • Enter the old password 34 Allows you to set , change , or delete the administrator (admin) password (sometimes called the setup password). Security Option Admin Password System Password Internal HDD-1 Password Description Allows you to set the mode that...
Video Option LCD Brightness Table 5. By default, the drive will turn off all light and sound emissions from the system. The options are: • Enable Microphone • Enable Camera • Enable Media Card • Disable Media Card Default Setting: All devices are enabled Table 4. Description This field lets you set • Enter the old password 34 Allows you to set , change , or delete the administrator (admin) password (sometimes called the setup password). Security Option Admin Password System Password Internal HDD-1 Password Description Allows you to set the mode that...
Dell Owners Manual
Page 35
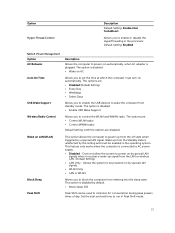
... Password Password Configuration Password Bypass Password Change Non-Admin Setup Changes TPM Security Computrace CPU XD Support OROM Keyboard Access Admin Setup Lockout Description • Enter the new password • Confirm the new password Default Setting: Not set Allows you to enable the Execute Disable mode of your password. Allows you to activate or disable the optional Computrace software The options are permitted when an administrator password is disabled. • Allows Wireless Switch Changes Allows you to set access to enter the Option ROM Configuration screens using hotkeys...
... Password Password Configuration Password Bypass Password Change Non-Admin Setup Changes TPM Security Computrace CPU XD Support OROM Keyboard Access Admin Setup Lockout Description • Enter the new password • Confirm the new password Default Setting: Not set Allows you to enable the Execute Disable mode of your password. Allows you to activate or disable the optional Computrace software The options are permitted when an administrator password is disabled. • Allows Wireless Switch Changes Allows you to set access to enter the Option ROM Configuration screens using hotkeys...
Dell Owners Manual
Page 36
... Option Multi Core Support Intel SpeedStep C States Control Intel TurboBoost Allows you enable the Custom Mode, the relevant options for the processor. Table 6. The options are : • PK • KEK • db • dbx If you to enable or disable Secure Boot feature • Disabled • Enabled(Default Setting) NOTE: For enable system needs to be UEFI boot mode and enable legacy option ROMs to File- Deletes the selected key • Reset All Keys...
... Option Multi Core Support Intel SpeedStep C States Control Intel TurboBoost Allows you enable the Custom Mode, the relevant options for the processor. Table 6. The options are : • PK • KEK • db • dbx If you to enable or disable Secure Boot feature • Disabled • Enabled(Default Setting) NOTE: For enable system needs to be UEFI boot mode and enable legacy option ROMs to File- Deletes the selected key • Reset All Keys...
Dell Owners Manual
Page 37
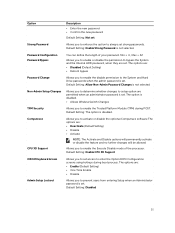
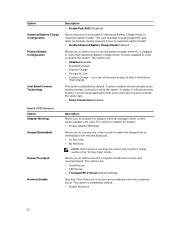
... automatically. The option is connected to AC power supply. • Disabled - Set the start and end time to run in the processor. This option allows the computer to power up signal from the LAN or wireless LAN. (Default Setting) • LAN Only - This feature only works when the computer is disabled • Enable USB Wake Support Allows you to set the time at which the computer must be used to minimize...
... automatically. The option is connected to AC power supply. • Disabled - Set the start and end time to run in the processor. This option allows the computer to power up signal from the LAN or wireless LAN. (Default Setting) • LAN Only - This feature only works when the computer is disabled • Enable USB Wake Support Allows you to set the time at which the computer must be used to minimize...
Dell Owners Manual
Page 38
... setup is disabled by default. • Enable Numlock 38 The options are used. This option is running, this option has no effect, Setup works in order to enable this option. The option is plugged in Advanced Battery Charge Mode to define how the computer handles the mouse and touchpad input. If option enables will synchronize emails or social media application that 'Advanced Battery Charge Mode' must charge. Note that were open when system entered the sleep state. • Smart Connection(Disabled...
... setup is disabled by default. • Enable Numlock 38 The options are used. This option is running, this option has no effect, Setup works in order to enable this option. The option is plugged in Advanced Battery Charge Mode to define how the computer handles the mouse and touchpad input. If option enables will synchronize emails or social media application that 'Advanced Battery Charge Mode' must charge. Note that were open when system entered the sleep state. • Smart Connection(Disabled...
Dell Owners Manual
Page 39
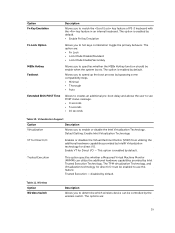
... creates an additional pre-boot delay and allows the user to match the key feature of PS-2 keyboard with the key feature in an internal keyboard. disabled by the wireless switch. Default Setting: Enable Intel Virtualization Technology VT for Direct I/O Enables or disables the Virtual Machine Monitor (VMM) from utilizing the additional hardware capabilities provided by default. This option is enabled by Intel® Virtualization technology for Direct I /O. Option Fn Key Emulation Fn Lock Option MEBx Hotkey...
... creates an additional pre-boot delay and allows the user to match the key feature of PS-2 keyboard with the key feature in an internal keyboard. disabled by the wireless switch. Default Setting: Enable Intel Virtualization Technology VT for Direct I/O Enables or disables the Virtual Machine Monitor (VMM) from utilizing the additional hardware capabilities provided by default. This option is enabled by Intel® Virtualization technology for Direct I /O. Option Fn Key Emulation Fn Lock Option MEBx Hotkey...
Dell Owners Manual
Page 40
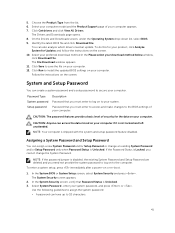
.... • Clear Log Updating the BIOS It is recommended to locate or find your computer. If you to dell.com/support. 3. The options are: • WWAN • Bluetooth • WLAN/WiGig All options are enabled by default. This option is not already set by default. Re-start the computer. 2. Go to enable or disable the wireless devices. Allows you are unable to update your computer battery is fully charged and connected to create a system...
.... • Clear Log Updating the BIOS It is recommended to locate or find your computer. If you to dell.com/support. 3. The options are: • WWAN • Bluetooth • WLAN/WiGig All options are enabled by default. This option is not already set by default. Re-start the computer. 2. Go to enable or disable the wireless devices. Allows you are unable to update your computer battery is fully charged and connected to create a system...
Dell Owners Manual
Page 41
... screen. 10. Click Save to install the updated BIOS settings on your computer model and the Product Support page of security for Updates and follow the instructions on to your computer. NOTE: Your computer is Unlocked. The File Download window appears. 11. CAUTION: Anyone can assign a new System Password and/or Setup Password or change the System Password. 5. Choose the Product Type from the list. 6. Password that Password Status is Locked, you must enter...
... screen. 10. Click Save to install the updated BIOS settings on your computer model and the Product Support page of security for Updates and follow the instructions on to your computer. NOTE: Your computer is Unlocked. The File Download window appears. 11. CAUTION: Anyone can assign a new System Password and/or Setup Password or change the System Password. 5. Choose the Product Type from the list. 6. Password that Password Status is Locked, you must enter...
Dell Owners Manual
Page 43
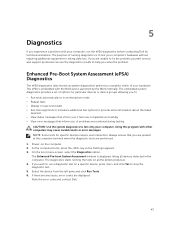
... computer. If you solve the problem. Note the error code and contact Dell. 43 The Enhanced Pre-boot System Assessment window is launched by the BIOS internally. The purpose of options for specific devices require user interaction. If there are any issues, error codes are unable to fix the problem yourself, service and support personnel can use the diagnostics results to test your computer. On the boot menu screen, select the Diagnostics...
... computer. If you solve the problem. Note the error code and contact Dell. 43 The Enhanced Pre-boot System Assessment window is launched by the BIOS internally. The purpose of options for specific devices require user interaction. If there are any issues, error codes are unable to fix the problem yourself, service and support personnel can use the diagnostics results to test your computer. On the boot menu screen, select the Diagnostics...

Dell Owners Manual
Page 44
... indicate battery charge status. Turns on the computer and blinks when the computer is connected to an electrical outlet, the battery light operates as a diagnostic tool when there's a possible failure to initialize or memory is enabled. Table 15. System failed on when wireless networking is unsupported. They display the storage, battery and wireless devices connectivity and activity. The USB controller encountered a problem during initialization. Battery Status Lights If the computer is in Option ROM initialization. Device Status Lights Turns...
... indicate battery charge status. Turns on the computer and blinks when the computer is connected to an electrical outlet, the battery light operates as a diagnostic tool when there's a possible failure to initialize or memory is enabled. Table 15. System failed on when wireless networking is unsupported. They display the storage, battery and wireless devices connectivity and activity. The USB controller encountered a problem during initialization. Battery Status Lights If the computer is in Option ROM initialization. Device Status Lights Turns...
Dell Owners Manual
Page 46
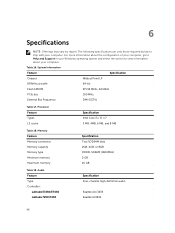
... bus width 64-bit Flash EPROM SPI 32 Mbits, 64 Mbits PCIe bus 100 MHz External Bus Frequency DMI (5GT/s) Table 17. Audio Feature Type Controller: Latitude E7250/E7450 Latitude 7250/7450 Specification Four-channel high-definition audio Realtek ALC3235 Realtek AL3234 46 For more information about your computer. Memory Feature Memory connector Memory capacity Memory type Minimum memory Maximum memory Specification Two SODIMM slots 2GB, 4GB, or 8GB...
... bus width 64-bit Flash EPROM SPI 32 Mbits, 64 Mbits PCIe bus 100 MHz External Bus Frequency DMI (5GT/s) Table 17. Audio Feature Type Controller: Latitude E7250/E7450 Latitude 7250/7450 Specification Four-channel high-definition audio Realtek ALC3235 Realtek AL3234 46 For more information about your computer. Memory Feature Memory connector Memory capacity Memory type Minimum memory Maximum memory Specification Two SODIMM slots 2GB, 4GB, or 8GB...

Dell Owners Manual
Page 48
Ports and Connectors Features Audio Video Network adapter USB 3.0 Memory card reader Micro Subscriber Identity Module (uSIM) card Docking port Specification One microphone/stereo headphone/speakers connector • one HDMI • one mDP RJ-45 connector One USB 3.0, one PowerShare Support upto SD4.0 One One Table 24. Display Feature Type Latitude 7250 HD FHD W/Touch Specification Latitude 7450 HD FHD Dimensions: Height 181.4 mm 194.9 mm 205.6 mm 205.6 mm Width 290.5 mm 302...
Ports and Connectors Features Audio Video Network adapter USB 3.0 Memory card reader Micro Subscriber Identity Module (uSIM) card Docking port Specification One microphone/stereo headphone/speakers connector • one HDMI • one mDP RJ-45 connector One USB 3.0, one PowerShare Support upto SD4.0 One One Table 24. Display Feature Type Latitude 7250 HD FHD W/Touch Specification Latitude 7450 HD FHD Dimensions: Height 181.4 mm 194.9 mm 205.6 mm 205.6 mm Width 290.5 mm 302...


