Owners Manual
Page 3
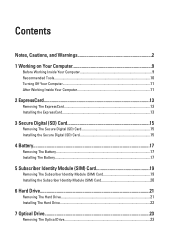
... The Battery...17 5 Subscriber Identity Module (SIM) Card 19 Removing The Subscriber Identity Module (SIM) Card 19 Installing the Subscriber Identity Module (SIM) Card 20 6 Hard Drive 21 Removing The Hard Drive 21 Installing The Hard Drive 22 7 Optical Drive 23 Removing The Optical...
... The Battery...17 5 Subscriber Identity Module (SIM) Card 19 Removing The Subscriber Identity Module (SIM) Card 19 Installing the Subscriber Identity Module (SIM) Card 20 6 Hard Drive 21 Removing The Hard Drive 21 Installing The Hard Drive 22 7 Optical Drive 23 Removing The Optical...
Owners Manual
Page 21
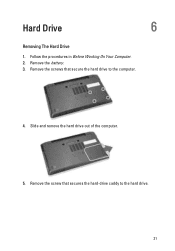
Slide and remove the hard drive out of the computer. 5. Hard Drive 6 Removing The Hard Drive 1. Remove the screws that secures the hard-drive caddy to the computer. 4. Remove the battery. 3. Follow the procedures in Before Working On Your Computer. 2. Remove the screw that secure the hard drive to the hard drive. 21
Slide and remove the hard drive out of the computer. 5. Hard Drive 6 Removing The Hard Drive 1. Remove the screws that secures the hard-drive caddy to the computer. 4. Remove the battery. 3. Follow the procedures in Before Working On Your Computer. 2. Remove the screw that secure the hard drive to the hard drive. 21

Owners Manual
Page 22
Tighten the screws to secure the hard-drive caddy to the hard drive. 2. Install the battery. 6. Pull and remove the hard-drive caddy away from the hard drive. Installing The Hard Drive 1. Attach the hard-drive caddy to the hard drive. 3. Replace and tighten the screws that secure the hard drive to the computer. 5. 6. Follow the procedures in After working inside your computer. 22 Slide the hard drive into the computer. 4.
Tighten the screws to secure the hard-drive caddy to the hard drive. 2. Install the battery. 6. Pull and remove the hard-drive caddy away from the hard drive. Installing The Hard Drive 1. Attach the hard-drive caddy to the hard drive. 3. Replace and tighten the screws that secure the hard drive to the computer. 5. 6. Follow the procedures in After working inside your computer. 22 Slide the hard drive into the computer. 4.
Owners Manual
Page 43
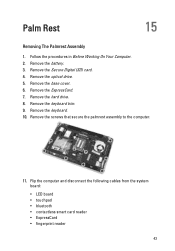
... from the system board: • LED board • touchpad • bluetooth • contactless smart card reader • ExpressCard • fingerprint reader 43 Remove the optical drive. 5. Remove the keyboard. 10. Remove the screws that secure the palmrest assembly to the computer. 11. Remove the base cover. 6. Remove the ExpressCard. 7. Remove the...
... from the system board: • LED board • touchpad • bluetooth • contactless smart card reader • ExpressCard • fingerprint reader 43 Remove the optical drive. 5. Remove the keyboard. 10. Remove the screws that secure the palmrest assembly to the computer. 11. Remove the base cover. 6. Remove the ExpressCard. 7. Remove the...
Owners Manual
Page 45
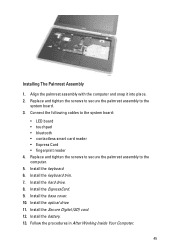
Installing The Palmrest Assembly 1. Install the hard drive. 8. Install the base cover. 10. Install the Secure Digital (SD) card. 12. Follow the procedures in After Working Inside Your Computer. 45 Replace and tighten ... the ExpressCard. 9. Align the palmrest assembly with the computer and snap it into place. 2. Install the battery. 13. Install the keyboard trim. 7. Install the optical drive. 11. Install the keyboard. 6. Connect the following cables to the computer. 5. Replace and tighten the screws to secure the palmrest assembly to the system board. 3.
Installing The Palmrest Assembly 1. Install the hard drive. 8. Install the base cover. 10. Install the Secure Digital (SD) card. 12. Follow the procedures in After Working Inside Your Computer. 45 Replace and tighten ... the ExpressCard. 9. Align the palmrest assembly with the computer and snap it into place. 2. Install the battery. 13. Install the keyboard trim. 7. Install the optical drive. 11. Install the keyboard. 6. Connect the following cables to the computer. 5. Replace and tighten the screws to secure the palmrest assembly to the system board. 3.
Owners Manual
Page 47
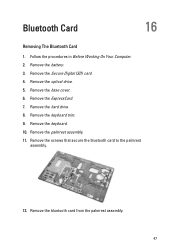
Remove the keyboard. 10. Remove the hard drive. 8. Remove the base cover. 6. Remove the screws that secure the bluetooth card to the palmrest assembly. 12. Remove the optical drive. 5. Remove the bluetooth card from the palmrest assembly. 47 Remove the ExpressCard. 7. Remove the Secure Digital (SD) card. 4. Remove the palmrest assembly. 11. Bluetooth Card 16 Removing The Bluetooth Card 1. Follow the procedures in Before Working On Your Computer. 2. Remove the keyboard trim. 9. Remove the battery. 3.
Remove the keyboard. 10. Remove the hard drive. 8. Remove the base cover. 6. Remove the screws that secure the bluetooth card to the palmrest assembly. 12. Remove the optical drive. 5. Remove the bluetooth card from the palmrest assembly. 47 Remove the ExpressCard. 7. Remove the Secure Digital (SD) card. 4. Remove the palmrest assembly. 11. Bluetooth Card 16 Removing The Bluetooth Card 1. Follow the procedures in Before Working On Your Computer. 2. Remove the keyboard trim. 9. Remove the battery. 3.
Owners Manual
Page 48
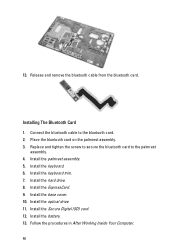
13. Install the hard drive. 8. Install the base cover. 10. Installing The Bluetooth Card 1. Install the palmrest assembly. 5. Install the keyboard. 6. Connect the bluetooth cable to the palmrest assembly. 4. Follow the procedures in After Working Inside Your Computer. 48 Install the ExpressCard. 9. Install the battery. 13. Install the optical drive. 11. Install the keyboard...
13. Install the hard drive. 8. Install the base cover. 10. Installing The Bluetooth Card 1. Install the palmrest assembly. 5. Install the keyboard. 6. Connect the bluetooth cable to the palmrest assembly. 4. Follow the procedures in After Working Inside Your Computer. 48 Install the ExpressCard. 9. Install the battery. 13. Install the optical drive. 11. Install the keyboard...
Owners Manual
Page 49
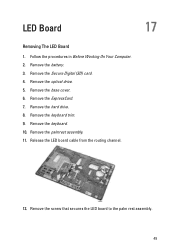
Follow the procedures in Before Working On Your Computer. 2. Remove the keyboard trim. 9. Release the LED board cable from the routing channel. 12. Remove the screw that secures the LED board to the palm rest assembly. 49 Remove the optical drive. 5. Remove the hard drive. 8. Remove the ExpressCard. 7. Remove the Secure Digital (SD) card. 4. Remove the keyboard. 10. Remove the palmrest assembly. 11. Remove the battery. 3. LED Board 17 Removing The LED Board 1. Remove the base cover. 6.
Follow the procedures in Before Working On Your Computer. 2. Remove the keyboard trim. 9. Release the LED board cable from the routing channel. 12. Remove the screw that secures the LED board to the palm rest assembly. 49 Remove the optical drive. 5. Remove the hard drive. 8. Remove the ExpressCard. 7. Remove the Secure Digital (SD) card. 4. Remove the keyboard. 10. Remove the palmrest assembly. 11. Remove the battery. 3. LED Board 17 Removing The LED Board 1. Remove the base cover. 6.
Owners Manual
Page 51
Installing The LED Board 1. Align the LED board on the palmrest. 2. Replace and tighten the screw that secure the LED board to its original position. 4. Install the hard drive. 8. Install the optical drive. 11. Install the keyboard trim. 7. Route the LED board cable to the palmrest. 3. Install the base cover. 10. Install the battery. 13. Install the Secure Digital (SD) card. 12. Install the keyboard. 6. Install the palmrest assembly. 5. Install the ExpressCard. 9. Follow the procedures in After Working Inside Your Computer. 51
Installing The LED Board 1. Align the LED board on the palmrest. 2. Replace and tighten the screw that secure the LED board to its original position. 4. Install the hard drive. 8. Install the optical drive. 11. Install the keyboard trim. 7. Route the LED board cable to the palmrest. 3. Install the base cover. 10. Install the battery. 13. Install the Secure Digital (SD) card. 12. Install the keyboard. 6. Install the palmrest assembly. 5. Install the ExpressCard. 9. Follow the procedures in After Working Inside Your Computer. 51
Owners Manual
Page 53
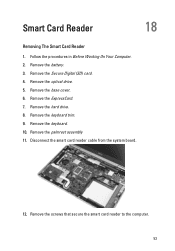
Remove the hard drive. 8. Smart Card Reader 18 Removing The Smart Card Reader 1. Remove the optical drive. 5. Remove the keyboard trim. 9. Remove the keyboard. 10. Remove the Secure Digital (SD) card. 4. Remove the palmrest assembly 11. Follow the procedures in Before Working On Your Computer. 2. Remove the screws that secure the smart card reader to the computer. 53 Remove the battery. 3. Remove the ExpressCard. 7. Disconnect the smart card reader cable from the system board. 12. Remove the base cover. 6.
Remove the hard drive. 8. Smart Card Reader 18 Removing The Smart Card Reader 1. Remove the optical drive. 5. Remove the keyboard trim. 9. Remove the keyboard. 10. Remove the Secure Digital (SD) card. 4. Remove the palmrest assembly 11. Follow the procedures in Before Working On Your Computer. 2. Remove the screws that secure the smart card reader to the computer. 53 Remove the battery. 3. Remove the ExpressCard. 7. Disconnect the smart card reader cable from the system board. 12. Remove the base cover. 6.
Owners Manual
Page 55
Installing The Smart Card Reader 1. Install the keyboard. 7. Install the hard drive. 9. Install the Secure Digital (SD) card. 13. Install the battery. 14. Place the smart card reader to the computer. 5. Install the palmrest assembly. 6. Follow the .... 55 Replace and tighten the screws to secure the palmrest assembly to its original position on the computer. 2. Install the keyboard trim. 8. Install the optical drive. 12. Replace and tighten the screws to secure the smart card reader to the system board. 4. Install the ExpressCard. 10. Connect the smart card reader...
Installing The Smart Card Reader 1. Install the keyboard. 7. Install the hard drive. 9. Install the Secure Digital (SD) card. 13. Install the battery. 14. Place the smart card reader to the computer. 5. Install the palmrest assembly. 6. Follow the .... 55 Replace and tighten the screws to secure the palmrest assembly to its original position on the computer. 2. Install the keyboard trim. 8. Install the optical drive. 12. Replace and tighten the screws to secure the smart card reader to the system board. 4. Install the ExpressCard. 10. Connect the smart card reader...
Owners Manual
Page 57
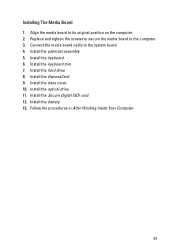
Remove the keyboard. 10. Remove the screws that secures the media board to the computer. 57 Remove the optical drive. 5. Remove the ExpressCard. 7. Remove the keyboard trim. 9. Follow the procedures in Before Working On Your Computer. 2. Remove the battery. 3. Remove the hard drive. 8. Remove the base cover. 6. Media Board 19 Removing The Media Board 1. Disconnect the media board cable from the system board. 12. Remove the Secure Digital (SD) card. 4. Remove the palmrest assembly. 11.
Remove the keyboard. 10. Remove the screws that secures the media board to the computer. 57 Remove the optical drive. 5. Remove the ExpressCard. 7. Remove the keyboard trim. 9. Follow the procedures in Before Working On Your Computer. 2. Remove the battery. 3. Remove the hard drive. 8. Remove the base cover. 6. Media Board 19 Removing The Media Board 1. Disconnect the media board cable from the system board. 12. Remove the Secure Digital (SD) card. 4. Remove the palmrest assembly. 11.
Owners Manual
Page 59
Connect the media board cable to its original position on the computer. 2. Install the keyboard trim. 7. Install the optical drive. 11. Install the base cover. 10. Align the media board to the system board. 4. Install the hard drive. 8. Install the palmrest assembly. 5. Follow the procedures in After Working Inside Your Computer. 59 Install the keyboard. 6. Replace and tighten the screws to secure the media board to the computer. 3. Install the Secure Digital (SD) card. 12. Install the battery. 13. Installing The Media Board 1. Install the ExpressCard. 9.
Connect the media board cable to its original position on the computer. 2. Install the keyboard trim. 7. Install the optical drive. 11. Install the base cover. 10. Align the media board to the system board. 4. Install the hard drive. 8. Install the palmrest assembly. 5. Follow the procedures in After Working Inside Your Computer. 59 Install the keyboard. 6. Replace and tighten the screws to secure the media board to the computer. 3. Install the Secure Digital (SD) card. 12. Install the battery. 13. Installing The Media Board 1. Install the ExpressCard. 9.
Owners Manual
Page 61
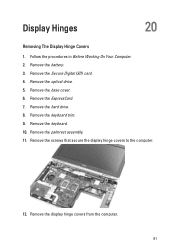
Remove the battery. 3. Remove the keyboard trim. 9. Remove the screws that secure the display hinge covers to the computer. 12. Remove the optical drive. 5. Remove the keyboard. 10. Remove the hard drive. 8. Follow the procedures in Before Working On Your Computer. 2. Remove the base cover. 6. Remove the display hinge covers from the computer. 61 Remove the ExpressCard. 7. Remove the Secure Digital (SD) card. 4. Remove the palmrest assembly. 11. Display Hinges 20 Removing The Display Hinge Covers 1.
Remove the battery. 3. Remove the keyboard trim. 9. Remove the screws that secure the display hinge covers to the computer. 12. Remove the optical drive. 5. Remove the keyboard. 10. Remove the hard drive. 8. Follow the procedures in Before Working On Your Computer. 2. Remove the base cover. 6. Remove the display hinge covers from the computer. 61 Remove the ExpressCard. 7. Remove the Secure Digital (SD) card. 4. Remove the palmrest assembly. 11. Display Hinges 20 Removing The Display Hinge Covers 1.
Owners Manual
Page 62
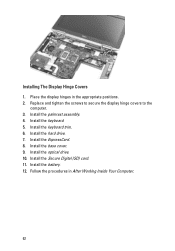
Install the keyboard trim. 6. Install the base cover. 9. Install the ExpressCard. 8. Install the battery. 12. Install the palmrest assembly. 4. Install the hard drive. 7. Install the optical drive. 10. Installing The Display Hinge Covers 1. Follow the procedures in the appropriate positions. 2. Replace and tighten the screws to secure the display hinge covers to the computer. 3. Install the keyboard. 5. Install the Secure Digital (SD) card. 11. Place the display hinges in After Working Inside Your Computer. 62
Install the keyboard trim. 6. Install the base cover. 9. Install the ExpressCard. 8. Install the battery. 12. Install the palmrest assembly. 4. Install the hard drive. 7. Install the optical drive. 10. Installing The Display Hinge Covers 1. Follow the procedures in the appropriate positions. 2. Replace and tighten the screws to secure the display hinge covers to the computer. 3. Install the keyboard. 5. Install the Secure Digital (SD) card. 11. Place the display hinges in After Working Inside Your Computer. 62
Owners Manual
Page 63
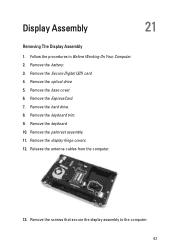
Remove the battery. 3. Remove the Secure Digital (SD) card. 4. Remove the ExpressCard. 7. Remove the display hinge covers. 12. Follow the procedures in Before Working On Your Computer. 2. Remove the optical drive. 5. Remove the palmrest assembly. 11. Display Assembly 21 Removing The Display Assembly 1. Remove the base cover. 6. Release the antenna cables from the computer. 13. Remove the screws that secure the display assembly to the computer. 63 Remove the hard drive. 8. Remove the keyboard. 10. Remove the keyboard trim. 9.
Remove the battery. 3. Remove the Secure Digital (SD) card. 4. Remove the ExpressCard. 7. Remove the display hinge covers. 12. Follow the procedures in Before Working On Your Computer. 2. Remove the optical drive. 5. Remove the palmrest assembly. 11. Display Assembly 21 Removing The Display Assembly 1. Remove the base cover. 6. Release the antenna cables from the computer. 13. Remove the screws that secure the display assembly to the computer. 63 Remove the hard drive. 8. Remove the keyboard. 10. Remove the keyboard trim. 9.

Owners Manual
Page 67
Replace and tighten the screws to secure the display panel to the system board. 6. Install the optical drive. 17. Install the hard drive. 14. Install the Secure Digital (SD) card. 18. Route the antenna cables through the system board. 7. Install the display hinge covers. 10. Install the keyboard ...
Replace and tighten the screws to secure the display panel to the system board. 6. Install the optical drive. 17. Install the hard drive. 14. Install the Secure Digital (SD) card. 18. Route the antenna cables through the system board. 7. Install the display hinge covers. 10. Install the keyboard ...
Owners Manual
Page 69
Remove the hard drive. 9. Remove the wireless wide area network (WWAN) card. 13. Remove the media board. 15. Remove the battery. 3. Remove the ExpressCard. 8. Remove the display hinge covers. 17. System Board 22 Removing The System Board 1. Follow the procedures in Before Working On Your Computer. 2. Remove the optical drive. 5. Remove the display assembly...
Remove the hard drive. 9. Remove the wireless wide area network (WWAN) card. 13. Remove the media board. 15. Remove the battery. 3. Remove the ExpressCard. 8. Remove the display hinge covers. 17. System Board 22 Removing The System Board 1. Follow the procedures in Before Working On Your Computer. 2. Remove the optical drive. 5. Remove the display assembly...

Owners Manual
Page 73
Connect the power supply cable. 5. Route and connect the smart card and speaker cables to the computer. 6. Install the optical drive. 16. Install the Secure Digital (SD) card. 17. Replace and tighten the screws to secure the system board to the system board. 7. ...the keyboard. 11. Install the base cover. 15. Follow the procedures in the United States of America. 2. Install the display hinge covers. 9. Install the hard drive. 13. Install the battery. 18. Replace and tighten the screw to secure the TAA board to the computer. 3. Install the display assembly. 8. Install the ...
Connect the power supply cable. 5. Route and connect the smart card and speaker cables to the computer. 6. Install the optical drive. 16. Install the Secure Digital (SD) card. 17. Replace and tighten the screws to secure the system board to the system board. 7. ...the keyboard. 11. Install the base cover. 15. Follow the procedures in the United States of America. 2. Install the display hinge covers. 9. Install the hard drive. 13. Install the battery. 18. Replace and tighten the screw to secure the TAA board to the computer. 3. Install the display assembly. 8. Install the ...
Owners Manual
Page 75
... procedures in Before Working On Your Computer. 2. Remove the wireless wide area network (WWAN) card. 13. Remove the hard drive. 9. Remove the coin-cell battery. 14. Remove the display hinge covers. 17. Remove the optical drive. 5. Remove the display assembly. 18. Remove the keyboard trim. 10. Remove the wireless local area network (WLAN...
... procedures in Before Working On Your Computer. 2. Remove the wireless wide area network (WWAN) card. 13. Remove the hard drive. 9. Remove the coin-cell battery. 14. Remove the display hinge covers. 17. Remove the optical drive. 5. Remove the display assembly. 18. Remove the keyboard trim. 10. Remove the wireless local area network (WLAN...


