User Manual
Page 2
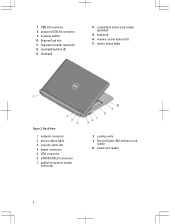
7. touchpad buttons (2) 13. volume control buttons (3) 17. Back View 1. power connector 5. network connector 2. VGA connector 6. Secure Digital (SD) memory-card reader 10. security cable slot 4. USB 3.0 connector 8. wireless switch 10. fingerprint reader (optional) 12. device status lights Figure 2. eSATA/USB 2.0 connector 7. audio/microphone combo connector 8. keyboard 16. touchpad 14. contactless smart-card reader (optional) 15. powered USB 3.0 connector 9. ExpressCard slot 11. device status lights 3. cooling vents 9. smart card reader 2
7. touchpad buttons (2) 13. volume control buttons (3) 17. Back View 1. power connector 5. network connector 2. VGA connector 6. Secure Digital (SD) memory-card reader 10. security cable slot 4. USB 3.0 connector 8. wireless switch 10. fingerprint reader (optional) 12. device status lights Figure 2. eSATA/USB 2.0 connector 7. audio/microphone combo connector 8. keyboard 16. touchpad 14. contactless smart-card reader (optional) 15. powered USB 3.0 connector 9. ExpressCard slot 11. device status lights 3. cooling vents 9. smart card reader 2
User Manual
Page 3
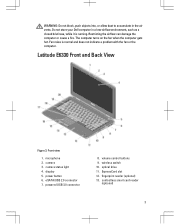
...power button 6. volume control buttons 9. fingerprint reader (optional) 13. Fan noise is running. camera status light 4. wireless switch 10. Do not store your Dell computer in the air vents. eSATA/USB 2.0 connector 7. camera 3. powered USB 3.0 connector 8. ExpressCard slot 12.... Front view 1. display 5. contactless smart card reader (optional) 3 microphone 2. Latitude E6330 Front and Back View Figure 3. ...
...power button 6. volume control buttons 9. fingerprint reader (optional) 13. Fan noise is running. camera status light 4. wireless switch 10. Do not store your Dell computer in the air vents. eSATA/USB 2.0 connector 7. camera 3. powered USB 3.0 connector 8. ExpressCard slot 12.... Front view 1. display 5. contactless smart card reader (optional) 3 microphone 2. Latitude E6330 Front and Back View Figure 3. ...
User Manual
Page 8
... Information in this publication to refer to change without the written permission of Wireless Ethernet Compatibility Alliance, Inc. The Bluetooth® word mark is a registered trademark of Dell Inc. Other trademarks and trade names may be used in this publication is...User License Agreement Additional information on your product is a trademark owned by Dell Inc. Trademarks used in this text: Dell™, the DELL logo, Dell Precision™, Precision ON™, ExpressCharge™, Latitude™, Latitude ON™, OptiPlex™, Vostro™, and Wi-Fi Catcher™...
... Information in this publication to refer to change without the written permission of Wireless Ethernet Compatibility Alliance, Inc. The Bluetooth® word mark is a registered trademark of Dell Inc. Other trademarks and trade names may be used in this publication is...User License Agreement Additional information on your product is a trademark owned by Dell Inc. Trademarks used in this text: Dell™, the DELL logo, Dell Precision™, Precision ON™, ExpressCharge™, Latitude™, Latitude ON™, OptiPlex™, Vostro™, and Wi-Fi Catcher™...
Owner's Manual
Page 3
... Installing the Memory...18 Removing The Palmrest...18 Installing the Palmrest...20 Removing the Keyboard...21 Installing the Keyboard...22 Removing the Wireless Local Access Network (WLAN 23 Installing the Wireless Local Access Network (WLAN 24 Removing the Heat-Sink Fan...24 Installing the Heat-Sink Fan...25 Removing the Heat-Sink...
... Installing the Memory...18 Removing The Palmrest...18 Installing the Palmrest...20 Removing the Keyboard...21 Installing the Keyboard...22 Removing the Wireless Local Access Network (WLAN 23 Installing the Wireless Local Access Network (WLAN 24 Removing the Heat-Sink Fan...24 Installing the Heat-Sink Fan...25 Removing the Heat-Sink...
Owner's Manual
Page 23
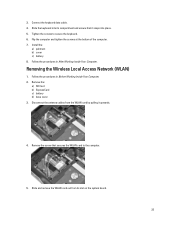
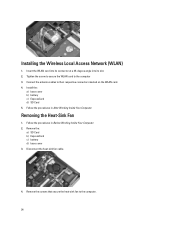
... 8. Follow the procedures in After Working Inside Your Computer. Connect the keyboard data cable. 4. Follow the procedures in Before Working Inside Your Computer. 2. Removing the Wireless Local Access Network (WLAN) 1. Flip the computer and tighten the screws at the bottom of the computer. 7. 3. Slide the keyboard into place. 5. Remove the: a) SD...
... 8. Follow the procedures in After Working Inside Your Computer. Connect the keyboard data cable. 4. Follow the procedures in Before Working Inside Your Computer. 2. Removing the Wireless Local Access Network (WLAN) 1. Flip the computer and tighten the screws at the bottom of the computer. 7. 3. Slide the keyboard into place. 5. Remove the: a) SD...
Owner's Manual
Page 24
Installing the Wireless Local Access Network (WLAN) 1. Removing the Heat-Sink Fan 1. Connect the antenna cables to the computer. 24 Follow the procedures in Before Working Inside Your ...
Installing the Wireless Local Access Network (WLAN) 1. Removing the Heat-Sink Fan 1. Connect the antenna cables to the computer. 24 Follow the procedures in Before Working Inside Your ...

Owner's Manual
Page 43
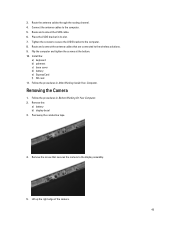
Disconnect any antenna cables that secure the low-voltage differential signaling (LVDS) bracket to the wireless solutions and remove them from the routing channels. 5. Remove the screws that may be connected to the computer. 6. Disconnect the LVDS cable. 43 Remove the LVDS bracket. 7. 4.
Disconnect any antenna cables that secure the low-voltage differential signaling (LVDS) bracket to the wireless solutions and remove them from the routing channels. 5. Remove the screws that may be connected to the computer. 6. Disconnect the LVDS cable. 43 Remove the LVDS bracket. 7. 4.
Owner's Manual
Page 45
... cables through the routing channel. 4. Place the LVDS bracket in Before Working On Your Computer. 2. Tighten the screws to secure the LVDS bracket to the wireless solutions. 9. Route and connect the antenna cables that secures the camera to the computer. 5. Follow the procedures in After Working Inside Your Computer. Connect the...
... cables through the routing channel. 4. Place the LVDS bracket in Before Working On Your Computer. 2. Tighten the screws to secure the LVDS bracket to the wireless solutions. 9. Route and connect the antenna cables that secures the camera to the computer. 5. Follow the procedures in After Working Inside Your Computer. Connect the...

Owner's Manual
Page 55
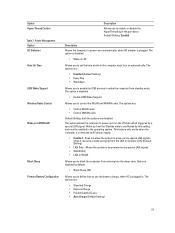
... to set the admin password before you to enable the Trusted Platform Module (TPM) during POST. Default Setting: Enable Strong Password is disabled. • Allows Wireless Switch Changes Allows you set . Min = 4 , Max = 32 Allows you to bypass the System and the Internal HDD password, when they are permitted when an...
... to set the admin password before you to enable the Trusted Platform Module (TPM) during POST. Default Setting: Enable Strong Password is disabled. • Allows Wireless Switch Changes Allows you set . Min = 4 , Max = 32 Allows you to bypass the System and the Internal HDD password, when they are permitted when an...
Owner's Manual
Page 57
...AC use the battery charge, when AC is unaffected by default. • Block Sleep (S3) Allows you to block the computer from the LAN or wireless LAN. (Default Setting) • LAN Only - This feature only works when the computer is plugged. Allows the system to be enabled in the ...when triggered by special LAN signals when it receives a wake-up from standby mode. Power Management Option AC Behavior Auto On Time USB Wake Support Wireless Radio Control Wake on by a special LAN signal. The option is disabled • Enable USB Wake Support Allows you to enable the USB ...
...AC use the battery charge, when AC is unaffected by default. • Block Sleep (S3) Allows you to block the computer from the LAN or wireless LAN. (Default Setting) • LAN Only - This feature only works when the computer is plugged. Allows the system to be enabled in the ...when triggered by special LAN signals when it receives a wake-up from standby mode. Power Management Option AC Behavior Auto On Time USB Wake Support Wireless Radio Control Wake on by a special LAN signal. The option is disabled • Enable USB Wake Support Allows you to enable the USB ...
Owner's Manual
Page 59
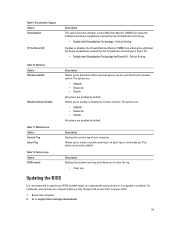
...to create a system asset tag if an asset tag is available. Description Displays the system event log and allows you to support.dell.com/support/downloads. 59 Allows you to a power outlet 1. For notebooks, ensure that your computer battery is not set . ...System Logs Option BIOS events Description Allows you to update your computer. Wireless Option Wireless Switch Wireless Device Enable Table 11. The options are: • WWAN • Bluetooth • WLAN All options are enabled by default. Maintenance...
...to create a system asset tag if an asset tag is available. Description Displays the system event log and allows you to support.dell.com/support/downloads. 59 Allows you to a power outlet 1. For notebooks, ensure that your computer battery is not set . ...System Logs Option BIOS events Description Allows you to update your computer. Wireless Option Wireless Switch Wireless Device Enable Table 11. The options are: • WWAN • Bluetooth • WLAN All options are enabled by default. Maintenance...
Owner's Manual
Page 65
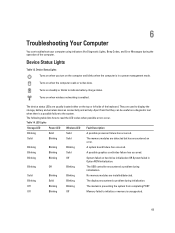
...The USB controller encountered a problem during initialization. The device status LEDs are used to display the storage, battery and wireless devices connectivity and activity. Off Blinking Blinking The modem is unsupported. 65 Turns on steadily or blinks to read the...following table lists how to indicate battery charge status. Blinking Solid Blinking The display encountered a problem during initialization. Turns on when wireless networking is in Option ROM initialization. Table 14. 6 Troubleshooting Your Computer You can be useful as a diagnostic tool when ...
...The USB controller encountered a problem during initialization. The device status LEDs are used to display the storage, battery and wireless devices connectivity and activity. Off Blinking Blinking The modem is unsupported. 65 Turns on steadily or blinks to read the...following table lists how to indicate battery charge status. Blinking Solid Blinking The display encountered a problem during initialization. Turns on when wireless networking is in Option ROM initialization. Table 14. 6 Troubleshooting Your Computer You can be useful as a diagnostic tool when ...
Owner's Manual
Page 68
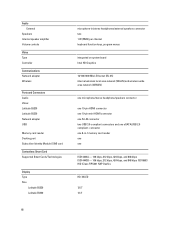
... program menus integrated on system board Intel HD Graphics 10/100/1000 Mb/s Ethernet (RJ-45) internal wireless local area network (WLAN) and wireless wide area network (WWAN) one microphone/stereo headphone/speakers connector one 19-pin HDMI connector one 19-pin ...WLED 12.5" 13.3" 68 Audio External Speakers Internal speaker amplifier Volume controls Video Type Controller Communications Network adapter Wireless Ports and Connectors Audio Video: Latitude E6230 Latitude E6330 Network adapter USB Memory card reader Docking port Subscriber Identity Module (SIM) card Contactless Smart Card Supported...
... program menus integrated on system board Intel HD Graphics 10/100/1000 Mb/s Ethernet (RJ-45) internal wireless local area network (WLAN) and wireless wide area network (WWAN) one microphone/stereo headphone/speakers connector one 19-pin HDMI connector one 19-pin ...WLED 12.5" 13.3" 68 Audio External Speakers Internal speaker amplifier Volume controls Video Type Controller Communications Network adapter Wireless Ports and Connectors Audio Video: Latitude E6230 Latitude E6330 Network adapter USB Memory card reader Docking port Subscriber Identity Module (SIM) card Contactless Smart Card Supported...


