User Manual
Page 2
Contents Notes, Cautions, and Warnings 0 1 Working on Your Computer...5 Before Working Inside Your Computer...5 Turning Off Your Computer...6 After Working Inside Your Computer...6 2 Removing and Installing Components 7 Recommended Tools...7 Removing the SD Memory Card...7 Installing the SD...9 Installing the Subscriber Identity Module (SIM) Card 9 Removing the Display Bezel...9 Installing the Display Bezel...10 Removing the Camera...10 Installing the Camera...10 Removing the Display Panel...11 Installing the Display Panel...12 Removing the Keyboard Trim...12 Installing the Keyboard Trim...14 ...
Contents Notes, Cautions, and Warnings 0 1 Working on Your Computer...5 Before Working Inside Your Computer...5 Turning Off Your Computer...6 After Working Inside Your Computer...6 2 Removing and Installing Components 7 Recommended Tools...7 Removing the SD Memory Card...7 Installing the SD...9 Installing the Subscriber Identity Module (SIM) Card 9 Removing the Display Bezel...9 Installing the Display Bezel...10 Removing the Camera...10 Installing the Camera...10 Removing the Display Panel...11 Installing the Display Panel...12 Removing the Keyboard Trim...12 Installing the Keyboard Trim...14 ...
User Manual
Page 10
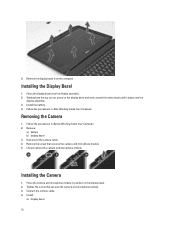
... Your Computer. Tighten the screw that secures the camera and microphone module. 5. Follow the procedures in Before Working Inside Your Computer. 2. Removing the Camera 1. Place the camera and microphone module in position on the display bezel and work around the entire bezel until it snaps onto the display assembly. 3. 5. Place the display bezel onto the...
... Your Computer. Tighten the screw that secures the camera and microphone module. 5. Follow the procedures in Before Working Inside Your Computer. 2. Removing the Camera 1. Place the camera and microphone module in position on the display bezel and work around the entire bezel until it snaps onto the display assembly. 3. 5. Place the display bezel onto the...
User Manual
Page 61
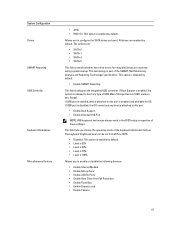
...• Enable eSATA Ports • Enable Hard Drive Free Fall Protection • Enable Fixed Bay • Enable Express card • Enable Camera 61 All drives are enabled by default. This field lets you choose the operating mode of the SMART (Self Monitoring Analysis and Reporting Technology) ... feature. Allows you to this port. • Enable Boot Support • Enable External USB Port NOTE: USB keyboard and mouse always work in the BIOS setup irrespective of USB Mass Storage Devices (HDD, memory key, floppy). The options are reported during system startup. This ...
...• Enable eSATA Ports • Enable Hard Drive Free Fall Protection • Enable Fixed Bay • Enable Express card • Enable Camera 61 All drives are enabled by default. This field lets you choose the operating mode of the SMART (Self Monitoring Analysis and Reporting Technology) ... feature. Allows you to this port. • Enable Boot Support • Enable External USB Port NOTE: USB keyboard and mouse always work in the BIOS setup irrespective of USB Mass Storage Devices (HDD, memory key, floppy). The options are reported during system startup. This ...


