View
Page 28
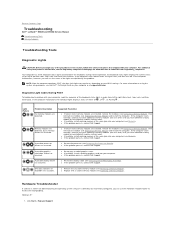
... your Service Manual on the Dell Support website at battery failure or support.dell.com). motherboard failure. 2 If the problem persists, contact Dell. 28 Troubleshooting failure. Code Description (repetitive short beeps) Suggested Remedy 1 BIOS checksum Contact Dell. If the computer starts normally, reinstall an additional module. motherboard failure 4 RAM Read/Write 1 Ensure that you have identified a faulty module or reinstalled all modules without error. 2 If available, install good memory of the same type into...
... your Service Manual on the Dell Support website at battery failure or support.dell.com). motherboard failure. 2 If the problem persists, contact Dell. 28 Troubleshooting failure. Code Description (repetitive short beeps) Suggested Remedy 1 BIOS checksum Contact Dell. If the computer starts normally, reinstall an additional module. motherboard failure 4 RAM Read/Write 1 Ensure that you have identified a faulty module or reinstalled all modules without error. 2 If available, install good memory of the same type into...
View
Page 31
... Management (DRM) restrictions on page 36). See your Service Manual at support.dell.com for more information. Then, shut down the computer, remove the hard drive (see your Service Manual at support.dell.com for more information. The system configuration information does not match the hardware configuration. The message is most likely to occur after a memory module is trying to boot to nonbootable media, such as a floppy disk or CD. K E Y B O A R D C O N T R O L L E R F A I L U R E - K E Y B O A R D D A T A L I N E F A I L U R E - K E Y B O A R D S T U C K KEY...
... Management (DRM) restrictions on page 36). See your Service Manual at support.dell.com for more information. Then, shut down the computer, remove the hard drive (see your Service Manual at support.dell.com for more information. The system configuration information does not match the hardware configuration. The message is most likely to occur after a memory module is trying to boot to nonbootable media, such as a floppy disk or CD. K E Y B O A R D C O N T R O L L E R F A I L U R E - K E Y B O A R D D A T A L I N E F A I L U R E - K E Y B O A R D S T U C K KEY...

View
Page 35
...problem and follow the remaining troubleshooting steps. A chip on the system board might be malfunctioning or system board failure (see "Contacting Dell" on hard drive, or the hard drive cable is loose, or no bootable device exists. • If the hard drive is your Service Manual at support.dell.com). Use external power source for assistance. Possible hard drive failure during harddrive start the Hardware Troubleshooter: Windows Vista: 1 Click the Windows Vista Start button , and click Help and Support. 2 Type hardware troubleshooter in BIOS setup. HARD DRIVE SELF MONITORING...
...problem and follow the remaining troubleshooting steps. A chip on the system board might be malfunctioning or system board failure (see "Contacting Dell" on hard drive, or the hard drive cable is loose, or no bootable device exists. • If the hard drive is your Service Manual at support.dell.com). Use external power source for assistance. Possible hard drive failure during harddrive start the Hardware Troubleshooter: Windows Vista: 1 Click the Windows Vista Start button , and click Help and Support. 2 Type hardware troubleshooter in BIOS setup. HARD DRIVE SELF MONITORING...
View
Page 36
Windows XP: 1 Click Start→Help and Support. 2 Type hardware troubleshooter in the system setup program and is active. NOTICE: The Dell Diagnostics works only on page 40) and run the Dell Diagnostics before you contact Dell for technical assistance. Starting the Dell Diagnostics From Your Hard Drive NOTE: If your computer cannot display a screen image, see "Lockups and Software Problems" on Dell computers. When to be working properly. 2 Turn on page 61. 1 Ensure...
Windows XP: 1 Click Start→Help and Support. 2 Type hardware troubleshooter in the system setup program and is active. NOTICE: The Dell Diagnostics works only on page 40) and run the Dell Diagnostics before you contact Dell for technical assistance. Starting the Dell Diagnostics From Your Hard Drive NOTE: If your computer cannot display a screen image, see "Lockups and Software Problems" on Dell computers. When to be working properly. 2 Turn on page 61. 1 Ensure...
View
Page 37
... the Drivers and Utilities Media 1 Insert the Drivers and Utilities media. 2 Shut down your computer and try again. NOTE: If you wait too long and the operating system logo appears, continue to proceed. 6 Select Run the 32 Bit Dell Diagnostics from the start -up, the computer starts according to the devices specified in the system setup program. 3 When the boot device list appears, highlight CD/DVD...
... the Drivers and Utilities Media 1 Insert the Drivers and Utilities media. 2 Shut down your computer and try again. NOTE: If you wait too long and the operating system logo appears, continue to proceed. 6 Select Run the 32 Bit Dell Diagnostics from the start -up, the computer starts according to the devices specified in the system setup program. 3 When the boot device list appears, highlight CD/DVD...

View
Page 39
... and exit any open programs you are : • Power, keyboard, and mouse extension cables • Too many devices connected to the same power strip • Multiple power strips connected to the same electrical outlet Memory Problems CAUTION: Before you begin any expansion cards, including graphics cards (see your Service Manual at support.dell.com). • Remove and then reinstall any of interference are not using to resume normal operation. Troubleshooting 39 ELIMINATE...
... and exit any open programs you are : • Power, keyboard, and mouse extension cables • Too many devices connected to the same power strip • Multiple power strips connected to the same electrical outlet Memory Problems CAUTION: Before you begin any expansion cards, including graphics cards (see your Service Manual at support.dell.com). • Remove and then reinstall any of interference are not using to resume normal operation. Troubleshooting 39 ELIMINATE...
View
Page 46
... to use System Restore (see "Restoring Your Operating System" on page 48) does not resolve the problem, reinstall the driver from other sources, your Drivers and Utilities media. NOTE: The User Account Control window may appear. If this is your computer to the operating state that existed before you installed the new driver. Reinstalling Drivers and Utilities NOTICE: The Dell Support website at support.dell.com and your administrator to enter the Device Manager. 3 Right...
... to use System Restore (see "Restoring Your Operating System" on page 48) does not resolve the problem, reinstall the driver from other sources, your Drivers and Utilities media. NOTE: The User Account Control window may appear. If this is your computer to the operating state that existed before you installed the new driver. Reinstalling Drivers and Utilities NOTICE: The Dell Support website at support.dell.com and your administrator to enter the Device Manager. 3 Right...
View
Page 52
... change the boot sequence for one time only. NOTE: The Drivers and Utilities media contains drivers that were installed during the assembly of the computer. Depending on the region from CD-ROM, and follow the instructions on the screen to the devices specified in the system setup program. 5 When the boot device list appears, highlight CD/DVD/CD-RW Drive and press . 6 Press any required drivers. When the DELL...
... change the boot sequence for one time only. NOTE: The Drivers and Utilities media contains drivers that were installed during the assembly of the computer. Depending on the region from CD-ROM, and follow the instructions on the screen to the devices specified in the system setup program. 5 When the boot device list appears, highlight CD/DVD/CD-RW Drive and press . 6 Press any required drivers. When the DELL...

View
Page 65
setup computer, 11 Internet connection, 14 quick setup, 11 software problems, 41 troubleshooting, 40-41 updates, 42 specifications AC adapter, 24 audio, 21 battery, 23 communications, 21 display, 22 environmental, 26 keyboard, 23 memory, 20 physical, 25 ports and connectors, 20 processor, 19 system information, 19 touch pad, 23 video, 21 support contacting Dell, 61 information, 54 System Restore, 48 enabling, 50 T telephone numbers, 61 transferring information to a new computer, 15 troubleshooting, 54 blue screen, 41 computer not responding...
setup computer, 11 Internet connection, 14 quick setup, 11 software problems, 41 troubleshooting, 40-41 updates, 42 specifications AC adapter, 24 audio, 21 battery, 23 communications, 21 display, 22 environmental, 26 keyboard, 23 memory, 20 physical, 25 ports and connectors, 20 processor, 19 system information, 19 touch pad, 23 video, 21 support contacting Dell, 61 information, 54 System Restore, 48 enabling, 50 T telephone numbers, 61 transferring information to a new computer, 15 troubleshooting, 54 blue screen, 41 computer not responding...
Service Manual
Page 4
... computer: l To remove any installed cards, such as an ExpressCard, see the Dell Support website at support.dell.com) Before Working on Your Computer Use the following tools: l Small flat-blade screwdriver l Phillips screwdriver l Small plastic scribe l Flash BIOS update (see the Dell™ Technology Guide on a card. Back to Contents Page Working on Your Computer Dell™ Latitude™ E5400 and E5500 Service Manual Recommended Tools Before Working on Your Computer...
... computer: l To remove any installed cards, such as an ExpressCard, see the Dell Support website at support.dell.com) Before Working on Your Computer Use the following tools: l Small flat-blade screwdriver l Phillips screwdriver l Small plastic scribe l Flash BIOS update (see the Dell™ Technology Guide on a card. Back to Contents Page Working on Your Computer Dell™ Latitude™ E5400 and E5500 Service Manual Recommended Tools Before Working on Your Computer...
Service Manual
Page 6
... the main battery is properly installed, and that is known to be working properly to prevent a loss of the drive tray, then gently push to highlight CD-ROM, and then press . When the DELL logo appears, press immediately. Back to Contents Page Flashing the BIOS Dell™ Latitude™ E5400 and E5500 Service Manual Flashing the BIOS From a CD Flashing the BIOS From the Hard Drive If a BIOS-update program media, such...
... the main battery is properly installed, and that is known to be working properly to prevent a loss of the drive tray, then gently push to highlight CD-ROM, and then press . When the DELL logo appears, press immediately. Back to Contents Page Flashing the BIOS Dell™ Latitude™ E5400 and E5500 Service Manual Flashing the BIOS From a CD Flashing the BIOS From the Hard Drive If a BIOS-update program media, such...
Service Manual
Page 31
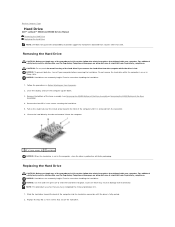
... computer is hot. Pull on Your Computer. 2. For additional safety best practices information, see Removing the E5400 Bottom of the Base Assembly or Removing the E5500 Bottom of the procedures in damage to the connector. Back to Contents Page Hard Drive Dell™ Latitude™ E5400 and E5500 Service Manual Removing the Hard Drive Replacing the Hard Drive NOTE: Dell does not guarantee compatibility or provide support for hard drives obtained...
... computer is hot. Pull on Your Computer. 2. For additional safety best practices information, see Removing the E5400 Bottom of the Base Assembly or Removing the E5500 Bottom of the procedures in damage to the connector. Back to Contents Page Hard Drive Dell™ Latitude™ E5400 and E5500 Service Manual Removing the Hard Drive Replacing the Hard Drive NOTE: Dell does not guarantee compatibility or provide support for hard drives obtained...
Service Manual
Page 37
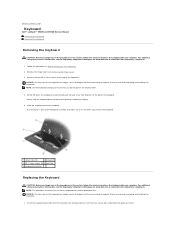
... Before Working on the display cable. 4. Gently rock the keyboard back and forth while pulling it toward the display. 5. NOTE: This procedure assumes that you have completed the removal procedure first. Back to Contents Page Keyboard Dell™ Latitude™ E5400 and E5500 Service Manual Removing the Keyboard Replacing the Keyboard Removing the Keyboard CAUTION: Before you begin any of the procedures in this section, follow the safety instructions...
... Before Working on the display cable. 4. Gently rock the keyboard back and forth while pulling it toward the display. 5. NOTE: This procedure assumes that you have completed the removal procedure first. Back to Contents Page Keyboard Dell™ Latitude™ E5400 and E5500 Service Manual Removing the Keyboard Replacing the Keyboard Removing the Keyboard CAUTION: Before you begin any of the procedures in this section, follow the safety instructions...
Service Manual
Page 42
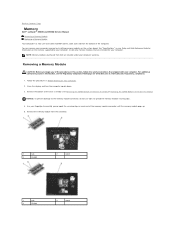
... to Contents Page Memory Dell™ Latitude™ E5400 and E5500 Service Manual Removing a Memory Module Replacing a Memory Module Your computer has two user-accessible SODIMM sockets, both accessed from the connector. 1 tab 3 E5400 2 notch 1 tab 3 E5500 2 notch Removing a Memory Module CAUTION: Before you begin any of the procedures in this section, follow the safety instructions that are covered under your Setup and Quick Reference Guide for your computer. Remove the memory module from the bottom of...
... to Contents Page Memory Dell™ Latitude™ E5400 and E5500 Service Manual Removing a Memory Module Replacing a Memory Module Your computer has two user-accessible SODIMM sockets, both accessed from the connector. 1 tab 3 E5400 2 notch 1 tab 3 E5500 2 notch Removing a Memory Module CAUTION: Before you begin any of the procedures in this section, follow the safety instructions that are covered under your Setup and Quick Reference Guide for your computer. Remove the memory module from the bottom of...
Service Manual
Page 62
... Service Manual Troubleshooting Tools Solving Problems Troubleshooting Tools Diagnostic Lights CAUTION: Before you begin any installed graphics cards. SPD data indicates all modules without error, the lights flash, and then turn off ) of the lights to help identify the problem. l If the problem persists, contact Dell Support. Your computer has three keyboard status lights located above the keyboard. If the computer malfunctions, however, you can use the status of the Num Lock, Caps Lock, and Scroll Lock features. Windows...
... Service Manual Troubleshooting Tools Solving Problems Troubleshooting Tools Diagnostic Lights CAUTION: Before you begin any installed graphics cards. SPD data indicates all modules without error, the lights flash, and then turn off ) of the lights to help identify the problem. l If the problem persists, contact Dell Support. Your computer has three keyboard status lights located above the keyboard. If the computer malfunctions, however, you can use the status of the Num Lock, Caps Lock, and Scroll Lock features. Windows...
Service Manual
Page 63
... board, keyboard, display, memory, hard drive, etc. ¡ During the assessment, answer any questions that best describes the problem, and click Next to a docking device (docked), undock it. NOTE: The Drivers and Utilities media is connected to follow the remaining troubleshooting steps. 2. In the Hardware Troubleshooter list, select the option that appear. ¡ If failures are detected during the Pre-boot System Assessment, write down the error code(s) and contact Dell Support...
... board, keyboard, display, memory, hard drive, etc. ¡ During the assessment, answer any questions that best describes the problem, and click Next to a docking device (docked), undock it. NOTE: The Drivers and Utilities media is connected to follow the remaining troubleshooting steps. 2. In the Hardware Troubleshooter list, select the option that appear. ¡ If failures are detected during the Pre-boot System Assessment, write down the error code(s) and contact Dell Support...
Service Manual
Page 65
... hardware configuration for installation instructions. Error Messages CAUTION: Before you cannot resolve the problem, contact Dell Support. Selecting Test Memory initiates the extended memory test, which can take up to thirty minutes or more . For any error conditions encountered. To remove and then reinstall the program: Windows XP: 1. Click Uninstall. 4. Custom Test Use to test a specific device or customize the tests to complete. The following menu appears: Option...
... hardware configuration for installation instructions. Error Messages CAUTION: Before you cannot resolve the problem, contact Dell Support. Selecting Test Memory initiates the extended memory test, which can take up to thirty minutes or more . For any error conditions encountered. To remove and then reinstall the program: Windows XP: 1. Click Uninstall. 4. Custom Test Use to test a specific device or customize the tests to complete. The following menu appears: Option...
Service Manual
Page 69
... the problem. If necessary, install additional memory (see Dell Diagnostics). l Ensure that shipped with the program. Click Start ® Control Panel® Programs® Use an older program with the memory. In the welcome screen, click Next. 3. Back up your files immediately Use a virus-scanning program to check the hard drive, floppy disks, CDs, or DVDs Save and close any open files and exit any of memory supported...
... the problem. If necessary, install additional memory (see Dell Diagnostics). l Ensure that shipped with the program. Click Start ® Control Panel® Programs® Use an older program with the memory. In the welcome screen, click Next. 3. Back up your files immediately Use a virus-scanning program to check the hard drive, floppy disks, CDs, or DVDs Save and close any open files and exit any of memory supported...

Service Manual
Page 70
...-panel headphone connector. Adjust the Windows volume control - See the Setup and Quick Reference Guide for interference. l Run the Dell Diagnostics (see Dell Diagnostics). If the power light is green and the computer is off . The computer is either turned off nearby fans, fluorescent lights, or halogen lamps to verify that the electrical outlet is automatically disabled when headphones are turned on properly. Eliminate interference - No sound from...
...-panel headphone connector. Adjust the Windows volume control - See the Setup and Quick Reference Guide for interference. l Run the Dell Diagnostics (see Dell Diagnostics). If the power light is green and the computer is off . The computer is either turned off nearby fans, fluorescent lights, or halogen lamps to verify that the electrical outlet is automatically disabled when headphones are turned on properly. Eliminate interference - No sound from...
Service Manual
Page 71
... display settings - Try different settings for troubleshooting purposes. Check the diagnostic lights - Windows Vista: 1. Only part of the card is required for Color quality and Screen resolution. If you remove the card, store it in this section, follow the safety instructions that shipped with a PCI graphics card installed, removal of the display is readable Connect an external monitor - 1. See Diagnostic Lights. Click Start® Control Panel® Appearance and Themes. 2. Adjust Resolution and Colors settings, as needed...
... display settings - Try different settings for troubleshooting purposes. Check the diagnostic lights - Windows Vista: 1. Only part of the card is required for Color quality and Screen resolution. If you remove the card, store it in this section, follow the safety instructions that shipped with a PCI graphics card installed, removal of the display is readable Connect an external monitor - 1. See Diagnostic Lights. Click Start® Control Panel® Appearance and Themes. 2. Adjust Resolution and Colors settings, as needed...


