
Quick Reference Guide
Page 9
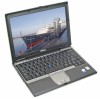
.... 3 Connect the AC adapter to the AC adapter connector on the computer and to the electrical outlet. 4 Open the computer display and press the power button to turn on page 11). Setting Up Your Computer CAUTION: Before you begin any of the procedures in this section, follow the safety instructions in...
.... 3 Connect the AC adapter to the AC adapter connector on the computer and to the electrical outlet. 4 Open the computer display and press the power button to turn on page 11). Setting Up Your Computer CAUTION: Before you begin any of the procedures in this section, follow the safety instructions in...
Quick Reference Guide
Page 10
...; Docking devices: Your computer supports the Dell™ Media Base, the Dell D/Dock Expansion Station, and the Dell D/Port Advanced Port Replicator. For connector locations... Guide for detailed information about your desktop, or click the Start button, click Help and Support Center, and then click User and system... Various batteries are available for the 1394 port. NOTE: The D420 has been optimally designed to be used with this port is ... v.92 56K modem and a 10/100/1000 Ethernet network adapter on page 12. For information on your computer. The following items address some of the D-...
...; Docking devices: Your computer supports the Dell™ Media Base, the Dell D/Dock Expansion Station, and the Dell D/Port Advanced Port Replicator. For connector locations... Guide for detailed information about your desktop, or click the Start button, click Help and Support Center, and then click User and system... Various batteries are available for the 1394 port. NOTE: The D420 has been optimally designed to be used with this port is ... v.92 56K modem and a 10/100/1000 Ethernet network adapter on page 12. For information on your computer. The following items address some of the D-...

Quick Reference Guide
Page 11
Front View 1 2 10 9 3 8 7 6 5 4 1 display latch 2 display 3 device status lights 4 touch pad 5 touch pad buttons 6 track stick 7 keyboard 8 speaker 9 keyboard and network status lights 10 ambient light sensor Quick Reference Guide 11
Front View 1 2 10 9 3 8 7 6 5 4 1 display latch 2 display 3 device status lights 4 touch pad 5 touch pad buttons 6 track stick 7 keyboard 8 speaker 9 keyboard and network status lights 10 ambient light sensor Quick Reference Guide 11

Quick Reference Guide
Page 12
... cause a fire. 1 air vent Back View 1 2 3 2 WiFi locator Wireless On/Off Switch 3 power button 12 3 4 1 network connector (RJ-45) 2 modem connector (RJ-11) 3 USB connectors (2) 4 video connector 5 powered USB connector 6 infrared sensor 5 678 7 IEEE 1394 connector 8 AC adapter connector 12 Quick Reference Guide Do not store your computer in the air vents. Left...
... cause a fire. 1 air vent Back View 1 2 3 2 WiFi locator Wireless On/Off Switch 3 power button 12 3 4 1 network connector (RJ-45) 2 modem connector (RJ-11) 3 USB connectors (2) 4 video connector 5 powered USB connector 6 infrared sensor 5 678 7 IEEE 1394 connector 8 AC adapter connector 12 Quick Reference Guide Do not store your computer in the air vents. Left...

Quick Reference Guide
Page 15
... the Power Meter, double-click the icon on the battery charge. Charge Gauge By either pressing once or pressing and holding the status button) The battery operating time is charged. Each light represents incremental degradation. After hundreds of its charge remaining, four of times it is ...largely determined by using the charge gauge, press and hold the status button on . If no charge. Dell™ QuickSet Battery Meter If Dell QuickSet is in one of the charge capacity remains, and you can show a status of the total battery charge...
... the Power Meter, double-click the icon on the battery charge. Charge Gauge By either pressing once or pressing and holding the status button) The battery operating time is charged. Each light represents incremental degradation. After hundreds of its charge remaining, four of times it is ...largely determined by using the charge gauge, press and hold the status button on . If no charge. Dell™ QuickSet Battery Meter If Dell QuickSet is in one of the charge capacity remains, and you can show a status of the total battery charge...

Quick Reference Guide
Page 18
... reinstall the program. If you are unable to get a response by pressing a key on your keyboard or moving your mouse, press and hold the power button for at least 8 to 10 seconds until the computer turns off . Then restart your computer. C HECK T H E SOFTWARE D O C U M E N T A T I T... on the screen. If you are unable to get a response by pressing a key on your keyboard or moving your mouse, press and hold the power button for an earlier Microsoft® Windows® operating system R U N T H E P R O G R A M C O M P A T I B I L I O N - The Program Compatibility Wizard...
... reinstall the program. If you are unable to get a response by pressing a key on your keyboard or moving your mouse, press and hold the power button for at least 8 to 10 seconds until the computer turns off . Then restart your computer. C HECK T H E SOFTWARE D O C U M E N T A T I T... on the screen. If you are unable to get a response by pressing a key on your keyboard or moving your mouse, press and hold the power button for an earlier Microsoft® Windows® operating system R U N T H E P R O G R A M C O M P A T I B I L I O N - The Program Compatibility Wizard...

Quick Reference Guide
Page 21
...your Service Tag. 3 If you run a test from the numbered list. Dell Diagnostics Main Menu 1 After the Dell Diagnostics loads and the Main Menu screen appears, click the button for your computer. 7 When the Dell Diagnostics Main Menu appears, select the test you to answer questions periodically. This...you are listed, select the version appropriate for the option you want to run . If you cannot resolve the error condition, contact Dell (see "Contacting Dell" in the following table for your computer is encountered during a test, a message appears with an error code and a description of...
...your Service Tag. 3 If you run a test from the numbered list. Dell Diagnostics Main Menu 1 After the Dell Diagnostics loads and the Main Menu screen appears, click the button for your computer. 7 When the Dell Diagnostics Main Menu appears, select the test you to answer questions periodically. This...you are listed, select the version appropriate for the option you want to run . If you cannot resolve the error condition, contact Dell (see "Contacting Dell" in the following table for your computer is encountered during a test, a message appears with an error code and a description of...
Media Base Setup Guide
Page 4
...of data and tells you make better use of your desktop, or click the Start button, → Help and Support, → User and system guides, → User's guides, and then click Dell Latitude User's Guide). Other trademarks and trade names may be used in this document is ...: A NOTE indicates important information that helps you how to change without the written permission of Dell Inc. Microsoft and Windows are trademarks of abbreviations and acronyms, see the Dell™ Latitude™ D420 User's Guide (depending on your operating system, double-click the User's Guide icon on your...
...of data and tells you make better use of your desktop, or click the Start button, → Help and Support, → User and system guides, → User's guides, and then click Dell Latitude User's Guide). Other trademarks and trade names may be used in this document is ...: A NOTE indicates important information that helps you how to change without the written permission of Dell Inc. Microsoft and Windows are trademarks of abbreviations and acronyms, see the Dell™ Latitude™ D420 User's Guide (depending on your operating system, double-click the User's Guide icon on your...
Media Base Setup Guide
Page 10
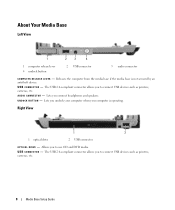
... the media base if the media base is operating. A U D I V E - Allows you connect headphones and speakers. U S B C O N N E C T O R - About Your Media Base Left View 1 2 3 4 1 computer release lever 4 undock button 2 USB connector 3 audio connector C O M P U T E R R E L E A S E L E V E R - The USB 2.0-compliant connector allows you to connect USB devices such as printers, cameras, etc. 8 Media Base Setup Guide Lets you...
... the media base if the media base is operating. A U D I V E - Allows you connect headphones and speakers. U S B C O N N E C T O R - About Your Media Base Left View 1 2 3 4 1 computer release lever 4 undock button 2 USB connector 3 audio connector C O M P U T E R R E L E A S E L E V E R - The USB 2.0-compliant connector allows you to connect USB devices such as printers, cameras, etc. 8 Media Base Setup Guide Lets you...
Media Base Setup Guide
Page 17
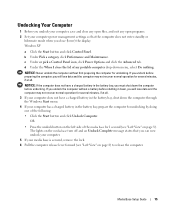
..., you will lose data and the computer may not recover normal operation for undocking by doing one of the following: • Click the Start button and click Undock Computer. The lights on page 8) to release the computer. NOTICE: If the computer does not have a charged battery in the...computer does not have a charged battery in the battery bay, prepare the computer for several minutes, if at all . OR • Press the undock button on page 8). Undocking Your Computer 1 Before you undock your computer, save and close any open files, and exit any open programs. 2 Set your ...
..., you will lose data and the computer may not recover normal operation for undocking by doing one of the following: • Click the Start button and click Undock Computer. The lights on page 8) to release the computer. NOTICE: If the computer does not have a charged battery in the...computer does not have a charged battery in the battery bay, prepare the computer for several minutes, if at all . OR • Press the undock button on page 8). Undocking Your Computer 1 Before you undock your computer, save and close any open files, and exit any open programs. 2 Set your ...


