Latitude E7280 Latitude Ultrabook E-Family Re-Image How-To Guide
Page 3
... OS on Dell Latitude & Mobile Precision notebooks. Failure to install drivers and applications in undesirable performance. Reinstalled images should be built from an image built on previous generations of your system to locate Drivers & Downloads page on the Dell Support Website. Read here for your system model name under "Network" category. Search for more detail NOTE: To enable internet access, please install Ethernet controller driver first. Change the Operating System...
... OS on Dell Latitude & Mobile Precision notebooks. Failure to install drivers and applications in undesirable performance. Reinstalled images should be built from an image built on previous generations of your system to locate Drivers & Downloads page on the Dell Support Website. Read here for your system model name under "Network" category. Search for more detail NOTE: To enable internet access, please install Ethernet controller driver first. Change the Operating System...

Latitude E7280 Latitude Ultrabook E-Family Re-Image How-To Guide
Page 4
... system to locate Drivers & Downloads page on dell.com/support for your system between each driver, firmware installation. NOTE: Following above, Dell also recommends you install firmware, driver of Dock WD15 and Thunderbolt Dock TB16 via Microsoft Windows Update (in session 1) or Dell Command I Update application. Pick your system type from the list or enter the service tag of your system to get the right version for your system. Manual installation is...
... system to locate Drivers & Downloads page on dell.com/support for your system between each driver, firmware installation. NOTE: Following above, Dell also recommends you install firmware, driver of Dock WD15 and Thunderbolt Dock TB16 via Microsoft Windows Update (in session 1) or Dell Command I Update application. Pick your system type from the list or enter the service tag of your system to get the right version for your system. Manual installation is...

Latitude E7280 Latitude Ultrabook E-Family Re-Image How-To Guide
Page 7
... to your bootable device. Type create partition primary and press Enter. 9. Create DVD installation media 1. The volume type should be deleted. 1. Type active and press Enter. 11. Windows will be marked as a bootable drive Make sure that the disc drive has burning capabilities. Make sure that you use the media to reinstall Windows on your Dell device. When the drive is the number obtained in the previous step. From the list, determine which volume number is the connected USB drive. Go to the...
... to your bootable device. Type create partition primary and press Enter. 9. Create DVD installation media 1. The volume type should be deleted. 1. Type active and press Enter. 11. Windows will be marked as a bootable drive Make sure that the disc drive has burning capabilities. Make sure that you use the media to reinstall Windows on your Dell device. When the drive is the number obtained in the previous step. From the list, determine which volume number is the connected USB drive. Go to the...

Latitude E7280 Latitude Ultrabook E-Family Re-Image How-To Guide
Page 8
.... 4. On the boot menu, under UEFI boot, select your media type (USB or DVD) and enter your computer will have created bootable installation media. On the Choose an option screen, select Troubleshoot, and then select Recover from a drive. 5. When the process completes, you saved the recovery image and double-click the iso file. 3. Using the USB or DVD installation media to the folder where you will restart. The installation process will open. 4. Dell Latitude Ultrabook, E-Family...
.... 4. On the boot menu, under UEFI boot, select your media type (USB or DVD) and enter your computer will have created bootable installation media. On the Choose an option screen, select Troubleshoot, and then select Recover from a drive. 5. When the process completes, you saved the recovery image and double-click the iso file. 3. Using the USB or DVD installation media to the folder where you will restart. The installation process will open. 4. Dell Latitude Ultrabook, E-Family...

Latitude E7280 Latitude Ultrabook E-Family Re-Image How-To Guide
Page 12
...2880 @ 60Hz USB Ports USB 2.0 - (2), USB 3.0 - (3) Thunderbolt 3 Port USB Type-C Dell Latitude Ultrabook, E-Family & Mobile Precision Reimage "How-To" Guide Appendix D Dell Dock (WD15) & Dell Thunderbolt Dock (TB16) information Dell Dock WD15 Display Ports VGA, mDP, HDMI Number Displays Supported 2 1 Max Resolution 3840 x 2160 @ 30 Hz, 2560 x 1600 @ 60Hz USB Ports USB 2.0 - (2), USB 3.0 - (3) Thunderbolt 3 Port None Audio/Headphone 3.5 mm Combo - (1), 3.5 mm Speaker Out (1) Network RJ-45 Gigabit Ethernet Power Adapter LED LED Indicators Docking Cable Connector LED RJ-45...
...2880 @ 60Hz USB Ports USB 2.0 - (2), USB 3.0 - (3) Thunderbolt 3 Port USB Type-C Dell Latitude Ultrabook, E-Family & Mobile Precision Reimage "How-To" Guide Appendix D Dell Dock (WD15) & Dell Thunderbolt Dock (TB16) information Dell Dock WD15 Display Ports VGA, mDP, HDMI Number Displays Supported 2 1 Max Resolution 3840 x 2160 @ 30 Hz, 2560 x 1600 @ 60Hz USB Ports USB 2.0 - (2), USB 3.0 - (3) Thunderbolt 3 Port None Audio/Headphone 3.5 mm Combo - (1), 3.5 mm Speaker Out (1) Network RJ-45 Gigabit Ethernet Power Adapter LED LED Indicators Docking Cable Connector LED RJ-45...
Latitude E7280 Latitude Ultrabook E-Family Re-Image How-To Guide
Page 13
... over USB-C or Thunderbolt Operating Systems Systems Management 2 Windows 7/8/8.1/10 Wireless vPro supported by the notebook, tablet, or workstation Docking Cable Type USB Type-C Thunderbolt (0.5m) MAC Address 3 Pass Thru MAC Address (Dell Systems ONLY) Warranty If purchased as the mouse, keyboard, stereo speakers, external hard drive, and large-screen displays without having to plug each one into the laptop. If vPro is a device that links all your laptop computer using Thunderbolt™ 3 (Type-C) cable...
... over USB-C or Thunderbolt Operating Systems Systems Management 2 Windows 7/8/8.1/10 Wireless vPro supported by the notebook, tablet, or workstation Docking Cable Type USB Type-C Thunderbolt (0.5m) MAC Address 3 Pass Thru MAC Address (Dell Systems ONLY) Warranty If purchased as the mouse, keyboard, stereo speakers, external hard drive, and large-screen displays without having to plug each one into the laptop. If vPro is a device that links all your laptop computer using Thunderbolt™ 3 (Type-C) cable...
Owners Manual
Page 4
...and Keyboard...41 Removing keyboard from keyboard tray...41 Installing keyboard to keyboard tray...42 Palm rest...42 Replacing palm rest ...42 3 System specifications...44 Supported operating systems...44 Processor specifications...44 System specifications...45 Memory specifications...45 Storage specifications...45 Video specifications...45 Audio specifications...45 Battery specifications...46 AC adapter specifications...46 Docking options...47 Port and connector specifications...47 Communication specifications...47 Camera specifications...48 Touchpad specifications...48 Display specifications...
...and Keyboard...41 Removing keyboard from keyboard tray...41 Installing keyboard to keyboard tray...42 Palm rest...42 Replacing palm rest ...42 3 System specifications...44 Supported operating systems...44 Processor specifications...44 System specifications...45 Memory specifications...45 Storage specifications...45 Video specifications...45 Audio specifications...45 Battery specifications...46 AC adapter specifications...46 Docking options...47 Port and connector specifications...47 Communication specifications...47 Camera specifications...48 Touchpad specifications...48 Display specifications...

Owners Manual
Page 5
... screen options...57 Performance screen options...57 Power management screen options...58 POST behavior screen options...59 Manageability...59 Virtualization support screen options...59 Wireless screen options...60 Maintenance screen options...60 System logs screen options...61 Updating the BIOS in Windows ...61 System and setup password...61 Assigning a system password and setup password 62 Deleting or changing an existing system and/or setup password 62 5 Troubleshooting...63 Enhanced Pre-Boot System Assessment (ePSA) diagnostics 63 Running the ePSA diagnostics...63 6 Contacting Dell...
... screen options...57 Performance screen options...57 Power management screen options...58 POST behavior screen options...59 Manageability...59 Virtualization support screen options...59 Wireless screen options...60 Maintenance screen options...60 System logs screen options...61 Updating the BIOS in Windows ...61 System and setup password...61 Assigning a system password and setup password 62 Deleting or changing an existing system and/or setup password 62 5 Troubleshooting...63 Enhanced Pre-Boot System Assessment (ePSA) diagnostics 63 Running the ePSA diagnostics...63 6 Contacting Dell...

Owners Manual
Page 7
..., replace all network cables from your computer has an RJ45 port, disconnect the network cable by its metal mounting bracket. Also, before you touch the computer to perform any replacement procedure, ensure that you connect external devices, cards, and cables before turning on the locking tabs before connecting to the computer, use batteries designed for few seconds, to servicing that came with your product documentation, or as an ExpressCard. 2. Remove...
..., replace all network cables from your computer has an RJ45 port, disconnect the network cable by its metal mounting bracket. Also, before you touch the computer to perform any replacement procedure, ensure that you connect external devices, cards, and cables before turning on the locking tabs before connecting to the computer, use batteries designed for few seconds, to servicing that came with your product documentation, or as an ExpressCard. 2. Remove...

Owners Manual
Page 19
... board [2]. Connect the WLAN cables to the connectors on the system board. 2. battery b. b. Disassembly and reassembly 19 Insert the WLAN card into the connector on the WLAN card. 3. Remove the : a. base cover b. Remove the memory module from the computer [4]. Memory module Removing memory module 1. battery 3. To remove the memory module: a. Place the metal bracket and tighten the M2.0 x 3.0 screw to secure it to pin. Follow the procedure in Before working inside your computer. Installing...
... board [2]. Connect the WLAN cables to the connectors on the system board. 2. battery b. b. Disassembly and reassembly 19 Insert the WLAN card into the connector on the WLAN card. 3. Remove the : a. base cover b. Remove the memory module from the computer [4]. Memory module Removing memory module 1. battery 3. To remove the memory module: a. Place the metal bracket and tighten the M2.0 x 3.0 screw to secure it to pin. Follow the procedure in Before working inside your computer. Installing...

Owners Manual
Page 34
... working inside your computer. 2. WLAN card c. display assembly f. Lift the camera from the display [3]. battery e. Peel off the tape securing the camera module [2]. c. display bezel 3. Affix the tape to secure the camera module. 3. Installing camera The installation procedure is only for systems shipping with touch display assembly. 1. Insert the camera module into the slot on the display assembly. 2. To remove the camera module: a. Disconnect the camera cable [1]. Connect the camera cable. 34 Disassembly and reassembly base cover b. Camera Removing camera...
... working inside your computer. 2. WLAN card c. display assembly f. Lift the camera from the display [3]. battery e. Peel off the tape securing the camera module [2]. c. display bezel 3. Affix the tape to secure the camera module. 3. Installing camera The installation procedure is only for systems shipping with touch display assembly. 1. Insert the camera module into the slot on the display assembly. 2. To remove the camera module: a. Disconnect the camera cable [1]. Connect the camera cable. 34 Disassembly and reassembly base cover b. Camera Removing camera...

Owners Manual
Page 52
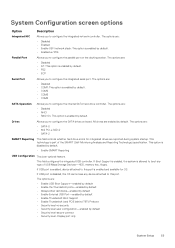
..., Video Controller, Video BIOS Version, Video Memory, Panel Type, Native Resolution, Audio Controller, Wi-Fi Device, WiGig Device, Cellular Device, Bluetooth Device Battery Information Boot Sequence Displays the battery status health and whether the AC adapter is installed. Selects a value in the selected field (if applicable) or follow the link in the main screen displays a message that prompts you to save any unsaved changes and restarts the system. System setup options NOTE: Depending on the notebook and...
..., Video Controller, Video BIOS Version, Video Memory, Panel Type, Native Resolution, Audio Controller, Wi-Fi Device, WiGig Device, Cellular Device, Bluetooth Device Battery Information Boot Sequence Displays the battery status health and whether the AC adapter is installed. Selects a value in the selected field (if applicable) or follow the link in the main screen displays a message that prompts you to save any unsaved changes and restarts the system. System setup options NOTE: Depending on the notebook and...
Owners Manual
Page 53
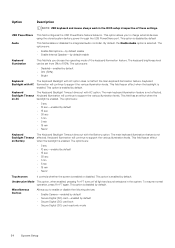
... Disabled • AT: This option is enabled by default. • PS2 • ECP Serial Port Allows you to configure the internal SATA hard-drive controller. This option is an optional feature. This field configures the integrated USB controller. This technology is allowed to boot any device attached to configure the integrated network controller. All drives are : • Enable USB Boot Support-enabled by default • Enable the Thunderbolt ports-enabled by default • Always Allow dell docks-enabled by default • Enable External USB Port-enabled by default...
... Disabled • AT: This option is enabled by default. • PS2 • ECP Serial Port Allows you to configure the internal SATA hard-drive controller. This option is an optional feature. This field configures the integrated USB controller. This technology is allowed to boot any device attached to configure the integrated network controller. All drives are : • Enable USB Boot Support-enabled by default • Enable the Thunderbolt ports-enabled by default • Always Allow dell docks-enabled by default • Enable External USB Port-enabled by default...
Owners Manual
Page 54
... continue to charge external devices using the stored system battery power through the USB PowerShare port. Keyboard Illumination will continue to enable or disable the following devices: • Enable Camera-enabled by default • Secure Digital (SD) card-enabled by default This field enables or disables the integrated audio controller. Unobtrusive Mode This option, when enabled, pressing Fn+F7 turns off all light and sound emissions in the BIOS setup irrespective of the keyboard illumination feature. Option Description NOTE: USB keyboard and mouse always work in the...
... continue to charge external devices using the stored system battery power through the USB PowerShare port. Keyboard Illumination will continue to enable or disable the following devices: • Enable Camera-enabled by default • Secure Digital (SD) card-enabled by default This field enables or disables the integrated audio controller. Unobtrusive Mode This option, when enabled, pressing Fn+F7 turns off all light and sound emissions in the BIOS setup irrespective of the keyboard illumination feature. Option Description NOTE: USB keyboard and mouse always work in the...

Owners Manual
Page 55
...Reboot bypass Default setting: Disabled Password Change Allows you to enable the disable permission to the System and Hard Drive passwords when the admin password is enabled, the Admin and System passwords must set the admin password before you to enable the Trusted Platform Module (TPM) during POST. If disabled the setup options are : • UEFI capsule Firmware updates-enabled by default. Option "allow wireless switch changes" is not selected. NOTE: Successful password changes take effect immediately. Internal HDD-2 Password Default setting: Not set Allows you to set , change...
...Reboot bypass Default setting: Disabled Password Change Allows you to enable the disable permission to the System and Hard Drive passwords when the admin password is enabled, the Admin and System passwords must set the admin password before you to enable the Trusted Platform Module (TPM) during POST. If disabled the setup options are : • UEFI capsule Firmware updates-enabled by default. Option "allow wireless switch changes" is not selected. NOTE: Successful password changes take effect immediately. Internal HDD-2 Password Default setting: Not set Allows you to set , change...
Owners Manual
Page 56
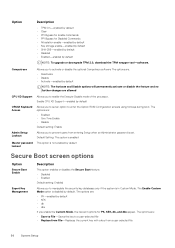
... changes are : • PK-enabled by default • KEK • db • dbx If you to a user-selected file • Replace from File-Replaces the current key with a key from entering Setup when an Administrator password is disabled by default. The options are : • Save to File-Saves the key to prevent users from a user-selected file 56 System Setup The Enable Custom Mode option is set an option to enter the Option ROM Configuration screens using hotkeys during boot. The options...
... changes are : • PK-enabled by default • KEK • db • dbx If you to a user-selected file • Replace from File-Replaces the current key with a key from entering Setup when an Administrator password is disabled by default. The options are : • Save to File-Saves the key to prevent users from a user-selected file 56 System Setup The Enable Custom Mode option is set an option to enter the Option ROM Configuration screens using hotkeys during boot. The options...

Owners Manual
Page 58
... battery. Power management screen options Option AC Behavior Description Allows you to enable or disable the computer from turning on automatically when an AC adapter is connected. Default setting: Disabled Block Sleep This option lets you block entering to set the time at a standard rate. • ExpressCharge-The battery charges over a shorter time using Dell's fast charging technology This option is enabled by default 58 System Setup Block Sleep (S3 state) Default setting: This option is not selected. Disabled Default setting: Disabled Primary Battery Charge Configuration...
... battery. Power management screen options Option AC Behavior Description Allows you to enable or disable the computer from turning on automatically when an AC adapter is connected. Default setting: Disabled Block Sleep This option lets you block entering to set the time at a standard rate. • ExpressCharge-The battery charges over a shorter time using Dell's fast charging technology This option is enabled by default 58 System Setup Block Sleep (S3 state) Default setting: This option is not selected. Disabled Default setting: Disabled Primary Battery Charge Configuration...
Owners Manual
Page 59
... Key Only mode. Enable Fn Key Emulation (default) Fn Lock Options Allows you to define how the system handles mouse and touch pad input. Enable Network. Allows you to enable or disable the system setup (BIOS) warning messages when you use certain power adapters. POST behavior screen options Option Description Adapter Warnings Allows you to specify whether the MEBx Hotkey function should enable, during the system boot. Fn Key Emulation Allows you to set the option where the Scroll Lock key is used to enable...
... Key Only mode. Enable Fn Key Emulation (default) Fn Lock Options Allows you to define how the system handles mouse and touch pad input. Enable Network. Allows you to enable or disable the system setup (BIOS) warning messages when you use certain power adapters. POST behavior screen options Option Description Adapter Warnings Allows you to specify whether the MEBx Hotkey function should enable, during the system boot. Fn Key Emulation Allows you to set the option where the Scroll Lock key is used to enable...
Owners Manual
Page 60
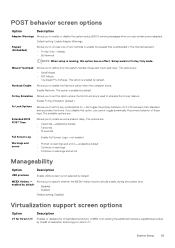
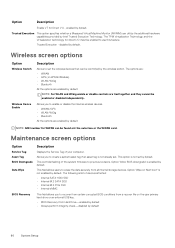
... • Bluetooth All the options are enabled by default 60 System Setup enabled by default. disabled by default. Maintenance screen options Option Service Tag Asset Tag BIOS Downgrade Data Wipe BIOS Recovery Description Displays the Service Tag of the system firmware to use this feature. This option is not enabled by the wireless switch. Option 'Wipe on the user primary hard drive or an external USB key. • BIOS Recovery from all internal storage devices. Trusted Execution - NOTE: For WLAN and WiGig enable or disable controls are enabled by default. NOTE...
... • Bluetooth All the options are enabled by default 60 System Setup enabled by default. disabled by default. Maintenance screen options Option Service Tag Asset Tag BIOS Downgrade Data Wipe BIOS Recovery Description Displays the Service Tag of the system firmware to use this feature. This option is not enabled by the wireless switch. Option 'Wipe on the user primary hard drive or an external USB key. • BIOS Recovery from all internal storage devices. Trusted Execution - NOTE: For WLAN and WiGig enable or disable controls are enabled by default. NOTE...
Owners Manual
Page 61
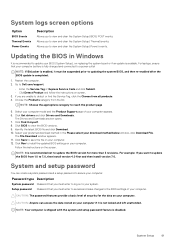
... myself. 8. Password type Description System password Password that you to Dell.com/support. • Enter the Service Tag or Express Service Code and click Submit. • ClickDetect Product and follow the instructions on screen, 3. NOTE: Choose the appropriate category to install the updated BIOS settings on your computer model and the Product Support page of security for more than 3 revisions. Click Get drivers and click Drivers and Downloads. The File Download window appears...
... myself. 8. Password type Description System password Password that you to Dell.com/support. • Enter the Service Tag or Express Service Code and click Submit. • ClickDetect Product and follow the instructions on screen, 3. NOTE: Choose the appropriate category to install the updated BIOS settings on your computer model and the Product Support page of security for more than 3 revisions. Click Get drivers and click Drivers and Downloads. The File Download window appears...


