
Owners Manual
Page 3
...and Installing Components 9 System Overview...9 Recommended Tools...10 Removing the SD Card...10 Installing the SD Card...11 Removing the Battery...11 Installing the Battery...11 Removing the Access Panel...11 Installing the Access Panel...12 Removing the Memory Module...12 Installing the Memory Module...12 ...the Input/Output (I/O) Board...21 Removing the System Board...21 Installing the System Board...22 Removing the Coin-Cell Battery...23 Installing the Coin-Cell Battery...23 Removing the Heatsink...24 Installing the Heatsink...24 Removing the System Fan...25 Installing the System Fan...25 ...
...and Installing Components 9 System Overview...9 Recommended Tools...10 Removing the SD Card...10 Installing the SD Card...11 Removing the Battery...11 Installing the Battery...11 Removing the Access Panel...11 Installing the Access Panel...12 Removing the Memory Module...12 Installing the Memory Module...12 ...the Input/Output (I/O) Board...21 Removing the System Board...21 Installing the System Board...22 Removing the Coin-Cell Battery...23 Installing the Coin-Cell Battery...23 Removing the Heatsink...24 Installing the Heatsink...24 Removing the System Fan...25 Installing the System Fan...25 ...
Owners Manual
Page 4
... Deleting or Changing an Existing System and/or Setup Password 44 4 Troubleshooting...47 Enhanced Pre-Boot System Assessment (ePSA) Diagnostics 47 Device Status Lights...47 Battery Status Lights...48 Beep Codes...48 LED Error Codes...48 5 Specifications...51 6 Contacting...
... Deleting or Changing an Existing System and/or Setup Password 44 4 Troubleshooting...47 Enhanced Pre-Boot System Assessment (ePSA) Diagnostics 47 Device Status Lights...47 Battery Status Lights...48 Beep Codes...48 LED Error Codes...48 5 Specifications...51 6 Contacting...
Owners Manual
Page 5
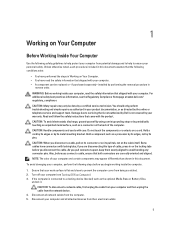
... of the computer. CAUTION: To disconnect a network cable, first unplug the cable from your computer (see the Regulatory Compliance Homepage at www.dell.com/ regulatory_compliance CAUTION: Many repairs may appear differently than shown in this type of cable, press in Working on Your Computer. • ...a component such as a processor by its edges, not by periodically touching an unpainted metal surface, such as the optional Media Base or Battery Slice, undock it. Some cables have read the safety information that came with care. 1 Working on Your Computer Before Working Inside Your ...
... of the computer. CAUTION: To disconnect a network cable, first unplug the cable from your computer (see the Regulatory Compliance Homepage at www.dell.com/ regulatory_compliance CAUTION: Many repairs may appear differently than shown in this type of cable, press in Working on Your Computer. • ...a component such as a processor by its edges, not by periodically touching an unpainted metal surface, such as the optional Media Base or Battery Slice, undock it. Some cables have read the safety information that came with care. 1 Working on Your Computer Before Working Inside Your ...
Owners Manual
Page 6
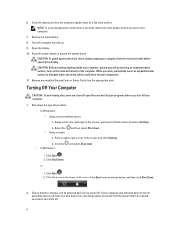
Select the * Using a mouse: and then select Shut down . 1. b. Click Start . 2. Remove the main battery. 8. CAUTION: Before touching anything inside your operating system, press and hold the power button for about 6 seconds to dissipate static electricity, which... could harm internal components. 11. Click the - Click Start . 2. or 1. NOTE: To avoid damaging the system board, you must remove the main battery before you shut down your computer, ground yourself by touching an unpainted metal surface, such as shown below, and then click Shut Down . 2. Turning Off...
Select the * Using a mouse: and then select Shut down . 1. b. Click Start . 2. Remove the main battery. 8. CAUTION: Before touching anything inside your operating system, press and hold the power button for about 6 seconds to dissipate static electricity, which... could harm internal components. 11. Click the - Click Start . 2. or 1. NOTE: To avoid damaging the system board, you must remove the main battery before you shut down your computer, ground yourself by touching an unpainted metal surface, such as shown below, and then click Shut Down . 2. Turning Off...
Owners Manual
Page 7
...any telephone or network cables to your computer and all attached devices to the computer, use batteries designed for this particular Dell computer. Connect any external devices, such as a port replicator, battery slice, or media base, and replace any cards, such as an ExpressCard. 2. CAUTION...network device and then plug it into the computer. 3. Connect your computer. Do not use only the battery designed for other Dell computers. 1. Replace the battery. 4. After Working Inside Your Computer After you complete any replacement procedure, ensure you connect any external ...
...any telephone or network cables to your computer and all attached devices to the computer, use batteries designed for this particular Dell computer. Connect any external devices, such as a port replicator, battery slice, or media base, and replace any cards, such as an ExpressCard. 2. CAUTION...network device and then plug it into the computer. 3. Connect your computer. Do not use only the battery designed for other Dell computers. 1. Replace the battery. 4. After Working Inside Your Computer After you complete any replacement procedure, ensure you connect any external ...

Owners Manual
Page 9
battery bay 9 System Overview 1. memory module(s) 2. hard drive 4. optical drive 5. SD card slot 3. 2 Removing and Installing Components This section provides detailed information on how to remove or install the components from your computer.
battery bay 9 System Overview 1. memory module(s) 2. hard drive 4. optical drive 5. SD card slot 3. 2 Removing and Installing Components This section provides detailed information on how to remove or install the components from your computer.
Owners Manual
Page 11
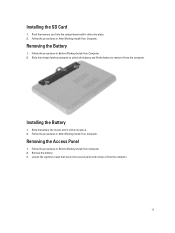
... Follow the procedures in Before Working Inside Your Computer. 2. Removing the Battery 1. Slide the release latches outwards to unlock the battery and lift the battery to remove it clicks into place. 2. Slide the battery into its slot until it from the computer. 11 Follow the procedures in... After Working Inside Your Computer. Removing the Access Panel 1. Installing the SD Card 1. Installing the Battery 1. Push the memory card into the compartment until it from the computer. Follow the procedures in After Working Inside Your Computer. ...
... Follow the procedures in Before Working Inside Your Computer. 2. Removing the Battery 1. Slide the release latches outwards to unlock the battery and lift the battery to remove it clicks into place. 2. Slide the battery into its slot until it from the computer. 11 Follow the procedures in... After Working Inside Your Computer. Removing the Access Panel 1. Installing the SD Card 1. Installing the Battery 1. Push the memory card into the compartment until it from the computer. Follow the procedures in After Working Inside Your Computer. ...

Owners Manual
Page 12
... to the computer. 3. Remove the memory module from the memory module until it clicks into the memory socket and press until it pops up. Remove: a) battery b) SD card c) access panel 3. Removing the Memory Module 1. Install: a) access panel b) SD card...
... to the computer. 3. Remove the memory module from the memory module until it clicks into the memory socket and press until it pops up. Remove: a) battery b) SD card c) access panel 3. Removing the Memory Module 1. Install: a) access panel b) SD card...

Owners Manual
Page 13
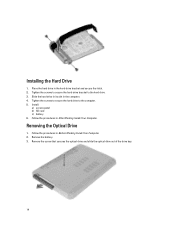
Follow the procedures in Before Working Inside Your Computer. 2. Remove the screws that secure the hard-drive bracket. Slide the hard drive to the computer. 4. Remove the screws that secure the hard drive to release it from its connector. Lift the tab to remove the hard-drive bracket from the computer. 5. Removing the Hard Drive 1. Remove: a) battery b) SD card c) access panel 3. Lift the latch to remove the hard drive from the hard drive. 13 3. Follow the procedures in After Working Inside Your Computer.
Follow the procedures in Before Working Inside Your Computer. 2. Remove the screws that secure the hard-drive bracket. Slide the hard drive to the computer. 4. Remove the screws that secure the hard drive to release it from its connector. Lift the tab to remove the hard-drive bracket from the computer. 5. Removing the Hard Drive 1. Remove: a) battery b) SD card c) access panel 3. Lift the latch to remove the hard drive from the hard drive. 13 3. Follow the procedures in After Working Inside Your Computer.
Owners Manual
Page 14
... in Before Working Inside Your Computer. 2. Follow the procedures in After Working Inside Your Computer. Install: a) access panel b) SD card c) battery 6. Place the hard drive in the computer. 4. Remove the battery. 3. Installing the Hard Drive 1. Tighten the screws to secure the hard drive to the hard drive. 3. Remove the screw that secures...
... in Before Working Inside Your Computer. 2. Follow the procedures in After Working Inside Your Computer. Install: a) access panel b) SD card c) battery 6. Place the hard drive in the computer. 4. Remove the battery. 3. Installing the Hard Drive 1. Tighten the screws to secure the hard drive to the hard drive. 3. Remove the screw that secures...

Owners Manual
Page 15
Remove the optical-drive bracket from the optical drive. Install the battery. 6. Follow the procedures in Before Working Inside Your Computer. 2. Remove the battery. 3. Tighten the screws to secure the optical-drive bracket to the computer. 5. Follow the procedures in After Working Inside Your Computer. Tighten the screw to ...
Remove the optical-drive bracket from the optical drive. Install the battery. 6. Follow the procedures in Before Working Inside Your Computer. 2. Remove the battery. 3. Tighten the screws to secure the optical-drive bracket to the computer. 5. Follow the procedures in After Working Inside Your Computer. Tighten the screw to ...
Owners Manual
Page 17
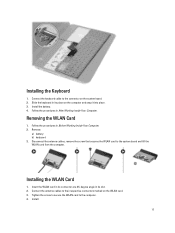
Slide the keyboard in its place on the WLAN card. 3. Follow the procedures in Before Working Inside Your Computer. 2. Remove: a) battery b) keyboard 3. Connect the antenna cables to the system board and lift the WLAN card from the computer. Install: 17 Installing the... 1. Connect the keyboard cable to the computer. 4. Removing the WLAN Card 1. Follow the procedures in After Working Inside Your Computer. Install the battery. 4. Tighten the screw to secure the WLAN card to the connector on the system board. 2. Installing the WLAN Card 1. Disconnect the antenna cables...
Slide the keyboard in its place on the WLAN card. 3. Follow the procedures in Before Working Inside Your Computer. 2. Remove: a) battery b) keyboard 3. Connect the antenna cables to the system board and lift the WLAN card from the computer. Install: 17 Installing the... 1. Connect the keyboard cable to the computer. 4. Removing the WLAN Card 1. Follow the procedures in After Working Inside Your Computer. Install the battery. 4. Tighten the screw to secure the WLAN card to the connector on the system board. 2. Installing the WLAN Card 1. Disconnect the antenna cables...
Owners Manual
Page 18
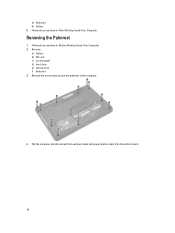
Follow the procedures in After Working Inside Your Computer. Removing the Palmrest 1. Remove: a) battery b) SD card c) access panel d) hard drive e) optical-drive f) keyboard 3. Flip the computer and disconnect the touchpad cable and power-button cable from the system board. 18 a) keyboard b) battery 5. Follow the procedures in Before Working Inside Your Computer. 2. Remove the screws that secure the palmrest to the computer. 4.
Follow the procedures in After Working Inside Your Computer. Removing the Palmrest 1. Remove: a) battery b) SD card c) access panel d) hard drive e) optical-drive f) keyboard 3. Flip the computer and disconnect the touchpad cable and power-button cable from the system board. 18 a) keyboard b) battery 5. Follow the procedures in Before Working Inside Your Computer. 2. Remove the screws that secure the palmrest to the computer. 4.

Owners Manual
Page 20
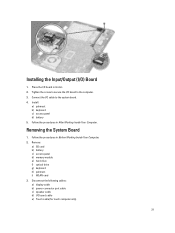
...secure the palmrest to the computer. 5. Install: a) keyboard b) optical drive c) hard drive d) access panel e) SD card f) battery 6. Remove the screw that secures the I/O board to the system board. 3. Flip the computer and tighten the screws to secure the... Your Computer. Installing the Palmrest 1. Connect the touchpad cable and the power-button cables to the computer and lift the I /O) Board 1. Remove: a) battery b) access panel c) keyboard d) palmrest 3. Removing the Input/Output (I /O board from the system board. Follow the procedures in Before Working Inside Your Computer...
...secure the palmrest to the computer. 5. Install: a) keyboard b) optical drive c) hard drive d) access panel e) SD card f) battery 6. Remove the screw that secures the I/O board to the system board. 3. Flip the computer and tighten the screws to secure the... Your Computer. Installing the Palmrest 1. Connect the touchpad cable and the power-button cables to the computer and lift the I /O) Board 1. Remove: a) battery b) access panel c) keyboard d) palmrest 3. Removing the Input/Output (I /O board from the system board. Follow the procedures in Before Working Inside Your Computer...
Owners Manual
Page 21
... 3. Place the I /O board to the system board. 4. Disconnect the following cables: a) display cable b) power-connector port cable c) speaker cable d) I /O) Board 1. Install: a) palmrest b) keyboard c) access panel d) battery 5. Follow the procedures in its slot. 2. Tighten the screw to secure the I /O board in After Working Inside Your Computer. Installing the Input/Output (I /O board cable...
... 3. Place the I /O board to the system board. 4. Disconnect the following cables: a) display cable b) power-connector port cable c) speaker cable d) I /O) Board 1. Install: a) palmrest b) keyboard c) access panel d) battery 5. Follow the procedures in its slot. 2. Tighten the screw to secure the I /O board in After Working Inside Your Computer. Installing the Input/Output (I /O board cable...

Owners Manual
Page 23
... drive g) memory module h) access panel i) battery 3. Follow the procedures in Before Working Inside Your Computer. 2. Installing the Coin-Cell Battery 1. Follow the procedures in After Working Inside Your Computer. 23 Place the coin-cell battery in After Working Inside Your Computer. Flip the... system board and place it on a flat surface. 4. Remove: a) battery b) access panel c) memory module d) hard drive e) optical drive f) keyboard g)...
... drive g) memory module h) access panel i) battery 3. Follow the procedures in Before Working Inside Your Computer. 2. Installing the Coin-Cell Battery 1. Follow the procedures in After Working Inside Your Computer. 23 Place the coin-cell battery in After Working Inside Your Computer. Flip the... system board and place it on a flat surface. 4. Remove: a) battery b) access panel c) memory module d) hard drive e) optical drive f) keyboard g)...

Owners Manual
Page 24
... Inside Your Computer. 2. Install: a) system board b) palmrest c) keyboard d) optical drive e) hard drive f) memory module g) WLAN card h) access panel i) SD card j) battery 24 Remove the screws that secure the heatsink to the system board. 3. Tighten the screws to secure the heatsink to the system board. Installing the... from the system board. Flip the system board and place it on the system board. 2. Removing the Heatsink 1. Remove: a) SD card b) battery c) access panel d) memory module e) hard drive f) optical drive g) keyboard h) palmrest i) WLAN card j) system board 3.
... Inside Your Computer. 2. Install: a) system board b) palmrest c) keyboard d) optical drive e) hard drive f) memory module g) WLAN card h) access panel i) SD card j) battery 24 Remove the screws that secure the heatsink to the system board. 3. Tighten the screws to secure the heatsink to the system board. Installing the... from the system board. Flip the system board and place it on the system board. 2. Removing the Heatsink 1. Remove: a) SD card b) battery c) access panel d) memory module e) hard drive f) optical drive g) keyboard h) palmrest i) WLAN card j) system board 3.

Owners Manual
Page 25
... the system board. Installing the System Fan 1. Connect the system-fan cable to the system board. 4. c) Lift the system fan from the system board. Remove: a) battery b) access panel c) memory module d) hard drive e) optical drive f) keyboard g) palmrest h) WLAN card i) system board 3. Follow the procedures in its place on the system board. 2. Follow...
... the system board. Installing the System Fan 1. Connect the system-fan cable to the system board. 4. c) Lift the system fan from the system board. Remove: a) battery b) access panel c) memory module d) hard drive e) optical drive f) keyboard g) palmrest h) WLAN card i) system board 3. Follow the procedures in its place on the system board. 2. Follow...

Owners Manual
Page 26
Follow the procedures in Before Working Inside Your Computer. 2. Follow the procedures in After Working Inside Your Computer. Peel the tape that secures the LED silicon tubes to the computer. Lift and remove the LED silicon tubes from their routing channel. 26 Unroute the speaker cables from the computer. 4. Removing the Speakers 1. Remove: a) battery b) SD card c) access panel d) memory module e) hard drive f) optical drive g) keyboard h) palmrest i) WLAN card j) system board 3. h) access panel i) battery 5.
Follow the procedures in Before Working Inside Your Computer. 2. Follow the procedures in After Working Inside Your Computer. Peel the tape that secures the LED silicon tubes to the computer. Lift and remove the LED silicon tubes from their routing channel. 26 Unroute the speaker cables from the computer. 4. Removing the Speakers 1. Remove: a) battery b) SD card c) access panel d) memory module e) hard drive f) optical drive g) keyboard h) palmrest i) WLAN card j) system board 3. h) access panel i) battery 5.

Owners Manual
Page 27
...: For the Touch system, the display assembly is a single component and should not be further dismantled. 1. Place the LED silicon tubes on the computer. 3. Remove: a) battery b) access panel c) memory module d) hard drive e) optical drive f) keyboard g) palmrest 27 Install: a) system board b) WLAN card c) palmrest d) keyboard e) optical drive f) hard drive g) memory module h) access...
...: For the Touch system, the display assembly is a single component and should not be further dismantled. 1. Place the LED silicon tubes on the computer. 3. Remove: a) battery b) access panel c) memory module d) hard drive e) optical drive f) keyboard g) palmrest 27 Install: a) system board b) WLAN card c) palmrest d) keyboard e) optical drive f) hard drive g) memory module h) access...

