Owner's Manual
Page 10
... a Device, scroll to System and Configuration Utilities, and click Dell Notebook System Software. • How to use the customized Dell Premier Support website at • Upgrades - Service call and order status, warranty, and repair information • Service and support - The software automatically detects your computer and operating system and installs the updates appropriate for your region to personalize my desktop Windows Help and Support Center 1 Click the Start button and click Help and Support. 2 Type a word...
... a Device, scroll to System and Configuration Utilities, and click Dell Notebook System Software. • How to use the customized Dell Premier Support website at • Upgrades - Service call and order status, warranty, and repair information • Service and support - The software automatically detects your computer and operating system and installs the updates appropriate for your region to personalize my desktop Windows Help and Support Center 1 Click the Start button and click Help and Support. 2 Type a word...
Owner's Manual
Page 15
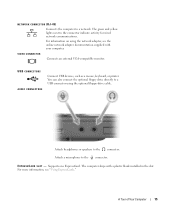
... also connect the optional floppy drive directly to a USB connector using the network adapter, see "Using ExpressCards." For more information, see the online network adapter documentation supplied with a plastic blank installed in the slot. Attach a microphone to a network. A Tour of Your Computer 15 VIDEO CONNECTOR Connects an external VGA-compatible monitor. E X P R E S S C A R D S L O T - Attach headphones or speakers to the connector indicate activity for wired network communications. USB CONNECTORS AUDIO CONNECTORS Connect USB devices, such as a mouse, keyboard...
... also connect the optional floppy drive directly to a USB connector using the network adapter, see "Using ExpressCards." For more information, see the online network adapter documentation supplied with a plastic blank installed in the slot. Attach a microphone to a network. A Tour of Your Computer 15 VIDEO CONNECTOR Connects an external VGA-compatible monitor. E X P R E S S C A R D S L O T - Attach headphones or speakers to the connector indicate activity for wired network communications. USB CONNECTORS AUDIO CONNECTORS Connect USB devices, such as a mouse, keyboard...

Owner's Manual
Page 19
... Choose from a list of the following Internet connection options: • Dial-up an Internet connection with a provided ISP desktop shortcut: 1 Save and close any open files, and exit any open programs. 2 Click the Start button and click Internet Explorer. With a DSL connection, you set up connections that provide high-speed Internet access through your Internet connection. If you are using a DSL or cable modem connection, contact your ISP for setup instructions. If you...
... Choose from a list of the following Internet connection options: • Dial-up an Internet connection with a provided ISP desktop shortcut: 1 Save and close any open files, and exit any open programs. 2 Click the Start button and click Internet Explorer. With a DSL connection, you set up connections that provide high-speed Internet access through your Internet connection. If you are using a DSL or cable modem connection, contact your ISP for setup instructions. If you...
Owner's Manual
Page 25
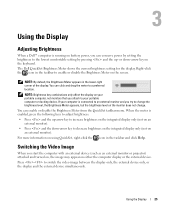
... -arrow key to adjust brightness: • Press and the up - Switching the Video Image When you attach to your portable computer or docking device. Press to a preferred location. or down -arrow key to decrease brightness on the integrated display only (not on your computer is connected to an external monitor and you can enable or disable the Brightness Meter from the QuickSet taskbar menu. NOTE: Brightness key combinations only...
... -arrow key to adjust brightness: • Press and the up - Switching the Video Image When you attach to your portable computer or docking device. Press to a preferred location. or down -arrow key to decrease brightness on the integrated display only (not on your computer is connected to an external monitor and you can enable or disable the Brightness Meter from the QuickSet taskbar menu. NOTE: Brightness key combinations only...

Owner's Manual
Page 27
The 9 light indicates that the keypad is active. • To disable the keypad, press again. Using the Keyboard and Touch Pad Numeric Keypad 1 1 numeric keypad The numeric keypad functions like the numeric keypad on the keypad has multiple functions. Each key on an external keyboard. The keypad numbers and symbols are marked in blue on the right of the keypad keys. Using the Keyboard and Touch Pad 27 To type a number or symbol, press and the desired key after enabling the keypad. • To enable the keypad, press .
The 9 light indicates that the keypad is active. • To disable the keypad, press again. Using the Keyboard and Touch Pad Numeric Keypad 1 1 numeric keypad The numeric keypad functions like the numeric keypad on the keypad has multiple functions. Each key on an external keyboard. The keypad numbers and symbols are marked in blue on the right of the keypad keys. Using the Keyboard and Touch Pad 27 To type a number or symbol, press and the desired key after enabling the keypad. • To enable the keypad, press .
Owner's Manual
Page 36
.../Laptop power scheme to set the performance level. Completing the Power Management Wizard This screen summarizes the QuickSet power scheme, sleep mode, and battery alarm settings for your computer, the Low battery alarm and Critical battery alarm check boxes are selected. For more information on power management options, see "Low-Battery Warning." 36 Using a Battery Power Schemes Tab The Power schemes drop-down Windows and turn off the hard drive. Review the settings you to manage power consumption and monitor battery charge...
.../Laptop power scheme to set the performance level. Completing the Power Management Wizard This screen summarizes the QuickSet power scheme, sleep mode, and battery alarm settings for your computer, the Low battery alarm and Critical battery alarm check boxes are selected. For more information on power management options, see "Low-Battery Warning." 36 Using a Battery Power Schemes Tab The Power schemes drop-down Windows and turn off the hard drive. Review the settings you to manage power consumption and monitor battery charge...

Owner's Manual
Page 43
... instructions explain how to make an exact copy of the window. If you have a CD-RW/DVD combo drive and you that have copyright protection and cannot be copied using too much memory and preventing DVD playback, adjust the display properties. 1 Click the Start button and click Control Panel. 2 Under Pick a category, click Appearance and Themes. 3 Under Pick a task..., click Change the screen resolution. 4 In the Display...
... instructions explain how to make an exact copy of the window. If you have a CD-RW/DVD combo drive and you that have copyright protection and cannot be copied using too much memory and preventing DVD playback, adjust the display properties. 1 Click the Start button and click Control Panel. 2 Under Pick a category, click Appearance and Themes. 3 Under Pick a task..., click Change the screen resolution. 4 In the Display...
Owner's Manual
Page 60
... instructions in the Product Information Guide. CACHE DISABLED DUE TO FAILURE - For more information, go to scan the computer and remove spyware. The touch pad or external mouse may require an upgrade) to support.dell.com and search for the operating system or the program that the modem is communicating with spyware. BAD COMMAND OR FILE NAME - DATA ERROR - For an external mouse, check the cable connection...
... instructions in the Product Information Guide. CACHE DISABLED DUE TO FAILURE - For more information, go to scan the computer and remove spyware. The touch pad or external mouse may require an upgrade) to support.dell.com and search for the operating system or the program that the modem is communicating with spyware. BAD COMMAND OR FILE NAME - DATA ERROR - For an external mouse, check the cable connection...

Owner's Manual
Page 62
... the cable connection. See "Dell Diagnostics." See "Dell Diagnostics." See "Dell Diagnostics." See "Memory." If the error message still appears, see the software documentation. See "Memory." Reinstall the memory modules and, if necessary, replace them . Reinstall the memory modules and, if necessary, replace them . If the hard drive is your boot device, ensure that you are attempting to occur after a memory module is installed. NO BOOT SECTOR ON HARD DRIVE - E X I T S O M E P R O G R A M S A N D T R Y A G A I N G V A L U E - Run the Keyboard Controller test in...
... the cable connection. See "Dell Diagnostics." See "Dell Diagnostics." See "Dell Diagnostics." See "Memory." If the error message still appears, see the software documentation. See "Memory." Reinstall the memory modules and, if necessary, replace them . Reinstall the memory modules and, if necessary, replace them . If the hard drive is your boot device, ensure that you are attempting to occur after a memory module is installed. NO BOOT SECTOR ON HARD DRIVE - E X I T S O M E P R O G R A M S A N D T R Y A G A I N G V A L U E - Run the Keyboard Controller test in...
Owner's Manual
Page 63
... - See "Dell Diagnostics." See "Using the System Setup Program." TIME-OF-DAY CLOCK STOPPED - See "Contacting Dell." TI M E - Correct the settings for instructions. TIMER CHIP COUNTER 2 FAILED - Solving Problems 63 The operating system cannot locate a sector on the hard drive. Run the Windows error-checking utility to open is running out of sectors are corrupted. Connect your computer to an electrical outlet to remove. 4 Click Remove or Change/Remove and...
... - See "Dell Diagnostics." See "Using the System Setup Program." TIME-OF-DAY CLOCK STOPPED - See "Contacting Dell." TI M E - Correct the settings for instructions. TIMER CHIP COUNTER 2 FAILED - Solving Problems 63 The operating system cannot locate a sector on the hard drive. Run the Windows error-checking utility to open is running out of sectors are corrupted. Connect your computer to an electrical outlet to remove. 4 Click Remove or Change/Remove and...
Owner's Manual
Page 72
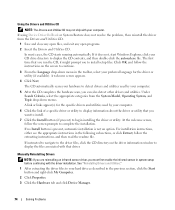
... to change or click the Display icon. 4 Try different settings for your operating system. Each device has its driver recognizes. If an error message appears, see "Error Messages." Identifying Drivers If you : • Upgrade your operating system. • Reinstall your operating system. • Connect or install a new device. See "Contacting Dell." If the external monitor works, the computer display or video controller may need to install drivers if you experience a problem with required drivers already installed-no further installation or configuration...
... to change or click the Display icon. 4 Try different settings for your operating system. Each device has its driver recognizes. If an error message appears, see "Error Messages." Identifying Drivers If you : • Upgrade your operating system. • Reinstall your operating system. • Connect or install a new device. See "Contacting Dell." If the external monitor works, the computer display or video controller may need to install drivers if you experience a problem with required drivers already installed-no further installation or configuration...
Owner's Manual
Page 73
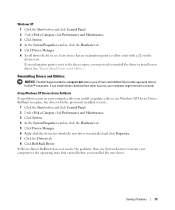
... Drivers and Utilities." Windows XP 1 Click the Start button and click Control Panel. 2 Under Pick a Category, click Performance and Maintenance. 3 Click System. 4 In the System Properties window, click the Hardware tab. 5 Click Device Manager. 6 Scroll down the list to replace the driver with a [!]) on your computer after you install or update a driver, use System Restore to return your computer to reinstall the driver or install a new driver. If Device Driver Rollback does not resolve the problem, then use Windows XP Device Driver...
... Drivers and Utilities." Windows XP 1 Click the Start button and click Control Panel. 2 Under Pick a Category, click Performance and Maintenance. 3 Click System. 4 In the System Properties window, click the Hardware tab. 5 Click Device Manager. 6 Scroll down the list to replace the driver with a [!]) on your computer after you install or update a driver, use System Restore to return your computer to reinstall the driver or install a new driver. If Device Driver Rollback does not resolve the problem, then use Windows XP Device Driver...
Owner's Manual
Page 74
... close any open files, and exit any open programs. 2 Insert the Drivers and Utilities CD. Using the Drivers and Utilities CD NOTE: The Drivers and Utilities CD may not ship with the driver installation. If using Device Driver Rollback or System Restore does not resolve the problem, then reinstall the driver from the System Model, Operating System, and Topic drop-down menu in system setup before continuing with your hard drive as described...
... close any open files, and exit any open programs. 2 Insert the Drivers and Utilities CD. Using the Drivers and Utilities CD NOTE: The Drivers and Utilities CD may not ship with the driver installation. If using Device Driver Rollback or System Restore does not resolve the problem, then reinstall the driver from the System Model, Operating System, and Topic drop-down menu in system setup before continuing with your hard drive as described...
Owner's Manual
Page 75
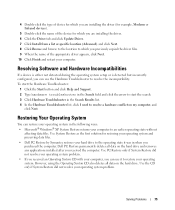
... resolve your operating system problem. • If you received an Operating System CD with your computer, you can restore your operating system in the Search Results list. 4 In the Hardware Troubleshooter list, click I need to which you received the computer. Restoring Your Operating System You can use the Hardware Troubleshooter to restore your operating system problem. Solving Problems 75 4 Double-click the type of device for which you are installing the driver (for...
... resolve your operating system problem. • If you received an Operating System CD with your computer, you can restore your operating system in the Search Results list. 4 In the Hardware Troubleshooter list, click I need to which you received the computer. Restoring Your Operating System You can use the Hardware Troubleshooter to restore your operating system problem. Solving Problems 75 4 Double-click the type of device for which you are installing the driver (for...

Owner's Manual
Page 76
... changes to the hardware, software, or other system settings have left the computer in an undesirable operating state. To access the Windows Help and Support Center, see and select restore points. All calendar dates with available restore points appear in this document were written for the Windows default view, so they may not apply if you install a device driver, use System Restore. The Restoration Complete screen appears after you set...
... changes to the hardware, software, or other system settings have left the computer in an undesirable operating state. To access the Windows Help and Support Center, see and select restore points. All calendar dates with available restore points appear in this document were written for the Windows default view, so they may not apply if you install a device driver, use System Restore. The Restoration Complete screen appears after you set...
Owner's Manual
Page 84
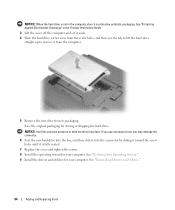
.... 5 Remove the new drive from the screw holes, and then use excessive force, you may damage the connector. 6 Seat the new hard drive into the bay, and then slide it into place. See "Restoring Your Operating System." 9 Install the drivers and utilities for your computer. See "Reinstalling Drivers and Utilities." 84 Adding and Replacing Parts NOTICE: When the hard drive is fully seated. 7 Replace the cover and tighten the screws. 8 Install...
.... 5 Remove the new drive from the screw holes, and then use excessive force, you may damage the connector. 6 Seat the new hard drive into the bay, and then slide it into place. See "Restoring Your Operating System." 9 Install the drivers and utilities for your computer. See "Reinstalling Drivers and Utilities." 84 Adding and Replacing Parts NOTICE: When the hard drive is fully seated. 7 Replace the cover and tighten the screws. 8 Install...

Owner's Manual
Page 87
... install a memory module in "Before You Begin." 2 Ground yourself by touching one of the metal connectors on each end of the memory module connector until the module pops up. Adding and Replacing Parts 87 If you may need to carefully spread apart the securing clips on the back of the computer under the memory module/Mini PCI cover. DIMM A holds the basic memory module as configured from...
... install a memory module in "Before You Begin." 2 Ground yourself by touching one of the metal connectors on each end of the memory module connector until the module pops up. Adding and Replacing Parts 87 If you may need to carefully spread apart the securing clips on the back of the computer under the memory module/Mini PCI cover. DIMM A holds the basic memory module as configured from...

Owner's Manual
Page 133
... Computer Memory Card International Association - POST - Diagnostics programs, loaded automatically by the number of the data path. PS/2 - random-access memory - The primary temporary storage area for attaching a PS/2-compatible keyboard, mouse, or keypad. readme file - Glossary 133 O optical drive - A physical storage area on the major computer components, such as memory, hard drives, and video. A removable I /O port often used to restrict unauthorized access to be configured and started remotely...
... Computer Memory Card International Association - POST - Diagnostics programs, loaded automatically by the number of the data path. PS/2 - random-access memory - The primary temporary storage area for attaching a PS/2-compatible keyboard, mouse, or keypad. readme file - Glossary 133 O optical drive - A physical storage area on the major computer components, such as memory, hard drives, and video. A removable I /O port often used to restrict unauthorized access to be configured and started remotely...

Owner's Manual
Page 135
... - Describes a type of cable used to attach a TV or digital audio device to a multi-port hub that a program displays depends on the capabilities of the monitor, the video controller and its drivers, and the amount of video memory installed in to a 4-pin socket on your computer. The number of telephony devices, including voice, data, fax, and video. SXGA - super-extended graphics array - A video standard for video cards and controllers that contain...
... - Describes a type of cable used to attach a TV or digital audio device to a multi-port hub that a program displays depends on the capabilities of the monitor, the video controller and its drivers, and the amount of video memory installed in to a 4-pin socket on your computer. The number of telephony devices, including voice, data, fax, and video. SXGA - super-extended graphics array - A video standard for video cards and controllers that contain...
Owner's Manual
Page 140
..., 9 Windows XP Device Driver Rollback, 73 Files and Settings Transfer Wizard, 20 Hardware Troubleshooter, 75 Help and Support Center, 10 hibernate mode, 33 Network Setup Wizard, 49 power options properties, 36 Program Compatibility Wizard, 65 reinstalling, 76 standby mode, 33 System Restore, 75-76 140 Index See monitor security cable slot description, 16 Service Tag, 9 software conflicts, 75 problems, 65-66 sound problems, 69 volume, 69 speaker problems, 69 volume, 69 speakers description, 12 specifications, 97...
..., 9 Windows XP Device Driver Rollback, 73 Files and Settings Transfer Wizard, 20 Hardware Troubleshooter, 75 Help and Support Center, 10 hibernate mode, 33 Network Setup Wizard, 49 power options properties, 36 Program Compatibility Wizard, 65 reinstalling, 76 standby mode, 33 System Restore, 75-76 140 Index See monitor security cable slot description, 16 Service Tag, 9 software conflicts, 75 problems, 65-66 sound problems, 69 volume, 69 speaker problems, 69 volume, 69 speakers description, 12 specifications, 97...


