
Owners Manual
Page 4
... Internet Connection Problems 35 Transferring Information to a New Computer 36 Setting Up a Printer 38 Printer Cable 38 Connecting a Parallel Printer 38 Connecting a USB Printer 39 Printer Problems 40 Setting Up the Docking Device to Connect to a Network . . . . 41 Power Protection Devices 41 Surge Protectors 41 Line Conditioners 42 Uninterruptible Power Supplies 42 Turning Off Your Computer 42 3 Using Batteries and Module Bay Devices Using a Battery 44 Battery Performance 44 Checking the Battery Charge 45 Charging the Battery 47 Removing a Battery 47 Installing a Battery...
... Internet Connection Problems 35 Transferring Information to a New Computer 36 Setting Up a Printer 38 Printer Cable 38 Connecting a Parallel Printer 38 Connecting a USB Printer 39 Printer Problems 40 Setting Up the Docking Device to Connect to a Network . . . . 41 Power Protection Devices 41 Surge Protectors 41 Line Conditioners 42 Uninterruptible Power Supplies 42 Turning Off Your Computer 42 3 Using Batteries and Module Bay Devices Using a Battery 44 Battery Performance 44 Checking the Battery Charge 45 Charging the Battery 47 Removing a Battery 47 Installing a Battery...
Owners Manual
Page 15
If you have a charged battery available in case you connect a cable make sure both connectors are asked to turn off the computer, remove any connector pins. NOTICE: When taking the computer from low-temperature conditions into a cooler environment, allow sufficient time for work, place it on ...computer, battery, and hard drive from environmental hazards such as a memory module by its edges, not its strain-relief loop, not on the cable itself. When Using Your Computer Observe the following safe-handling guidelines to prevent damage to your computer: • When setting up the...
If you have a charged battery available in case you connect a cable make sure both connectors are asked to turn off the computer, remove any connector pins. NOTICE: When taking the computer from low-temperature conditions into a cooler environment, allow sufficient time for work, place it on ...computer, battery, and hard drive from environmental hazards such as a memory module by its edges, not its strain-relief loop, not on the cable itself. When Using Your Computer Observe the following safe-handling guidelines to prevent damage to your computer: • When setting up the...
Owners Manual
Page 16
... prolonged keyboard use may result in the sequence indicated. www.dell.com | support.dell.com When Using Your Computer (continued) • Clean the display with a soft, clean cloth and water. NOTICE: The only time you should ever access the inside of the display to help file when setting up and using your computer and turn off the computer before disconnecting a device or removing a memory module, Mini PCI card...
... prolonged keyboard use may result in the sequence indicated. www.dell.com | support.dell.com When Using Your Computer (continued) • Clean the display with a soft, clean cloth and water. NOTICE: The only time you should ever access the inside of the display to help file when setting up and using your computer and turn off the computer before disconnecting a device or removing a memory module, Mini PCI card...
Owners Manual
Page 33
2 SECTION 2 Setting Up Your Computer Connecting to the Internet Modem and Internet Connection Problems Transferring Information to a New Computer Setting Up a Printer Printer Problems Setting Up the Docking Device to Connect to a Network Power Protection Devices Turning Off Your Computer
2 SECTION 2 Setting Up Your Computer Connecting to the Internet Modem and Internet Connection Problems Transferring Information to a New Computer Setting Up a Printer Printer Problems Setting Up the Docking Device to Connect to a Network Power Protection Devices Turning Off Your Computer
Owners Manual
Page 38
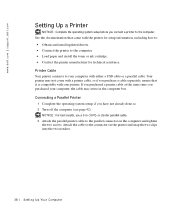
...for setup information, including how to: • Obtain and install updated drivers. • Connect the printer to the computer. www.dell.com | support.dell.com Setting Up a Printer NOTICE: Complete the operating system setup before you have not already done so. 2 Turn off... the computer (see page 42). Your printer may arrive in the computer box. If you purchased a printer cable at the same time you purchase a cable separately, ensure that came with the printer for technical assistance. See the documentation that it is compatible with either a USB cable or a parallel cable...
...for setup information, including how to: • Obtain and install updated drivers. • Connect the printer to the computer. www.dell.com | support.dell.com Setting Up a Printer NOTICE: Complete the operating system setup before you have not already done so. 2 Turn off... the computer (see page 42). Your printer may arrive in the computer box. If you purchased a printer cable at the same time you purchase a cable separately, ensure that came with the printer for technical assistance. See the documentation that it is compatible with either a USB cable or a parallel cable...
Owners Manual
Page 97
... the Start button and click Control Panel. 2 Click Appearance and Themes. 3 Click the area you want to the computer. 2 Turn on . Scanner Problems C H E C K T H E P O W E R C A B L E C O N N E C T I O N - Ensure that the scanner cable is turned on the computer and the monitor, and adjust the monitor brightness and contrast controls. C H E C K T H E S C A N N E R C A B L E C O N N E C T I O N - See the scanner documentation for Color quality and Screen resolution. S E E " E R R O R M E S S A G E S " - If an error message appears, see page 139). If the external monitor works...
... the Start button and click Control Panel. 2 Click Appearance and Themes. 3 Click the area you want to the computer. 2 Turn on . Scanner Problems C H E C K T H E P O W E R C A B L E C O N N E C T I O N - Ensure that the scanner cable is turned on the computer and the monitor, and adjust the monitor brightness and contrast controls. C H E C K T H E S C A N N E R C A B L E C O N N E C T I O N - See the scanner documentation for Color quality and Screen resolution. S E E " E R R O R M E S S A G E S " - If an error message appears, see page 139). If the external monitor works...
Owners Manual
Page 101
... device and any attached external devices, and disconnect them in a safe place to dry. 7 Remove the hard drive (see page 125). 8 Remove the memory module(s) (see page 114). 9 Open the display and place the computer right-side up across two books or similar props to dry. 5 Remove the battery. 6 Wipe off any installed PC Cards, and put them from their power sources and then from the electrical outlet. Use...
... device and any attached external devices, and disconnect them in a safe place to dry. 7 Remove the hard drive (see page 125). 8 Remove the memory module(s) (see page 114). 9 Open the display and place the computer right-side up across two books or similar props to dry. 5 Remove the battery. 6 Wipe off any installed PC Cards, and put them from their power sources and then from the electrical outlet. Use...
Owners Manual
Page 103
..., update the driver. 1 Click the Start button and click Control Panel. 2 Under Pick a Category, click Performance and Maintenance. 3 Click System. 4 In the System Properties window, click the Hardware tab. 5 Click Device Manager. So l vi n g Pro b l em s 103 C O NT A C T DE L L - If you are not on your Microsoft® Windows® operating system. A driver is the source of your operating system. • Connect or install a new device. Ensure that controls a device such as the keyboard driver...
..., update the driver. 1 Click the Start button and click Control Panel. 2 Under Pick a Category, click Performance and Maintenance. 3 Click System. 4 In the System Properties window, click the Hardware tab. 5 Click Device Manager. So l vi n g Pro b l em s 103 C O NT A C T DE L L - If you are not on your Microsoft® Windows® operating system. A driver is the source of your operating system. • Connect or install a new device. Ensure that controls a device such as the keyboard driver...
Owners Manual
Page 104
... the problem, then use Windows XP Device Driver Rollback to display the CD contents, and then 104 So l vi n g Pro b l em s In most cases, the CD starts running automatically. www.dell.com | support.dell.com 6 Scroll down the list to see if any device has an exclamation point (a yellow circle with the previously installed version. 1 Click the Start button and click Control Panel. 2 Under Pick a Category, click Performance and Maintenance...
... the problem, then use Windows XP Device Driver Rollback to display the CD contents, and then 104 So l vi n g Pro b l em s In most cases, the CD starts running automatically. www.dell.com | support.dell.com 6 Scroll down the list to see if any device has an exclamation point (a yellow circle with the previously installed version. 1 Click the Start button and click Control Panel. 2 Under Pick a Category, click Performance and Maintenance...
Owners Manual
Page 106
www.dell.com | support.dell.com 7 Click the Driver tab and click Update Driver. 8 Click Install from a list or specific location (Advanced) and click Next. 9 Click Browse and browse to the location to which you want to restore your computer. System Restore does not monitor your data files. Creating a Restore Point 1 Click the Start button and click Help and Support. 2 Click System Restore. 3 Follow the instructions on using System Restore. The Select a Restore Point screen provides...
www.dell.com | support.dell.com 7 Click the Driver tab and click Update Driver. 8 Click Install from a list or specific location (Advanced) and click Next. 9 Click Browse and browse to the location to which you want to restore your computer. System Restore does not monitor your data files. Creating a Restore Point 1 Click the Start button and click Help and Support. 2 Click System Restore. 3 Follow the instructions on using System Restore. The Select a Restore Point screen provides...
Owners Manual
Page 124
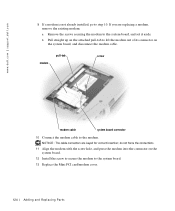
NOTICE: The cable connectors are replacing a modem, remove the existing modem: a Remove the screws securing the modem to the system board. 13 Replace the Mini PCI card/modem cover. 124 Adding and Replacing Pa rts www.dell.com | support.dell.com 9 If a modem is not already installed, go to the modem. b Pull straight up...of its connector on the system board. 12 Install the screw to secure the modem to the system board, and set it aside. modem pull-tab screw modem cable system board connector 10 Connect the modem cable to step 10. do not force the connections. 11 Align the modem with...
NOTICE: The cable connectors are replacing a modem, remove the existing modem: a Remove the screws securing the modem to the system board. 13 Replace the Mini PCI card/modem cover. 124 Adding and Replacing Pa rts www.dell.com | support.dell.com 9 If a modem is not already installed, go to the modem. b Pull straight up...of its connector on the system board. 12 Install the screw to secure the modem to the system board, and set it aside. modem pull-tab screw modem cable system board connector 10 Connect the modem cable to step 10. do not force the connections. 11 Align the modem with...
Owners Manual
Page 135
... the Windows logo appears, continue to write down your computer work incorrectly. You can use the system setup program as follows: • To set up ) configuration and docking-device configuration settings • Basic device configuration settings • System security and hard-drive password settings NOTICE: Unless you cannot change (because they are determined by Dell technical support, do so by the computer) appear less bright. To the right of system memory...
... the Windows logo appears, continue to write down your computer work incorrectly. You can use the system setup program as follows: • To set up ) configuration and docking-device configuration settings • Basic device configuration settings • System security and hard-drive password settings NOTICE: Unless you cannot change (because they are determined by Dell technical support, do so by the computer) appear less bright. To the right of system memory...
Owners Manual
Page 146
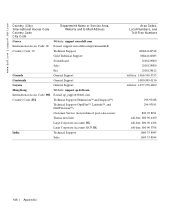
... Support Guyana General Support Hong Kong Website: support.ap.dell.com International Access Code: 001 E-mail: ap_support@dell.com Country Code: 852 Technical Support (Dimension™ and Inspiron™) Technical Support (OptiPlex™, Latitude™, and Dell Precision™) Customer Service (non-technical, post-sales issues) Transaction Sales Large Corporate Accounts HK Large Corporate Accounts GCP HK India Technical Support Sales Area Codes, Local Numbers, and Toll-Free Numbers...
... Support Guyana General Support Hong Kong Website: support.ap.dell.com International Access Code: 001 E-mail: ap_support@dell.com Country Code: 852 Technical Support (Dimension™ and Inspiron™) Technical Support (OptiPlex™, Latitude™, and Dell Precision™) Customer Service (non-technical, post-sales issues) Transaction Sales Large Corporate Accounts HK Large Corporate Accounts GCP HK India Technical Support Sales Area Codes, Local Numbers, and Toll-Free Numbers...
Owners Manual
Page 147
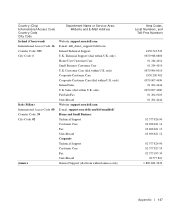
... Appendix 147 Country (City) International Access Code Country Code City Code Ireland (Cherrywood) International Access Code: 16 Country Code: 353 City Code: 1 Italy (Milan) International Access Code: 00 Country Code: 39 City Code: 02 Jamaica Department Name or Service Area, Website and E-Mail Address Website: support.euro.dell.com E-mail: dell_direct_support@dell.com Ireland Technical Support U.K. only) Fax/SalesFax Switchboard Website: support.euro.dell.com E-mail: support.euro.dell.com/it/it/emaildell/ Home...
... Appendix 147 Country (City) International Access Code Country Code City Code Ireland (Cherrywood) International Access Code: 16 Country Code: 353 City Code: 1 Italy (Milan) International Access Code: 00 Country Code: 39 City Code: 02 Jamaica Department Name or Service Area, Website and E-Mail Address Website: support.euro.dell.com E-mail: dell_direct_support@dell.com Ireland Technical Support U.K. only) Fax/SalesFax Switchboard Website: support.euro.dell.com E-mail: support.euro.dell.com/it/it/emaildell/ Home...
Owners Manual
Page 148
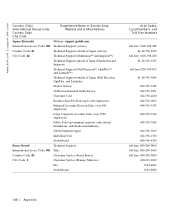
... (Kawasaki) Website: support.jp.dell.com International Access Code: 001 Technical Support (servers) Country Code: 81 Technical Support outside of Japan (servers) City Code: 44 Technical Support (Dimension™ and Inspiron™) Technical Support outside of Japan (Dimension and Inspiron) Technical Support (Dell Precision™, OptiPlex™, and Latitude™) Technical Support outside of Japan (Dell Precision, OptiPlex, and Latitude) Faxbox Service 24-Hour Automated Order Service Customer Care Business...
... (Kawasaki) Website: support.jp.dell.com International Access Code: 001 Technical Support (servers) Country Code: 81 Technical Support outside of Japan (servers) City Code: 44 Technical Support (Dimension™ and Inspiron™) Technical Support outside of Japan (Dimension and Inspiron) Technical Support (Dell Precision™, OptiPlex™, and Latitude™) Technical Support outside of Japan (Dell Precision, OptiPlex, and Latitude) Faxbox Service 24-Hour Automated Order Service Customer Care Business...
Owners Manual
Page 150
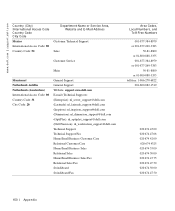
www.dell.com | support.dell.com Country (City) International Access Code Country Code City Code Mexico International Access Code: 00 Country Code: 52 Department Name or Service Area, Website and E-Mail Address Customer Technical Support Sales Customer Service Main Montserrat Netherlands Antilles Netherlands (Amsterdam) International Access Code: 00 Country Code: 31 City Code: 20 General Support General Support Website: support.euro.dell.com E-mail (Technical Support): (Enterprise): nl_server_support@dell.com (Latitude): nl_latitude_support@dell.com (Inspiron): nl_inspiron_support@dell....
www.dell.com | support.dell.com Country (City) International Access Code Country Code City Code Mexico International Access Code: 00 Country Code: 52 Department Name or Service Area, Website and E-Mail Address Customer Technical Support Sales Customer Service Main Montserrat Netherlands Antilles Netherlands (Amsterdam) International Access Code: 00 Country Code: 31 City Code: 20 General Support General Support Website: support.euro.dell.com E-mail (Technical Support): (Enterprise): nl_server_support@dell.com (Latitude): nl_latitude_support@dell.com (Inspiron): nl_inspiron_support@dell....

Owners Manual
Page 159
... EXPIRED. Problems caused by using accessories, parts, or components not supplied by this limited warranty? DELL'S RESPONSIBILITY FOR MALFUNCTIONS AND DEFECTS IN HARDWARE IS LIMITED TO REPAIR AND REPLACEMENT AS SET FORTH IN THIS WARRANTY STATEMENT. Appendix 159 What is covered by Dell • Products with missing or altered Service Tags or serial numbers • Products for which warranty came with product instructions - Servicing not...
... EXPIRED. Problems caused by using accessories, parts, or components not supplied by this limited warranty? DELL'S RESPONSIBILITY FOR MALFUNCTIONS AND DEFECTS IN HARDWARE IS LIMITED TO REPAIR AND REPLACEMENT AS SET FORTH IN THIS WARRANTY STATEMENT. Appendix 159 What is covered by Dell • Products with missing or altered Service Tags or serial numbers • Products for which warranty came with product instructions - Servicing not...
Owners Manual
Page 163
... Dell-branded batteries lasts only 1 year and the limited warranty on your purchase). Problems caused by using accessories, parts, or components not supplied by Dell - THIS IS THE MAXIMUM AMOUNT FOR WHICH WE ARE RESPONSIBLE. Servicing not authorized by Dell • Products with electrical power - Appendix 163 DELL'S RESPONSIBILITY FOR MALFUNCTIONS AND DEFECTS IN PRODUCT IS LIMITED TO REPAIR AND REPLACEMENT AS SET...
... Dell-branded batteries lasts only 1 year and the limited warranty on your purchase). Problems caused by using accessories, parts, or components not supplied by Dell - THIS IS THE MAXIMUM AMOUNT FOR WHICH WE ARE RESPONSIBLE. Servicing not authorized by Dell • Products with electrical power - Appendix 163 DELL'S RESPONSIBILITY FOR MALFUNCTIONS AND DEFECTS IN PRODUCT IS LIMITED TO REPAIR AND REPLACEMENT AS SET...
Owners Manual
Page 167
... claims are made will, at Dell's option, be repaired or replaced at the time of malfunction, including peripherals and software used. The end user must always supply proof of purchase, indicating name and address of the seller, date of purchase, model and serial number, name and address of the customer, and details of symptoms and configuration at Dell's expense. Eldorado do Brasil Ltda...
... claims are made will, at Dell's option, be repaired or replaced at the time of malfunction, including peripherals and software used. The end user must always supply proof of purchase, indicating name and address of the seller, date of purchase, model and serial number, name and address of the customer, and details of symptoms and configuration at Dell's expense. Eldorado do Brasil Ltda...
Owners Manual
Page 169
...warranty does not cover any costs relating to external causes, including accident, problems with electrical power, usage not in accordance with its instructions, or you depending on the nature of the problem.] The replacement processor is ...option, will be prepared to Intel's publicly available specifications for purchasers in materials and workmanship and will substantially conform to provide: (1) your system's motherboard. Please be free from Intel, you should call Intel at its family of Pentium® and Celeron® processors, if properly used and installed, will be free...
...warranty does not cover any costs relating to external causes, including accident, problems with electrical power, usage not in accordance with its instructions, or you depending on the nature of the problem.] The replacement processor is ...option, will be prepared to Intel's publicly available specifications for purchasers in materials and workmanship and will substantially conform to provide: (1) your system's motherboard. Please be free from Intel, you should call Intel at its family of Pentium® and Celeron® processors, if properly used and installed, will be free...


