Comprehensive Specifications
Page 1
... a 64-bit operating system. Processor Information Types • Intel® Celeron® • Intel Pentium® Dual Core • Intel Core™2 Duo • Intel Core2 Quad Memory Connectors Memory-module capacities Memory type Memory configurations possible Computer Information System chipset RAID support four internally-accessible DDR3 DIMM sockets 1 GB and 2 GB 1066-MHz DDR3 DIMM; NOTE: Offerings may need when setting up, updating drivers for, and upgrading your computer.
... a 64-bit operating system. Processor Information Types • Intel® Celeron® • Intel Pentium® Dual Core • Intel Core™2 Duo • Intel Core2 Quad Memory Connectors Memory-module capacities Memory type Memory configurations possible Computer Information System chipset RAID support four internally-accessible DDR3 DIMM sockets 1 GB and 2 GB 1066-MHz DDR3 DIMM; NOTE: Offerings may need when setting up, updating drivers for, and upgrading your computer.
Service Manual
Page 1
Dell™ Inspiron™ 560s Service Manual Before You Begin Technical Overview Computer Cover Support Bracket Front Bezel Memory Module(s) PCI and PCI Express Cards Drives Fans Front I/O Panel Processor System Board Power Supply Battery System Setup Notes, Cautions, and Warnings NOTE: A NOTE indicates important information that helps you make better use of Dell Inc.; Trademarks used in this text: Dell, the DELL logo, and Inspiron are trademarks of your computer. is a registered trademark of data if instructions are either...
Dell™ Inspiron™ 560s Service Manual Before You Begin Technical Overview Computer Cover Support Bracket Front Bezel Memory Module(s) PCI and PCI Express Cards Drives Fans Front I/O Panel Processor System Board Power Supply Battery System Setup Notes, Cautions, and Warnings NOTE: A NOTE indicates important information that helps you make better use of Dell Inc.; Trademarks used in this text: Dell, the DELL logo, and Inspiron are trademarks of your computer. is a registered trademark of data if instructions are either...
Service Manual
Page 4
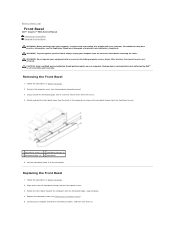
... covers, bezels, filler brackets, front-panel inserts, etc.) removed. Follow the procedures in a secure location. Set the front bezel aside in Before You Begin. 2. Replace the computer cover (see the Regulatory Compliance Homepage at a time to release them on your computer. Back to Contents Page Front Bezel Dell™ Inspiron™ 560s Service Manual Removing the Front Bezel Replacing the Front Bezel WARNING: Before working inside...
... covers, bezels, filler brackets, front-panel inserts, etc.) removed. Follow the procedures in a secure location. Set the front bezel aside in Before You Begin. 2. Replace the computer cover (see the Regulatory Compliance Homepage at a time to release them on your computer. Back to Contents Page Front Bezel Dell™ Inspiron™ 560s Service Manual Removing the Front Bezel Replacing the Front Bezel WARNING: Before working inside...
Service Manual
Page 8
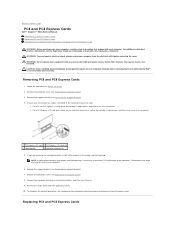
... computer from the operating system. 10. Replace the support bracket (see Configuring Your Computer After Removing or Installing a PCI or PCI Express Card. Damage due to electrical outlets, and then turn them on your equipment with your computer. Back to Contents Page PCI and PCI Express Cards Dell™ Inspiron™ 560s Service Manual Removing PCI and PCI Express Cards Replacing PCI and PCI Express Cards Configuring Your Computer After Removing or Installing a PCI or PCI Express Card WARNING: Before working inside your computer...
... computer from the operating system. 10. Replace the support bracket (see Configuring Your Computer After Removing or Installing a PCI or PCI Express Card. Damage due to electrical outlets, and then turn them on your equipment with your computer. Back to Contents Page PCI and PCI Express Cards Dell™ Inspiron™ 560s Service Manual Removing PCI and PCI Express Cards Replacing PCI and PCI Express Cards Configuring Your Computer After Removing or Installing a PCI or PCI Express Card WARNING: Before working inside your computer...

Service Manual
Page 10
... Audio Controller and then change the setting to the network card's connector. 1. Back to the computer's back panel connectors. Connect the external audio devices to the integrated network connector. Enter system setup (see Entering System Setup). 2. Connect the network cable to the sound card's connectors. 1. Enter system setup (see Entering System Setup). 2. Sound Card Installed Removed 1. Network Card 1. For information on location of external connectors, see the documentation that shipped with the card. Connect the network cable to Enabled. 3. Configuring...
... Audio Controller and then change the setting to the network card's connector. 1. Back to the computer's back panel connectors. Connect the external audio devices to the integrated network connector. Enter system setup (see Entering System Setup). 2. Connect the network cable to the sound card's connectors. 1. Enter system setup (see Entering System Setup). 2. Sound Card Installed Removed 1. Network Card 1. For information on location of external connectors, see the documentation that shipped with the card. Connect the network cable to Enabled. 3. Configuring...

Service Manual
Page 11
... computer cover (see System Board Components). WARNING: A new battery can restore the correct settings after the new battery has been installed. 2. CAUTION: If you pry the battery out of its socket with a blunt object, be careful not to touch the system board with the same or equivalent type recommended by the manufacturer. Back to Contents Page Battery Dell™ Inspiron™ 560s Service Manual Removing the Battery Replacing the Battery WARNING: Before working inside...
... computer cover (see System Board Components). WARNING: A new battery can restore the correct settings after the new battery has been installed. 2. CAUTION: If you pry the battery out of its socket with a blunt object, be careful not to touch the system board with the same or equivalent type recommended by the manufacturer. Back to Contents Page Battery Dell™ Inspiron™ 560s Service Manual Removing the Battery Replacing the Battery WARNING: Before working inside...

Service Manual
Page 15
... the new processor, reuse the original heat sink assembly when you are familiar with any objects to remove it from the tab that secures it. 5. Damage due to Contents Page Processor Dell™ Inspiron™ 560s Service Manual Removing the Processor Replacing the Processor WARNING: Before working inside the socket or allow any cover(s) (including computer covers, bezels, filler brackets, front-panel inserts, etc.) removed. For technical service information, see Removing the Processor Fan...
... the new processor, reuse the original heat sink assembly when you are familiar with any objects to remove it from the tab that secures it. 5. Damage due to Contents Page Processor Dell™ Inspiron™ 560s Service Manual Removing the Processor Replacing the Processor WARNING: Before working inside the socket or allow any cover(s) (including computer covers, bezels, filler brackets, front-panel inserts, etc.) removed. For technical service information, see Removing the Processor Fan...

Service Manual
Page 18
... perform repairs on the side of the data cable from the system board and set it aside. Hard Drive Removing the Hard Drive CAUTION: If you are replacing a hard drive that contains data that you want to Contents Page Drives Dell™ Inspiron™ 560s Service Manual Hard Drive Media Card Reader Optical Drive WARNING: Before working inside your computer, read the safety information that is not authorized by Dell™ is not covered by your warranty. Disconnect the power cable...
... perform repairs on the side of the data cable from the system board and set it aside. Hard Drive Removing the Hard Drive CAUTION: If you are replacing a hard drive that contains data that you want to Contents Page Drives Dell™ Inspiron™ 560s Service Manual Hard Drive Media Card Reader Optical Drive WARNING: Before working inside your computer, read the safety information that is not authorized by Dell™ is not covered by your warranty. Disconnect the power cable...

Service Manual
Page 19
... (see Replacing the Support Bracket). 9. 6. See the documentation that they are replacing an existing drive, remove the shoulder screws from the system board connector (see System Setup). Media Card Reader Removing the Media Card Reader 1. If removing the hard drive changes the drive configuration, ensure that it is configured for your computer and devices to electrical outlets, and then turn them to verify that you are properly connected and firmly seated. 8. Check the documentation for hard drive operation...
... (see Replacing the Support Bracket). 9. 6. See the documentation that they are replacing an existing drive, remove the shoulder screws from the system board connector (see System Setup). Media Card Reader Removing the Media Card Reader 1. If removing the hard drive changes the drive configuration, ensure that it is configured for your computer and devices to electrical outlets, and then turn them to verify that you are properly connected and firmly seated. 8. Check the documentation for hard drive operation...
Service Manual
Page 28
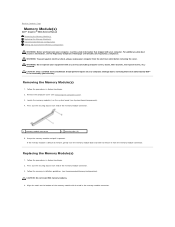
... to Contents Page Memory Module(s) Dell™ Inspiron™ 560s Service Manual Removing the Memory Module(s) Replacing the Memory Module(s) Recommended Memory Configuration Setting Up Dual-Channel Memory Configuration WARNING: Before working inside your computer, read the safety information that is not authorized by Dell™ is not covered by your computer from the memory-module connector. Follow the memory installation guidelines (see Removing the Computer Cover). 3. CAUTION: Only a certified service technician should perform repairs on the bottom...
... to Contents Page Memory Module(s) Dell™ Inspiron™ 560s Service Manual Removing the Memory Module(s) Replacing the Memory Module(s) Recommended Memory Configuration Setting Up Dual-Channel Memory Configuration WARNING: Before working inside your computer, read the safety information that is not authorized by Dell™ is not covered by your computer from the memory-module connector. Follow the memory installation guidelines (see Removing the Computer Cover). 3. CAUTION: Only a certified service technician should perform repairs on the bottom...
Service Manual
Page 33
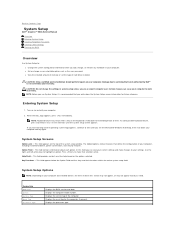
...-arrow keys to highlight an option. l View the installed amount of memory or set the type of your computer, including installed hardware, power conservation, and security features. Damage due to servicing that selection active. Entering System Setup 1. System Setup Screens Options List - Displays the service tag of the system setup window. This field contains information about each option. System Setup Options NOTE: Depending on the keyboard is not covered by your warranty. Displays the computer model number. Displays the...
...-arrow keys to highlight an option. l View the installed amount of memory or set the type of your computer, including installed hardware, power conservation, and security features. Damage due to servicing that selection active. Entering System Setup 1. System Setup Screens Options List - Displays the service tag of the system setup window. This field contains information about each option. System Setup Options NOTE: Depending on the keyboard is not covered by your warranty. Displays the computer model number. Displays the...

Service Manual
Page 34
...of installed memory. The items displayed are dynamically updated according to the SATA 3 connector. CD/DVD; Disabled (Hard Drive by default) l CPU XD Support - Network; CD/DVD; Network; Power On; Indicates the amount of processor Level 2 cache. SATA 1 Displays the SATA drives connected to the network devices detected. Enabled; Disabled (Disabled by default) 2nd Boot Device Removable Dev.; Disabled (Enabled by default) l USB Operation Mode - Disabled (Enabled by default) l Multi Core Support - Disabled (Enabled by default) Onboard LAN Boot ROM Enabled; Disabled...
...of installed memory. The items displayed are dynamically updated according to the SATA 3 connector. CD/DVD; Disabled (Hard Drive by default) l CPU XD Support - Network; CD/DVD; Network; Power On; Indicates the amount of processor Level 2 cache. SATA 1 Displays the SATA drives connected to the network devices detected. Enabled; Disabled (Disabled by default) 2nd Boot Device Removable Dev.; Disabled (Enabled by default) l USB Operation Mode - Disabled (Enabled by default) l Multi Core Support - Disabled (Enabled by default) Onboard LAN Boot ROM Enabled; Disabled...
Service Manual
Page 35
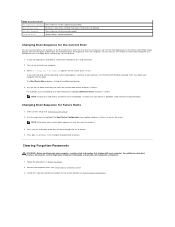
... Entering System Setup). 2. Turn on the Drivers and Utilities media, but you want to change the boot priority of devices. 4. Then shut down your computer to a USB device such as a floppy drive, memory key, or CD-RW drive. 1. Changing Boot Sequence for example, to tell the computer to boot from the hard drive when the diagnostic tests are booting to wait until you are complete. Remove the computer cover (see System Board Components). Locate the 3-pin password reset jumper on the screen...
... Entering System Setup). 2. Turn on the Drivers and Utilities media, but you want to change the boot priority of devices. 4. Then shut down your computer to a USB device such as a floppy drive, memory key, or CD-RW drive. 1. Changing Boot Sequence for example, to tell the computer to boot from the hard drive when the diagnostic tests are booting to wait until you are complete. Remove the computer cover (see System Board Components). Locate the 3-pin password reset jumper on the screen...
Setup Guide
Page 5
...Keyboard and Mouse 7 Connect the Display 8 Connect the Network Cable (Optional 10 Connect the Power Cable 11 Press the Power Button 12 Set Up Microsoft Windows 13 Create System Recovery Media (Recommended 13 Connect to the Internet (Optional 14 Using Your Inspiron Desktop 18 Front View Features 18 Back View Features 20 Back Panel Connectors 22 Software Features 24 Dell Dock 25 Dell DataSafe Online Backup 26 Solving Problems 27 Beep Codes 27 Network Problems 28 Power Problems 29 Memory Problems 31 Lockups and Software Problems 32 Using Support Tools 34 Dell Support Center...
...Keyboard and Mouse 7 Connect the Display 8 Connect the Network Cable (Optional 10 Connect the Power Cable 11 Press the Power Button 12 Set Up Microsoft Windows 13 Create System Recovery Media (Recommended 13 Connect to the Internet (Optional 14 Using Your Inspiron Desktop 18 Front View Features 18 Back View Features 20 Back Panel Connectors 22 Software Features 24 Dell Dock 25 Dell DataSafe Online Backup 26 Solving Problems 27 Beep Codes 27 Network Problems 28 Power Problems 29 Memory Problems 31 Lockups and Software Problems 32 Using Support Tools 34 Dell Support Center...
Setup Guide
Page 12
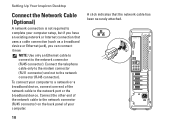
Setting Up Your Inspiron Desktop Connect the Network Cable (Optional) A network connection is not required to the network connector (RJ45 connector). Connect the telephone cable only to the modem connector (RJ11 connector) and not to complete your computer setup, but if you have an existing network or Internet connection that the network cable has been securely attached. 10 A click indicates that uses a cable connection (such as a broadband device or Ethernet jack), you can connect it now. Connect the other end...
Setting Up Your Inspiron Desktop Connect the Network Cable (Optional) A network connection is not required to the network connector (RJ45 connector). Connect the telephone cable only to the modem connector (RJ11 connector) and not to complete your computer setup, but if you have an existing network or Internet connection that the network cable has been securely attached. 10 A click indicates that uses a cable connection (such as a broadband device or Ethernet jack), you can connect it now. Connect the other end...
Setup Guide
Page 33
... the type of memory supported by your computer. If necessary, install additional memory (see the Service Manual at support.dell.com/manuals). • Reseat the memory module(s) into the connector(s) (see the Service Manual at support.dell.com/manuals). • Check if the memory module is compatible with your computer, see "Basic Specifications" on page 60. • Run the Dell Diagnostics (see "Dell Diagnostics" on page 38). • If the problem persists, contact Dell (see "Contacting Dell...
... the type of memory supported by your computer. If necessary, install additional memory (see the Service Manual at support.dell.com/manuals). • Reseat the memory module(s) into the connector(s) (see the Service Manual at support.dell.com/manuals). • Check if the memory module is compatible with your computer, see "Basic Specifications" on page 60. • Run the Dell Diagnostics (see "Dell Diagnostics" on page 38). • If the problem persists, contact Dell (see "Contacting Dell...

Setup Guide
Page 38
... Hard-disk drive failure - Hard-disk drive read failure - No bootable partition on the system board might be malfunctioning or there might be a system board failure. No timer tick interrupt - See the Service Manual at support.dell.com/manuals or contact Dell for assistance (see "Contacting Dell" on page 56). Replace keyboard or check the cable for loose connection. Possible system board failure or coin-cell battery low. See the Service Manual at support.dell.com/manuals. Using Support Tools CMOS checksum error - Battery needs replacement. CPU fan needs replacement...
... Hard-disk drive failure - Hard-disk drive read failure - No bootable partition on the system board might be malfunctioning or there might be a system board failure. No timer tick interrupt - See the Service Manual at support.dell.com/manuals or contact Dell for assistance (see "Contacting Dell" on page 56). Replace keyboard or check the cable for loose connection. Possible system board failure or coin-cell battery low. See the Service Manual at support.dell.com/manuals. Using Support Tools CMOS checksum error - Battery needs replacement. CPU fan needs replacement...
Setup Guide
Page 39
...). Click Start → Help and Support. 2. S.M.A.R.T error, possible hard drive failure. USB over current error - Dell recommends that you can use the Hardware Troubleshooter to connect the USB device, or if your data regularly. Using Support Tools Hardware Troubleshooter If a device is either not detected during the operating system setup or is detected but incorrectly configured, you back up your device has two USB cables, connect both of range may or may not indicate a potential hard drive problem - Use an external power source...
...). Click Start → Help and Support. 2. S.M.A.R.T error, possible hard drive failure. USB over current error - Dell recommends that you can use the Hardware Troubleshooter to connect the USB device, or if your data regularly. Using Support Tools Hardware Troubleshooter If a device is either not detected during the operating system setup or is detected but incorrectly configured, you back up your device has two USB cables, connect both of range may or may not indicate a potential hard drive problem - Use an external power source...
Setup Guide
Page 40
... hard drive or from the boot menu and press . Ensure that the device that you want to be working properly. 2. NOTE: The Drivers and Utilities disc is recommended that is located on a hidden diagnostic utility partition on Dell computers. Starting Dell Diagnostics From Your Hard Drive The Dell Diagnostics is known to test displays in "Lockups and Software Problems" on page 56). 1. NOTE: If your computer. 3. Turn on (or restart) your computer cannot display a screen image, contact Dell (see "Contacting Dell...
... hard drive or from the boot menu and press . Ensure that the device that you want to be working properly. 2. NOTE: The Drivers and Utilities disc is recommended that is located on a hidden diagnostic utility partition on Dell computers. Starting Dell Diagnostics From Your Hard Drive The Dell Diagnostics is known to test displays in "Lockups and Software Problems" on page 56). 1. NOTE: If your computer. 3. Turn on (or restart) your computer cannot display a screen image, contact Dell (see "Contacting Dell...
Setup Guide
Page 62
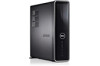
Computer Model Dell™ Inspiron™ 560s Processor Types Intel® Celeron® Intel Pentium® Dual Core Intel Core™2 Duo Intel Core2 Quad Drives Externally accessible Internally accessible one 5.25-inch bay for SATA DVD-ROM, SATA DVD+/RW Super Multi Drive, or Blu-ray Disc™ combo drive one 3.5-inch FlexBay two 3.5-inch bays for , and upgrading your computer. For more detailed specifications, see the Comprehensive Specifications at support.dell.com/manuals. For more...
Computer Model Dell™ Inspiron™ 560s Processor Types Intel® Celeron® Intel Pentium® Dual Core Intel Core™2 Duo Intel Core2 Quad Drives Externally accessible Internally accessible one 5.25-inch bay for SATA DVD-ROM, SATA DVD+/RW Super Multi Drive, or Blu-ray Disc™ combo drive one 3.5-inch FlexBay two 3.5-inch bays for , and upgrading your computer. For more detailed specifications, see the Comprehensive Specifications at support.dell.com/manuals. For more...


