Owner's Manual
Page 7
... Software and Hardware Incompatibilities 91 Restoring Your Operating System 92 Using Microsoft Windows System Restore . . . . 93 Using Dell PC Restore 95 Using the Operating System CD 98 4 Removing and Installing Parts 101 Before You Begin 101 Recommended Tools ... Inside View of Your Computer 106 System Board Components 107 Power Supply DC Connector Pin Assignments . . . . . 109 Memory 112 Memory Installation Guidelines 112 Installing Memory 113 Removing Memory 115 Cards 116 PCI and PCI Express Cards 116 Bezel 123 Removing the Bezel 123 Replacing the Bezel 124 Contents 7
... Software and Hardware Incompatibilities 91 Restoring Your Operating System 92 Using Microsoft Windows System Restore . . . . 93 Using Dell PC Restore 95 Using the Operating System CD 98 4 Removing and Installing Parts 101 Before You Begin 101 Recommended Tools ... Inside View of Your Computer 106 System Board Components 107 Power Supply DC Connector Pin Assignments . . . . . 109 Memory 112 Memory Installation Guidelines 112 Installing Memory 113 Removing Memory 115 Cards 116 PCI and PCI Express Cards 116 Bezel 123 Removing the Bezel 123 Replacing the Bezel 124 Contents 7
Owner's Manual
Page 8
... Drives 126 Installing a Second Hard Drive (Optional) . . . . . 129 Floppy Drive 131 Media Card Reader 137 CD or DVD Drive 141 Battery 144 Replacing the Battery 144 Power Supply 146 Replacing the Power Supply 146 Processor 148 Removing the Processor 148 Installing the Processor 150 I/O Panel 153 Removing the I/O Panel 153 Installing the I/O Panel 154 Processor Fan...
... Drives 126 Installing a Second Hard Drive (Optional) . . . . . 129 Floppy Drive 131 Media Card Reader 137 CD or DVD Drive 141 Battery 144 Replacing the Battery 144 Power Supply 146 Replacing the Power Supply 146 Processor 148 Removing the Processor 148 Installing the Processor 150 I/O Panel 153 Removing the I/O Panel 153 Installing the I/O Panel 154 Processor Fan...
Owner's Manual
Page 146
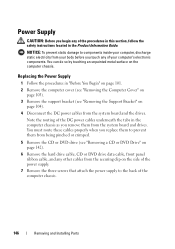
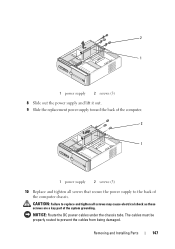
Replacing the Power Supply 1 Follow the procedures in "Before You Begin" on page 101. 2 Remove the computer ... cable, and any other cables from the securing clip on the side of the power supply. 7 Remove the three screws that attach the power supply to components inside your computer, discharge static electricity from the system board and the ...procedures in this section, follow the safety instructions located in the Product Information Guide. Power Supply CAUTION: Before you begin any of the DC power cables underneath the tabs in the computer chassis as you remove them from being pinched...
Replacing the Power Supply 1 Follow the procedures in "Before You Begin" on page 101. 2 Remove the computer ... cable, and any other cables from the securing clip on the side of the power supply. 7 Remove the three screws that attach the power supply to components inside your computer, discharge static electricity from the system board and the ...procedures in this section, follow the safety instructions located in the Product Information Guide. Power Supply CAUTION: Before you begin any of the DC power cables underneath the tabs in the computer chassis as you remove them from being pinched...
Owner's Manual
Page 147
The cables must be properly routed to the back of the system grounding. CAUTION: Failure to replace and tighten all screws that secure the power supply to prevent the cables from being damaged. NOTICE: Route the DC power cables under the chassis tabs. Removing and Installing Parts 147 2 1 1 power supply 2 screws (3) 8 Slide out the power supply and lift it out. 9 Slide the replacement power supply toward the back of the computer. 2 1 1 power supply 2 screws (3) 10 Replace and tighten all screws may cause electrical shock as these screws are a key part of the computer chassis.
The cables must be properly routed to the back of the system grounding. CAUTION: Failure to replace and tighten all screws that secure the power supply to prevent the cables from being damaged. NOTICE: Route the DC power cables under the chassis tabs. Removing and Installing Parts 147 2 1 1 power supply 2 screws (3) 8 Slide out the power supply and lift it out. 9 Slide the replacement power supply toward the back of the computer. 2 1 1 power supply 2 screws (3) 10 Replace and tighten all screws may cause electrical shock as these screws are a key part of the computer chassis.

Owner's Manual
Page 148
... the Computer Cover" on page 103). 3 Carefully disconnect and move any of the power supply. You can do so by running the Dell Diagnostics (see "Dell Diagnostics" on page 165). 11 Reconnect the DC power cables to the system board and drives. 12 Replace the CD or DVD drive (see "Installing a CD or DVD Drive" on...: To prevent static damage to components inside your computer and devices to an electrical outlet, and turn them on. 16 Verify that are secure. 14 Replace the computer cover (see "Replacing the Computer Cover" on page 84).
... the Computer Cover" on page 103). 3 Carefully disconnect and move any of the power supply. You can do so by running the Dell Diagnostics (see "Dell Diagnostics" on page 165). 11 Reconnect the DC power cables to the system board and drives. 12 Replace the CD or DVD drive (see "Installing a CD or DVD Drive" on...: To prevent static damage to components inside your computer and devices to an electrical outlet, and turn them on. 16 Verify that are secure. 14 Replace the computer cover (see "Replacing the Computer Cover" on page 84).

Owner's Manual
Page 162
... any static electricity that the memory modules can re-route them . Note the routing of the computer. CAUTION: The heat sink assembly, power supply, and other unexpected injuries, always unplug your computer, ground yourself by touching an unpainted metal surface, such as the metal at the back...page 121). 4 Remove the processor and the heat sink assembly (see "Removing the Processor" on page 148). 5 Remove the memory modules (see "Replacing the Computer Cover" on page 103). 3 Remove any add-in the same location after installing the new system board. 7 Remove the eight screws from...
... any static electricity that the memory modules can re-route them . Note the routing of the computer. CAUTION: The heat sink assembly, power supply, and other unexpected injuries, always unplug your computer, ground yourself by touching an unpainted metal surface, such as the metal at the back...page 121). 4 Remove the processor and the heat sink assembly (see "Removing the Processor" on page 148). 5 Remove the memory modules (see "Replacing the Computer Cover" on page 103). 3 Remove any add-in the same location after installing the new system board. 7 Remove the eight screws from...


