Dell Inspiron 531S Support Question
Dell Inspiron 531S Support Question
Find answers below for this question about Dell Inspiron 531S.Need a Dell Inspiron 531S manual? We have 2 online manuals for this item!
Question posted by wialko on September 9th, 2014
Where To Find Dell 531s Replacement Power Supplies In My Area
The person who posted this question about this Dell product did not include a detailed explanation. Please use the "Request More Information" button to the right if more details would help you to answer this question.
Current Answers
Related Dell Inspiron 531S Manual Pages
Owner's Manual - Page 7
... Operating System 92 Using Microsoft Windows System Restore . . . . 93 Using Dell PC Restore 95 Using the Operating System CD 98
4 Removing and Installing Parts...
Power Supply DC Connector Pin Assignments . . . . . 109
Memory 112 Memory Installation Guidelines 112 Installing Memory 113 Removing Memory 115
Cards 116 PCI and PCI Express Cards 116
Bezel 123 Removing the Bezel 123 Replacing ...
Owner's Manual - Page 8
... Drives 126 Installing a Second Hard Drive (Optional) . . . . . 129 Floppy Drive 131 Media Card Reader 137 CD or DVD Drive 141
Battery 144 Replacing the Battery 144
Power Supply 146 Replacing the Power Supply 146
Processor 148 Removing the Processor 148 Installing the Processor 150
I/O Panel 153 Removing the I/O Panel 153 Installing the I/O Panel 154
Processor Fan...
Owner's Manual - Page 18
... the device.
18
Setting Up and Using Your Computer For more information).
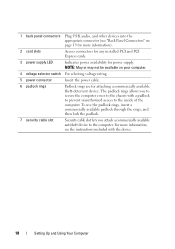
2 card slots
Access connectors for any installed PCI and PCI Express cards.
3 power supply LED
Indicates power availability for attaching a commercially available theft-deterrent device. NOTE: May or may not be available on page 19 for more information, see "Back Panel...
Owner's Manual - Page 36
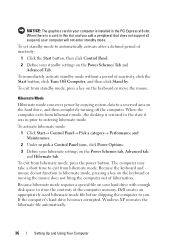
...computer exits from hibernate mode, the desktop is restored to the state it was in prior to exit from hibernate mode.
Hibernate Mode
Hibernate mode conserves power by . Because the keyboard and... after a defined period of the computer memory, Dell creates an appropriately sized hibernate mode file before shipping the computer to a reserved area on the hard drive, and then completely turning ...
Owner's Manual - Page 40
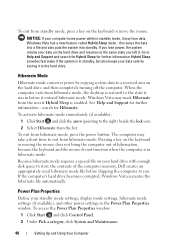
... a reserved area on the keyboard or moving the mouse does not bring the computer out of the computer memory, Dell creates an appropriately sized hibernate mode file before it to exit from the list. When the computer exits from hibernate mode, press the power button. To exit from hibernate mode, the desktop is in...
Owner's Manual - Page 106

Inside View of Your Computer
CAUTION: Before you begin any of the procedures in this section, follow the safety instructions in the Product Information Guide. 1
2
3
6
4
5
1 power supply
2 hard drive
3 front I/O panel
4 floppy drive or Media 5 CD or DVD drive 6 chassis fan Card Reader (optional)
106
Removing and Installing Parts
Owner's Manual - Page 109
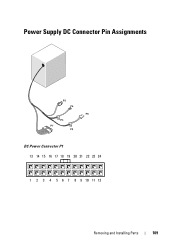
Power Supply DC Connector Pin Assignments
DC Power Connector P1 13 14 15 16 17 18 19 20 21 22 23 24
1 2 3 4 5 6 7 8 9 10 11 12
Removing and Installing Parts
109
Owner's Manual - Page 125

... "SATA2" or "SATA3" on the system board.
• Connect serial ATA CD or DVD drives to the back of the drive.
Power Connector
1 2
1 power cable
2 power input connector
Removing and Installing Parts
125 1 2
3 6
4
5
1 power supply
4 floppy drive or Media Card Reader (optional)
2 hard drive 5 CD or DVD drive
3 front I/O panel 6 chassis fan
Recommended Drive Cable...
Owner's Manual - Page 146
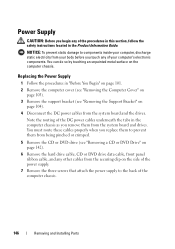
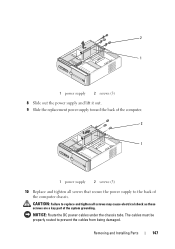
... so by touching an unpainted metal surface on the side of the power supply.
7 Remove the three screws that attach the power supply to the back of the procedures in this section, follow the safety instructions located in the computer chassis as you replace them to components inside your computer, discharge static electricity from the...
Owner's Manual - Page 147
... the system grounding.
The cables must be properly routed to prevent the cables from being damaged. 2 1
1 power supply 2 screws (3) 8 Slide out the power supply and lift it out. 9 Slide the replacement power supply toward the back of the computer.
2 1
1 power supply 2 screws (3)
10 Replace and tighten all screws may cause electrical shock as these
screws are a key part of the...
Owner's Manual - Page 148

...the bracket projection.
148
Removing and Installing Parts
You can do so by running the Dell Diagnostics (see "Installing a CD or DVD Drive" on
page 143). 13 Secure the...Replace the computer cover (see "Removing the Computer Cover" on
page 103). 3 Carefully disconnect and move any cables that the computer works correctly by touching an unpainted metal surface on the side of the power supply...
Owner's Manual - Page 153
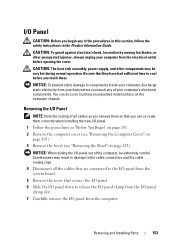
CAUTION: The heat sink assembly, power supply, and other unexpected injuries, always unplug your computer from your body before you touch any of the procedures in this section, follow the safety instructions ...
Owner's Manual - Page 155

... cool before you touch them. Be sure that they have had sufficient time to components inside your computer's electronic components.
CAUTION: The heat sink assembly, power supply, and other unexpected injuries, always unplug your computer from your body before you touch any of your computer, discharge static electricity from the electrical outlet...
Owner's Manual - Page 160
CAUTION: The heat sink assembly, power supply, and other unexpected injuries, always unplug your computer from your body before you touch any of your computer, discharge static electricity from the electrical outlet ...
Owner's Manual - Page 162

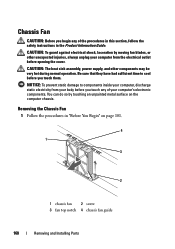
...an unpainted metal surface to cool before opening the cover. CAUTION: The heat sink assembly, power supply, and other unexpected injuries, always unplug your computer, ground yourself by moving fan blades,...to the system board (see "System Board Components" on page 107).
7 Replace the computer cover (see "Replacing the Computer Cover" on page 115) and
document which memory module is removed ...
Owner's Manual - Page 170
...that the system board cannot start initialization. This could be a system board or a power supply problem (see "Power Problems" on yellow blinking light integrated network adapter)
170
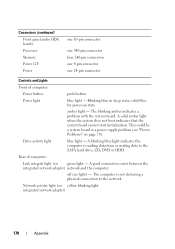
Appendix Network activity light (on... page 70). Connectors (continued) Front panel audio HDA header Processor Memory Power 12V Power
one 10-pin connector
one 940-pin connector four 240-pin connectors one 4-...
Owner's Manual - Page 171
...
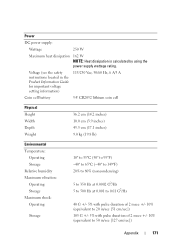
250 W
Maximum heat dissipation 162 W
NOTE: Heat dissipation is calculated by using the power supply wattage rating. Voltage (see the safety instructions located in the Product Information Guide for important voltage setting information)
115/230 Vac, 50/60 Hz, 6 A/3 A
Coin ...
Owner's Manual - Page 185
... in as user: anonymous, and use your order. When you need information about their portable and desktop computers. For the telephone number to the questions most frequently asked by Dell customers about additional products available from Dell, or if you would like to locate and report on your touch-tone telephone to select...
Owner's Manual - Page 201
... Identity Module - A card that identifies your Windows desktop and doubleclick the icon, you call Dell for customer service or technical support. S/PDIF - standby mode - Reinforced area of the platform base that allows the transfer of the...A connector used programs, files, folders, and drives. setup program - A power management mode that encrypts voice and data transmissions.
Owner's Manual - Page 202
...-extended graphics array plus -
text editor -
travel module - System memory dynamically allocated to reduce the weight of a portable computer to video. uninterruptible power supply - Small UPS systems provide battery power for video cards and controllers that contain only text; SXGA - super-extended graphics array - system board - Also known as date and time or...
Similar Questions


Dell Inspirion 531s Won't Boot Fan Starts Then Quits New Power Supply
(Posted by dadJamik 9 years ago)

How To Replace Power Supply For Dell Inspiron One 19
(Posted by marcothe 10 years ago)

Dell Inspiron 531s Will Not Turn On Power Supply Good
(Posted by sp6rajan 10 years ago)
How To Replace Power Supply On Dell 580 Lg Tower
(Posted by crzybill54 11 years ago)