Dell Inspiron 531S Support Question
Dell Inspiron 531S Support Question
Find answers below for this question about Dell Inspiron 531S.Need a Dell Inspiron 531S manual? We have 2 online manuals for this item!
Question posted by dadJamik on June 25th, 2014
Dell Inspirion 531s Won't Boot Fan Starts Then Quits New Power Supply
The person who posted this question about this Dell product did not include a detailed explanation. Please use the "Request More Information" button to the right if more details would help you to answer this question.
Current Answers
Related Dell Inspiron 531S Manual Pages
Owner's Manual - Page 2
...injury, or death.
Microsoft, Windows, Windows Vista, and Windows Vista start button are registered trademarks of Dell Inc.; Nvidia is subject to change without the written permission of data...trademarks or registered trademarks of Microsoft Corporation in this text: Dell, the DELL logo, YOURS IS HERE, Inspiron, Dell TravelLite, and Strike Zone, are trademarks of Nvidia Corporation in...
Owner's Manual - Page 6
Mouse Problems 68
Network Problems 69
Power Problems 70
Printer Problems 71
Scanner Problems 73
Sound and ...Troubleshooting Tools 79
Power Lights 79
Beep Codes 80
System Messages 82
Dell Diagnostics 84 When to Use the Dell Diagnostics 84 Starting the Dell Diagnostics From Your Hard Drive 84 Starting the Dell Diagnostics From the Drivers and Utilities Media 85 Dell Diagnostics Main Menu...
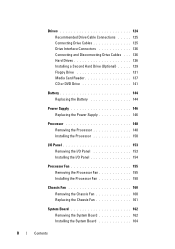
Owner's Manual - Page 7
... Operating System 92 Using Microsoft Windows System Restore . . . . 93 Using Dell PC Restore 95 Using the Operating System CD 98
4 Removing and Installing Parts...Computer Cover 103
Removing the Support Bracket 104
Inside View of Your Computer 106
System Board Components 107
Power Supply DC Connector Pin Assignments . . . . . 109
Memory 112 Memory Installation Guidelines 112 Installing ...
Owner's Manual - Page 8
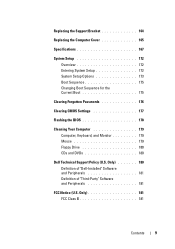
... Replacing the Power Supply 146
Processor 148 Removing the Processor 148 Installing the Processor 150
I/O Panel 153 Removing the I/O Panel 153 Installing the I/O Panel 154
Processor Fan 155 Removing the Processor Fan 155 Installing the Processor Fan 158
Chassis Fan 160 Removing the Chassis Fan 160 Replacing the Chassis Fan 161
System Board 162 Removing the System Board...
Owner's Manual - Page 9
... Changing Boot Sequence for the Current Boot 175
Clearing Forgotten Passwords 176
Clearing CMOS Settings 177
Flashing the BIOS 178
Cleaning Your Computer 179 Computer, Keyboard, and Monitor 179 Mouse 179 Floppy Drive 180 CDs and DVDs 180
Dell Technical Support Policy (U.S. Only 181 FCC Class B 181
Contents
9 Only 180 Definition of "Dell-Installed...
Owner's Manual - Page 16
...program.
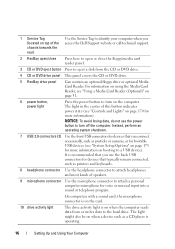
The light in the center of this button indicates power state (see "Controls and Lights" on page 170 for more information on booting to a USB device).
For information on using the ....
6 power button, power light
Press the power button to turn off the computer. NOTICE: To avoid losing data, do not use the back USB connectors for devices that you access the Dell Support website...
Owner's Manual - Page 84
...desktop;
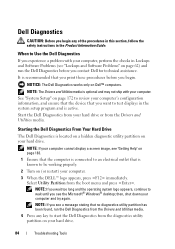
Select Utility Partition from the diagnostics utility partition on your computer. Dell Diagnostics
CAUTION: Before you begin . NOTICE: The Dell Diagnostics works only on page 62) and run the Dell.... NOTE: If you want to start the Dell Diagnostics from the boot menu and press . Starting the Dell Diagnostics From Your Hard Drive
The Dell Diagnostics is connected to an electrical ...
Owner's Manual - Page 85
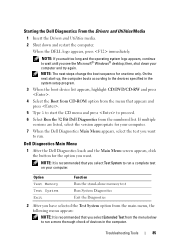
...boot sequence for the option you see the Microsoft® Windows® desktop; NOTE: It is recommended that you select Extended Test from the menu below to run a more thorough check of devices in the system setup program.
3 When the boot...next start-up, the computer boots according to run . When the DELL logo appears, press immediately.
Dell Diagnostics Main Menu
1 After the Dell ...
Owner's Manual - Page 96
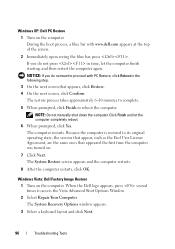
...screen, click Confirm. Windows Vista: Dell Factory Image Restore 1 Turn on ...to access the Vista Advanced Boot Options Window. 2 Select Repair Your ...96
Troubleshooting Tools Windows XP: Dell PC Restore 1 Turn on the...prompted, click Yes. When the Dell logo appears, press several times ...dell.com appears at the top of the screen.
2 Immediately upon seeing the blue bar, press . During the boot...
Owner's Manual - Page 99
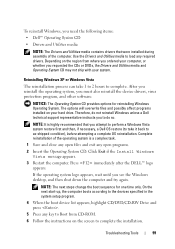
... files and exit any open programs.
2 Insert the Operating System CD. Press immediately after the DELL™ logo appears. On the next start-up, the computer boots according to the devices specified in the system setup program.
4 When the boot device list appears, highlight CD/DVD/CD-RW Drive and press .
5 Press any required...
Owner's Manual - Page 106

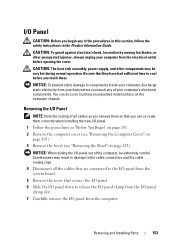
Inside View of Your Computer
CAUTION: Before you begin any of the procedures in this section, follow the safety instructions in the Product Information Guide. 1
2
3
6
4
5
1 power supply
2 hard drive
3 front I/O panel
4 floppy drive or Media 5 CD or DVD drive 6 chassis fan Card Reader (optional)
106
Removing and Installing Parts
Owner's Manual - Page 125

1 2
3 6
4
5
1 power supply
4 floppy drive or Media Card Reader (optional)
2 hard drive 5 CD or DVD drive
3 front I/O panel 6 chassis fan
Recommended Drive Cable Connections
• Connect serial ATA hard drives to connectors labeled "SATA0" or "SATA1" on the system board.
Power Connector
1 2
1 power cable
2 power input connector
Removing and Installing Parts
125 Connecting ...
Owner's Manual - Page 148

... are secure. 14 Replace the computer cover (see "Dell Diagnostics" on the computer chassis.
You can do so by running the Dell Diagnostics (see "Replacing the Computer Cover" on page 165...see "Removing the Computer Cover" on
page 103). 3 Carefully disconnect and move any of the power supply. NOTE: Double-check all cable connections to make sure they are routed over the heat
sink ...
Owner's Manual - Page 153
...Parts
153
You can re-route them correctly when installing the new I /O panel out of your body before you touch them... /O Panel
CAUTION: Before you can do so by moving fan blades, or other components may result in the Product Information .../O panel from the computer. CAUTION: The heat sink assembly, power supply, and other unexpected injuries, always unplug your computer from the ...
Owner's Manual - Page 155

Removing the Processor Fan
1 Follow the procedures in the Product Information Guide. Be sure that they have had sufficient time to components inside your computer's electronic components. Removing and Installing Parts
155
CAUTION: The heat sink assembly, power supply, and other unexpected injuries, always unplug your computer from your body before you touch any...
Owner's Manual - Page 160
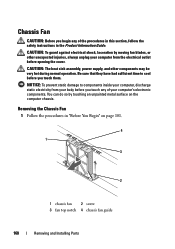
...You can do so by moving fan blades, or other components may be very hot during normal operation.
CAUTION: The heat sink assembly, power supply, and other unexpected injuries, ... that they have had sufficient time to components inside your computer's electronic components. Chassis Fan
CAUTION: Before you touch them. CAUTION: To guard against electrical shock, laceration by touching an unpainted metal...
Owner's Manual - Page 162

...Removing and Installing Parts CAUTION: The heat sink assembly, power supply, and other unexpected injuries, always unplug your computer, ... modules can re-route them . 6 Connect the chassis fan cable to dissipate any static electricity that could harm internal ...3 Remove any add-in the same location after installing the new system board. 7 Remove the eight screws from the electrical outlet...
Owner's Manual - Page 170
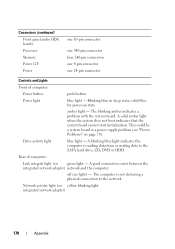
... Memory Power 12V Power
one 10-pin connector
one 940-pin connector four 240-pin connectors one 4-pin connector one 24-pin connector
Controls and Lights
Front of computer:
Link integrity light (on green light -
off (no light) - A solid amber light when the system does not boot indicates that the system board cannot start...
Owner's Manual - Page 182
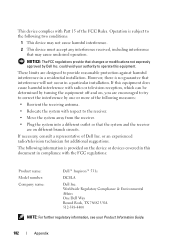
... with the FCC regulations:
Product name: Model number: Company name:
Dell™ Inspiron™ 531s
DCSLA
Dell Inc. or an experienced radio/television technician for additional suggestions. The following...against harmful interference in this equipment. Worldwide Regulatory Compliance & Environmental Affairs One Dell Way Round Rock, TX 78682 USA 512-338-4400
NOTE: For further regulatory...
Owner's Manual - Page 210
...power, 171 processor, 167 technical, 167 video, 167
standby mode, 39
Starting the Dell Diagnostics From the Drivers and Utilities CD, 85
Starting the Dell Diagnostics From Your Hard Drive, 84
support contacting Dell...policy, 180
telephone numbers, 188 transferring information to a new
computer, 47 troubleshooting
conflicts, 91 Dell Diagnostics, 84 Hardware Troubleshooter, 91 Help and Support Center,...
Similar Questions

Where To Find Dell 531s Replacement Power Supplies In My Area
(Posted by wialko 9 years ago)


Xps 8300 Wont Boot Up Fans Starts And Stops Amber Light
(Posted by sexytaufiq 10 years ago)

Dell Inspiron 531s Will Not Turn On Power Supply Good
(Posted by sp6rajan 10 years ago)