Setup and Specifications
Page 4
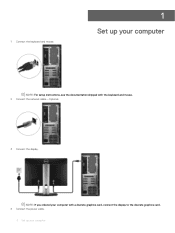
NOTE: If you ordered your computer with a discrete graphics card, connect the display to the discrete graphics card. 4 Connect the power cable. 4 Set up your computer 1 Connect the keyboard and mouse. 1 Set up your computer NOTE: For setup instructions, see the documentation shipped with the keyboard and mouse. 2 Connect the network cable-Optional. 3 Connect the display.
NOTE: If you ordered your computer with a discrete graphics card, connect the display to the discrete graphics card. 4 Connect the power cable. 4 Set up your computer 1 Connect the keyboard and mouse. 1 Set up your computer NOTE: For setup instructions, see the documentation shipped with the keyboard and mouse. 2 Connect the network cable-Optional. 3 Connect the display.
Service Manual
Page 3
... module 21 Prerequisites...21 Procedure...21 11 Replacing the solid-state drive/Intel Optane memory module 23 Procedure...23 Post-requisites...23 12 Removing the graphics card...24 Prerequisites...24 Contents 3
... module 21 Prerequisites...21 Procedure...21 11 Replacing the solid-state drive/Intel Optane memory module 23 Procedure...23 Post-requisites...23 12 Removing the graphics card...24 Prerequisites...24 Contents 3
Service Manual
Page 4
Procedure...24 13 Replacing the graphics card...25 Procedure...25 Post-requisites...25 14 Removing the coin-cell battery...26 Prerequisites...26 Procedure...26 15 Replacing the coin-cell battery...27 Procedure...27 Post-requisites...27 16 Removing the wireless card...28 Prerequisites...28 Procedure...28 17 Replacing the wireless card...30 Procedure...30 Post...
Procedure...24 13 Replacing the graphics card...25 Procedure...25 Post-requisites...25 14 Removing the coin-cell battery...26 Prerequisites...26 Procedure...26 15 Replacing the coin-cell battery...27 Procedure...27 Post-requisites...27 16 Removing the wireless card...28 Prerequisites...28 Procedure...28 17 Replacing the wireless card...30 Procedure...30 Post...
Service Manual
Page 10
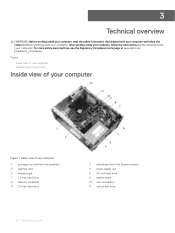
... best practices, see the Regulatory Compliance home page at www.dell.com/ regulatory_compliance. Inside view of your computer Figure 1. Topics: • Inside view of your computer • System board components Inside view of your computer 1 processor fan and heat-sink assembly 3 graphics card 5 wireless card 7 2.5-inch hard drive 9 memory module(s) 11 2.5-inch hard drive...
... best practices, see the Regulatory Compliance home page at www.dell.com/ regulatory_compliance. Inside view of your computer Figure 1. Topics: • Inside view of your computer • System board components Inside view of your computer 1 processor fan and heat-sink assembly 3 graphics card 5 wireless card 7 2.5-inch hard drive 9 memory module(s) 11 2.5-inch hard drive...
Service Manual
Page 11
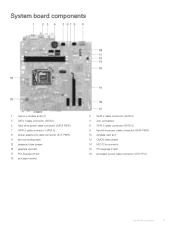
... connector (SATA PWR) 7 SATA 0 cable connector (SATA 0) 9 power-supply unit cable connector (ATX PWR) 11 service mode jumper 13 password clear jumper 15 graphics card slot 17 PCI-Express X1 slot 19 processor socket 2 SATA 2 cable connector (SATA 2) 4 coin-cell battery 6 SATA 3 cable connector (SATA 3) 8 hard...-drive power cable connector (SATA PWR) 10 wireless-card slot 12 CMOS clear jumper 14 M.2 PCIe connector 16 PCI-Express X1 slot 18 processor-power cable connector (ATX CPU) Technical overview 11
... connector (SATA PWR) 7 SATA 0 cable connector (SATA 0) 9 power-supply unit cable connector (ATX PWR) 11 service mode jumper 13 password clear jumper 15 graphics card slot 17 PCI-Express X1 slot 19 processor socket 2 SATA 2 cable connector (SATA 2) 4 coin-cell battery 6 SATA 3 cable connector (SATA 3) 8 hard...-drive power cable connector (SATA PWR) 10 wireless-card slot 12 CMOS clear jumper 14 M.2 PCIe connector 16 PCI-Express X1 slot 18 processor-power cable connector (ATX CPU) Technical overview 11
Service Manual
Page 24
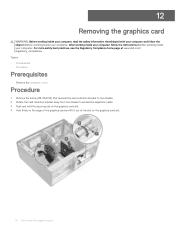
..., see the Regulatory Compliance home page at www.dell.com/ regulatory_compliance. 12 Removing the graphics card WARNING: Before working inside your computer, read the safety information that secures the card-retention bracket to the chassis. 2 Rotate the card-retention bracket away from the chassis to access the... expansion cards. 3 Push and hold the securing tab on the graphics-card slot. 4 Hold firmly on the edge of the graphics card and lift it out of the slot on the graphics-card slot. 24 Removing the graphics card After working inside your computer, follow...
..., see the Regulatory Compliance home page at www.dell.com/ regulatory_compliance. 12 Removing the graphics card WARNING: Before working inside your computer, read the safety information that secures the card-retention bracket to the chassis. 2 Rotate the card-retention bracket away from the chassis to access the... expansion cards. 3 Push and hold the securing tab on the graphics-card slot. 4 Hold firmly on the edge of the graphics card and lift it out of the slot on the graphics-card slot. 24 Removing the graphics card After working inside your computer, follow...
Service Manual
Page 25
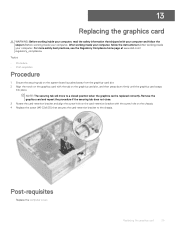
... best practices, see the Regulatory Compliance home page at www.dell.com/ regulatory_compliance. Post-requisites Replace the computer cover. 13 Replacing the graphics card WARNING: Before working inside your computer, read the safety information that secures the card-retention bracket to a closed position when the graphics card is replaced correctly. Topics: • Procedure • Post-requisites...
... best practices, see the Regulatory Compliance home page at www.dell.com/ regulatory_compliance. Post-requisites Replace the computer cover. 13 Replacing the graphics card WARNING: Before working inside your computer, read the safety information that secures the card-retention bracket to a closed position when the graphics card is replaced correctly. Topics: • Procedure • Post-requisites...
Service Manual
Page 51
... cables correctly after you replace the system board. NOTE: Depending on system board connectors, see the Regulatory Compliance home page at www.dell.com/ regulatory_compliance. If only one hard drive is stored in the system board. NOTE: Your computer's Service Tag is installed skip.... 2 Remove the front bezel. 3 Remove the memory module. 4 Remove the solid-state drive/Intel Optane memory. 5 Remove the graphics card. 6 Remove the wireless card. 7 Remove the processor fan and heat-sink assembly. 8 Remove the processor. For information on the configuration ordered your computer may have...
... cables correctly after you replace the system board. NOTE: Depending on system board connectors, see the Regulatory Compliance home page at www.dell.com/ regulatory_compliance. If only one hard drive is stored in the system board. NOTE: Your computer's Service Tag is installed skip.... 2 Remove the front bezel. 3 Remove the memory module. 4 Remove the solid-state drive/Intel Optane memory. 5 Remove the graphics card. 6 Remove the wireless card. 7 Remove the processor fan and heat-sink assembly. 8 Remove the processor. For information on the configuration ordered your computer may have...

Service Manual
Page 58
Post-requisites 1 Replace the processor. 2 Replace the processor fan and heat-sink assembly. 3 Replace the wireless card. 4 Replace the graphics card. 5 Replace the solid-state drive/Intel Optane memory. 6 Replace the memory module. 7 Replace the front bezel. 8 Replace the computer cover. 58 Replacing the system board
Post-requisites 1 Replace the processor. 2 Replace the processor fan and heat-sink assembly. 3 Replace the wireless card. 4 Replace the graphics card. 5 Replace the solid-state drive/Intel Optane memory. 6 Replace the memory module. 7 Replace the front bezel. 8 Replace the computer cover. 58 Replacing the system board


