
Inspiron 20 3052 Service Manual
Page 4
Replacing the back cover 25 Procedure...25 Post-requisites 25 Removing the hard drive 26 Prerequisites...26 Procedure...26 Replacing the hard drive 29 Procedure...29 Post-requisites 29 Removing the memory module 30 Prerequisites...30 Procedure...30 Replacing the memory module 32 Procedure...32 Post-requisites 33 Removing the wireless card 35 Prerequisites...35 Procedure...35 Replacing the wireless card 37 Procedure...37 Post-requisites 38 Removing the control-buttons board 39 Prerequisites...39 Procedure...39 4
Replacing the back cover 25 Procedure...25 Post-requisites 25 Removing the hard drive 26 Prerequisites...26 Procedure...26 Replacing the hard drive 29 Procedure...29 Post-requisites 29 Removing the memory module 30 Prerequisites...30 Procedure...30 Replacing the memory module 32 Procedure...32 Post-requisites 33 Removing the wireless card 35 Prerequisites...35 Procedure...35 Replacing the wireless card 37 Procedure...37 Post-requisites 38 Removing the control-buttons board 39 Prerequisites...39 Procedure...39 4

Inspiron 20 3052 Service Manual
Page 9
... and hold the power button for shut-down instructions. 3 Disconnect your computer and all attached devices from their electrical outlets. 4 Disconnect all cables such as telephone cables, network cables and so on, from your computer. 5 Disconnect all open files and exit all attached devices and peripherals, such as keyboard, mouse, monitor, and so on, from your computer. 6 Remove any media card and optical disc from your computer CAUTION...
... and hold the power button for shut-down instructions. 3 Disconnect your computer and all attached devices from their electrical outlets. 4 Disconnect all cables such as telephone cables, network cables and so on, from your computer. 5 Disconnect all open files and exit all attached devices and peripherals, such as keyboard, mouse, monitor, and so on, from your computer. 6 Remove any media card and optical disc from your computer CAUTION...
Inspiron 20 3052 Service Manual
Page 10
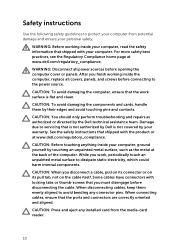
... on its pull tab, not on the cable itself. When connecting cables, ensure that the work , periodically touch an unpainted metal surface to dissipate static electricity, which could harm internal components. CAUTION: Press and eject any connector pins. Safety instructions Use the following safety guidelines to protect your computer from the media-card reader. 10 For more safety best practices, see the...
... on its pull tab, not on the cable itself. When connecting cables, ensure that the work , periodically touch an unpainted metal surface to dissipate static electricity, which could harm internal components. CAUTION: Press and eject any connector pins. Safety instructions Use the following safety guidelines to protect your computer from the media-card reader. 10 For more safety best practices, see the...

Inspiron 20 3052 Service Manual
Page 12
After working inside your computer CAUTION: Leaving stray or loose screws inside your computer may severely damage your computer. 1 Replace all screws and ensure that no stray screws remain inside your computer. 2 Connect any external devices, peripherals, and cables you removed before working on your computer. 3 Replace any media cards, discs, and any other parts that you removed before working on your computer. 4 Connect your computer and all attached devices to their electrical outlets. 5 Turn on your computer. 12
After working inside your computer CAUTION: Leaving stray or loose screws inside your computer may severely damage your computer. 1 Replace all screws and ensure that no stray screws remain inside your computer. 2 Connect any external devices, peripherals, and cables you removed before working on your computer. 3 Replace any media cards, discs, and any other parts that you removed before working on your computer. 4 Connect your computer and all attached devices to their electrical outlets. 5 Turn on your computer. 12

Inspiron 20 3052 Service Manual
Page 13
... computer and follow the instructions in Before working inside your computer 1 speakers (2) 3 control-buttons board 5 fan 7 heat sink 9 memory module 11 coin-cell battery 2 hard-drive assembly 4 display assembly 6 display-assembly base 8 wireless card 10 system board 13 After working inside your computer, follow the steps in After working inside your computer. For more safety best practices, see the Regulatory Compliance home page at www.dell.com/regulatory_compliance. Inside view of your computer...
... computer and follow the instructions in Before working inside your computer 1 speakers (2) 3 control-buttons board 5 fan 7 heat sink 9 memory module 11 coin-cell battery 2 hard-drive assembly 4 display assembly 6 display-assembly base 8 wireless card 10 system board 13 After working inside your computer, follow the steps in After working inside your computer. For more safety best practices, see the Regulatory Compliance home page at www.dell.com/regulatory_compliance. Inside view of your computer...

Inspiron 20 3052 Service Manual
Page 15
9 control-buttons board cable connector 10 display-panel power cable connector (PWRCN) 11 display-cable connector 12 hard-drive data cable connector (SATA_HDD) 13 optical-drive cable connector (SATA_HDD) 14 hard-drive and optical-drive power cable connector (SATAP1) 15 fan-cable connector (FAN_CPU) 15
9 control-buttons board cable connector 10 display-panel power cable connector (PWRCN) 11 display-cable connector 12 hard-drive data cable connector (SATA_HDD) 13 optical-drive cable connector (SATA_HDD) 14 hard-drive and optical-drive power cable connector (SATAP1) 15 fan-cable connector (FAN_CPU) 15

Inspiron 20 3052 Service Manual
Page 26
... working inside your computer. For more safety best practices, see the Regulatory Compliance home page at www.dell.com/regulatory_compliance. Procedure 1 Note the routing of the touch-screen board cable and remove it from step 1 to the display- CAUTION: Hard drives are fragile. Removing the hard drive WARNING: Before working inside your computer, read the safety information that secures the hard-drive assembly to step 2 in "Removing the optical drive". 3 Remove...
... working inside your computer. For more safety best practices, see the Regulatory Compliance home page at www.dell.com/regulatory_compliance. Procedure 1 Note the routing of the touch-screen board cable and remove it from step 1 to the display- CAUTION: Hard drives are fragile. Removing the hard drive WARNING: Before working inside your computer, read the safety information that secures the hard-drive assembly to step 2 in "Removing the optical drive". 3 Remove...

Inspiron 20 3052 Service Manual
Page 27
4 Slide and lift the hard-drive assembly off the display-assembly base. 1 touch-screen board cable 3 hard-drive cable 2 screw 4 hard-drive assembly 5 Remove the screws that secure the hard-drive bracket to the hard drive. 27
4 Slide and lift the hard-drive assembly off the display-assembly base. 1 touch-screen board cable 3 hard-drive cable 2 screw 4 hard-drive assembly 5 Remove the screws that secure the hard-drive bracket to the hard drive. 27

Inspiron 20 3052 Service Manual
Page 29
... it to the display-assembly base. 5 Replace the screw that secures the hard-drive assembly to the hard drive. 7 Route the touch-board cable through the routing guides on the hard- Exercise care when handling the hard drive. assembly base. 6 Connect the power and data cable to the display- After working inside your computer, follow the steps in "Replacing the optical drive". 3 Replace the stand. 29 Replacing the hard drive WARNING: Before working inside your computer, read...
... it to the display-assembly base. 5 Replace the screw that secures the hard-drive assembly to the hard drive. 7 Route the touch-board cable through the routing guides on the hard- Exercise care when handling the hard drive. assembly base. 6 Connect the power and data cable to the display- After working inside your computer, follow the steps in "Replacing the optical drive". 3 Replace the stand. 29 Replacing the hard drive WARNING: Before working inside your computer, read...

Inspiron 20 3052 Service Manual
Page 33
NOTE: If you do not hear the click, remove the memory module and reinstall it clicks into place. 2 Slide the memory module firmly into the slot at an angle and press the memory module down until it . 1 memory module 3 notch Post-requisites 1 Replace the system-board shield. 2 Replace the back cover. 2 memory-module slot 4 tab 33
NOTE: If you do not hear the click, remove the memory module and reinstall it clicks into place. 2 Slide the memory module firmly into the slot at an angle and press the memory module down until it . 1 memory module 3 notch Post-requisites 1 Replace the system-board shield. 2 Replace the back cover. 2 memory-module slot 4 tab 33

Inspiron 20 3052 Service Manual
Page 37
... shipped with your computer and follow the instructions in Before working inside your computer: Connectors on the wireless card Antenna-cable color Main (white triangle) White Auxiliary (black triangle) Black 4 Press down the other end of the wireless card and align the screw hole on the wireless-card bracket and wireless card with the tab on the system board. 37 For more safety best practices, see...
... shipped with your computer and follow the instructions in Before working inside your computer: Connectors on the wireless card Antenna-cable color Main (white triangle) White Auxiliary (black triangle) Black 4 Press down the other end of the wireless card and align the screw hole on the wireless-card bracket and wireless card with the tab on the system board. 37 For more safety best practices, see...

Inspiron 20 3052 Service Manual
Page 39
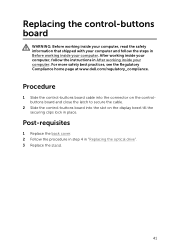
... 1 Remove the stand. 2 Follow the procedure from step 1 to step 2 in After working inside your computer. Procedure 1 Using your fingertips, push the securing clips on the control-buttons board slot and lift the control-buttons board off the display bezel. 39 Removing the control-buttons board WARNING: Before working inside your computer, read the safety information that shipped with your computer and follow the instructions in "Removing the optical drive". 3 Remove the back cover.
... 1 Remove the stand. 2 Follow the procedure from step 1 to step 2 in After working inside your computer. Procedure 1 Using your fingertips, push the securing clips on the control-buttons board slot and lift the control-buttons board off the display bezel. 39 Removing the control-buttons board WARNING: Before working inside your computer, read the safety information that shipped with your computer and follow the instructions in "Removing the optical drive". 3 Remove the back cover.
Inspiron 20 3052 Service Manual
Page 41
Replacing the control-buttons board WARNING: Before working inside your computer, read the safety information that shipped with your computer and follow the instructions in After working inside your computer. Procedure 1 Slide the control-buttons board cable into the connector on the controlbuttons board and close the latch to secure the cable. 2 Slide the control-buttons board into the slot on the display bezel till the securing clips lock in "Replacing the optical drive". 3 Replace the...
Replacing the control-buttons board WARNING: Before working inside your computer, read the safety information that shipped with your computer and follow the instructions in After working inside your computer. Procedure 1 Slide the control-buttons board cable into the connector on the controlbuttons board and close the latch to secure the cable. 2 Slide the control-buttons board into the slot on the display bezel till the securing clips lock in "Replacing the optical drive". 3 Replace the...
Inspiron 20 3052 Service Manual
Page 52
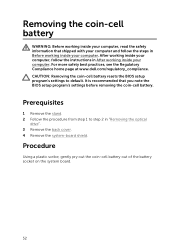
... the instructions in After working inside your computer. Removing the coin-cell battery WARNING: Before working inside your computer, read the safety information that you note the BIOS setup program's settings before removing the coin-cell battery. After working inside your computer. CAUTION: Removing the coin-cell battery resets the BIOS setup program's settings to step 2 in Before working inside your computer, follow the steps in "Removing the optical drive". 3 Remove the back cover. 4 Remove the system-board shield...
... the instructions in After working inside your computer. Removing the coin-cell battery WARNING: Before working inside your computer, read the safety information that you note the BIOS setup program's settings before removing the coin-cell battery. After working inside your computer. CAUTION: Removing the coin-cell battery resets the BIOS setup program's settings to step 2 in Before working inside your computer, follow the steps in "Removing the optical drive". 3 Remove the back cover. 4 Remove the system-board shield...

Inspiron 20 3052 Service Manual
Page 63
Post-requisites 1 Replace the system-board shield. 2 Replace the back cover. 3 Follow the procedure in step 4 in "Replacing the optical drive". 4 Replace the stand. 63 Procedure 1 Using the alignment posts and rubber grommets on the display bezel, place the speakers on the display bezel. 2 Route the speaker cable through the routing guides on the display bezel and the display-panel base. 3 Connect the speaker cable to the system board. After working inside your computer, follow...
Post-requisites 1 Replace the system-board shield. 2 Replace the back cover. 3 Follow the procedure in step 4 in "Replacing the optical drive". 4 Replace the stand. 63 Procedure 1 Using the alignment posts and rubber grommets on the display bezel, place the speakers on the display bezel. 2 Route the speaker cable through the routing guides on the display bezel and the display-panel base. 3 Connect the speaker cable to the system board. After working inside your computer, follow...
Inspiron 20 3052 Service Manual
Page 64
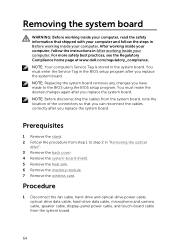
... the fan cable, hard-drive and optical-drive power cable, optical-drive data cable, hard-drive data cable, microphone and camera cable, speaker cable, display-panel power cable, and touch-board cable from step 1 to the BIOS using the BIOS setup program. For more safety best practices, see the Regulatory Compliance home page at www.dell.com/regulatory_compliance. You must enter the Service Tag in the BIOS setup program after you replace the system board. NOTE: Your computer's Service Tag is stored in Before working inside your...
... the fan cable, hard-drive and optical-drive power cable, optical-drive data cable, hard-drive data cable, microphone and camera cable, speaker cable, display-panel power cable, and touch-board cable from step 1 to the BIOS using the BIOS setup program. For more safety best practices, see the Regulatory Compliance home page at www.dell.com/regulatory_compliance. You must enter the Service Tag in the BIOS setup program after you replace the system board. NOTE: Your computer's Service Tag is stored in Before working inside your...
Inspiron 20 3052 Service Manual
Page 67
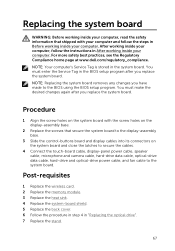
... cables. 4 Connect the touch-board cable, display-panel power cable, speaker cable, microphone and camera cable, hard-drive data cable, optical-drive data cable, hard-drive and optical-drive power cable, and fan cable to the BIOS using the BIOS setup program. For more safety best practices, see the Regulatory Compliance home page at www.dell.com/regulatory_compliance. You must make the desired changes again after you have made to the system board. Post-requisites 1 Replace the wireless card. 2 Replace the memory module. 3 Replace the heat sink. 4 Replace the system-board...
... cables. 4 Connect the touch-board cable, display-panel power cable, speaker cable, microphone and camera cable, hard-drive data cable, optical-drive data cable, hard-drive and optical-drive power cable, and fan cable to the BIOS using the BIOS setup program. For more safety best practices, see the Regulatory Compliance home page at www.dell.com/regulatory_compliance. You must make the desired changes again after you have made to the system board. Post-requisites 1 Replace the wireless card. 2 Replace the memory module. 3 Replace the heat sink. 4 Replace the system-board...
Inspiron 20 3052 Service Manual
Page 80
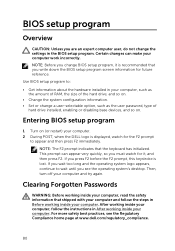
... your computer and follow the instructions in Before working inside your computer. NOTE: Before you change a user-selectable option, such as the user password, type of the hard drive, and so on. • Change the system configuration information. • Set or change BIOS setup program, it is displayed, watch for it, and then press F2. BIOS setup program Overview CAUTION: Unless you write down the BIOS setup program screen information for future reference...
... your computer and follow the instructions in Before working inside your computer. NOTE: Before you change a user-selectable option, such as the user password, type of the hard drive, and so on. • Change the system configuration information. • Set or change BIOS setup program, it is displayed, watch for it, and then press F2. BIOS setup program Overview CAUTION: Unless you write down the BIOS setup program screen information for future reference...
Inspiron 20 3052 Service Manual
Page 82
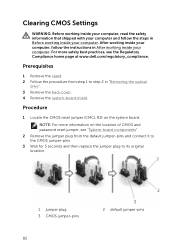
...see "System-board components". 2 Remove the jumper plug from step 1 to its original location. 1 jumper plug 3 CMOS jumper-pins 82 2 default jumper-pins After working inside your computer, follow the steps in Before working inside your computer. Prerequisites 1 Remove the stand. 2 Follow the procedure from the default jumper-pins and connect it to the CMOS jumper-pins. 3 Wait for 5 seconds and then replace the jumper plug to step 2 in "Removing the optical drive". 3 Remove the back cover. 4 Remove the system-board shield. Clearing CMOS Settings WARNING: Before working inside your...
...see "System-board components". 2 Remove the jumper plug from step 1 to its original location. 1 jumper plug 3 CMOS jumper-pins 82 2 default jumper-pins After working inside your computer, follow the steps in Before working inside your computer. Prerequisites 1 Remove the stand. 2 Follow the procedure from the default jumper-pins and connect it to the CMOS jumper-pins. 3 Wait for 5 seconds and then replace the jumper plug to step 2 in "Removing the optical drive". 3 Remove the back cover. 4 Remove the system-board shield. Clearing CMOS Settings WARNING: Before working inside your...
Inspiron 20 3052 Service Manual
Page 84
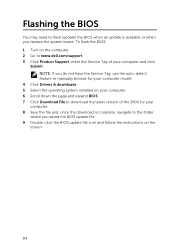
... feature or manually browse for your computer model. 4 Click Drivers & downloads. 5 Select the operating system installed on your computer. 6 Scroll down the page and expand BIOS. 7 Click Download File to download the latest version of the BIOS for your computer and click Submit. Flashing the BIOS You may need to flash (update) the BIOS when an update is complete, navigate to www.dell.com/support. 3 Click Product Support, enter the Service Tag...
... feature or manually browse for your computer model. 4 Click Drivers & downloads. 5 Select the operating system installed on your computer. 6 Scroll down the page and expand BIOS. 7 Click Download File to download the latest version of the BIOS for your computer and click Submit. Flashing the BIOS You may need to flash (update) the BIOS when an update is complete, navigate to www.dell.com/support. 3 Click Product Support, enter the Service Tag...


