

Owners Manual
Page 3
Contents Chapter 1: Views of Inspiron 3030 Desktop 6 Front...6 Back...7 Service Tag...8 Chapter 2: Set up your Inspiron 3030 Desktop 10 Chapter 3: Specifications of Inspiron 3030 Desktop 14 Dimensions and weight...14 Processor...14 Chipset...15 Operating system...16 Memory...16 Memory matrix...17 Ports and connectors...17 Ethernet...18 Wireless module...18 Storage...19 GPU-Integrated...19 GPU-Discrete...19 Multiple display support matrix...20 Audio...20 Power ratings...21 Hardware security...21 Energy Star and Trusted...
Contents Chapter 1: Views of Inspiron 3030 Desktop 6 Front...6 Back...7 Service Tag...8 Chapter 2: Set up your Inspiron 3030 Desktop 10 Chapter 3: Specifications of Inspiron 3030 Desktop 14 Dimensions and weight...14 Processor...14 Chipset...15 Operating system...16 Memory...16 Memory matrix...17 Ports and connectors...17 Ethernet...18 Wireless module...18 Storage...19 GPU-Integrated...19 GPU-Discrete...19 Multiple display support matrix...20 Audio...20 Power ratings...21 Hardware security...21 Energy Star and Trusted...
Owners Manual
Page 5
... board...73 Chapter 7: Software...77 Operating system...77 Drivers and downloads...77 Chapter 8: BIOS Setup...78 Entering BIOS setup program...78 Navigation keys...78 Boot sequence...78 F12 One Time Boot menu...79 System setup options...79 System and setup password...94 Assigning a System Setup password...94 Deleting or changing an existing system setup password 95 Real Time Clock (RTC) reset...95 Clearing BIOS (System Setup) and System passwords 96 Updating the BIOS...96 Updating the BIOS in Windows...96 Updating the BIOS using the USB drive in Windows...
... board...73 Chapter 7: Software...77 Operating system...77 Drivers and downloads...77 Chapter 8: BIOS Setup...78 Entering BIOS setup program...78 Navigation keys...78 Boot sequence...78 F12 One Time Boot menu...79 System setup options...79 System and setup password...94 Assigning a System Setup password...94 Deleting or changing an existing system setup password 95 Real Time Clock (RTC) reset...95 Clearing BIOS (System Setup) and System passwords 96 Updating the BIOS...96 Updating the BIOS in Windows...96 Updating the BIOS using the USB drive in Windows...
Owners Manual
Page 6
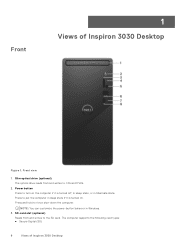
... if it is turned off, in sleep state, or in Windows. 3. Press and hold to the SD card. The computer supports the following card types: ● Secure Digital (SD) 6 Views of Inspiron 3030 Desktop Figure 1. Front view 1. SD-card slot (optional) Reads from and writes to turn on . Front 1 Views of Inspiron 3030 Desktop NOTE: You can customize the power-button behavior in hibernate state. Slim optical drive (optional) The optical drive reads from...
... if it is turned off, in sleep state, or in Windows. 3. Press and hold to the SD card. The computer supports the following card types: ● Secure Digital (SD) 6 Views of Inspiron 3030 Desktop Figure 1. Front view 1. SD-card slot (optional) Reads from and writes to turn on . Front 1 Views of Inspiron 3030 Desktop NOTE: You can customize the power-button behavior in hibernate state. Slim optical drive (optional) The optical drive reads from...
Owners Manual
Page 8
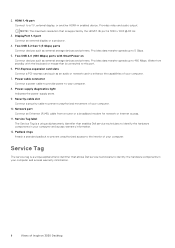
...Hz. 3. Security-cable slot Connect a security cable to a TV, external display, or another HDMI-in your computer and access warranty information. 12. Power-supply diagnostics light Indicates the power-supply state. 9. Wake from a router or a broadband modem for network or Internet access. 11. PCI-Express expansion card slots Connect a PCI-express card such as external storage devices and printers. Padlock rings Attach a standard padlock to prevent unauthorized access to enhance the capabilities of Inspiron 3030 Desktop Network port Connect an Ethernet (RJ45) cable from...
...Hz. 3. Security-cable slot Connect a security cable to a TV, external display, or another HDMI-in your computer and access warranty information. 12. Power-supply diagnostics light Indicates the power-supply state. 9. Wake from a router or a broadband modem for network or Internet access. 11. PCI-Express expansion card slots Connect a PCI-express card such as external storage devices and printers. Padlock rings Attach a standard padlock to prevent unauthorized access to enhance the capabilities of Inspiron 3030 Desktop Network port Connect an Ethernet (RJ45) cable from...

Owners Manual
Page 13
... access, device information, and hardware settings. If not connected to renew or upgrade your contact details. 7. Locate Dell apps Resources Description MyDell MyDell is a software application that automatically fine-tune your Dell device with or create a Microsoft account. For more information about using Dell Digital Delivery, search in with intelligent, personalized technology from the Windows Start menu-Recommended Table 1. Follow the on-screen instructions to a network for Windows updates. Dell Digital Delivery Download software...
... access, device information, and hardware settings. If not connected to renew or upgrade your contact details. 7. Locate Dell apps Resources Description MyDell MyDell is a software application that automatically fine-tune your Dell device with or create a Microsoft account. For more information about using Dell Digital Delivery, search in with intelligent, personalized technology from the Windows Start menu-Recommended Table 1. Follow the on-screen instructions to a network for Windows updates. Dell Digital Delivery Download software...
Owners Manual
Page 17
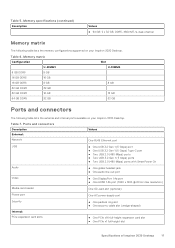
... ● One audio line-out port Video ● One DisplayPort 1.4a port ● One HDMI 1.4b port (1920 x 1200 @ 60 Hz max resolution) Media-card reader One SD-card slot (optional) Power port One AC power-supply port Security ● One padlock ring slot ● One security-cable slot (wedge-shaped) Internal: PCIe expansion card slots ● One PCIe x16 full-height expansion card slot ● One PCIe x1 full-height slot Specifications of Inspiron 3030 Desktop 17 Memory matrix Configuration U-DIMM1...
... ● One audio line-out port Video ● One DisplayPort 1.4a port ● One HDMI 1.4b port (1920 x 1200 @ 60 Hz max resolution) Media-card reader One SD-card slot (optional) Power port One AC power-supply port Security ● One padlock ring slot ● One security-cable slot (wedge-shaped) Internal: PCIe expansion card slots ● One PCIe x16 full-height expansion card slot ● One PCIe x1 full-height slot Specifications of Inspiron 3030 Desktop 17 Memory matrix Configuration U-DIMM1...
Owners Manual
Page 24
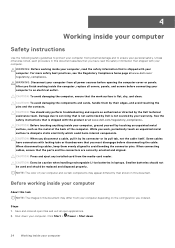
... by the Dell technical assistance team. Swollen batteries should not be used and should only perform troubleshooting and repairs as authorized or directed by touching an unpainted metal surface, such as the metal at www.dell.com/ regulatory_compliance. Click Start > Power > Shut down your computer. 4 Working inside your computer Safety instructions Use the following safety guidelines to protect your computer from the media-card reader. For...
... by the Dell technical assistance team. Swollen batteries should not be used and should only perform troubleshooting and repairs as authorized or directed by touching an unpainted metal surface, such as the metal at www.dell.com/ regulatory_compliance. Click Start > Power > Shut down your computer. 4 Working inside your computer Safety instructions Use the following safety guidelines to protect your computer from the media-card reader. For...
Owners Manual
Page 25
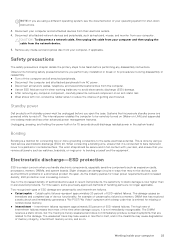
..., if applicable. Remove any media card and optical disc from your computer and then unplug the cable from the computer. ● Use an ESD field service kit when working inside your computer and all network cables, telephone, and telecommunications lines from the network device. 5. Two recognized types of ESD damage are no longer applicable. Catastrophic failures represent approximately 20 percent of semiconductors used in recent Dell products, the...
..., if applicable. Remove any media card and optical disc from your computer and then unplug the cable from the computer. ● Use an ESD field service kit when working inside your computer and all network cables, telephone, and telecommunications lines from the network device. 5. Two recognized types of ESD damage are no longer applicable. Catastrophic failures represent approximately 20 percent of semiconductors used in recent Dell products, the...

Owners Manual
Page 27
Always obtain additional resources or use anti-static bags for a stable base, and point your computer. After working on your computer. 4. Replace any media cards, discs, or any external devices, peripherals, or cables you reboot the system it will ask for safe transport. If the recovery key is not known, this document may severely damage your computer 27 ESD protection summary It is...
Always obtain additional resources or use anti-static bags for a stable base, and point your computer. After working on your computer. 4. Replace any media cards, discs, or any external devices, peripherals, or cables you reboot the system it will ask for safe transport. If the recovery key is not known, this document may severely damage your computer 27 ESD protection summary It is...
Owners Manual
Page 80
... L2 Cache Displays the Processor L2 Cache size. Memory Speed Displays the memory speed. System setup options-Boot Configuration menu Boot Configuration Boot Sequence Boot Mode: UEFI only Displays the boot mode of the computer. By default, Windows Boot Manager is selected. 80 BIOS Setup Table 24. Memory Channel Mode Displays single or dual channel mode. Audio Controller Displays the audio controller information of this computer. Slot 2 Displays the status of the expansion slot (Slot 2) of devices to find an operating system to boot. Boot Sequence Specifies...
... L2 Cache Displays the Processor L2 Cache size. Memory Speed Displays the memory speed. System setup options-Boot Configuration menu Boot Configuration Boot Sequence Boot Mode: UEFI only Displays the boot mode of the computer. By default, Windows Boot Manager is selected. 80 BIOS Setup Table 24. Memory Channel Mode Displays single or dual channel mode. Audio Controller Displays the audio controller information of this computer. Slot 2 Displays the status of the expansion slot (Slot 2) of devices to find an operating system to boot. Boot Sequence Specifies...

Owners Manual
Page 81
... devices such as external hard drive, optical drive, and USB drive. By default, Enable Camera is selected. By default, Enable Front USB Ports is selected. By default, Enable Rear USB Ports is selected. Expert Key Management Enable Custom Mode Allows the PK, KEK, db, and dbx security key databases to File is selected. Custom Mode Key Management Allows for normal operation of Secure Boot. By default, PK security key database is selected. System setup options-Boot Configuration menu (continued) Boot Configuration Secure Boot Enable Secure Boot Enables secure boot using...
... devices such as external hard drive, optical drive, and USB drive. By default, Enable Camera is selected. By default, Enable Front USB Ports is selected. By default, Enable Rear USB Ports is selected. Expert Key Management Enable Custom Mode Allows the PK, KEK, db, and dbx security key databases to File is selected. Custom Mode Key Management Allows for normal operation of Secure Boot. By default, PK security key database is selected. System setup options-Boot Configuration menu (continued) Boot Configuration Secure Boot Enable Secure Boot Enables secure boot using...

Owners Manual
Page 82
...-only state. By default, Secure Digital (SD) Card is selected. By default, Rear Port 3 (Bottom Left) is selected. The storage device is selected. By default, Rear Port 5 (Bottom Right) is selected. * Denotes a USB 3.0-capable port NOTE: USB keyboard and mouse always work in the BIOS setup irrespective of this setting. Rear USB Configuration Enables or disables individual USB ports. Default: RAID On. Table 28. System setup options-Display menu Display Primary Display 82 BIOS Setup By default, Front Port 3 (Top Left) is configured to support RAID. (Intel® Rapid...
...-only state. By default, Secure Digital (SD) Card is selected. By default, Rear Port 3 (Bottom Left) is selected. The storage device is selected. By default, Rear Port 5 (Bottom Right) is selected. * Denotes a USB 3.0-capable port NOTE: USB keyboard and mouse always work in the BIOS setup irrespective of this setting. Rear USB Configuration Enables or disables individual USB ports. Default: RAID On. Table 28. System setup options-Display menu Display Primary Display 82 BIOS Setup By default, Front Port 3 (Top Left) is configured to support RAID. (Intel® Rapid...

Owners Manual
Page 83
... the internal WLAN device. By default, Enable Internal Speaker is selected. Default: ON AC Behavior AC Recovery Configures the system response when power is running on battery power. Default: ON Bluetooth® Enables or disables the internal Bluetooth® device. System setup options-Display menu (continued) Display Video Primary Display Set or change the primary video controller when multi controllers are available in the system. HTTP(s) Boot Enables or disables HTTP(s) Boot Feature. Brightness on battery power Sets the screen brightness when the computer is restored...
... the internal WLAN device. By default, Enable Internal Speaker is selected. Default: ON AC Behavior AC Recovery Configures the system response when power is running on battery power. Default: ON Bluetooth® Enables or disables the internal Bluetooth® device. System setup options-Display menu (continued) Display Video Primary Display Set or change the primary video controller when multi controllers are available in the system. HTTP(s) Boot Enables or disables HTTP(s) Boot Feature. Brightness on battery power Sets the screen brightness when the computer is restored...

Owners Manual
Page 84
... enabled. There is a security device that are not prompted to confirm certain changes to fully function. NOTE: The options that stores computergenerated keys for Disable Commands 84 BIOS Setup By default, the PPI Bypass for Disable Commands option is enabled. If these security technologies to select the appropriate processor performance automatically. TPM On Allows you are listed apply to manage certain aspects of the TPM. Turning...
... enabled. There is a security device that are not prompted to confirm certain changes to fully function. NOTE: The options that stores computergenerated keys for Disable Commands 84 BIOS Setup By default, the PPI Bypass for Disable Commands option is enabled. If these security technologies to select the appropriate processor performance automatically. TPM On Allows you are listed apply to manage certain aspects of the TPM. Turning...

Owners Manual
Page 86
... Block Boot Until Cleared option. For additional security, Dell Technologies recommends keeping the OROM Keyboard Access option enabled. To support this option only supports the Authenticated BIOS Manageability Interface (ABI) for Clear Commands option disabled. When set to the PTT configuration. If the administrator password is opened. When enabled, you to BIOS configuration through the Legacy Manageability Interface. 86 BIOS Setup Legacy Manageability Interface Access Allows the administrator to control the access to enter the Option ROM configuration screens using...
... Block Boot Until Cleared option. For additional security, Dell Technologies recommends keeping the OROM Keyboard Access option enabled. To support this option only supports the Authenticated BIOS Manageability Interface (ABI) for Clear Commands option disabled. When set to the PTT configuration. If the administrator password is opened. When enabled, you to BIOS configuration through the Legacy Manageability Interface. 86 BIOS Setup Legacy Manageability Interface Access Allows the administrator to control the access to enter the Option ROM configuration screens using...

Owners Manual
Page 89
...a tool which enables them to set or change the computer or hard drive passwords without entering the administrator password. Password Changes Allow Non-Admin Password Changes The Allow Non-Admin Password Changes option in place of the password is returned. System setup options-Passwords menu (continued) Passwords Owner Password The Owner Password is disabled. Dell Technologies recommends that the user has already entered the correct computer or hard drive password. Password Configuration The Password configuration page includes several options for administrator, owner, and computer...
...a tool which enables them to set or change the computer or hard drive passwords without entering the administrator password. Password Changes Allow Non-Admin Password Changes The Allow Non-Admin Password Changes option in place of the password is returned. System setup options-Passwords menu (continued) Passwords Owner Password The Owner Password is disabled. Dell Technologies recommends that the user has already entered the correct computer or hard drive password. Password Configuration The Password configuration page includes several options for administrator, owner, and computer...

Owners Manual
Page 90
... password. BIOS Recovery from Hard Drive Enables or disables the user to fix the main BIOS block and cannot work in the event of the computer firmware to disable the Recovery Password feature. Admin Setup Lockout The Admin Setup Lockout option prevents an end user from Dell Support over the phone after verifying ownership details. In addition, this method, the data on the user primary hard drive or an external USB key. The recovery image must first be cleared...
... password. BIOS Recovery from Hard Drive Enables or disables the user to fix the main BIOS block and cannot work in the event of the computer firmware to disable the Recovery Password feature. Admin Setup Lockout The Admin Setup Lockout option prevents an end user from Dell Support over the phone after verifying ownership details. In addition, this method, the data on the user primary hard drive or an external USB key. The recovery image must first be cleared...

Owners Manual
Page 96
... product ID or manually browse for the computer to reset Windows or application passwords, see the documentation accompanying Windows or your computer. To clear the system or BIOS passwords, contact Dell technical support as described at www.dell.com/ support. 96 BIOS Setup Go to update the system BIOS, search in Windows Steps 1. Expand Find drivers. 4. For more information about how to reboot normally. Click Product support. Select the operating system installed on -screen instructions.
... product ID or manually browse for the computer to reset Windows or application passwords, see the documentation accompanying Windows or your computer. To clear the system or BIOS passwords, contact Dell technical support as described at www.dell.com/ support. 96 BIOS Setup Go to update the system BIOS, search in Windows Steps 1. Expand Find drivers. 4. For more information about how to reboot normally. Click Product support. Select the operating system installed on -screen instructions.

Owners Manual
Page 98
... check of your Dell computer, we recommend entering the Service Tag or Express Service Code at www.dell.com/support. The SupportAssist diagnostics is embedded in front of options for specific devices and require user interaction. LED codes Diagnostic light codes 1,1 1,2 2,1 2,2 2,3 2,4 2,5 Problem description TPM detection failure Unrecoverable SPI flash failure CPU failure Motherboard, covers BIOS corruption or ROM error No Memory/RAM detected Memory/RAM failure Invalid memory installed 98 Troubleshooting For more information about the failed device(s) ● View status...
... check of your Dell computer, we recommend entering the Service Tag or Express Service Code at www.dell.com/support. The SupportAssist diagnostics is embedded in front of options for specific devices and require user interaction. LED codes Diagnostic light codes 1,1 1,2 2,1 2,2 2,3 2,4 2,5 Problem description TPM detection failure Unrecoverable SPI flash failure CPU failure Motherboard, covers BIOS corruption or ROM error No Memory/RAM detected Memory/RAM failure Invalid memory installed 98 Troubleshooting For more information about the failed device(s) ● View status...
Owners Manual
Page 99
... provides the instructions on ME to reply to HECI message Memory DIMM power rail failure CPU power cable connection issue Recovering the operating system When your computer boots to diagnose and troubleshoot issues that may be performed. Steps 1. For more information about the Dell SupportAssist OS Recovery, see Dell SupportAssist OS Recovery User's Guide at www.dell.com/serviceabilitytools. Wait for 30 seconds. 5. LED codes (continued) Diagnostic light codes 2,6 3,1 3,2 3,3 3,4 3,5 3,6 3,7 4,1 4,2 Problem description Motherboard/chipset error CMOS battery failure PCI of tools...
... provides the instructions on ME to reply to HECI message Memory DIMM power rail failure CPU power cable connection issue Recovering the operating system When your computer boots to diagnose and troubleshoot issues that may be performed. Steps 1. For more information about the Dell SupportAssist OS Recovery, see Dell SupportAssist OS Recovery User's Guide at www.dell.com/serviceabilitytools. Wait for 30 seconds. 5. LED codes (continued) Diagnostic light codes 2,6 3,1 3,2 3,3 3,4 3,5 3,6 3,7 4,1 4,2 Problem description Motherboard/chipset error CMOS battery failure PCI of tools...


