Solutions Guide
Page 13
... remove a memory module from the system board or disconnect a device from environmental hazards such as baggage. You can put the hard drive through an X-ray security machine, but never put the drive through an X-ray security machine, but never put your computer, battery, and hard drive from the computer, turn off the computer, disconnect the AC adapter cable, and then wait 5 seconds before turning on power...
... remove a memory module from the system board or disconnect a device from environmental hazards such as baggage. You can put the hard drive through an X-ray security machine, but never put the drive through an X-ray security machine, but never put your computer, battery, and hard drive from the computer, turn off the computer, disconnect the AC adapter cable, and then wait 5 seconds before turning on power...

Solutions Guide
Page 14
....dell.com | support.dell.com When Using Your Computer (continued) • Clean the display with a soft, clean cloth and water. When Working Inside Your Computer Before removing or installing memory modules, Mini PCI cards, or modems, perform the following these procedures, you confirm that you are installing memory modules, a Mini PCI card, or a modem. CAUTION: Viewing the display or external monitor screen for continuous operation as office equipment. Do not use...
....dell.com | support.dell.com When Using Your Computer (continued) • Clean the display with a soft, clean cloth and water. When Working Inside Your Computer Before removing or installing memory modules, Mini PCI cards, or modems, perform the following these procedures, you confirm that you are installing memory modules, a Mini PCI card, or a modem. CAUTION: Viewing the display or external monitor screen for continuous operation as office equipment. Do not use...
Solutions Guide
Page 26
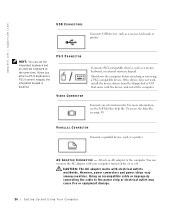
.... 26 Setting Up and Using Yo ur Computer www.dell.com | support.dell.com USB CONNECTORS Connects USB devices, such as a mouse, keyboard, or external numeric keypad. When you attach a PS/2 keyboard or PS/2 numeric keypad, the integrated keypad is disabled. PARALLEL CONNECTOR Connects a parallel device, such as a printer. A C A D A P T ER C O N N EC T O R - Using an incompatible cable or improperly connecting the cable to the computer. Shut down the computer before attaching or removing...
.... 26 Setting Up and Using Yo ur Computer www.dell.com | support.dell.com USB CONNECTORS Connects USB devices, such as a mouse, keyboard, or external numeric keypad. When you attach a PS/2 keyboard or PS/2 numeric keypad, the integrated keypad is disabled. PARALLEL CONNECTOR Connects a parallel device, such as a printer. A C A D A P T ER C O N N EC T O R - Using an incompatible cable or improperly connecting the cable to the computer. Shut down the computer before attaching or removing...
Solutions Guide
Page 29
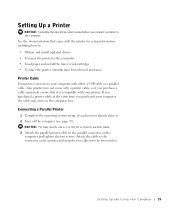
... to: • Obtain and install updated drivers. • Connect the printer to the computer. • Load paper and install the toner or ink cartridge • Contact the printer manufacturer for technical assistance Printer Cable Your printer connects to the computer. Setting Up a Printer NOTICE: Complete the operating system setup before you have not already done so. 2 Turn off the computer (see...
... to: • Obtain and install updated drivers. • Connect the printer to the computer. • Load paper and install the toner or ink cartridge • Contact the printer manufacturer for technical assistance Printer Cable Your printer connects to the computer. Setting Up a Printer NOTICE: Complete the operating system setup before you have not already done so. 2 Turn off the computer (see...

Solutions Guide
Page 30
... the USB printer cable to the USB connectors on the computer. Connecting a USB Printer 1 Complete the operating system setup if you have not already done so. 2 Install the printer driver if necessary. The USB connectors fit only one way. 30 Setting Up and Using Yo ur Computer If the Add New Hardware Wizard window appears, click Cancel. 5 Install the printer driver if necessary. www.dell.com | support.dell.com parallel...
... the USB printer cable to the USB connectors on the computer. Connecting a USB Printer 1 Complete the operating system setup if you have not already done so. 2 Install the printer driver if necessary. The USB connectors fit only one way. 30 Setting Up and Using Yo ur Computer If the Add New Hardware Wizard window appears, click Cancel. 5 Install the printer driver if necessary. www.dell.com | support.dell.com parallel...

Solutions Guide
Page 40
... the right of the keypad keys. • To enable and disable the numeric keypad, press light indicates that the keypad is active. . The keypad numbers and symbols are marked in blue on the keypad has multiple functions. www.dell.com | support.dell.com Numeric Keypad numeric keypad HINT: When you connect an external PS/2 keyboard or PS/2 keypad to the computer, the integrated keypad...
... the right of the keypad keys. • To enable and disable the numeric keypad, press light indicates that the keypad is active. . The keypad numbers and symbols are marked in blue on the keypad has multiple functions. www.dell.com | support.dell.com Numeric Keypad numeric keypad HINT: When you connect an external PS/2 keyboard or PS/2 keypad to the computer, the integrated keypad...

Solutions Guide
Page 65
... it is connected to an electrical outlet, Dell recommends that you turn off the battery and put it . So l vi n g Pro b l em s 65 E-Mail Problems E N S U R E T H A T Y O U A R E C O N N E C T E D T O T H E I D E R - Contact your Internet service provider for at least 24 hours in a safe place to dry. 7 Remove the hard drive (see page 85). 8 Remove the memory module (see page 79). 9 Open the display and place the computer right-side up across two books or...
... it is connected to an electrical outlet, Dell recommends that you turn off the battery and put it . So l vi n g Pro b l em s 65 E-Mail Problems E N S U R E T H A T Y O U A R E C O N N E C T E D T O T H E I D E R - Contact your Internet service provider for at least 24 hours in a safe place to dry. 7 Remove the hard drive (see page 85). 8 Remove the memory module (see page 79). 9 Open the display and place the computer right-side up across two books or...
Solutions Guide
Page 69
... your operating system. 1 Save and close any open files, exit any open programs, and insert the Drivers and Utilities CD. 2 Click the Start button and click Control Panel. 3 Under Pick a category, click Performance and Maintenance. 4 Under or pick a Control Panel icon, click System. 5 Click the Hardware tab. 6 Click Device Manager. 7 Click Action and click Update Driver. 8 Click Install from a list or specific location (Advanced) and click Next. 9 Verify that Search removable media is...
... your operating system. 1 Save and close any open files, exit any open programs, and insert the Drivers and Utilities CD. 2 Click the Start button and click Control Panel. 3 Under Pick a category, click Performance and Maintenance. 4 Under or pick a Control Panel icon, click System. 5 Click the Hardware tab. 6 Click Device Manager. 7 Click Action and click Update Driver. 8 Click Install from a list or specific location (Advanced) and click Next. 9 Verify that Search removable media is...

Solutions Guide
Page 71
... Restore does not monitor changes to the computer's hardware or software (including new hardware or program installations), or other system settings, have left the computer in the My Documents folder, data files, or e-mail messages after restoring the computer to make regular backups of a hard disk malfunction, use System Restore, confirm that it becomes inaccessible because of your data files. Using System Restore The Microsoft® Windows® XP operating...
... Restore does not monitor changes to the computer's hardware or software (including new hardware or program installations), or other system settings, have left the computer in the My Documents folder, data files, or e-mail messages after restoring the computer to make regular backups of a hard disk malfunction, use System Restore, confirm that it becomes inaccessible because of your data files. Using System Restore The Microsoft® Windows® XP operating...

Solutions Guide
Page 72
... Restore. 2 Click Create a restore point. 3 Click Next. 4 Type a name for the new restore point in the Restore point description field. If Device Driver Rollback does not resolve the problem, then use the System Restore Wizard, click the Start button, click Help and Support, click System Restore, and then follow the instructions on as the computer administrator or a user with administrator rights. NOTICE: Before restoring the computer to an earlier operating...
... Restore. 2 Click Create a restore point. 3 Click Next. 4 Type a name for the new restore point in the Restore point description field. If Device Driver Rollback does not resolve the problem, then use the System Restore Wizard, click the Start button, click Help and Support, click System Restore, and then follow the instructions on as the computer administrator or a user with administrator rights. NOTICE: Before restoring the computer to an earlier operating...
Solutions Guide
Page 75
... Setup screen appears, and the operating system begins to boot from the drive. 4 If you are reinstalling Windows XP Home Edition, at the Computer Name and Administrator Password window, enter a name for your current Windows XP data, type r to complete the setup depends on the screen. HINT: The time required to select the repair option, and then remove the CD from CD message appears, press any key...
... Setup screen appears, and the operating system begins to boot from the drive. 4 If you are reinstalling Windows XP Home Edition, at the Computer Name and Administrator Password window, enter a name for your current Windows XP data, type r to complete the setup depends on the screen. HINT: The time required to select the repair option, and then remove the CD from CD message appears, press any key...

Solutions Guide
Page 80
a Use your fingertips to spread the inner metal tabs that secure the memory module. 6 If you are replacing a memory module, remove the existing module. The module should pop up. No error message indicates this failure. 7 Ground yourself and install the new memory module: a Align the notch in the module with the slot in the center of the module firmly into the connector, and rotate the module down until you do...
a Use your fingertips to spread the inner metal tabs that secure the memory module. 6 If you are replacing a memory module, remove the existing module. The module should pop up. No error message indicates this failure. 7 Ground yourself and install the new memory module: a Align the notch in the module with the slot in the center of the module firmly into the connector, and rotate the module down until you do...
Solutions Guide
Page 97
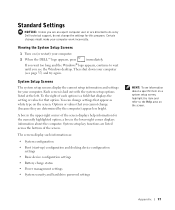
... you cannot change (because they are listed across the bottom of each option is laid out with the system setup options listed at the left. To the right of the screen. System setup key functions are determined by Dell technical support, do not change settings that appear as : • System configuration • Boot (start-up) configuration and docking device configuration settings • Basic device configuration settings • Battery charge status • Power management settings • System security and hard drive password settings HINT...
... you cannot change (because they are listed across the bottom of each option is laid out with the system setup options listed at the left. To the right of the screen. System setup key functions are determined by Dell technical support, do not change settings that appear as : • System configuration • Boot (start-up) configuration and docking device configuration settings • Basic device configuration settings • Battery charge status • Power management settings • System security and hard drive password settings HINT...

Solutions Guide
Page 102
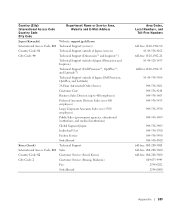
... Care Home/Small Business Sales Corporate Sales Fax Switchboard Bermuda General Support Bolivia General Support Brazil Website: www.dell.com/br International Access Code: 00 Customer Support, Technical Support Country Code: 55 Tech Support Fax City Code: 51 Customer Care Fax Sales British Virgin Islands General Support Area Codes, Local Numbers, and Toll-Free Numbers 01 795 67602 01 795 67605 01 795 67603 0660 8056...
... Care Home/Small Business Sales Corporate Sales Fax Switchboard Bermuda General Support Bolivia General Support Brazil Website: www.dell.com/br International Access Code: 00 Customer Support, Technical Support Country Code: 55 Tech Support Fax City Code: 51 Customer Care Fax Sales British Virgin Islands General Support Area Codes, Local Numbers, and Toll-Free Numbers 01 795 67602 01 795 67605 01 795 67603 0660 8056...
Solutions Guide
Page 109
... Japan (Kawasaki) Website: support.jp.dell.com International Access Code: 001 Technical Support (servers) Country Code: 81 Technical Support outside of Japan (servers) City Code: 44 Technical Support (Dimension™ and Inspiron™) Technical Support outside of Japan (Dimension and Inspiron) Technical Support (Dell Precision™, OptiPlex™, and Latitude™) Technical Support outside of Japan (Dell Precision, OptiPlex, and Latitude) 24-Hour Automated Order Service Customer Care Business...
... Japan (Kawasaki) Website: support.jp.dell.com International Access Code: 001 Technical Support (servers) Country Code: 81 Technical Support outside of Japan (servers) City Code: 44 Technical Support (Dimension™ and Inspiron™) Technical Support outside of Japan (Dimension and Inspiron) Technical Support (Dell Precision™, OptiPlex™, and Latitude™) Technical Support outside of Japan (Dell Precision, OptiPlex, and Latitude) 24-Hour Automated Order Service Customer Care Business...

Solutions Guide
Page 110
...) International Access Code: 00 Country Code: 60 City Code: 4 Website: support.euro.dell.com E-mail: tech_be@dell.com Technical Support (Brussels, Belgium) Home/Small Business Sales (Brussels, Belgium) Corporate Sales (Brussels, Belgium) Customer Care (Brussels, Belgium) Fax (Brussels, Belgium) Switchboard (Brussels, Belgium) Technical Support Customer Service (Penang, Malaysia) Transaction Sales Technical Support Customer Service Transaction Sales Corporate Sales Area Codes, Local Numbers, and Toll-Free Numbers 512...
...) International Access Code: 00 Country Code: 60 City Code: 4 Website: support.euro.dell.com E-mail: tech_be@dell.com Technical Support (Brussels, Belgium) Home/Small Business Sales (Brussels, Belgium) Corporate Sales (Brussels, Belgium) Customer Care (Brussels, Belgium) Fax (Brussels, Belgium) Switchboard (Brussels, Belgium) Technical Support Customer Service (Penang, Malaysia) Transaction Sales Technical Support Customer Service Transaction Sales Corporate Sales Area Codes, Local Numbers, and Toll-Free Numbers 512...
Solutions Guide
Page 114
www.dell.com | support.dell.com Country (City) International Access Code Country Code City Code Department Name or Service Area, Website and E-Mail Address Sweden (Upplands Vasby) Website: support.euro.dell.com International Access Code: 00 E-mail: swe_support@dell.com Country Code: 46 City Code: 8 E-mail Support for Latitude and Inspiron: Swe-nbk_kats@dell.com E-mail Support for OptiPlex: Swe_kats@dell.com E-mail Support for Servers: Nordic_server_support@dell.com Technical Support Relational Customer Care Home/Small...
www.dell.com | support.dell.com Country (City) International Access Code Country Code City Code Department Name or Service Area, Website and E-Mail Address Sweden (Upplands Vasby) Website: support.euro.dell.com International Access Code: 00 E-mail: swe_support@dell.com Country Code: 46 City Code: 8 E-mail Support for Latitude and Inspiron: Swe-nbk_kats@dell.com E-mail Support for OptiPlex: Swe_kats@dell.com E-mail Support for Servers: Nordic_server_support@dell.com Technical Support Relational Customer Care Home/Small...
Solutions Guide
Page 119
...serial numbers • Products for which warranty you purchased, see the invoice that result from: - Failure to follow the product instructions or failure to the Dell-branded hardware products through our factory-integration system, third-party software, or the reloading of software • Non-Dell-branded products and accessories • Problems that accompanied your -our end-user customer's-Dellbranded hardware products, including Dell...year limited warranty. DELL'S RESPONSIBILITY FOR MALFUNCITONS AND DEFECTS IN HARDWARE IS LIMITED TO REPAIR AND REPLACEMENT AS SET FORTH IN THIS ...
...serial numbers • Products for which warranty you purchased, see the invoice that result from: - Failure to follow the product instructions or failure to the Dell-branded hardware products through our factory-integration system, third-party software, or the reloading of software • Non-Dell-branded products and accessories • Problems that accompanied your -our end-user customer's-Dellbranded hardware products, including Dell...year limited warranty. DELL'S RESPONSIBILITY FOR MALFUNCITONS AND DEFECTS IN HARDWARE IS LIMITED TO REPAIR AND REPLACEMENT AS SET FORTH IN THIS ...

Solutions Guide
Page 123
...'s-Dellbranded hardware products, including Dell-branded monitors, keyboards, wireless access points, and pointing devices (mice). This limited warranty covers defects in materials and workmanship in order to return the product. Servicing not authorized by us • Products with electrical power - • Reconditioned or Refurbished Dell-Branded Hardware Products and Parts - This limited warranty does not cover: • Software, including the operating system and software added to perform preventive maintenance - External...
...'s-Dellbranded hardware products, including Dell-branded monitors, keyboards, wireless access points, and pointing devices (mice). This limited warranty covers defects in materials and workmanship in order to return the product. Servicing not authorized by us • Products with electrical power - • Reconditioned or Refurbished Dell-Branded Hardware Products and Parts - This limited warranty does not cover: • Software, including the operating system and software added to perform preventive maintenance - External...

Solutions Guide
Page 128
..., indicating name and address of the seller, date of purchase, model and serial number, name and address of the customer, and details of symptoms and configuration at Dell's expense. Limitation and Statutory Rights Dell makes no other warranty, guarantee or like statement other than as explicitly stated above and the return number provided to and from : improper or inadequate installation, use...
..., indicating name and address of the seller, date of purchase, model and serial number, name and address of the customer, and details of symptoms and configuration at Dell's expense. Limitation and Statutory Rights Dell makes no other warranty, guarantee or like statement other than as explicitly stated above and the return number provided to and from : improper or inadequate installation, use...


