
Owners Manual
Page 12
After Working Inside Your Computer CAUTION: Leaving stray or loose screws inside your computer may severely damage your computer. 1 Replace all screws and make sure that no stray screws remain inside your computer. 2 Connect any external devices, peripherals, and cables you removed before working on your computer. 3 Replace any media cards, discs, and any other part(s) that you removed before working on your computer. 4 Connect your computer and all attached devices to their electrical outlets. 5 Turn on your computer. 12
After Working Inside Your Computer CAUTION: Leaving stray or loose screws inside your computer may severely damage your computer. 1 Replace all screws and make sure that no stray screws remain inside your computer. 2 Connect any external devices, peripherals, and cables you removed before working on your computer. 3 Replace any media cards, discs, and any other part(s) that you removed before working on your computer. 4 Connect your computer and all attached devices to their electrical outlets. 5 Turn on your computer. 12

Owners Manual
Page 80
13 Carefully lift the camera assembly and turn it over. 1 display bezel 3 screws (2) 2 camera assembly 14 Disconnect the camera cable from the camera assembly. 15 Remove the screw that secures the camera to the camera bracket. 16 Lift the camera at an angle and remove it from under the tab on the camera bracket. 1 screw 3 camera 5 camera cable 80 2 camera bracket 4 tab
13 Carefully lift the camera assembly and turn it over. 1 display bezel 3 screws (2) 2 camera assembly 14 Disconnect the camera cable from the camera assembly. 15 Remove the screw that secures the camera to the camera bracket. 16 Lift the camera at an angle and remove it from under the tab on the camera bracket. 1 screw 3 camera 5 camera cable 80 2 camera bracket 4 tab

Owners Manual
Page 81
... the screw hole on the camera bracket. 2 Replace the screw that secures the camera to the camera bracket. 3 Connect the camera cable to the camera. 4 Turn the camera assembly over and align the screw holes on the camera assembly with the screw holes on the display bezel. 5 Replace the screws that.... 8 Replace the screws that secure the camera assembly to secure the cable. 81 For more safety best practices, see the Regulatory Compliance home page at dell.com/regulatory_compliance. After working inside your computer and follow the instructions in Before Working Inside Your Computer.
... the screw hole on the camera bracket. 2 Replace the screw that secures the camera to the camera bracket. 3 Connect the camera cable to the camera. 4 Turn the camera assembly over and align the screw holes on the camera assembly with the screw holes on the display bezel. 5 Replace the screws that.... 8 Replace the screws that secure the camera assembly to secure the cable. 81 For more safety best practices, see the Regulatory Compliance home page at dell.com/regulatory_compliance. After working inside your computer and follow the instructions in Before Working Inside Your Computer.
Owners Manual
Page 83
.... 10 Save the file and once the download is available or when you have your computer's Service Tag and click Submit. To flash the BIOS: 1 Turn on your computer. 7 Click BIOS. 8 Click Download File to download the latest version of the Service Tag. If you do not have your computer's Service...
.... 10 Save the file and once the download is available or when you have your computer's Service Tag and click Submit. To flash the BIOS: 1 Turn on your computer. 7 Click BIOS. 8 Click Download File to download the latest version of the Service Tag. If you do not have your computer's Service...

Specifications
Page 2
... the right-side of your computer to cover the camera lens. 4 Camera Allows you to video chat, capture photos, and record videos. 5 Camera-status light Turns on . 3 Camera-cover latch Covers your computer camera lens.
... the right-side of your computer to cover the camera lens. 4 Camera Allows you to video chat, capture photos, and record videos. 5 Camera-status light Turns on . 3 Camera-cover latch Covers your computer camera lens.
Specifications
Page 4
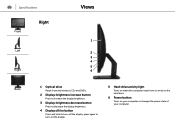
press again to decrease the display brightness. 4 Display off the display; Specifications Front Right Left Right Views 1 2 3 4 5 6 Back 1 Optical drive Reads from or writes to the hard drive. 6 Power button Turns on button Press and hold to turn -on the display. 5 Hard-drive activity light Turns on when the computer reads from and writes to CDs and DVDs. 2 Display-brightness increase button Press to increase the display brightness. 3 Display-brightness decrease3button Press to turn -off /on your computer or changes the power state of 4 your computer.
press again to decrease the display brightness. 4 Display off the display; Specifications Front Right Left Right Views 1 2 3 4 5 6 Back 1 Optical drive Reads from or writes to the hard drive. 6 Power button Turns on button Press and hold to turn -on the display. 5 Hard-drive activity light Turns on when the computer reads from and writes to CDs and DVDs. 2 Display-brightness increase button Press to increase the display brightness. 3 Display-brightness decrease3button Press to turn -off /on your computer or changes the power state of 4 your computer.

Me and My Dell
Page 3
Contents Windows 8.1 Features 12 Signing in 12 Microsoft account 12 Local account 12 Locking and unlocking your computer 12 Accessing the desktop 13 Turning off your computer 13 Start screen and tiles 14 Apps 14 Closing an app 14 Snapping apps 14 More Information 15 Setting Up Your Computer ... to the Internet Using WLAN 16 Connecting to the Internet Using WWAN 17 Setting up Audio 18 Configuring 5.1/7.1 Audio 18 Connecting 5.1 Speakers 19 Connecting 7.1 Speakers 20 Setting Up Your Printer 21 Contents 3
Contents Windows 8.1 Features 12 Signing in 12 Microsoft account 12 Local account 12 Locking and unlocking your computer 12 Accessing the desktop 13 Turning off your computer 13 Start screen and tiles 14 Apps 14 Closing an app 14 Snapping apps 14 More Information 15 Setting Up Your Computer ... to the Internet Using WLAN 16 Connecting to the Internet Using WWAN 17 Setting up Audio 18 Configuring 5.1/7.1 Audio 18 Connecting 5.1 Speakers 19 Connecting 7.1 Speakers 20 Setting Up Your Printer 21 Contents 3
Me and My Dell
Page 13
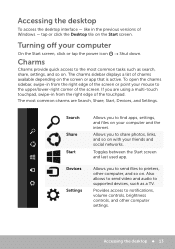
... the desktop 13 Allows you to share photos, links, and so on your friends and social networks. The most common tasks such as a TV. Turning off your mouse to printers, other computer settings. Accessing the desktop To access the desktop interface - tap or click the Desktop tile on the screen...
... the desktop 13 Allows you to share photos, links, and so on your friends and social networks. The most common tasks such as a TV. Turning off your mouse to printers, other computer settings. Accessing the desktop To access the desktop interface - tap or click the Desktop tile on the screen...
Me and My Dell
Page 16
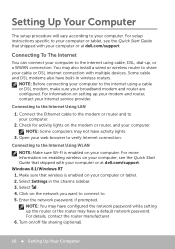
... your computer. Check for activity lights on your computer to the internet using a cable or DSL modem, make sure your computer or at dell.com/support. NOTE: Some computers may also install a wired or wireless router to share your cable or DSL internet connection with your computer,...WLAN NOTE: Make sure Wi-Fi is enabled on the network you want to connect to the Internet Using LAN 1. Select . 4. Turn on your computer or at dell.com/support. Click on your computer. 2. Windows 8.1/Windows RT 1. Connecting To The Internet You can connect your computer. Open your ...
... your computer. Check for activity lights on your computer to the internet using a cable or DSL modem, make sure your computer or at dell.com/support. NOTE: Some computers may also install a wired or wireless router to share your cable or DSL internet connection with your computer,...WLAN NOTE: Make sure Wi-Fi is enabled on the network you want to connect to the Internet Using LAN 1. Select . 4. Turn on your computer or at dell.com/support. Click on your computer. 2. Windows 8.1/Windows RT 1. Connecting To The Internet You can connect your computer. Open your ...

Me and My Dell
Page 17
... to connect to . Windows 8.1/Windows RT 1. Make sure that wireless is enabled on your computer or tablet. 2. Select Settings in the search box and press . 2. Turn on the network you want to connect to . 4. Click Start , type Mobile Broadband Utility in the charms sidebar. 3. Setting Up Your Computer 17 In...
... to connect to . Windows 8.1/Windows RT 1. Make sure that wireless is enabled on your computer or tablet. 2. Select Settings in the search box and press . 2. Turn on the network you want to connect to . 4. Click Start , type Mobile Broadband Utility in the charms sidebar. 3. Setting Up Your Computer 17 In...
Me and My Dell
Page 22
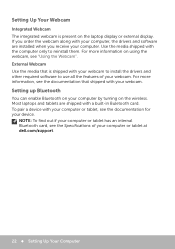
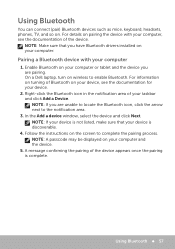
NOTE: To find out if your computer or tablet has an internal Bluetooth card, see the Specifications of your computer or tablet at dell.com/support. 22 Setting Up Your Computer If you receive your webcam. For more information on the wireless. Most laptops and tablets ...up Bluetooth You can enable Bluetooth on your device. Use the media shipped with your computer or tablet, see the documentation for your computer by turning on using the webcam, see the documentation that is present on the laptop display or external display. To pair a device with the computer ...
NOTE: To find out if your computer or tablet has an internal Bluetooth card, see the Specifications of your computer or tablet at dell.com/support. 22 Setting Up Your Computer If you receive your webcam. For more information on the wireless. Most laptops and tablets ...up Bluetooth You can enable Bluetooth on your device. Use the media shipped with your computer or tablet, see the documentation for your computer by turning on using the webcam, see the documentation that is present on the laptop display or external display. To pair a device with the computer ...

Me and My Dell
Page 24
... batteries. Battery Batteries are type of system board, temperature, the time for several years. The life cycle of the battery is turned off , and so on your computer may require a Dell service technician to use your computer. Depending on the computer model, the battery on . 24 Battery After the battery life...
... batteries. Battery Batteries are type of system board, temperature, the time for several years. The life cycle of the battery is turned off , and so on your computer may require a Dell service technician to use your computer. Depending on the computer model, the battery on . 24 Battery After the battery life...

Me and My Dell
Page 27
... arrow keys Physical Keyboard Physical keyboards are generally used with desktop computers. Some keyboards may have a built-in a dark environment. You can turn on the backlight manually or configure the backlight to allow for using the keyboard in dark environments. • Navigation keys for volume adjustment, application...on. Keyboard Backlight The backlight present on some physical keyboards illuminates the symbols on the keys to turn on automatically when your computer is placed in keyboard. Keyboard 27 External keyboards are used with laptop and desktop computers...
... arrow keys Physical Keyboard Physical keyboards are generally used with desktop computers. Some keyboards may have a built-in a dark environment. You can turn on the backlight manually or configure the backlight to allow for using the keyboard in dark environments. • Navigation keys for volume adjustment, application...on. Keyboard Backlight The backlight present on some physical keyboards illuminates the symbols on the keys to turn on automatically when your computer is placed in keyboard. Keyboard 27 External keyboards are used with laptop and desktop computers...
Me and My Dell
Page 29
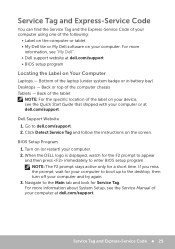
... bay) Desktops - Service Tag and Express-Service Code 29 Dell Support Website 1. Click Detect Service Tag and follow the instructions on (or restart) your computer at dell.com/support. BIOS Setup Program 1. Turn on the screen. Bottom of the computer chassis Tablets - Go to ...the desktop, then turn off your computer. NOTE: The F2 prompt stays active only for the ...
... bay) Desktops - Service Tag and Express-Service Code 29 Dell Support Website 1. Click Detect Service Tag and follow the instructions on (or restart) your computer at dell.com/support. BIOS Setup Program 1. Turn on the screen. Bottom of the computer chassis Tablets - Go to ...the desktop, then turn off your computer. NOTE: The F2 prompt stays active only for the ...
Me and My Dell
Page 30
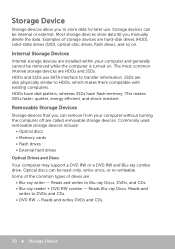
Internal Storage Devices Internal storage devices are HDDs and SSDs. The most common internal storage devices are installed within your computer without turning the computer off are : • Blu-ray writer - HDDs have disk platters, whereas SSDs have flash memory. Reads and writes DVDs and CDs. ...RW or a DVD RW and Blu-ray combo drive. Storage devices can remove from your computer and generally cannot be removed while the computer is turned on . Examples of drives are called removable storage devices. Reads and writes to DVDs and CDs. • DVD RW - Storage Device Storage ...
Internal Storage Devices Internal storage devices are HDDs and SSDs. The most common internal storage devices are installed within your computer without turning the computer off are : • Blu-ray writer - HDDs have disk platters, whereas SSDs have flash memory. Reads and writes DVDs and CDs. ...RW or a DVD RW and Blu-ray combo drive. Storage devices can remove from your computer and generally cannot be removed while the computer is turned on . Examples of drives are called removable storage devices. Reads and writes to DVDs and CDs. • DVD RW - Storage Device Storage ...

Me and My Dell
Page 43
... to each other or by default when wireless in turned on . You can be required for your computer or tablet, over a short distance. Bluetooth adapters can use NFC-enabled devices to your computer or tablet, see the documentation for WWAN connectivity. On Dell laptops and tablets that forward data at high speed...
... to each other or by default when wireless in turned on . You can be required for your computer or tablet, over a short distance. Bluetooth adapters can use NFC-enabled devices to your computer or tablet, see the documentation for WWAN connectivity. On Dell laptops and tablets that forward data at high speed...

Me and My Dell
Page 44
... due to perform other special keys, such as . Keyboard Shortcuts Some keys on ‑screen keyboard to type text and to being in use or turned off. Toggle between display devices - main display only, duplicate, extend to that option. Decrease brightness on the integrated display only (not on an integrated display...
... due to perform other special keys, such as . Keyboard Shortcuts Some keys on ‑screen keyboard to type text and to being in use or turned off. Toggle between display devices - main display only, duplicate, extend to that option. Decrease brightness on the integrated display only (not on an integrated display...
Me and My Dell
Page 57
Enable Bluetooth on your computer or tablet and the device you have Bluetooth drivers installed on your computer. On a Dell laptop, turn on your device, see the documentation of the device. For information on turning of Bluetooth on wireless to the notification area. 3. NOTE: Make sure that your device is complete. Pairing a Bluetooth device...
Enable Bluetooth on your computer or tablet and the device you have Bluetooth drivers installed on your computer. On a Dell laptop, turn on your device, see the documentation of the device. For information on turning of Bluetooth on wireless to the notification area. 3. NOTE: Make sure that your device is complete. Pairing a Bluetooth device...
Me and My Dell
Page 60
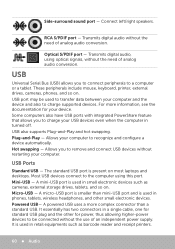
... laptops and desktops. Plug‑and‑Play - Allows you to connect peripherals to recognize and configure a device automatically. It essentially has two connectors in turned off. Transmits digital audio without restarting your computer. Transmits digital audio, using this port. Hot swapping - USB Ports Standard USB - Micro‑USB - Mini‑...
... laptops and desktops. Plug‑and‑Play - Allows you to connect peripherals to recognize and configure a device automatically. It essentially has two connectors in turned off. Transmits digital audio without restarting your computer. Transmits digital audio, using this port. Hot swapping - USB Ports Standard USB - Micro‑USB - Mini‑...
Me and My Dell
Page 61
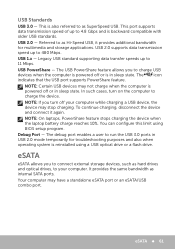
...an eSATA/USB combo port. NOTE: Certain USB devices may not charge when the computer is powered off your computer. In such cases, turn off or is reinstalled using BIOS setup program. NOTE: On laptops, PowerShare feature stops charging the device when the laptop battery charge reaches...sleep state. You can configure this limit using a USB optical drive or a flash drive. Your computer may stop charging. eSATA eSATA allows you turn on the computer to 480 Mbps. USB PowerShare - This port supports data transmission speed of up to run the USB 3.0 ports in USB 2.0...
...an eSATA/USB combo port. NOTE: Certain USB devices may not charge when the computer is powered off your computer. In such cases, turn off or is reinstalled using BIOS setup program. NOTE: On laptops, PowerShare feature stops charging the device when the laptop battery charge reaches...sleep state. You can configure this limit using a USB optical drive or a flash drive. Your computer may stop charging. eSATA eSATA allows you turn on the computer to 480 Mbps. USB PowerShare - This port supports data transmission speed of up to run the USB 3.0 ports in USB 2.0...

