Owners Manual
Page 9
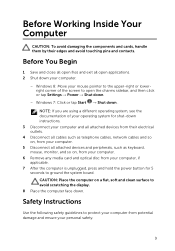
... of the screen to ground the system board. CAUTION: Place the computer on , from your computer. 6 Remove any media card and optical disc from potential damage and ensure your mouse pointer to the upper-right or lowerright corner of your operating system for shut-down instructions. 3 Disconnect your computer and all attached devices from their edges and avoid touching pins and contacts...
... of the screen to ground the system board. CAUTION: Place the computer on , from your computer. 6 Remove any media card and optical disc from potential damage and ensure your mouse pointer to the upper-right or lowerright corner of your operating system for shut-down instructions. 3 Disconnect your computer and all attached devices from their edges and avoid touching pins and contacts...
Owners Manual
Page 10
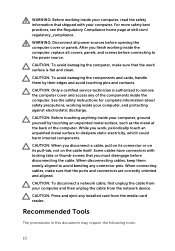
... computer, make sure that the work , periodically touch an unpainted metal surface to remove the computer cover and access any connector pins. CAUTION: Before touching anything inside your computer and then unplug the cable from the media-card reader. When disconnecting cables, keep them by touching an unpainted metal surface, such as the metal at dell.com/ regulatory_compliance. When connecting cables, make sure that the ports and connectors are...
... computer, make sure that the work , periodically touch an unpainted metal surface to remove the computer cover and access any connector pins. CAUTION: Before touching anything inside your computer and then unplug the cable from the media-card reader. When disconnecting cables, keep them by touching an unpainted metal surface, such as the metal at dell.com/ regulatory_compliance. When connecting cables, make sure that the ports and connectors are...

Owners Manual
Page 12
After Working Inside Your Computer CAUTION: Leaving stray or loose screws inside your computer may severely damage your computer. 1 Replace all screws and make sure that no stray screws remain inside your computer. 2 Connect any external devices, peripherals, and cables you removed before working on your computer. 3 Replace any media cards, discs, and any other part(s) that you removed before working on your computer. 4 Connect your computer and all attached devices to their electrical outlets. 5 Turn on your computer. 12
After Working Inside Your Computer CAUTION: Leaving stray or loose screws inside your computer may severely damage your computer. 1 Replace all screws and make sure that no stray screws remain inside your computer. 2 Connect any external devices, peripherals, and cables you removed before working on your computer. 3 Replace any media cards, discs, and any other part(s) that you removed before working on your computer. 4 Connect your computer and all attached devices to their electrical outlets. 5 Turn on your computer. 12
Owners Manual
Page 14
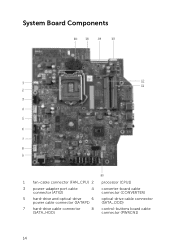
System Board Components 1 fan-cable connector (FAN_CPU) 2 processor (CPU1) 3 power-adapter port cable connector (ATX2) 4 converter-board cable connector (CONVERTER) 5 hard-drive and optical-drive 6 optical-drive cable connector power cable connector (SATAP1) (SATA_ODD) 7 hard-drive cable connector (SATA_HDD) 8 control-buttons board cable connector (PWRCN1) 14
System Board Components 1 fan-cable connector (FAN_CPU) 2 processor (CPU1) 3 power-adapter port cable connector (ATX2) 4 converter-board cable connector (CONVERTER) 5 hard-drive and optical-drive 6 optical-drive cable connector power cable connector (SATAP1) (SATA_ODD) 7 hard-drive cable connector (SATA_HDD) 8 control-buttons board cable connector (PWRCN1) 14
Owners Manual
Page 25
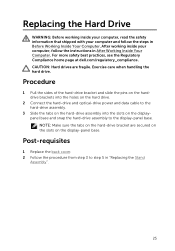
... dell.com/regulatory_compliance. Exercise care when handling the hard drive. Procedure 1 Pull the sides of the hard-drive bracket and slide the pins on the harddrive brackets into the holes on the hard drive. 2 Connect the hard-drive and optical-drive power and data cable to the hard-drive assembly. 3 Slide the tabs on the hard-drive assembly into the slots on the display-panel base. After working inside your computer and follow the instructions in "Replacing...
... dell.com/regulatory_compliance. Exercise care when handling the hard drive. Procedure 1 Pull the sides of the hard-drive bracket and slide the pins on the harddrive brackets into the holes on the hard drive. 2 Connect the hard-drive and optical-drive power and data cable to the hard-drive assembly. 3 Slide the tabs on the hard-drive assembly into the slots on the display-panel base. After working inside your computer and follow the instructions in "Replacing...
Owners Manual
Page 74
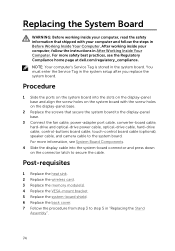
...Replace the wireless card. 3 Replace the memory module(s). 4 Replace the VESA-mount bracket. 5 Replace the system-board shield. 6 Replace the back cover. 7 Follow the procedure from step 3 to the system board. Replacing the System Board WARNING: Before working inside your computer, read the safety information that secure the system board to the display-panel base. 3 Connect the fan cable, power-adapter port cable, converter-board cable, hard-drive and optical-drive power cable, optical-drive cable, hard-drive cable, control-buttons board cable, touch-control board cable (optional), speaker...
...Replace the wireless card. 3 Replace the memory module(s). 4 Replace the VESA-mount bracket. 5 Replace the system-board shield. 6 Replace the back cover. 7 Follow the procedure from step 3 to the system board. Replacing the System Board WARNING: Before working inside your computer, read the safety information that secure the system board to the display-panel base. 3 Connect the fan cable, power-adapter port cable, converter-board cable, hard-drive and optical-drive power cable, optical-drive cable, hard-drive cable, control-buttons board cable, touch-control board cable (optional), speaker...
Me and My Dell
Page 16
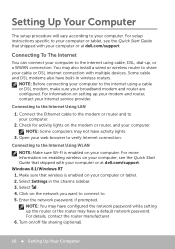
... (optional). 16 Setting Up Your Computer Turn on the network you want to connect to. 5. Connecting to the Internet Using LAN 1. You may not have activity lights. 3. Select Settings in wireless routers. Enter the network password, if prompted. Some cable and DSL modems also have a default network password. NOTE: Some computers may also install a wired or wireless router to share your broadband modem and router are configured. Windows 8.1/Windows RT 1. For more information on enabling wireless...
... (optional). 16 Setting Up Your Computer Turn on the network you want to connect to. 5. Connecting to the Internet Using LAN 1. You may not have activity lights. 3. Select Settings in wireless routers. Enter the network password, if prompted. Some cable and DSL modems also have a default network password. NOTE: Some computers may also install a wired or wireless router to share your broadband modem and router are configured. Windows 8.1/Windows RT 1. For more information on enabling wireless...
Me and My Dell
Page 18
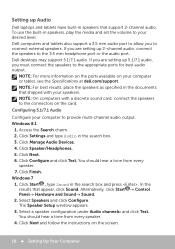
... are setting up 2‑channel audio, connect the speakers to your speakers. Windows 8.1 1. Click Settings and type Audio in the search box and press . Click Speaker/Headphones. 5. Click Next. 6. You should hear a tone from every speaker. 7. Click Start , type Sound in the search box. 3. Alternatively, click Start → Control Panel→ Hardware and Sound→ Sound. 2. Dell desktops may support 5.1/7.1 audio. Click Manage Audio Devices. 4. Click Finish. Select Speakers and click Configure. NOTE: For more information on the ports available...
... are setting up 2‑channel audio, connect the speakers to your speakers. Windows 8.1 1. Click Settings and type Audio in the search box and press . Click Speaker/Headphones. 5. Click Next. 6. You should hear a tone from every speaker. 7. Click Start , type Sound in the search box. 3. Alternatively, click Start → Control Panel→ Hardware and Sound→ Sound. 2. Dell desktops may support 5.1/7.1 audio. Click Manage Audio Devices. 4. Click Finish. Select Speakers and click Configure. NOTE: For more information on the ports available...
Me and My Dell
Page 21
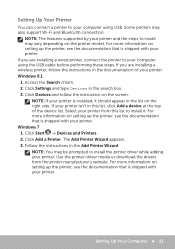
... Start → Devices and Printers. 2. Follow the instructions in the search box. 3. Use the printer-driver media or download the drivers from this list, click Add a device at the top of your computer using the USB cable before performing these steps. Windows 8.1 1. Access the Search charm. 2. Click Settings and type Devices in the Add Printer Wizard. Windows 7 1. NOTE: The features supported by your printer and the steps to install may be prompted to install...
... Start → Devices and Printers. 2. Follow the instructions in the search box. 3. Use the printer-driver media or download the drivers from this list, click Add a device at the top of your computer using the USB cable before performing these steps. Windows 8.1 1. Access the Search charm. 2. Click Settings and type Devices in the Add Printer Wizard. Windows 7 1. NOTE: The features supported by your printer and the steps to install may be prompted to install...
Me and My Dell
Page 22
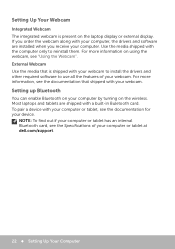
... can enable Bluetooth on your computer by turning on the laptop display or external display. To pair a device with the computer only to use all the features of your computer or tablet at dell.com/support. 22 Setting Up Your Computer Use the media shipped with your computer or tablet, see "Using the Webcam". External Webcam Use the media that shipped with a built-in Buletooth card...
... can enable Bluetooth on your computer by turning on the laptop display or external display. To pair a device with the computer only to use all the features of your computer or tablet at dell.com/support. 22 Setting Up Your Computer Use the media shipped with your computer or tablet, see "Using the Webcam". External Webcam Use the media that shipped with a built-in Buletooth card...
Me and My Dell
Page 30
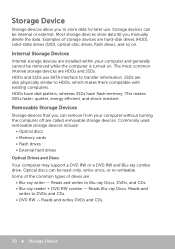
... is turned on . Some of the common types of storage devices are hard‑disk drives (HDD), solid‑state drives (SSD), optical-disc drives, flash drives, and so on . Reads Blu-ray Discs. Storage devices can be internal or external. Examples of drives are also physically similar to HDDs, which makes them compatible with existing computers. This makes SSDs faster, quieter, energy efficient, and shock resistant. Reads and writes DVDs and...
... is turned on . Some of the common types of storage devices are hard‑disk drives (HDD), solid‑state drives (SSD), optical-disc drives, flash drives, and so on . Reads Blu-ray Discs. Storage devices can be internal or external. Examples of drives are also physically similar to HDDs, which makes them compatible with existing computers. This makes SSDs faster, quieter, energy efficient, and shock resistant. Reads and writes DVDs and...
Me and My Dell
Page 34
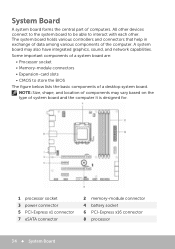
... 3 power connector 5 PCI-Express x1 connector 7 eSATA connector 2 memory-module connector 4 battery socket 6 PCI-Express x16 connector 8 processor 34 System Board Some important components of a system board are: • Processor socket • Memory-module connectors • Expansion‑card slots • CMOS to interact with each other. NOTE: Size, shape, and location of computers. System Board A system board forms the central part of components may also have integrated graphics, sound, and network capabilities. All other devices connect...
... 3 power connector 5 PCI-Express x1 connector 7 eSATA connector 2 memory-module connector 4 battery socket 6 PCI-Express x16 connector 8 processor 34 System Board Some important components of a system board are: • Processor socket • Memory-module connectors • Expansion‑card slots • CMOS to interact with each other. NOTE: Size, shape, and location of computers. System Board A system board forms the central part of components may also have integrated graphics, sound, and network capabilities. All other devices connect...

Me and My Dell
Page 39
... sound card and speakers must support 5.1/7.1 channels for audio output. A 7.1 audio system uses two additional speakers (rear left and rear right) in combination with two speakers (left surround, and right surround) and one subwoofer. 5.1 Audio 5.1 refers to a system with the 5.1 audio system. Speakers may support 3.5 mm audio connector, USB, or wireless connection to the number of audio channels in most surround-sound configurations. Speakers Laptops and tablets have a built-in speaker, however, they support; 2, 2.1, 5.1, 7.1, and so on setting...
... sound card and speakers must support 5.1/7.1 channels for audio output. A 7.1 audio system uses two additional speakers (rear left and rear right) in combination with two speakers (left surround, and right surround) and one subwoofer. 5.1 Audio 5.1 refers to a system with the 5.1 audio system. Speakers may support 3.5 mm audio connector, USB, or wireless connection to the number of audio channels in most surround-sound configurations. Speakers Laptops and tablets have a built-in speaker, however, they support; 2, 2.1, 5.1, 7.1, and so on setting...
Me and My Dell
Page 57
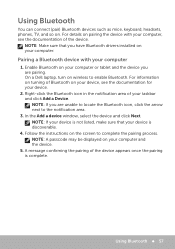
... and the device you have Bluetooth drivers installed on your device, see the documentation of the device appears once the pairing is not listed, make sure that you are unable to locate the Bluetooth icon, click the arrow next to complete the pairing process. Follow the instructions on wireless to enable Bluetooth. Enable Bluetooth on pairing the device with your computer 1. Using Bluetooth ...
... and the device you have Bluetooth drivers installed on your device, see the documentation of the device appears once the pairing is not listed, make sure that you are unable to locate the Bluetooth icon, click the arrow next to complete the pairing process. Follow the instructions on wireless to enable Bluetooth. Enable Bluetooth on pairing the device with your computer 1. Using Bluetooth ...
Me and My Dell
Page 60
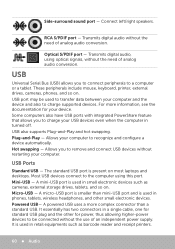
... devices such as barcode reader and receipt printers. 60 Audio Connect left/right speakers. USB Universal Serial Bus (USB) allows you to the computer using optical signals, without the need of analog audio conversion. Most USB devices connect to remove and connect USB devices without the use of an independent power supply. A micro-USB port is used in turned off. USB also supports Plug-and-Play and hot swapping. Allows your device. Mini‑USB - Optical S/PDIF port - These peripherals include mouse, keyboard, printer, external drives...
... devices such as barcode reader and receipt printers. 60 Audio Connect left/right speakers. USB Universal Serial Bus (USB) allows you to the computer using optical signals, without the need of analog audio conversion. Most USB devices connect to remove and connect USB devices without the use of an independent power supply. A micro-USB port is used in turned off. USB also supports Plug-and-Play and hot swapping. Allows your device. Mini‑USB - Optical S/PDIF port - These peripherals include mouse, keyboard, printer, external drives...
Me and My Dell
Page 61
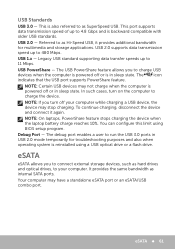
... such cases, turn off your computer. You can configure this limit using a USB optical drive or a flash drive. The USB PowerShare feature allows you turn on the computer to run the USB 3.0 ports in sleep state. USB PowerShare - To continue charging, disconnect the device and connect it provides additional bandwidth for troubleshooting purposes and also when operating system is also referred to connect external storage devices, such as Hi-Speed USB, it again. The debug port enables a user...
... such cases, turn off your computer. You can configure this limit using a USB optical drive or a flash drive. The USB PowerShare feature allows you turn on the computer to run the USB 3.0 ports in sleep state. USB PowerShare - To continue charging, disconnect the device and connect it provides additional bandwidth for troubleshooting purposes and also when operating system is also referred to connect external storage devices, such as Hi-Speed USB, it again. The debug port enables a user...
Me and My Dell
Page 67
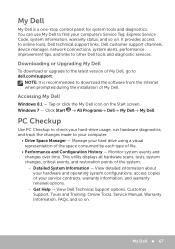
... diagnostics. Windows 7 - This utility displays all hardware scans, tests, system changes, critical events, and restoration points of My Dell. Get Help - View detailed information about your computer. • Drive Space Manager - Click Start → All Programs→ Dell→ My Dell→ My Dell. PC Checkup Use PC Checkup to check your hard‑drive usage, run hardware diagnostics, and track the changes made to your hardware and operating system configurations; Manage your computer's Service Tag, Express Service Code...
... diagnostics. Windows 7 - This utility displays all hardware scans, tests, system changes, critical events, and restoration points of My Dell. Get Help - View detailed information about your computer. • Drive Space Manager - Click Start → All Programs→ Dell→ My Dell→ My Dell. PC Checkup Use PC Checkup to check your hard‑drive usage, run hardware diagnostics, and track the changes made to your hardware and operating system configurations; Manage your computer's Service Tag, Express Service Code...
Me and My Dell
Page 69
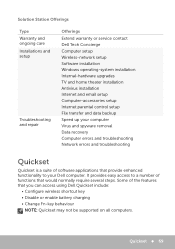
... access using Dell Quickset include: • Configure wireless shortcut key • Disable or enable battery charging • Change Fn‑key behaviour NOTE: Quickset may not be supported on all computers. Solution Station Offerings Type Warranty and ongoing care Installations and setup Troubleshooting and repair Offerings Extend warranty or service contact Dell Tech Concierge Computer setup Wireless‑network setup Software installation Windows operating‑system installation Internal‑hardware upgrades TV and home theater installation Antivirus installation Internet...
... access using Dell Quickset include: • Configure wireless shortcut key • Disable or enable battery charging • Change Fn‑key behaviour NOTE: Quickset may not be supported on all computers. Solution Station Offerings Type Warranty and ongoing care Installations and setup Troubleshooting and repair Offerings Extend warranty or service contact Dell Tech Concierge Computer setup Wireless‑network setup Software installation Windows operating‑system installation Internal‑hardware upgrades TV and home theater installation Antivirus installation Internet...
Me and My Dell
Page 72
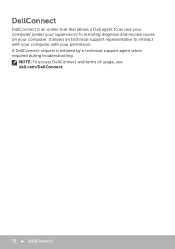
NOTE: To access DellConnect and terms of usage, see dell.com/DellConnect. 72 DellConnect A DellConnect request is an online tool that allows a Dell agent to access your computer (under your supervision) to interact with your computer with your computer. DellConnect DellConnect is initiated by a technical support agent when required during troubleshooting. It allows an technical support representative to remotely diagnose and resolve issues on your permission.
NOTE: To access DellConnect and terms of usage, see dell.com/DellConnect. 72 DellConnect A DellConnect request is an online tool that allows a Dell agent to access your computer (under your supervision) to interact with your computer with your computer. DellConnect DellConnect is initiated by a technical support agent when required during troubleshooting. It allows an technical support representative to remotely diagnose and resolve issues on your permission.
Me and My Dell
Page 91
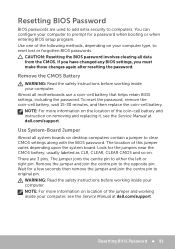
... battery. Use System‑Board Jumper Almost all system boards on your computer type, to reset lost or forgotten BIOS passwords. The location of the jumper and working inside your computer. There are used to add extra security to prompt for the jumpers near the CMOS battery, usually labeled as CLR, CLEAR, CLEAR CMOS and so on. WARNING: Read the safety instructions before working inside your computer, see the Service Manual at dell.com/support. CAUTION: Resetting the BIOS password involves clearing...
... battery. Use System‑Board Jumper Almost all system boards on your computer type, to reset lost or forgotten BIOS passwords. The location of the jumper and working inside your computer. There are used to add extra security to prompt for the jumpers near the CMOS battery, usually labeled as CLR, CLEAR, CLEAR CMOS and so on. WARNING: Read the safety instructions before working inside your computer, see the Service Manual at dell.com/support. CAUTION: Resetting the BIOS password involves clearing...


