

Owner's Manual
Page 3
... 7 Recommended Tools 8 2 After Working Inside Your Computer 9 3 Switch 11 Removing the Switch 11 Replacing the Switch 12 4 Battery 13 Removing the Battery 13 Replacing the Battery 13 5 Keyboard 15 Removing the Keyboard 15 Replacing the Keyboard 18 6 Base Cover 19 Removing the Base Cover 19 Replacing the Base Cover 20 7 Memory Module(s 21 Removing the Memory...
... 7 Recommended Tools 8 2 After Working Inside Your Computer 9 3 Switch 11 Removing the Switch 11 Replacing the Switch 12 4 Battery 13 Removing the Battery 13 Replacing the Battery 13 5 Keyboard 15 Removing the Keyboard 15 Replacing the Keyboard 18 6 Base Cover 19 Removing the Base Cover 19 Replacing the Base Cover 20 7 Memory Module(s 21 Removing the Memory...
Owner's Manual
Page 11
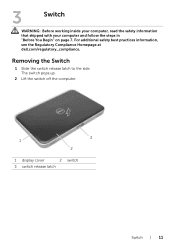
The switch pops up. 2 Lift the switch off the computer. 3 1 2 1 display cover 2 switch 3 switch release latch Switch | 11 For additional safety best practices information, see the Regulatory Compliance Homepage at dell.com/regulatory_compliance. Removing the Switch 1 Slide the switch release latch to the side. 3 Switch WARNING: Before working inside your computer, read the safety information that shipped with your computer and follow the steps in "Before You Begin" on page 7.
The switch pops up. 2 Lift the switch off the computer. 3 1 2 1 display cover 2 switch 3 switch release latch Switch | 11 For additional safety best practices information, see the Regulatory Compliance Homepage at dell.com/regulatory_compliance. Removing the Switch 1 Slide the switch release latch to the side. 3 Switch WARNING: Before working inside your computer, read the safety information that shipped with your computer and follow the steps in "Before You Begin" on page 7.
Owner's Manual
Page 12
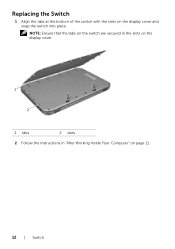
NOTE: Ensure that the tabs on the switch are secured in the slots on the display cover. 1 2 1 tabs 2 slots 2 Follow the instructions in "After Working Inside Your Computer" on the display cover and snap the switch into place. Replacing the Switch 1 Align the tabs at the bottom of the switch with the slots on page 11. 12 | Switch
NOTE: Ensure that the tabs on the switch are secured in the slots on the display cover. 1 2 1 tabs 2 slots 2 Follow the instructions in "After Working Inside Your Computer" on the display cover and snap the switch into place. Replacing the Switch 1 Align the tabs at the bottom of the switch with the slots on page 11. 12 | Switch


