
Me and My Dell
Page 3
Windows 8 17 Power Adapter 21 Battery 22 Laptop Battery 22 Conserving the Battery Power 22 Coin-Cell Battery 23 Improving the Battery Performance 23 Touchpad 24 About Touchpad 24 Touchpad Gestures 24 Scroll 24 Zoom 26 Rotate 27 Flick 28 My Favorites 28 Desktop 28 Display 29 3D Display 29 Wireless Display 29 Touchscreen Display 30 Contents 3 Contents Charms Sidebar 15 Signing in to Windows 8 16 Closing a Windows 8 app 17 Turning off your computer -
Windows 8 17 Power Adapter 21 Battery 22 Laptop Battery 22 Conserving the Battery Power 22 Coin-Cell Battery 23 Improving the Battery Performance 23 Touchpad 24 About Touchpad 24 Touchpad Gestures 24 Scroll 24 Zoom 26 Rotate 27 Flick 28 My Favorites 28 Desktop 28 Display 29 3D Display 29 Wireless Display 29 Touchscreen Display 30 Contents 3 Contents Charms Sidebar 15 Signing in to Windows 8 16 Closing a Windows 8 app 17 Turning off your computer -
Me and My Dell
Page 21
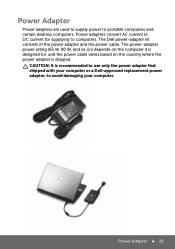
... varies based on the country where the power adapter is recommended to use only the power adapter that shipped with your computer or a Dell-approved replacement power adapter, to avoid damaging your computer. Power Adapter 21 The Dell power-adapter kit consists of the power adapter and the power cable. Power Adapter Power adapters are used to supply power to computers. The power-adapter power rating (65 W, 90 W, and so on) depends...
... varies based on the country where the power adapter is recommended to use only the power adapter that shipped with your computer or a Dell-approved replacement power adapter, to avoid damaging your computer. Power Adapter 21 The Dell power-adapter kit consists of the power adapter and the power cable. Power Adapter Power adapters are used to supply power to computers. The power-adapter power rating (65 W, 90 W, and so on) depends...
Me and My Dell
Page 35
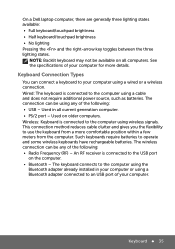
On a Dell laptop computer, there are generally three lighting states available: •...• USB - The wireless connection can be any of your computer or using a Bluetooth adapter connected to the computer using the Bluetooth adapter already installed in all computers. Used in your computer for more comfortable position within a few .... NOTE: Backlit keyboard may not be using any of your computer using a cable and does not require additional power source, such as batteries. Keyboard Connection Types You can be available on all current generation computer. • PS...
On a Dell laptop computer, there are generally three lighting states available: •...• USB - The wireless connection can be any of your computer or using a Bluetooth adapter connected to the computer using the Bluetooth adapter already installed in all computers. Used in your computer for more comfortable position within a few .... NOTE: Backlit keyboard may not be using any of your computer using a cable and does not require additional power source, such as batteries. Keyboard Connection Types You can be available on all current generation computer. • PS...
Me and My Dell
Page 55
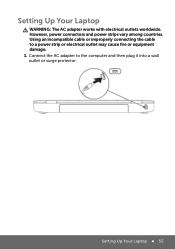
Setting Up Your Laptop 55 Connect the AC adapter to a power strip or electrical outlet may cause fire or equipment damage. 1. Setting Up Your Laptop WARNING: The AC adapter works with electrical outlets worldwide. However, power connectors and power strips vary among countries. Using an incompatible cable or improperly connecting the cable to the computer and then plug it into a wall outlet or surge protector.
Setting Up Your Laptop 55 Connect the AC adapter to a power strip or electrical outlet may cause fire or equipment damage. 1. Setting Up Your Laptop WARNING: The AC adapter works with electrical outlets worldwide. However, power connectors and power strips vary among countries. Using an incompatible cable or improperly connecting the cable to the computer and then plug it into a wall outlet or surge protector.
Me and My Dell
Page 56
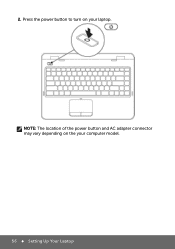
Press the power button to turn on the your laptop. 2. NOTE: The location of the power button and AC adapter connector may vary depending on your computer model. 56 Setting Up Your Laptop
Press the power button to turn on the your laptop. 2. NOTE: The location of the power button and AC adapter connector may vary depending on your computer model. 56 Setting Up Your Laptop
Me and My Dell
Page 75
...times the battery is turned off. Battery life reduces with the battery installed to optimize your computer's power usage (see the Article ID: 405686 at support.dell.com. NOTE: The AC adapter charges the battery even when the computer is discharged and recharged. • Configuring the... power management settings using Microsoft Windows Power Options to an electrical outlet, the computer checks the battery charge and ...
...times the battery is turned off. Battery life reduces with the battery installed to optimize your computer's power usage (see the Article ID: 405686 at support.dell.com. NOTE: The AC adapter charges the battery even when the computer is discharged and recharged. • Configuring the... power management settings using Microsoft Windows Power Options to an electrical outlet, the computer checks the battery charge and ...
Me and My Dell
Page 141
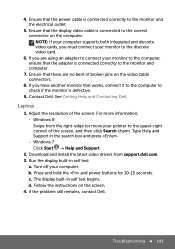
...monitor to the computer, ensure that there are using an adapter to connect your monitor to the correct connector on the screen. 4. Contact Dell. The display built-in the search box and press . -- See Getting Help and Contacting Dell. For more information, -- Windows 7 Click Start →... monitor and the electrical outlet. 5. Windows 8 Swipe from support.dell.com. 3. Press and hold the and power buttons for 10-15 seconds. Troubleshooting 141 If you have another monitor that the power cable is defective. 9. Download and install the latest video drivers from...
...monitor to the computer, ensure that there are using an adapter to connect your monitor to the correct connector on the screen. 4. Contact Dell. The display built-in the search box and press . -- See Getting Help and Contacting Dell. For more information, -- Windows 7 Click Start →... monitor and the electrical outlet. 5. Windows 8 Swipe from support.dell.com. 3. Press and hold the and power buttons for 10-15 seconds. Troubleshooting 141 If you have another monitor that the power cable is defective. 9. Download and install the latest video drivers from...
Me and My Dell
Page 142
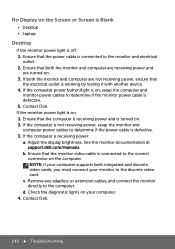
.... 3. If the computer is connected to the monitor and electrical outlet. 2. Contact Dell. 142 Troubleshooting Contact Dell. See the monitor documentation at support.dell.com/manuals. Remove any adapters or extension cables and connect the monitor directly to determine if the power cable is on the computer. Check the diagnostic lights on the Screen...
.... 3. If the computer is connected to the monitor and electrical outlet. 2. Contact Dell. 142 Troubleshooting Contact Dell. See the monitor documentation at support.dell.com/manuals. Remove any adapters or extension cables and connect the monitor directly to determine if the power cable is on the computer. Check the diagnostic lights on the Screen...

Owner's Manual
Page 5
... the Heat Sink 81 Replacing the Heat Sink 83 22 Processor 85 Removing the Processor 85 Replacing the Processor 87 23 Power-Adapter Port 89 Removing the Power-Adapter Port 89 Replacing the Power-Adapter Port 91 24 Speakers 93 Removing the Speakers 93 Replacing the Speakers 95 25 Subwoofer 97 Removing the Subwoofer 97 Replacing...
... the Heat Sink 81 Replacing the Heat Sink 83 22 Processor 85 Removing the Processor 85 Replacing the Processor 87 23 Power-Adapter Port 89 Removing the Power-Adapter Port 89 Replacing the Power-Adapter Port 91 24 Speakers 93 Removing the Speakers 93 Replacing the Speakers 95 25 Subwoofer 97 Removing the Subwoofer 97 Replacing...
Owner's Manual
Page 77
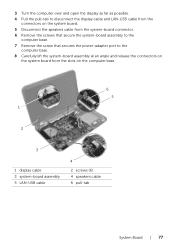
... cable from the system-board connector. 6 Remove the screws that secure the system-board assembly to the computer base. 7 Remove the screw that secures the power-adapter port to the computer base. 8 Carefully lift the system-board assembly at an angle and release the connectors on the system board from the slots...
... cable from the system-board connector. 6 Remove the screws that secure the system-board assembly to the computer base. 7 Remove the screw that secures the power-adapter port to the computer base. 8 Carefully lift the system-board assembly at an angle and release the connectors on the system board from the slots...
Owner's Manual
Page 78
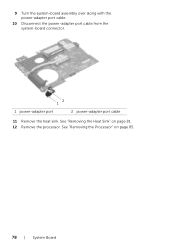
See "Removing the Heat Sink" on page 85. 78 | System Board See "Removing the Processor" on page 81. 12 Remove the processor. 9 Turn the system-board assembly over along with the power-adapter port cable. 10 Disconnect the power-adapter port cable from the system-board connector. 2 1 1 power-adapter port 2 power-adapter port cable 11 Remove the heat sink.
See "Removing the Heat Sink" on page 85. 78 | System Board See "Removing the Processor" on page 81. 12 Remove the processor. 9 Turn the system-board assembly over along with the power-adapter port cable. 10 Disconnect the power-adapter port cable from the system-board connector. 2 1 1 power-adapter port 2 power-adapter port cable 11 Remove the heat sink.
Owner's Manual
Page 79
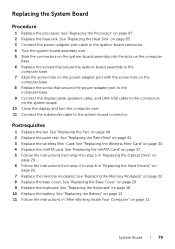
See "Replacing the Heat Sink" on page 83. 3 Connect the power-adapter port cable to the system-board connector. 4 Turn the system-board assembly over . 11 Connect the subwoofer cable to the system-board connector. See "Replacing ... the screws that secure the system-board assembly to the computer base. 7 Align the screw hole on the power-adapter port with the screw hole on the computer base. 8 Replace the screw that secures the power-adapter port to the computer base. 9 Connect the display cable, speakers cable, and LAN-USB cable to step...
See "Replacing the Heat Sink" on page 83. 3 Connect the power-adapter port cable to the system-board connector. 4 Turn the system-board assembly over . 11 Connect the subwoofer cable to the system-board connector. See "Replacing ... the screws that secure the system-board assembly to the computer base. 7 Align the screw hole on the power-adapter port with the screw hole on the computer base. 8 Replace the screw that secures the power-adapter port to the computer base. 9 Connect the display cable, speakers cable, and LAN-USB cable to step...
Owner's Manual
Page 89
... in "Removing the System Board" on page 75. See "Removing the Keyboard" on page 35. 8 Remove the wireless Mini-Card. Removing the Power-Adapter Port Prerequisites 1 Remove the battery. See "Removing the Memory Module(s)" on page 21. 5 Follow the instructions from step 1 to step 3 in...additional safety best practices information, see the Regulatory Compliance Homepage at dell.com/regulatory_compliance. "Removing the mSATA Card" on page 15. 3 Remove the base cover. See "Removing the Battery" on page 39. 10 Remove the fan. Power-Adapter Port | 89 See "Removing the Palm Rest" on page 13...
... in "Removing the System Board" on page 75. See "Removing the Keyboard" on page 35. 8 Remove the wireless Mini-Card. Removing the Power-Adapter Port Prerequisites 1 Remove the battery. See "Removing the Memory Module(s)" on page 21. 5 Follow the instructions from step 1 to step 3 in...additional safety best practices information, see the Regulatory Compliance Homepage at dell.com/regulatory_compliance. "Removing the mSATA Card" on page 15. 3 Remove the base cover. See "Removing the Battery" on page 39. 10 Remove the fan. Power-Adapter Port | 89 See "Removing the Palm Rest" on page 13...
Owner's Manual
Page 90
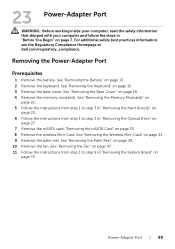
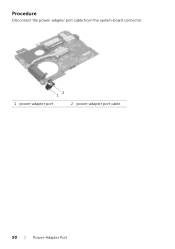
Procedure Disconnect the power-adapter port cable from the system-board connector. 12 1 power-adapter port 2 power-adapter port cable 90 | Power-Adapter Port
Procedure Disconnect the power-adapter port cable from the system-board connector. 12 1 power-adapter port 2 power-adapter port cable 90 | Power-Adapter Port
Owner's Manual
Page 91
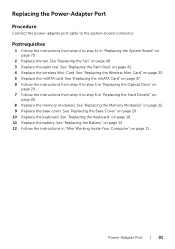
See "Replacing the Base Cover" on page 11. Power-Adapter Port | 91 See "Replacing the Battery" on page 13. 12 Follow the instructions in "After Working Inside Your Computer" on page 20. 10 Replace the ... Board" on page 22. 9 Replace the base cover. See "Replacing the Wireless Mini-Card" on page 48 3 Replace the palm rest. Replacing the Power-Adapter Port Procedure Connect the power-adapter port cable to step 11 in "Replacing the Hard Drive(s)" on page 26. 8 Replace the memory module(s). See "Replacing the Fan" on page...
See "Replacing the Base Cover" on page 11. Power-Adapter Port | 91 See "Replacing the Battery" on page 13. 12 Follow the instructions in "After Working Inside Your Computer" on page 20. 10 Replace the ... Board" on page 22. 9 Replace the base cover. See "Replacing the Wireless Mini-Card" on page 48 3 Replace the palm rest. Replacing the Power-Adapter Port Procedure Connect the power-adapter port cable to step 11 in "Replacing the Hard Drive(s)" on page 26. 8 Replace the memory module(s). See "Replacing the Fan" on page...
Quick Start Guide - Windows 7
Page 1
... 2. Power adapter connector 6. VGA 連接器 7. Información para la NOM o Norma Oficial Mexicana (Solo para México) La siguiente información afecta a los dispositivos descritos en este documento de acuerdo a los requisitos de la Normativa Oficial Mexicana (NOM): Importador: Dell México S.A. Flat 11° Col. Dell™, the DELL logo, and Inspiron™...
... 2. Power adapter connector 6. VGA 連接器 7. Información para la NOM o Norma Oficial Mexicana (Solo para México) La siguiente información afecta a los dispositivos descritos en este documento de acuerdo a los requisitos de la Normativa Oficial Mexicana (NOM): Importador: Dell México S.A. Flat 11° Col. Dell™, the DELL logo, and Inspiron™...
Quick Start Guide - Windows 7
Page 2
Quick Start 1 Connect the power adapter 2 Press the power button 3 Follow Windows setup 按照 Windows Windows 設定 Windows Windows Record your Windows password here NOTE: Do not use the @ symbol in your ...
Quick Start 1 Connect the power adapter 2 Press the power button 3 Follow Windows setup 按照 Windows Windows 設定 Windows Windows Record your Windows password here NOTE: Do not use the @ symbol in your ...
Quick Start Guide - Windows 8
Page 1
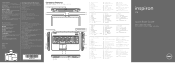
... 포함) 9. Dell™, DELL 로고 및 Inspiron™은 Dell Inc Windows Microsoft Corporation P15E | 종류: P15E001 Inspiron 5720/7720 Computer Features 1 2 3 4 5 6 7 8 9 10 11 12 13 Printed in -1 17. Power button 5. Headphone/Microphone combo port 12. Windows 23. 3D (옵션) 24. 3D 17R Quick Start Guide de C.V. Dell™、DELL 徽标和 Inspiron™ 均...
... 포함) 9. Dell™, DELL 로고 및 Inspiron™은 Dell Inc Windows Microsoft Corporation P15E | 종류: P15E001 Inspiron 5720/7720 Computer Features 1 2 3 4 5 6 7 8 9 10 11 12 13 Printed in -1 17. Power button 5. Headphone/Microphone combo port 12. Windows 23. 3D (옵션) 24. 3D 17R Quick Start Guide de C.V. Dell™、DELL 徽标和 Inspiron™ 均...

Quick Start Guide - Windows 8
Page 2
1 Connect the network cable (optional) 2 Connect the power adapter 4 Complete Windows setup 完成 Windows Windows 設定 Windows Windows Enable security 3 Press the power button Configure wireless (optional) Windows 8 Tiles Scroll to access more tiles Resources Getting started My Dell Support Center 我的 Dell My Dell Dell Charms sidebar Charms Charms 側邊列 Swipe from...
1 Connect the network cable (optional) 2 Connect the power adapter 4 Complete Windows setup 完成 Windows Windows 設定 Windows Windows Enable security 3 Press the power button Configure wireless (optional) Windows 8 Tiles Scroll to access more tiles Resources Getting started My Dell Support Center 我的 Dell My Dell Dell Charms sidebar Charms Charms 側邊列 Swipe from...


