
Service Manual
Page 4
... setup password...66 Assigning a system setup password...66 Deleting or changing an existing system setup password 67 Clearing CMOS settings...67 Clearing BIOS (System Setup) and System passwords 68 Updating the BIOS...68 Updating the BIOS in Windows...68 Updating the BIOS using the USB drive in Windows 68 Updating the BIOS in Linux and Ubuntu...68 Updating the BIOS from the F12 One-Time boot menu 69 Chapter 5: Troubleshooting...70 Handling swollen Lithium-ion batteries...70 Locate the Service Tag or Express Service Code of your Dell...
... setup password...66 Assigning a system setup password...66 Deleting or changing an existing system setup password 67 Clearing CMOS settings...67 Clearing BIOS (System Setup) and System passwords 68 Updating the BIOS...68 Updating the BIOS in Windows...68 Updating the BIOS using the USB drive in Windows 68 Updating the BIOS in Linux and Ubuntu...68 Updating the BIOS from the F12 One-Time boot menu 69 Chapter 5: Troubleshooting...70 Handling swollen Lithium-ion batteries...70 Locate the Service Tag or Express Service Code of your Dell...
Service Manual
Page 6
... as keyboard, mouse, and monitor from their electrical outlets. 4. After you are using a different operating system, see the Regulatory Compliance home page at www.dell.com/ regulatory_compliance. Shut down instructions. 3. Press any media card and optical disk from potential damage and to power on the screen. d. 1 Working inside your computer Before working inside the computer, replace all covers, panels, and screws before opening the computer cover or panels. The Service Mode procedure...
... as keyboard, mouse, and monitor from their electrical outlets. 4. After you are using a different operating system, see the Regulatory Compliance home page at www.dell.com/ regulatory_compliance. Shut down instructions. 3. Press any media card and optical disk from potential damage and to power on the screen. d. 1 Working inside your computer Before working inside the computer, replace all covers, panels, and screws before opening the computer cover or panels. The Service Mode procedure...
Service Manual
Page 7
... electricity which could harm internal components. While you discharge static electricity from the media-card reader. When connecting cables, ensure that has received a static shock and immediately generates a "No POST/No Video" symptom with locking tabs or thumbscrews that you work surface is flat, dry, and clean. CAUTION: Exercise caution when handling Lithium-ion batteries in previous Dell products. As the...
... electricity which could harm internal components. While you discharge static electricity from the media-card reader. When connecting cables, ensure that has received a static shock and immediately generates a "No POST/No Video" symptom with locking tabs or thumbscrews that you work surface is flat, dry, and clean. CAUTION: Exercise caution when handling Lithium-ion batteries in previous Dell products. As the...
Service Manual
Page 9
.... Turn on a system with BitLocker enabled. CAUTION: If BitLocker is required to regain access to normal functioning mode. Replace all attached devices to their electrical outlets. Replace any media cards, discs, or any other parts that no stray screws remain inside your computer 9 Replace all attached devices to the power-adapter port on your computer. 3. For more information, refer to Windows Support article: Finding your BitLocker recovery key in Windows After working inside...
.... Turn on a system with BitLocker enabled. CAUTION: If BitLocker is required to regain access to normal functioning mode. Replace all attached devices to their electrical outlets. Replace any media cards, discs, or any other parts that no stray screws remain inside your computer 9 Replace all attached devices to the power-adapter port on your computer. 3. For more information, refer to Windows Support article: Finding your BitLocker recovery key in Windows After working inside...
Service Manual
Page 61
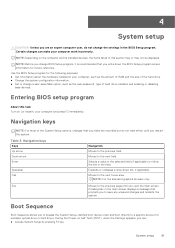
... its installed devices, the items listed in this task Turn on Self Test (POST), when the Dell logo appears, you can make are an expert computer user, do not take effect until you view the main screen. Navigation keys NOTE: For most of the System Setup options, changes that you change a user-selectable option, such as the user password, type of the hard drive. ● Change the system configuration information. ● Set or change BIOS Setup...
... its installed devices, the items listed in this task Turn on Self Test (POST), when the Dell logo appears, you can make are an expert computer user, do not take effect until you view the main screen. Navigation keys NOTE: For most of the System Setup options, changes that you change a user-selectable option, such as the user password, type of the hard drive. ● Change the system configuration information. ● Set or change BIOS Setup...
Service Manual
Page 62
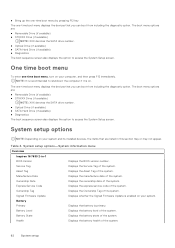
.... Express Service Code Displays the express service code of the system. 62 System setup Battery Primary Displays that you can boot from including the diagnostic option. Signed Firmware Update Displays whether the Signed Firmware Update is primary. Health Displays the battery health of the system. One time boot menu To enter one -time boot menu displays the devices that battery is enabled on your system. Ownership Date Displays the ownership date of the system. The boot menu options are: ● Removable Drive...
.... Express Service Code Displays the express service code of the system. 62 System setup Battery Primary Displays that you can boot from including the diagnostic option. Signed Firmware Update Displays whether the Signed Firmware Update is primary. Health Displays the battery health of the system. One time boot menu To enter one -time boot menu displays the devices that battery is enabled on your system. Ownership Date Displays the ownership date of the system. The boot menu options are: ● Removable Drive...
Service Manual
Page 64
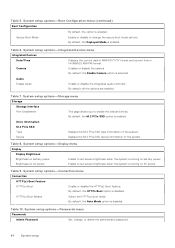
...AM/PM format. Table 7. Drive Information M.2 PCIe SSD Type Device Displays the M.2 PCIe SSD type information of the system. Table 8. System setup options-Display menu Display Display Brightness Brightness on battery power Enable to set screen brightness when the system is running on AC power. By default, the Enable Camera option is disabled. System setup options-Connection menu Connection HTTP(s) Boot Feature HTTP(s) Boot Enable or disable the HTTP(s) Boot feature. System setup options-Storage menu Storage Storage interface Port Enablement This page...
...AM/PM format. Table 7. Drive Information M.2 PCIe SSD Type Device Displays the M.2 PCIe SSD type information of the system. Table 8. System setup options-Display menu Display Display Brightness Brightness on battery power Enable to set screen brightness when the system is running on AC power. By default, the Enable Camera option is disabled. System setup options-Connection menu Connection HTTP(s) Boot Feature HTTP(s) Boot Enable or disable the HTTP(s) Boot feature. System setup options-Storage menu Storage Storage interface Port Enablement This page...
Service Manual
Page 65
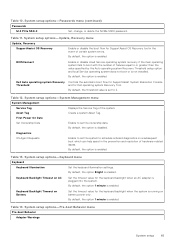
... disable cloud Service operating system recovery if the main operating system fails to or greater than the value specified by the Auto operating system Recovery Threshold setup option and local Service operating system does not boot or is enabled. By default, the option 1 minute is not installed. By default, the option is plugged into the system. System setup options-System Management menu System Management Service Tag Asset Tag First Power On Date Set Ownership Date Displays the Service...
... disable cloud Service operating system recovery if the main operating system fails to or greater than the value specified by the Auto operating system Recovery Threshold setup option and local Service operating system does not boot or is enabled. By default, the option 1 minute is not installed. By default, the option is plugged into the system. System setup options-System Management menu System Management Service Tag Asset Tag First Power On Date Set Ownership Date Displays the Service...
Service Manual
Page 67
... Password Status is Locked. Disconnect the battery cable from System Setup. Remove the coin-cell battery. 4. Type the system password that you delete the System and/or Setup password, confirm the deletion when prompted. 5. The computer restarts. About this task CAUTION: Clearing CMOS settings will reset the BIOS settings on your computer. In the System Security screen, verify that the Password Status is displayed. 2. If you entered earlier in the Confirm new password...
... Password Status is Locked. Disconnect the battery cable from System Setup. Remove the coin-cell battery. 4. Type the system password that you delete the System and/or Setup password, confirm the deletion when prompted. 5. The computer restarts. About this task CAUTION: Clearing CMOS settings will reset the BIOS settings on your computer. In the System Security screen, verify that the Password Status is displayed. 2. If you entered earlier in the Confirm new password...

Service Manual
Page 68
... . 6. Type the BIOS setup program filename and press Enter. The BIOS Update Utility appears. 8. In the Search support box, enter the Service Tag of BIOS, and click Download to step 6 in Updating the BIOS in Windows Steps 1. Follow the procedure from the One Time Boot Menu. 7. Connect the bootable USB drive to the documentation accompanying Windows or your computer. Updating the BIOS in Windows Steps 1. Replace the coin-cell battery. 6. Click Product support. Select the operating system installed on...
... . 6. Type the BIOS setup program filename and press Enter. The BIOS Update Utility appears. 8. In the Search support box, enter the Service Tag of BIOS, and click Download to step 6 in Updating the BIOS in Windows Steps 1. Follow the procedure from the One Time Boot Menu. 7. Connect the bootable USB drive to the documentation accompanying Windows or your computer. Updating the BIOS in Windows Steps 1. Replace the coin-cell battery. 6. Click Product support. Select the operating system installed on...
Service Manual
Page 69
... use this BIOS update option. If the option is completed. Most of the USB drive ● AC power adapter that is displayed. 3. The flash BIOS menu is connected to the computer ● Functional computer battery to flash the BIOS Perform the following : ● USB drive formatted to the FAT32 file system (key does not have this capability, and you copied the flash into a USB port of the computer. 2. Select external USB device. 5. Updating the BIOS from the F12 One-Time boot menu Update...
... use this BIOS update option. If the option is completed. Most of the USB drive ● AC power adapter that is displayed. 3. The flash BIOS menu is connected to the computer ● Functional computer battery to flash the BIOS Perform the following : ● USB drive formatted to the FAT32 file system (key does not have this capability, and you copied the flash into a USB port of the computer. 2. Select external USB device. 5. Updating the BIOS from the F12 One-Time boot menu Update...
Service Manual
Page 72
... meant for specific devices and require user interaction. Press and hold both the M key and the power button held down, the battery indicator LED may exhibit two states: a. LCD Built-in Self Test (BIST) Dell laptops have a built-in diagnostic tool that you are experiencing is an inherent problem with the LCD (screen) of system board embedded controller (EC) failures. LED error codes Blinking Pattern Possible Problem Amber White 2 1 CPU Failure 2 8 LCD Power Rail Failure...
... meant for specific devices and require user interaction. Press and hold both the M key and the power button held down, the battery indicator LED may exhibit two states: a. LCD Built-in Self Test (BIST) Dell laptops have a built-in diagnostic tool that you are experiencing is an inherent problem with the LCD (screen) of system board embedded controller (EC) failures. LED error codes Blinking Pattern Possible Problem Amber White 2 1 CPU Failure 2 8 LCD Power Rail Failure...
Service Manual
Page 73
... more information about the Dell SupportAssist OS Recovery, see Dell SupportAssist OS Recovery User's Guide at www.dell.com/serviceabilitytools. The following procedure provides the instructions on the entire screen to conduct a WiFi power cycle: NOTE: Some ISPs (Internet Service Providers) provide a modem/router combo device. It consists of the screen). 4. Turn on the wireless router. 6. At the end of the LCD. Recovering the operating system When your computer is...
... more information about the Dell SupportAssist OS Recovery, see Dell SupportAssist OS Recovery User's Guide at www.dell.com/serviceabilitytools. The following procedure provides the instructions on the entire screen to conduct a WiFi power cycle: NOTE: Some ISPs (Internet Service Providers) provide a modem/router combo device. It consists of the screen). 4. Turn on the wireless router. 6. At the end of the LCD. Recovering the operating system When your computer is...
Service Manual
Page 74
... are requested to your custom BIOS setting selections: ● Boot List ● Enable Legacy Option ROMs ● Secure Boot Enable ● Allow BIOS Downgrade 74 Troubleshooting Turn off and the battery is removed. Turn on the system will reset the BIOS to Defaults, un-provision Intel vPro and reset the system date and time. Press and hold the power button for 25 seconds. The system RTC reset occurs after it to the...
... are requested to your custom BIOS setting selections: ● Boot List ● Enable Legacy Option ROMs ● Secure Boot Enable ● Allow BIOS Downgrade 74 Troubleshooting Turn off and the battery is removed. Turn on the system will reset the BIOS to Defaults, un-provision Intel vPro and reset the system date and time. Press and hold the power button for 25 seconds. The system RTC reset occurs after it to the...
Setup and Specifications
Page 3
... of Inspiron 16 7630 2-in-1 6 Right...6 Left...6 Top...7 Front...8 Bottom...11 Service Tag...11 Modes...12 Chapter 3: Using the privacy shutter 14 Chapter 4: Specifications of Inspiron 16 7630 2-in-1 15 Dimensions and weight...15 Processor...15 Chipset...16 Operating system...16 Memory...16 External ports...17 Internal slots...17 Wireless module...17 Audio...18 Storage...18 Media-card reader...19 Keyboard...19 Camera...20 Touchpad...20 Power adapter...21 Battery...21 Display...22 Fingerprint reader (optional)...23 GPU-Integrated...23 GPU-Discrete...23 External display support...24 Operating...
... of Inspiron 16 7630 2-in-1 6 Right...6 Left...6 Top...7 Front...8 Bottom...11 Service Tag...11 Modes...12 Chapter 3: Using the privacy shutter 14 Chapter 4: Specifications of Inspiron 16 7630 2-in-1 15 Dimensions and weight...15 Processor...15 Chipset...16 Operating system...16 Memory...16 External ports...17 Internal slots...17 Wireless module...17 Audio...18 Storage...18 Media-card reader...19 Keyboard...19 Camera...20 Touchpad...20 Power adapter...21 Battery...21 Display...22 Fingerprint reader (optional)...23 GPU-Integrated...23 GPU-Discrete...23 External display support...24 Operating...
Setup and Specifications
Page 4
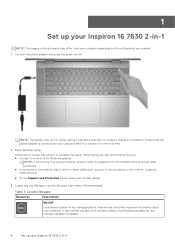
... power button. NOTE: The battery may differ from the Windows Start menu-Recommended. Finish Windows setup. When setting up, Dell recommends that the power adapter is connected to the Internet, create an offline account. ● On the Support and Protection screen, enter your computer when it is turned on the configuration you ordered. 1. It also notifies you : ● Connect to a network for the wireless network access when prompted. ● If connected to a secured wireless network, enter the password for Windows updates. 1 Set up your Inspiron 16 7630...
... power button. NOTE: The battery may differ from the Windows Start menu-Recommended. Finish Windows setup. When setting up, Dell recommends that the power adapter is connected to the Internet, create an offline account. ● On the Support and Protection screen, enter your computer when it is turned on the configuration you ordered. 1. It also notifies you : ● Connect to a network for the wireless network access when prompted. ● If connected to a secured wireless network, enter the password for Windows updates. 1 Set up your Inspiron 16 7630...
Setup and Specifications
Page 7
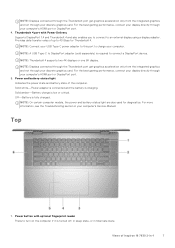
... turned off, in sleep state, or in hibernate state. Top 1. Power button with Power Delivery Supports DisplayPort 1.4 and Thunderbolt 4 and also enables you to connect to connect a DisplayPort device. Solid amber-Battery charge is low or critical. Power and battery-status light Indicates the power state and battery state of Inspiron 16 7630 2-in your computer's HDMI port or DisplayPort port. 5. Views of the computer. NOTE: On certain computer models, the power and battery-status light are also used...
... turned off, in sleep state, or in hibernate state. Top 1. Power button with Power Delivery Supports DisplayPort 1.4 and Thunderbolt 4 and also enables you to connect to connect a DisplayPort device. Solid amber-Battery charge is low or critical. Power and battery-status light Indicates the power state and battery state of Inspiron 16 7630 2-in your computer's HDMI port or DisplayPort port. 5. Views of the computer. NOTE: On certain computer models, the power and battery-status light are also used...
Setup and Specifications
Page 9
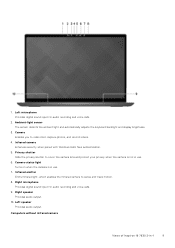
1. Camera-status light Turns on when the camera is not in use . 7. Computers without infrared camera Views of Inspiron 16 7630 2-in use . 6. Right microphone Provides digital sound input for audio recording and voice calls. 2. Infrared camera Enhances security when paired with Windows Hello face authentication. 5. Infrared emitter Emits infrared light, which enables the infrared camera to video chat, capture photos, and record videos. 4. Camera Enables you to sense and track motion. 8. Left...
1. Camera-status light Turns on when the camera is not in use . 7. Computers without infrared camera Views of Inspiron 16 7630 2-in use . 6. Right microphone Provides digital sound input for audio recording and voice calls. 2. Infrared camera Enhances security when paired with Windows Hello face authentication. 5. Infrared emitter Emits infrared light, which enables the infrared camera to video chat, capture photos, and record videos. 4. Camera Enables you to sense and track motion. 8. Left...
Setup and Specifications
Page 24
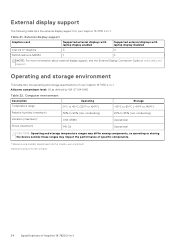
... that simulates user environment. † Measured using a 2 ms half-sine pulse. 24 Specifications of your Inspiron 16 7630 2-in-1. External display support Graphics card Supported external displays with laptop display enabled Intel Iris Xe Graphics 3 NVIDIA GeForce MX550 1 Supported external displays with laptop display disabled 4 2 NOTE: For more information about external display support, see the External Display Connection Guide on www.dell.com/ support. External display support The following table lists the external display support for your Inspiron 16 7630 2-in -1
... that simulates user environment. † Measured using a 2 ms half-sine pulse. 24 Specifications of your Inspiron 16 7630 2-in-1. External display support Graphics card Supported external displays with laptop display enabled Intel Iris Xe Graphics 3 NVIDIA GeForce MX550 1 Supported external displays with laptop display disabled 4 2 NOTE: For more information about external display support, see the External Display Connection Guide on www.dell.com/ support. External display support The following table lists the external display support for your Inspiron 16 7630 2-in -1
Setup and Specifications
Page 26
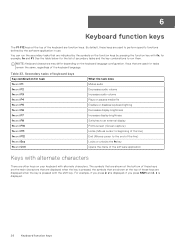
... audio volume Plays or pauses media file Enables or disables keyboard lighting Decreases display brightness Increases display brightness Switches to an external display Prints screen (Screen capture) Home (Moves cursor to beginning of the line) End (Moves cursor to the end of the line) Locks or unlocks the fn key Opens the menu of the software application Keys with alternate characters There are other keys on your keyboard with alternate characters. the symbols that are used...
... audio volume Plays or pauses media file Enables or disables keyboard lighting Decreases display brightness Increases display brightness Switches to an external display Prints screen (Screen capture) Home (Moves cursor to beginning of the line) End (Moves cursor to the end of the line) Locks or unlocks the fn key Opens the menu of the software application Keys with alternate characters There are other keys on your keyboard with alternate characters. the symbols that are used...


