
Owners Manual
Page 3
...Views of Inspiron 16 5635 6 Right...6 Left...6 Top...7 Front...8 Bottom...9 Chapter 2: Set up your Inspiron 16 5635 10 Chapter 3: Specifications of Inspiron 16 5635 12 Dimensions and weight...12 Processor...12 Chipset...13 Operating system...13 Memory...13 External ports...13 Internal slots...14 Wireless module...14 Audio...15 Storage...15 Media-card reader...16 Keyboard...16 Keyboard shortcuts...16 Camera...18 Touchpad...18 Power adapter...18 Battery...19 Display...20 Fingerprint reader (optional)...21 GPU-Integrated...21 GPU-Discrete...21 Multiple display support matrix...22 Operating and...
...Views of Inspiron 16 5635 6 Right...6 Left...6 Top...7 Front...8 Bottom...9 Chapter 2: Set up your Inspiron 16 5635 10 Chapter 3: Specifications of Inspiron 16 5635 12 Dimensions and weight...12 Processor...12 Chipset...13 Operating system...13 Memory...13 External ports...13 Internal slots...14 Wireless module...14 Audio...15 Storage...15 Media-card reader...16 Keyboard...16 Keyboard shortcuts...16 Camera...18 Touchpad...18 Power adapter...18 Battery...19 Display...20 Fingerprint reader (optional)...21 GPU-Integrated...21 GPU-Discrete...21 Multiple display support matrix...22 Operating and...
Owners Manual
Page 4
... Inspiron 16 5635...29 Chapter 5: Removing and installing Customer Replaceable Units (CRUs 31 Base cover...31 Removing the base cover...31 Installing the base cover...33 Wireless card...35 Removing the wireless card...35 Installing the wireless card...36 Solid-state drive...38 Removing the M.2 2230 solid-state drive...38 Installing the M.2 2230 solid-state drive...39 Removing the M.2 2280 solid-state drive...40 Installing the M.2 2280 solid-state drive...41 Fan...42 Removing the fan...42 Installing the fan...43 Chapter 6: Removing and installing...
... Inspiron 16 5635...29 Chapter 5: Removing and installing Customer Replaceable Units (CRUs 31 Base cover...31 Removing the base cover...31 Installing the base cover...33 Wireless card...35 Removing the wireless card...35 Installing the wireless card...36 Solid-state drive...38 Removing the M.2 2230 solid-state drive...38 Installing the M.2 2230 solid-state drive...39 Removing the M.2 2280 solid-state drive...40 Installing the M.2 2280 solid-state drive...41 Fan...42 Removing the fan...42 Installing the fan...43 Chapter 6: Removing and installing...
Owners Manual
Page 5
... time boot menu...78 System setup options...78 Updating the BIOS...82 Updating the BIOS in Windows...82 Updating the BIOS using the USB drive in Windows 83 Updating the BIOS from the F12 One-Time boot menu 83 System and setup password...84 Assigning a system setup password...84 Deleting or changing an existing system setup password 85 Clearing CMOS settings...85 Clearing BIOS (System Setup) and System passwords 85 Chapter 9: Troubleshooting...86 Handling swollen Lithium-ion batteries...86 Locate the Service Tag or Express Service Code of your Dell...
... time boot menu...78 System setup options...78 Updating the BIOS...82 Updating the BIOS in Windows...82 Updating the BIOS using the USB drive in Windows 83 Updating the BIOS from the F12 One-Time boot menu 83 System and setup password...84 Assigning a system setup password...84 Deleting or changing an existing system setup password 85 Clearing CMOS settings...85 Clearing BIOS (System Setup) and System passwords 85 Chapter 9: Troubleshooting...86 Handling swollen Lithium-ion batteries...86 Locate the Service Tag or Express Service Code of your Dell...

Owners Manual
Page 10
... it is turned on the configuration you : ● Connect to your Inspiron 16 5635 When setting up, Dell recommends that the power adapter is connected to a network for the first time. 2. If not connected to complete the setup. Table 1. NOTE: The battery may differ from the Windows Start menu-Recommended. 2 Set up your Inspiron 16 5635 About this document may go into power-saving mode during shipment to conserve charge on -screen instructions to the Internet, create an offline...
... it is turned on the configuration you : ● Connect to your Inspiron 16 5635 When setting up, Dell recommends that the power adapter is connected to a network for the first time. 2. If not connected to complete the setup. Table 1. NOTE: The battery may differ from the Windows Start menu-Recommended. 2 Set up your Inspiron 16 5635 About this document may go into power-saving mode during shipment to conserve charge on -screen instructions to the Internet, create an offline...
Owners Manual
Page 11
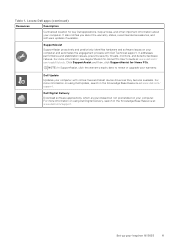
... expiry date to renew or upgrade your Inspiron 16 5635 11 It also notifies you about your computer. Dell Digital Delivery Download software applications, which are purchased but not preinstalled on your computer with Dell Technical support. Set up your warranty. Dell Update Updates your computer and automates the engagement process with critical fixes and latest device drivers as they become available. Locate Dell apps (continued) Resources Description...
... expiry date to renew or upgrade your Inspiron 16 5635 11 It also notifies you about your computer. Dell Digital Delivery Download software applications, which are purchased but not preinstalled on your computer with Dell Technical support. Set up your warranty. Dell Update Updates your computer and automates the engagement process with critical fixes and latest device drivers as they become available. Locate Dell apps (continued) Resources Description...
Owners Manual
Page 14
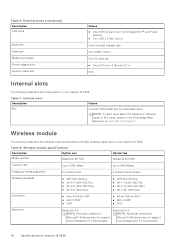
... types of M.2 cards, search in N/A Internal slots The following table lists the Wireless Local Area Network (WLAN) modules supported on your Inspiron 16 5635. Table 8. External ports (continued) Description USB ports Audio port Video port Media-card reader Power-adapter port Security-cable slot Values ● One USB 3.2 Gen 2 port with DisplayPort™ and Power Delivery ● Two USB 3.2 Gen 1 ports One Universal headset jack One HDMI 1.4 port One SD-card slot ● One 4.50 mm x 2.90 mm DC-in the Knowledge Base Resource at www.dell.com/support. Table 7. Wireless module...
... types of M.2 cards, search in N/A Internal slots The following table lists the Wireless Local Area Network (WLAN) modules supported on your Inspiron 16 5635. Table 8. External ports (continued) Description USB ports Audio port Video port Media-card reader Power-adapter port Security-cable slot Values ● One USB 3.2 Gen 2 port with DisplayPort™ and Power Delivery ● Two USB 3.2 Gen 1 ports One Universal headset jack One HDMI 1.4 port One SD-card slot ● One 4.50 mm x 2.90 mm DC-in the Knowledge Base Resource at www.dell.com/support. Table 7. Wireless module...

Owners Manual
Page 17
... the top row of the keyboard are needed for specific software applications, multi-media functionality can also define the primary behavior of Inspiron 16 5635 17 List of keyboard shortcuts Function key Re-defined key (for multi-media control, as indicated by the icon. Table 14. Subsequently, multi-media control can be disabled by changing Function Key Behavior in BIOS setup program. The keys F1-F12 at the bottom of the key. NOTE: You can be invoked...
... the top row of the keyboard are needed for specific software applications, multi-media functionality can also define the primary behavior of Inspiron 16 5635 17 List of keyboard shortcuts Function key Re-defined key (for multi-media control, as indicated by the icon. Table 14. Subsequently, multi-media control can be disabled by changing Function Key Behavior in BIOS setup program. The keys F1-F12 at the bottom of the key. NOTE: You can be invoked...
Owners Manual
Page 22
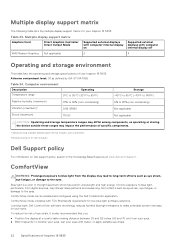
... simulates user environment. † Measured using a 2 ms half-sine pulse. Low blue light: Dell ComfortView software technology reduces harmful blue light emissions to the eyes. Airborne contaminant level: G1 as eye strain, eye fatigue, or damage to moisten your eyes, wet your Inspiron 16 5635. ComfortView mode complies with computer internal display off 4 Operating and storage environment This table lists the operating and storage specifications of specific...
... simulates user environment. † Measured using a 2 ms half-sine pulse. Low blue light: Dell ComfortView software technology reduces harmful blue light emissions to the eyes. Airborne contaminant level: G1 as eye strain, eye fatigue, or damage to moisten your eyes, wet your Inspiron 16 5635. ComfortView mode complies with computer internal display off 4 Operating and storage environment This table lists the operating and storage specifications of specific...
Owners Manual
Page 25
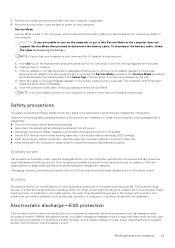
... key on the screen. d. NOTE: If you open the case. The internal power enables the system to power on your computer 25 Electrostatic discharge-ESD protection ESD is disconnected. Enter the service mode, if you are able to be secure and in advance by the user. CAUTION: If you are unable to turn on LAN) and suspended into Service Mode or the computer does not support Service Mode...
... key on the screen. d. NOTE: If you open the case. The internal power enables the system to power on your computer 25 Electrostatic discharge-ESD protection ESD is disconnected. Enter the service mode, if you are able to be secure and in advance by the user. CAUTION: If you are unable to turn on LAN) and suspended into Service Mode or the computer does not support Service Mode...
Owners Manual
Page 27
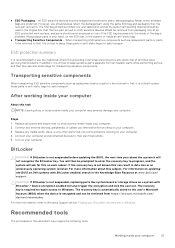
... computer. All ESD-sensitive devices must be used in the original box that the new part arrived in the system, or inside of the bag is not suspended before updating the BIOS, the next time you removed before working on Dell systems with BitLocker / Device encryption enabled will not recognize the BitLocker key. Replace any media cards, discs, or any external devices, peripherals, or cables you should be shipped...
... computer. All ESD-sensitive devices must be used in the original box that the new part arrived in the system, or inside of the bag is not suspended before updating the BIOS, the next time you removed before working on Dell systems with BitLocker / Device encryption enabled will not recognize the BitLocker key. Replace any media cards, discs, or any external devices, peripherals, or cables you should be shipped...
Owners Manual
Page 45
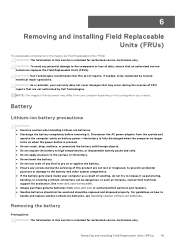
... authorized Dell partners and resellers. ● Swollen batteries should not be used and should be dangerous. Removing and installing Field Replaceable Units (FRUs) 45 CAUTION: As a reminder, your computer depending on the configuration you ordered. Disconnect the AC power adapter from the system and operate the computer solely on battery power-the battery is fully discharged when the computer no longer turns on when the power button...
... authorized Dell partners and resellers. ● Swollen batteries should not be used and should be dangerous. Removing and installing Field Replaceable Units (FRUs) 45 CAUTION: As a reminder, your computer depending on the configuration you ordered. Disconnect the AC power adapter from the system and operate the computer solely on battery power-the battery is fully discharged when the computer no longer turns on when the power button...
Owners Manual
Page 77
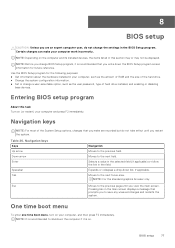
... screen displays a message that you are recorded but do not change a user-selectable option, such as the amount of RAM and the size of hard drive installed, and enabling or disabling base devices. BIOS setup 77 Use the BIOS Setup program for future reference. Moves to the previous field. NOTE: Before you change BIOS Setup program, it is recommended that prompts you restart the system. One time boot menu To enter one time boot menu, turn...
... screen displays a message that you are recorded but do not change a user-selectable option, such as the amount of RAM and the size of hard drive installed, and enabling or disabling base devices. BIOS setup 77 Use the BIOS Setup program for future reference. Moves to the previous field. NOTE: Before you change BIOS Setup program, it is recommended that prompts you restart the system. One time boot menu To enter one time boot menu, turn...
Owners Manual
Page 80
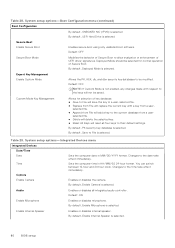
... setup options-Integrated Devices menu Integrated Devices Date/Time Date Time Camera Enable Camera Sets the computer date in HH/MM/SS 24-hour format. Changes to the current database from File will reset all integrated audio controller. Audio Enables or disables all four keys to be modified. Default: ON Enable Microphone Enables or disables microphone. Deployed Mode should be saved. Default: OFF NOTE: If Custom Mode is selected. selected file. ● Append from a user- Table 29. Enable Internal Speaker Enables...
... setup options-Integrated Devices menu Integrated Devices Date/Time Date Time Camera Enable Camera Sets the computer date in HH/MM/SS 24-hour format. Changes to the current database from File will reset all integrated audio controller. Audio Enables or disables all four keys to be modified. Default: ON Enable Microphone Enables or disables microphone. Deployed Mode should be saved. Default: OFF NOTE: If Custom Mode is selected. selected file. ● Append from a user- Table 29. Enable Internal Speaker Enables...
Owners Manual
Page 81
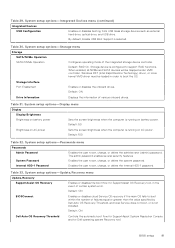
... Service does not boot, or is not installed. Default: ON Drive Information Displays the information of the integrated storage device controller. System setup options-Storage menu Storage SATA/NVMe Operation SATA/NVMe Operation Configures operating mode of various onboard drives. Default: 100 Table 32. System setup options-Passwords menu Passwords Admin Password Enables the user to support RAID functions. Storage Interface Port Enablement Enables or disables the onboard drives. Internal HDD-1 Password Enables the user to boot within the number of certain system error...
... Service does not boot, or is not installed. Default: ON Drive Information Displays the information of the integrated storage device controller. System setup options-Storage menu Storage SATA/NVMe Operation SATA/NVMe Operation Configures operating mode of various onboard drives. Default: 100 Table 32. System setup options-Passwords menu Passwords Admin Password Enables the user to support RAID functions. Storage Interface Port Enablement Enables or disables the onboard drives. Internal HDD-1 Password Enables the user to boot within the number of certain system error...
Owners Manual
Page 82
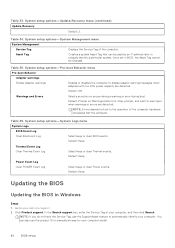
System setup options-Update,Recovery menu (continued) Update,Recovery Default: 2. System setup options-System Management menu System Management Service Tag Displays the Service Tag of the computer hardware will always halt the computer. System setup options-Pre-boot Behavior menu Pre-boot Behavior Adapter warnings Enable Adapter warnings Enables or disables the computer to www.dell.com/support. 2. Stop, prompt, and wait for your computer model. 82 BIOS setup Table 36. Default: Keep Power Event Log Clear POWER Event Log Select keep or clear Thermal events. In the...
System setup options-Update,Recovery menu (continued) Update,Recovery Default: 2. System setup options-System Management menu System Management Service Tag Displays the Service Tag of the computer hardware will always halt the computer. System setup options-Pre-boot Behavior menu Pre-boot Behavior Adapter warnings Enable Adapter warnings Enables or disables the computer to www.dell.com/support. 2. Stop, prompt, and wait for your computer model. 82 BIOS setup Table 36. Default: Keep Power Event Log Clear POWER Event Log Select keep or clear Thermal events. In the...
Owners Manual
Page 83
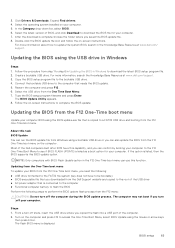
... downloaded from the Dell Support website and copied to access the One-Time Boot Menu, select BIOS Update using the USB drive in the Knowledge Base Resource at www.dell.com/support. 3. Follow the on -screen instructions. Select the operating system installed on the computer and press F12 to the root of the computer. 2. The flash BIOS menu is connected to the computer ● Functional computer battery to flash the BIOS Perform the following : ● USB drive formatted...
... downloaded from the Dell Support website and copied to access the One-Time Boot Menu, select BIOS Update using the USB drive in the Knowledge Base Resource at www.dell.com/support. 3. Follow the on -screen instructions. Select the operating system installed on the computer and press F12 to the root of the computer. 2. The flash BIOS menu is connected to the computer ● Functional computer battery to flash the BIOS Perform the following : ● USB drive formatted...
Owners Manual
Page 85
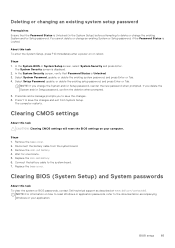
... password, and press Enter or Tab. 4. Clearing CMOS settings About this task CAUTION: Clearing CMOS settings will reset the BIOS settings on or reboot. Wait for one minute. 5. Replace the base cover. The System Security screen is Unlocked. 3. Select Setup Password, update, or delete the existing setup password, and press Enter or Tab. Steps 1. If you to the documentation accompanying Windows or your computer. Disconnect the battery cable from System Setup. BIOS setup 85 Press Y to the system board...
... password, and press Enter or Tab. 4. Clearing CMOS settings About this task CAUTION: Clearing CMOS settings will reset the BIOS settings on or reboot. Wait for one minute. 5. Replace the base cover. The System Security screen is Unlocked. 3. Select Setup Password, update, or delete the existing setup password, and press Enter or Tab. Steps 1. If you to the documentation accompanying Windows or your computer. Disconnect the battery cable from System Setup. BIOS setup 85 Press Y to the system board...
Owners Manual
Page 87
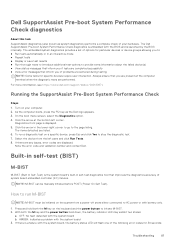
..., error codes are listed. 6. AMBER: Indicates a problem with the system board b. On the boot menu screen, select the Diagnostics option. 4. Press and hold both the M key and the power button held down, the battery indicator LED may exhibit two states: a. NOTE: M-BIST can be initiated on the keyboard and the power button to AC power or with the system board, the battery status LED will flash one of system board embedded controller (EC) failures. Dell SupportAssist Pre-boot...
..., error codes are listed. 6. AMBER: Indicates a problem with the system board b. On the boot menu screen, select the Diagnostics option. 4. Press and hold both the M key and the power button held down, the battery indicator LED may exhibit two states: a. NOTE: M-BIST can be initiated on the keyboard and the power button to AC power or with the system board, the battery status LED will flash one of system board embedded controller (EC) failures. Dell SupportAssist Pre-boot...
Owners Manual
Page 89
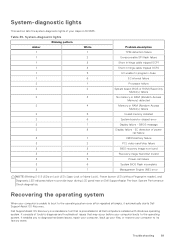
... computer boots to the operating system. System-diagnostic lights This section lists the system-diagnostic lights of power rail failure CMOS battery failure PCI, video card/chip failure BIOS recovery image not found Recovery image found but invalid Power-rail failure System BIOS Flash incomplete Management Engine (ME) error NOTE: Blinking 3-3-3 LEDs on Lock LED (Caps-Lock or Nums-Lock), Power button LED (without Fingerprint reader), and Diagnostic LED indicates failure to provide input during LCD panel test on Dell SupportAssist Pre-boot System...
... computer boots to the operating system. System-diagnostic lights This section lists the system-diagnostic lights of power rail failure CMOS battery failure PCI, video card/chip failure BIOS recovery image not found Recovery image found but invalid Power-rail failure System BIOS Flash incomplete Management Engine (ME) error NOTE: Blinking 3-3-3 LEDs on Lock LED (Caps-Lock or Nums-Lock), Power button LED (without Fingerprint reader), and Diagnostic LED indicates failure to provide input during LCD panel test on Dell SupportAssist Pre-boot System...
Owners Manual
Page 90
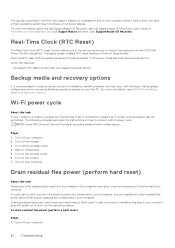
... power button for recovering Windows operating system on your Dell PC. see Dell SupportAssist OS Recovery User's Guide at www.dell.com/serviceabilitytools. Wi-Fi power cycle About this task Flea power is the residual static electricity that may be performed. Turn on the wireless router. 6. Backup media and recovery options It is removed. Turn off your computer. 2. Wait for 30 seconds. 5. Real-Time Clock (RTC Reset) The Real Time Clock (RTC) reset function...
... power button for recovering Windows operating system on your Dell PC. see Dell SupportAssist OS Recovery User's Guide at www.dell.com/serviceabilitytools. Wi-Fi power cycle About this task Flea power is the residual static electricity that may be performed. Turn on the wireless router. 6. Backup media and recovery options It is removed. Turn off your computer. 2. Wait for 30 seconds. 5. Real-Time Clock (RTC Reset) The Real Time Clock (RTC) reset function...


