Owners Manual
Page 4
... 15 Removing the Wireless Mini-Card 37 Prerequisites 37 Procedure 38 16 Replacing the Wireless Mini-Card 39 Procedure 39 Postrequisites 40 17 Removing the I/O Board 41 Prerequisites 41 Procedure 42 18 Replacing the I/O Board 43 Procedure 43 Postrequisites 43 19 Removing the System Board 45 Prerequisites 45 Procedure 46 20 Replacing the System Board 49 Procedure 49 Postrequisites 49 Entering the Service Tag in system setup...
... 15 Removing the Wireless Mini-Card 37 Prerequisites 37 Procedure 38 16 Replacing the Wireless Mini-Card 39 Procedure 39 Postrequisites 40 17 Removing the I/O Board 41 Prerequisites 41 Procedure 42 18 Replacing the I/O Board 43 Procedure 43 Postrequisites 43 19 Removing the System Board 45 Prerequisites 45 Procedure 46 20 Replacing the System Board 49 Procedure 49 Postrequisites 49 Entering the Service Tag in system setup...
Owners Manual
Page 17
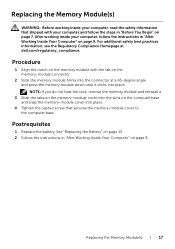
... do not hear the click, remove the memory module and reinstall it clicks into place. Replacing the Memory Module(s) WARNING: Before working inside your computer, read the safety information that secures the memory-module cover to the computer base. See "Replacing the Battery" on page 13. 2 Follow the instructions in "Before You Begin" on the memory-module connector. 2 Slide the memory module firmly into place. 4 Tighten the...
... do not hear the click, remove the memory module and reinstall it clicks into place. Replacing the Memory Module(s) WARNING: Before working inside your computer, read the safety information that secures the memory-module cover to the computer base. See "Replacing the Battery" on page 13. 2 Follow the instructions in "Before You Begin" on the memory-module connector. 2 Slide the memory module firmly into place. 4 Tighten the...
Owners Manual
Page 45
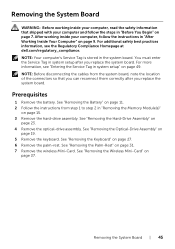
... and follow the instructions in system setup after you replace the system board. You must enter the Service Tag in "After Working Inside Your Computer" on page 7. See "Removing the Hard-Drive Assembly" on page 27. 6 Remove the palm-rest. See "Removing the Keyboard" on page 23. 4 Remove the optical-drive assembly. See "Removing the Wireless Mini-Card" on page 31. 7 Remove the wireless Mini-Card. NOTE: Your computer's Service Tag is...
... and follow the instructions in system setup after you replace the system board. You must enter the Service Tag in "After Working Inside Your Computer" on page 7. See "Removing the Hard-Drive Assembly" on page 27. 6 Remove the palm-rest. See "Removing the Keyboard" on page 23. 4 Remove the optical-drive assembly. See "Removing the Wireless Mini-Card" on page 31. 7 Remove the wireless Mini-Card. NOTE: Your computer's Service Tag is...
Owners Manual
Page 49
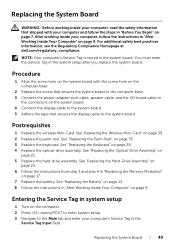
.... 4 Replace the optical-drive assembly. See "Replacing the Keyboard" on page 35. 3 Replace the keyboard. See "Replacing the Hard-Drive Assembly" on page 25. 6 Follow the instructions from step 3 and step 4 in "Replacing the Memory Module(s)" on page 9. Entering the Service Tag in system setup 1 Turn on the system board. 4 Connect the display cable to the system board. 5 Adhere the tape that secures the display cable to the Main tab and enter your computer's Service Tag...
.... 4 Replace the optical-drive assembly. See "Replacing the Keyboard" on page 35. 3 Replace the keyboard. See "Replacing the Hard-Drive Assembly" on page 25. 6 Follow the instructions from step 3 and step 4 in "Replacing the Memory Module(s)" on page 9. Entering the Service Tag in system setup 1 Turn on the system board. 4 Connect the display cable to the system board. 5 Adhere the tape that secures the display cable to the Main tab and enter your computer's Service Tag...
Owners Manual
Page 51
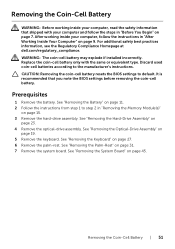
... instructions in "After Working Inside Your Computer" on page 7. Prerequisites 1 Remove the battery. See "Removing the Hard-Drive Assembly" on page 45. Discard used coin-cell batteries according to default. It is recommended that shipped with the same or equivalent type. See "Removing the System Board" on page 23. 4 Remove the optical-drive assembly. CAUTION: Removing the coin-cell battery resets the BIOS settings to the manufacturer's instructions. See "Removing the Optical-Drive...
... instructions in "After Working Inside Your Computer" on page 7. Prerequisites 1 Remove the battery. See "Removing the Hard-Drive Assembly" on page 45. Discard used coin-cell batteries according to default. It is recommended that shipped with the same or equivalent type. See "Removing the System Board" on page 23. 4 Remove the optical-drive assembly. CAUTION: Removing the coin-cell battery resets the BIOS settings to the manufacturer's instructions. See "Removing the Optical-Drive...
Me and My Dell
Page 15
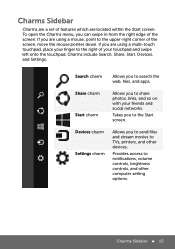
... of features which are located within the Start screen. To open the Charms menu, you are using a multi-touch touchpad, place your finger to the Start screen. If you to the right of the screen, move the mouse pointer down. Takes you are using a mouse, point to search the web, files, and apps. Charms include Search, Share, Start, Devices, and Settings. Share charm Start charm Allows you to...
... of features which are located within the Start screen. To open the Charms menu, you are using a multi-touch touchpad, place your finger to the Start screen. If you to the right of the screen, move the mouse pointer down. Takes you are using a mouse, point to search the web, files, and apps. Charms include Search, Share, Start, Devices, and Settings. Share charm Start charm Allows you to...
Me and My Dell
Page 23
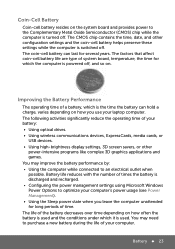
..., media cards, or USB devices. • Using high-brightness display settings, 3D screen savers, or other configuration settings and the coin-cell battery helps preserve these settings while the computer is turned off. The following activities significantly reduce the operating time of a battery, which is used and the conditions under which the computer is discharged and recharged. • Configuring the power management settings using Microsoft Windows Power Options to optimize your computer's power usage (see Power Management). • Using the Sleep power...
..., media cards, or USB devices. • Using high-brightness display settings, 3D screen savers, or other configuration settings and the coin-cell battery helps preserve these settings while the computer is turned off. The following activities significantly reduce the operating time of a battery, which is used and the conditions under which the computer is discharged and recharged. • Configuring the power management settings using Microsoft Windows Power Options to optimize your computer's power usage (see Power Management). • Using the Sleep power...
Me and My Dell
Page 36
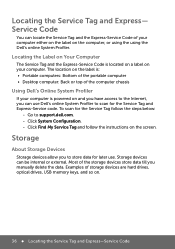
... instructions on and you have access to the Internet, you can be internal or external. Storage About Storage Devices Storage devices allow you manually delete the data. Storage devices can use . Most of the computer chassis Using Dell's Online System Profiler If your computer is located on a label on your computer either on the label on . 36 Locating the Service Tag and Express-Service Code Locating the Service...
... instructions on and you have access to the Internet, you can be internal or external. Storage About Storage Devices Storage devices allow you manually delete the data. Storage devices can use . Most of the computer chassis Using Dell's Online System Profiler If your computer is located on a label on your computer either on the label on . 36 Locating the Service Tag and Express-Service Code Locating the Service...

Me and My Dell
Page 47
... so on . • Video Chat - Click Start → All Programs or Programs. 2. Enabling a Webcam 1. Click Imaging Devices and then double-click Camera. 3. Open the webcam software to enable the microphone. Dell Webcam Manager includes: • Webcam Center - Cam Avatar - Access Dell Webcam Manager 1. Enable the Digital Array Microphone in the Dell Webcam Center 1. Click Enable. Select avatars for video chat. Cam Avatar Creator software for video chat, apply audio filters, or use all the webcam features and configuration options. Webcam 47 Click...
... so on . • Video Chat - Click Start → All Programs or Programs. 2. Enabling a Webcam 1. Click Imaging Devices and then double-click Camera. 3. Open the webcam software to enable the microphone. Dell Webcam Manager includes: • Webcam Center - Cam Avatar - Access Dell Webcam Manager 1. Enable the Digital Array Microphone in the Dell Webcam Center 1. Click Enable. Select avatars for video chat. Cam Avatar Creator software for video chat, apply audio filters, or use all the webcam features and configuration options. Webcam 47 Click...
Me and My Dell
Page 62
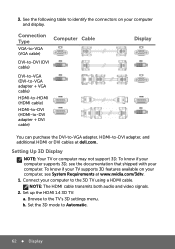
... video signals. 2. Set the 3D mode to the TV's 3D settings menu. b. Browse to Automatic. 62 Display To know if your computer supports 3D, see System Requirements at dell.com. 3. Setting Up 3D Display NOTE: Your TV or computer may not support 3D. Connection Type VGA-to-VGA (VGA cable) Computer Cable DVI-to-DVI (DVI cable) DVI-to-VGA (DVI-to-VGA adapter + VGA cable) HDMI-to-HDMI (HDMI cable) HDMI...
... video signals. 2. Set the 3D mode to the TV's 3D settings menu. b. Browse to Automatic. 62 Display To know if your computer supports 3D, see System Requirements at dell.com. 3. Setting Up 3D Display NOTE: Your TV or computer may not support 3D. Connection Type VGA-to-VGA (VGA cable) Computer Cable DVI-to-DVI (DVI cable) DVI-to-VGA (DVI-to-VGA adapter + VGA cable) HDMI-to-HDMI (HDMI cable) HDMI...
Me and My Dell
Page 64
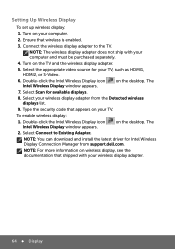
...your wireless display adapter. 64 Display NOTE: You can download and install the latest driver for Intel Wireless Display Connection Manager from the Detected wireless displays list. 9. Type the security code that wireless is enabled. 3. Double-click the Intel Wireless Display icon Intel Wireless Display window appears. on your TV, such as HDMI1, HDMI2, or S-Video. 6. Turn on the desktop. Select the appropriate video source for available displays. 8. Connect the wireless display adapter to Existing Adapter. Setting Up Wireless Display To set up wireless display...
...your wireless display adapter. 64 Display NOTE: You can download and install the latest driver for Intel Wireless Display Connection Manager from the Detected wireless displays list. 9. Type the security code that wireless is enabled. 3. Double-click the Intel Wireless Display icon Intel Wireless Display window appears. on your TV, such as HDMI1, HDMI2, or S-Video. 6. Turn on the desktop. Select the appropriate video source for available displays. 8. Connect the wireless display adapter to Existing Adapter. Setting Up Wireless Display To set up wireless display...
Me and My Dell
Page 70
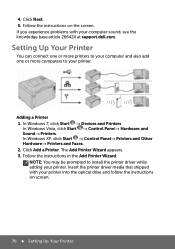
... may be prompted to your printer. Click Next. 5. If you experience problems with your computer sound, see the knowledge base article 266424 at support.dell.com. In Windows Vista, click Start → Control Panel→ Hardware and Sound→ Printers. Insert the printer driver media that shipped with your printer into the optical drive and follow the instructions on the screen. In Windows 7, click Start → Devices and Printers.
... may be prompted to your printer. Click Next. 5. If you experience problems with your computer sound, see the knowledge base article 266424 at support.dell.com. In Windows Vista, click Start → Control Panel→ Hardware and Sound→ Printers. Insert the printer driver media that shipped with your printer into the optical drive and follow the instructions on the screen. In Windows 7, click Start → Devices and Printers.

Me and My Dell
Page 103
.... Windows 7 and Windows Vista 1. Click Start , type network in the search box, and then click Network and Sharing Center→ Set up your wired Internet connection. Install any open files, and exit any software required for your Internet connection. • If you are using a dial-up connection, connect the telephone line to the optional external USB modem and to the Internet window appears. Setting Up a Local Area Network The following steps are general guidelines for setup instructions...
.... Windows 7 and Windows Vista 1. Click Start , type network in the search box, and then click Network and Sharing Center→ Set up your wired Internet connection. Install any open files, and exit any software required for your Internet connection. • If you are using a dial-up connection, connect the telephone line to the optional external USB modem and to the Internet window appears. Setting Up a Local Area Network The following steps are general guidelines for setup instructions...

Me and My Dell
Page 105
... telephone service for offerings available in the search box, and press . Contact your ISP for setup instructions. Type Device Manager in your computer. Under Tasks, click Device Manager. 3. Windows 8 1. Windows 7 and Windows Vista 1. Expand Network Adapters. NOTE: ISPs and ISP offerings vary by country. Set up a new connection or network → Connect to the telephone wall jack before you set up your Internet connection. • If you are using a DSL or cable/satellite modem connection, contact your wireless...
... telephone service for offerings available in the search box, and press . Contact your ISP for setup instructions. Type Device Manager in your computer. Under Tasks, click Device Manager. 3. Windows 8 1. Windows 7 and Windows Vista 1. Expand Network Adapters. NOTE: ISPs and ISP offerings vary by country. Set up a new connection or network → Connect to the telephone wall jack before you set up your Internet connection. • If you are using a DSL or cable/satellite modem connection, contact your wireless...
Me and My Dell
Page 114
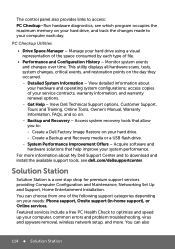
... support services providing Computer Configuration and Maintenance, Networking Set Up and Support, Home Entertainment Installation. Manage your hard drive using a visual representation of the space consumed by each day. Monitor system events and changes over time. Backup and Recovery - Acquire software and hardware solutions that allow you to: -- Access system recovery tools that help improve your computer each type of the following support categories depending on the day they occurred. -- Create a Backup and Recovery media or a USB flash drive...
... support services providing Computer Configuration and Maintenance, Networking Set Up and Support, Home Entertainment Installation. Manage your hard drive using a visual representation of the space consumed by each day. Monitor system events and changes over time. Backup and Recovery - Acquire software and hardware solutions that allow you to: -- Access system recovery tools that help improve your computer each type of the following support categories depending on the day they occurred. -- Create a Backup and Recovery media or a USB flash drive...
Me and My Dell
Page 115
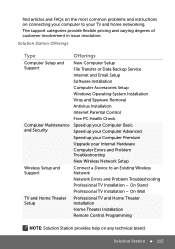
... and Problem Troubleshooting New Wireless Network Setup Wireless Setup and Support Connect a Device to an Existing Wireless Network Network Errors and Problem Troubleshooting Professional TV Installation - On Stand Professional TV Installation - The support categories provide flexible pricing and varying degrees of customer involvement in issue resolution. Solution Station Offerings Type Offerings Computer Setup and Support New Computer Setup File Transfer or Data Backup Service Internet and Email Setup Software Installation Computer Accessories Setup Windows Operating...
... and Problem Troubleshooting New Wireless Network Setup Wireless Setup and Support Connect a Device to an Existing Wireless Network Network Errors and Problem Troubleshooting Professional TV Installation - On Stand Professional TV Installation - The support categories provide flexible pricing and varying degrees of customer involvement in issue resolution. Solution Station Offerings Type Offerings Computer Setup and Support New Computer Setup File Transfer or Data Backup Service Internet and Email Setup Software Installation Computer Accessories Setup Windows Operating...
Me and My Dell
Page 116
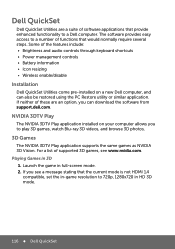
... software from support.dell.com. If you see www.nvidia.com. The software provides easy access to a number of software applications that provide enhanced functionality to a Dell computer. Playing Games in full-screen mode. 2. For a list of the features include: • Brightness and audio controls through keyboard shortcuts • Power management controls • Battery information • Icon resizing • Wireless enable/disable Installation Dell QuickSet Utilities come pre-installed on your computer allows you can also be restored using...
... software from support.dell.com. If you see www.nvidia.com. The software provides easy access to a number of software applications that provide enhanced functionality to a Dell computer. Playing Games in full-screen mode. 2. For a list of the features include: • Brightness and audio controls through keyboard shortcuts • Power management controls • Battery information • Icon resizing • Wireless enable/disable Installation Dell QuickSet Utilities come pre-installed on your computer allows you can also be restored using...
Me and My Dell
Page 149
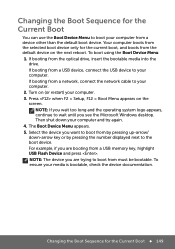
... USB device to wait until you are booting from the optical drive, insert the bootable media into the drive. To ensure your computer and try again. 4. Changing the Boot Sequence for the Current Boot 149 If booting from a USB memory key, highlight USB Flash Device and press . NOTE: If you are trying to the boot device. Turn on the screen. For example, if you wait too long and the operating...
... USB device to wait until you are booting from the optical drive, insert the bootable media into the drive. To ensure your computer and try again. 4. Changing the Boot Sequence for the Current Boot 149 If booting from a USB memory key, highlight USB Flash Device and press . NOTE: If you are trying to the boot device. Turn on the screen. For example, if you wait too long and the operating...
Me and My Dell
Page 155
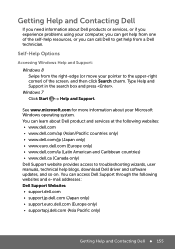
... and Contacting Dell If you need information about Dell products or services, or if you experience problems using your computer, you can call Dell to troubleshooting wizards, user manuals, technical help blogs, download Dell driver and software updates, and so on. Windows 7 Click Start → Help and Support. You can learn about your pointer to the upper-right corner) of the self-help resources, or you can access Dell Support through...
... and Contacting Dell If you need information about Dell products or services, or if you experience problems using your computer, you can call Dell to troubleshooting wizards, user manuals, technical help blogs, download Dell driver and software updates, and so on. Windows 7 Click Start → Help and Support. You can learn about your pointer to the upper-right corner) of the self-help resources, or you can access Dell Support through...

Me and My Dell
Page 167
... into the sleep state is ready to start again when you to configure when the power supply to transfer information, based on your hard disk, and then turns off . Transfer Methods You can access the same network folders or location. • USB flash drive or external hard drive - The system setup and the operating system allow you want to charge the battery during that connects two computers through USB ports. • Network - Putting your...
... into the sleep state is ready to start again when you to configure when the power supply to transfer information, based on your hard disk, and then turns off . Transfer Methods You can access the same network folders or location. • USB flash drive or external hard drive - The system setup and the operating system allow you want to charge the battery during that connects two computers through USB ports. • Network - Putting your...


