Owner's Manual
Page 6
... Audio . . . . 75 Enabling the Display Settings for a TV 78 8 Using ExpressCards 79 ExpressCard Blanks 79 Installing an ExpressCard 80 Removing an ExpressCard or Blank 81 9 Using the Memory Card Reader 83 Memory Card Blanks 83 Installing a Memory Card 83 Removing a Memory Card or Blank 85 10 Setting Up and Using Networks 87 Connecting a Network or Broadband Modem Cable . . 87 Setting Up a Network 88 Wireless Local Area Network 88 What You Need to Establish a WLAN Connection . 88 Checking Your Wireless Network Card 89 Setting Up a New WLAN Using a Wireless...
... Audio . . . . 75 Enabling the Display Settings for a TV 78 8 Using ExpressCards 79 ExpressCard Blanks 79 Installing an ExpressCard 80 Removing an ExpressCard or Blank 81 9 Using the Memory Card Reader 83 Memory Card Blanks 83 Installing a Memory Card 83 Removing a Memory Card or Blank 85 10 Setting Up and Using Networks 87 Connecting a Network or Broadband Modem Cable . . 87 Setting Up a Network 88 Wireless Local Area Network 88 What You Need to Establish a WLAN Connection . 88 Checking Your Wireless Network Card 89 Setting Up a New WLAN Using a Wireless...
Owner's Manual
Page 15
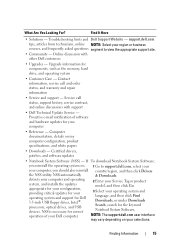
... drives, and USB devices. What Are You Looking For? Troubleshooting hints and Dell Support Website - Finding Information 15 Online discussion with support • Dell Technical Update Service - Upgrade information for your computer, you should also reinstall country/region, and then click Drivers the NSS utility. Computer documentation, details on 1 Go to view the appropriate support site. • Community - If To download Notebook System Software: you reinstall the operating...
... drives, and USB devices. What Are You Looking For? Troubleshooting hints and Dell Support Website - Finding Information 15 Online discussion with support • Dell Technical Update Service - Upgrade information for your computer, you should also reinstall country/region, and then click Drivers the NSS utility. Computer documentation, details on 1 Go to view the appropriate support site. • Community - If To download Notebook System Software: you reinstall the operating...

Owner's Manual
Page 26
...-Fi Catcher Network Locator light appears only when the computer is turned off and the wireless switch is normal and does not indicate a problem with a plastic blank installed in the slot. CAUTION: Do not block, push objects into, or allow dust to the connector. Restricting the airflow can damage the computer or cause a fire. Supports one ExpressCard. Fan noise is configured in a low...
...-Fi Catcher Network Locator light appears only when the computer is turned off and the wireless switch is normal and does not indicate a problem with a plastic blank installed in the slot. CAUTION: Do not block, push objects into, or allow dust to the connector. Restricting the airflow can damage the computer or cause a fire. Supports one ExpressCard. Fan noise is configured in a low...

Owner's Manual
Page 35
... to a New Computer You can transfer the following methods for setup information, including how to: • Obtain and install updated drivers. • Connect the printer to the computer. For technical assistance, refer to another: • E-mail messages • Toolbar settings • Window sizes • Internet bookmarks Use one of the following types of data from one computer to the printer owner's manual or...
... to a New Computer You can transfer the following methods for setup information, including how to: • Obtain and install updated drivers. • Connect the printer to the computer. For technical assistance, refer to another: • E-mail messages • Toolbar settings • Window sizes • Internet bookmarks Use one of the following types of data from one computer to the printer owner's manual or...
Owner's Manual
Page 41
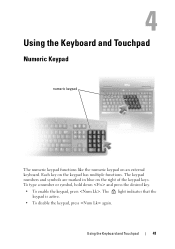
Each key on the right of the keypad keys. To type a number or symbol, hold down and press the desired key. • To enable the keypad, press . The 9 light indicates that the keypad is active. • To disable the keypad, press again. Using the Keyboard and Touchpad 41 The keypad numbers and symbols are marked in blue on the keypad has multiple functions. Using the Keyboard and Touchpad Numeric Keypad numeric keypad The numeric keypad functions like the numeric keypad on an external keyboard.
Each key on the right of the keypad keys. To type a number or symbol, hold down and press the desired key. • To enable the keypad, press . The 9 light indicates that the keypad is active. • To disable the keypad, press again. Using the Keyboard and Touchpad 41 The keypad numbers and symbols are marked in blue on the keypad has multiple functions. Using the Keyboard and Touchpad Numeric Keypad numeric keypad The numeric keypad functions like the numeric keypad on an external keyboard.

Owner's Manual
Page 94
... activate Mobile Broadband service through Windows Help and Support (click Start , and then click Help and Support). NOTE: Before you connect to Mobile Broadband ExpressCards or MiniCards. The user's guide is listed under Modems. Connecting to a Mobile Broadband Network NOTE: These instructions only apply to the Internet, you can view the type of Mobile Broadband card installed in Windows Help and Support: 1 Click Start → Help and Support→ Use Tools to internal cards...
... activate Mobile Broadband service through Windows Help and Support (click Start , and then click Help and Support). NOTE: Before you connect to Mobile Broadband ExpressCards or MiniCards. The user's guide is listed under Modems. Connecting to a Mobile Broadband Network NOTE: These instructions only apply to the Internet, you can view the type of Mobile Broadband card installed in Windows Help and Support: 1 Click Start → Help and Support→ Use Tools to internal cards...

Owner's Manual
Page 106
... 106 Troubleshooting For more are provided. Use this utility for information about your Service Tag, Dell can download Dell Support Center from the Services page at support.dell.com. Dell Support 3 The Dell Support 3 is customized for remote, real-time, technical support • Dell support contact information including e-mail and online chat addresses as well as available memory, disk space, installed hardware, network addresses, modem specifications, installed security software, and much more information about installing recommended drivers and downloads...
... 106 Troubleshooting For more are provided. Use this utility for information about your Service Tag, Dell can download Dell Support Center from the Services page at support.dell.com. Dell Support 3 The Dell Support 3 is customized for remote, real-time, technical support • Dell support contact information including e-mail and online chat addresses as well as available memory, disk space, installed hardware, network addresses, modem specifications, installed security software, and much more information about installing recommended drivers and downloads...

Owner's Manual
Page 108
... To access Dell Network Assistant: 1 Click the Dell Support Center icon on a regular basis or before contacting Dell for common configuration concerns. DellConnect is also available for users of Dell™ computers, the Dell Network Assistant helps simplify the setup, monitoring, troubleshooting, and repair of your Dell computer must have an Internet connection and your network. The application creates a detailed report that Dell technicians can work with Dell's associate during the troubleshooting session. The Dell Network...
... To access Dell Network Assistant: 1 Click the Dell Support Center icon on a regular basis or before contacting Dell for common configuration concerns. DellConnect is also available for users of Dell™ computers, the Dell Network Assistant helps simplify the setup, monitoring, troubleshooting, and repair of your Dell computer must have an Internet connection and your network. The application creates a detailed report that Dell technicians can work with Dell's associate during the troubleshooting session. The Dell Network...

Owner's Manual
Page 112
... faulty. AU X I L I L E NAME - If the problem persists, contact Dell (see "Contacting Dell" on page 178 as you are having problems connecting to an Internet service provider. For an external mouse, check the cable connection. With the Windows® Mail e-mail program open, click File. The touch pad or external mouse may require an upgrade) to scan the computer and remove spyware. 5 Click the COM port for your modem. 6 Click Properties...
... faulty. AU X I L I L E NAME - If the problem persists, contact Dell (see "Contacting Dell" on page 178 as you are having problems connecting to an Internet service provider. For an external mouse, check the cable connection. With the Windows® Mail e-mail program open, click File. The touch pad or external mouse may require an upgrade) to scan the computer and remove spyware. 5 Click the COM port for your modem. 6 Click Properties...
Owner's Manual
Page 115
... computer, and avoid touching the keyboard or keys during the boot routine. A memory module may be faulty or improperly seated. Reinstall the memory modules and, if necessary, replace them (see "Dell Diagnostics" on page 150). The computer cannot find the hard drive. If the hard drive is your boot device, ensure that the drive is conflicting with the operating system, another program, or a utility. The operating system may be corrupted...
... computer, and avoid touching the keyboard or keys during the boot routine. A memory module may be faulty or improperly seated. Reinstall the memory modules and, if necessary, replace them (see "Dell Diagnostics" on page 150). The computer cannot find the hard drive. If the hard drive is your boot device, ensure that the drive is conflicting with the operating system, another program, or a utility. The operating system may be corrupted...
Owner's Manual
Page 122
... program may require an upgrade) to scan the computer and remove spyware. For more information, go to support.dell.com and search for information. • Ensure that the program is installed and configured properly. • Verify that the device drivers do not conflict with spyware. Other software problems CHECK THE SOFTWARE DOCUMENTATION OR CONTACT THE SOFTWARE MANUFACTURER FOR TROUBLESHOOTING INFORMATION - • Ensure that...
... program may require an upgrade) to scan the computer and remove spyware. For more information, go to support.dell.com and search for information. • Ensure that the program is installed and configured properly. • Verify that the device drivers do not conflict with spyware. Other software problems CHECK THE SOFTWARE DOCUMENTATION OR CONTACT THE SOFTWARE MANUFACTURER FOR TROUBLESHOOTING INFORMATION - • Ensure that...

Owner's Manual
Page 126
... electrical outlet is USB. Bypass power protection devices, power strips, and extension cables to the following port(s): setting is LPT1 (Printer Port). EL I M I N A T E P O S S I B L E I C A L O U T L E T - Printer Problems Fill out the "Diagnostics Checklist" on page 50. See the printer documentation for instructions. 126 Troubleshooting Ensure that the computer turns on page 150). If the computer power light turns on, but the display remains blank, reinstall the memory modules (see "Memory" on . TEST...
... electrical outlet is USB. Bypass power protection devices, power strips, and extension cables to the following port(s): setting is LPT1 (Printer Port). EL I M I N A T E P O S S I B L E I C A L O U T L E T - Printer Problems Fill out the "Diagnostics Checklist" on page 50. See the printer documentation for instructions. 126 Troubleshooting Ensure that the computer turns on page 150). If the computer power light turns on, but the display remains blank, reinstall the memory modules (see "Memory" on . TEST...

Owner's Manual
Page 132
... the driver or install a new driver (see "Restoring Your Microsoft® Windows Vista® Operating System" on page 135) to return your administrator to enter the Device Manager. 3 Right-click the device for an exclamation point (a circle with the previously installed version. 1 Click Start , and then right-click Computer. 2 Click Properties, and then click Device Manager. Scroll down the list of your computer might not work correctly. Using Windows Device Driver Rollback If a problem...
... the driver or install a new driver (see "Restoring Your Microsoft® Windows Vista® Operating System" on page 135) to return your administrator to enter the Device Manager. 3 Right-click the device for an exclamation point (a circle with the previously installed version. 1 Click Start , and then right-click Computer. 2 Click Properties, and then click Device Manager. Scroll down the list of your computer might not work correctly. Using Windows Device Driver Rollback If a problem...

Owner's Manual
Page 134
... to enter the Device Manager. 3 Double-click the type of device for which you are installing the driver. 5 Click Driver tab, and then click Update Driver. 6 Click Browse and browse to the location to resolve the incompatibility. Troubleshooting Software and Hardware Problems in the Windows Vista® Operating System If a device is either not detected during the operating system setup or is a new operating system, so drivers or applications that support certain devices may appear. Manually Reinstalling Drivers...
... to enter the Device Manager. 3 Double-click the type of device for which you are installing the driver. 5 Click Driver tab, and then click Update Driver. 6 Click Browse and browse to the location to resolve the incompatibility. Troubleshooting Software and Hardware Problems in the Windows Vista® Operating System If a device is either not detected during the operating system setup or is a new operating system, so drivers or applications that support certain devices may appear. Manually Reinstalling Drivers...

Owner's Manual
Page 136
... → Maintenance → Back Up and Restore Center. If Device Driver Rollback does not resolve the problem, then use Device Driver Rollback (see "Using Windows Device Driver Rollback" on using System Restore. Using Windows Vista System Restore The Windows operating system provides System Restore to allow you install a device driver, use System Restore. 136 Troubleshooting Restoring the Computer to an Earlier Operating State If problems occur after you to return your Dell computer to the Windows Classic view. To access the Windows Vista Backup and Restore Center...
... → Maintenance → Back Up and Restore Center. If Device Driver Rollback does not resolve the problem, then use Device Driver Rollback (see "Using Windows Device Driver Rollback" on using System Restore. Using Windows Vista System Restore The Windows operating system provides System Restore to allow you install a device driver, use System Restore. 136 Troubleshooting Restoring the Computer to an Earlier Operating State If problems occur after you to return your Dell computer to the Windows Classic view. To access the Windows Vista Backup and Restore Center...

Owner's Manual
Page 189
... the External Hot Key option, which you can use system setup as follows: • To set or change the system setup settings. You can disable or enable only through system setup. Appendix 189 You may automatically configure most of system memory After you set up ) configuration • Basic device configuration settings • System security and hard drive password settings NOTE: Unless you are an expert computer user or are directed to do so by Dell technical support...
... the External Hot Key option, which you can use system setup as follows: • To set or change the system setup settings. You can disable or enable only through system setup. Appendix 189 You may automatically configure most of system memory After you set up ) configuration • Basic device configuration settings • System security and hard drive password settings NOTE: Unless you are an expert computer user or are directed to do so by Dell technical support...
Owner's Manual
Page 190
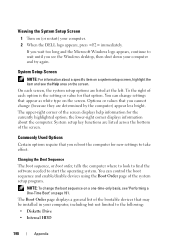
... can control the boot sequence and enable/disable devices using the Boot Order page of the system setup program. System setup key functions are listed at the left. Changing the Boot Sequence The boot sequence, or boot order, tells the computer where to look to find the software needed to take effect. On each screen, the system setup options are listed across the bottom of each option is the setting or value for that may be installed...
... can control the boot sequence and enable/disable devices using the Boot Order page of the system setup program. System setup key functions are listed at the left. Changing the Boot Sequence The boot sequence, or boot order, tells the computer where to look to find the software needed to take effect. On each screen, the system setup options are listed across the bottom of each option is the setting or value for that may be installed...
Owner's Manual
Page 211
... A backup power source used in to 1600 x 1200. A UPS keeps a computer running for video cards and controllers that is turned on a monitor. UPS systems typically provide surge suppression and may also provide voltage regulation. universal serial bus - video mode - A video standard for a limited amount of wires to protect against interference. The amount of video memory installed primarily influences the number of speakers, printer, broadband devices (DSL and cable...
... A backup power source used in to 1600 x 1200. A UPS keeps a computer running for video cards and controllers that is turned on a monitor. UPS systems typically provide surge suppression and may also provide voltage regulation. universal serial bus - video mode - A video standard for a limited amount of wires to protect against interference. The amount of video memory installed primarily influences the number of speakers, printer, broadband devices (DSL and cable...

Service Manual
Page 35
..., turn off your computer before removing the hard drive. Follow the procedures in Sleep state. CAUTION: Do not touch the metal housing of the hard drive bezel, then pull to Contents Page Hard Drive Dell™ Vostro™ 1500 and Inspiron™ 1520/1521 Service Manual Removing the Hard Drive Replacing the Hard Drive NOTE: Dell does not guarantee compatibility or provide support for hard drives obtained from sources other than Dell. NOTICE: When the hard drive is hot. Remove...
..., turn off your computer before removing the hard drive. Follow the procedures in Sleep state. CAUTION: Do not touch the metal housing of the hard drive bezel, then pull to Contents Page Hard Drive Dell™ Vostro™ 1500 and Inspiron™ 1520/1521 Service Manual Removing the Hard Drive Replacing the Hard Drive NOTE: Dell does not guarantee compatibility or provide support for hard drives obtained from sources other than Dell. NOTICE: When the hard drive is hot. Remove...
Service Manual
Page 42
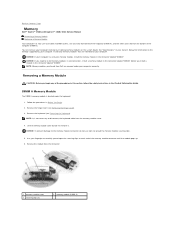
... Contents Page Memory Dell™ Vostro™ 1500 and Inspiron™ 1520/1521 Service Manual Removing a Memory Module Replacing a Memory Module Your computer has two user-accessible SODIMM sockets, one memory module, install the memory module in the connector labeled "DIMMA." See "Specifications" in your computer has only one accessed from beneath the keyboard (DIMM A), and the other accessed from the bottom of the procedures in this section, follow the safety instructions in the...
... Contents Page Memory Dell™ Vostro™ 1500 and Inspiron™ 1520/1521 Service Manual Removing a Memory Module Replacing a Memory Module Your computer has two user-accessible SODIMM sockets, one memory module, install the memory module in the connector labeled "DIMMA." See "Specifications" in your computer has only one accessed from beneath the keyboard (DIMM A), and the other accessed from the bottom of the procedures in this section, follow the safety instructions in the...


