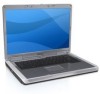

Owner's Manual
Page 7
...Drivers and Utilities 81 Resolving Software and Hardware Incompatibilities 83 Restoring Your Operating System 84 Using Microsoft Windows XP System Restore 84 Using Dell PC Restore by Symantec 85 Using the Operating System CD 87 11 Adding and Replacing Parts 89 Before You Begin 89 Recommended Tools ...89 Turning Off Your Computer 89 Before Working Inside Your Computer 90 Optical Drive 91 Hard Drive 92 Returning a Hard Drive to Dell 94 Memory 94 Modem 96 Hinge Cover 98 Keyboard 99 Wireless Mini-Card 101...
...Drivers and Utilities 81 Resolving Software and Hardware Incompatibilities 83 Restoring Your Operating System 84 Using Microsoft Windows XP System Restore 84 Using Dell PC Restore by Symantec 85 Using the Operating System CD 87 11 Adding and Replacing Parts 89 Before You Begin 89 Recommended Tools ...89 Turning Off Your Computer 89 Before Working Inside Your Computer 90 Optical Drive 91 Hard Drive 92 Returning a Hard Drive to Dell 94 Memory 94 Modem 96 Hinge Cover 98 Keyboard 99 Wireless Mini-Card 101...
Owner's Manual
Page 17
... the computer or to indicate battery charge status. If the computer is in a power management mode. Press the power button to turn on steadily or blinks to enter or exit a power management mode. See "Power Management Modes" on the computer, and blinks when the computer ... light operates as follows: • Off: The battery is adequately charged (or the computer is turned off the computer while the light is almost fully charged. About Your Computer 17 DEVICE STATUS LIGHTS Turns on when you turn off ). • Flashing orange: The battery charge is low. • Solid orange: The...
... the computer or to indicate battery charge status. If the computer is in a power management mode. Press the power button to turn on steadily or blinks to enter or exit a power management mode. See "Power Management Modes" on the computer, and blinks when the computer ... light operates as follows: • Off: The battery is adequately charged (or the computer is turned off the computer while the light is almost fully charged. About Your Computer 17 DEVICE STATUS LIGHTS Turns on when you turn off ). • Flashing orange: The battery charge is low. • Solid orange: The...

Owner's Manual
Page 19
To enable or disable wireless networking, press . KEYBOARD AND WIRELESS STATUS LIGHTS The green lights located above the keyboard indicate the following: 9 Turns on when wireless networking is enabled. Turns on when the numeric keypad is enabled. About Your Computer 19 Turns on when the uppercase letter function is enabled. A Turns on when the scroll lock function is enabled.
To enable or disable wireless networking, press . KEYBOARD AND WIRELESS STATUS LIGHTS The green lights located above the keyboard indicate the following: 9 Turns on when wireless networking is enabled. Turns on when the numeric keypad is enabled. About Your Computer 19 Turns on when the uppercase letter function is enabled. A Turns on when the scroll lock function is enabled.

Owner's Manual
Page 23
CAUTION: The AC adapter works with your computer turned either on or off. MODEM CONNECTOR (RJ-11) To use the internal modem, connect the telephone line to the power strip or electrical outlet may ...
CAUTION: The AC adapter works with your computer turned either on or off. MODEM CONNECTOR (RJ-11) To use the internal modem, connect the telephone line to the power strip or electrical outlet may ...

Owner's Manual
Page 29
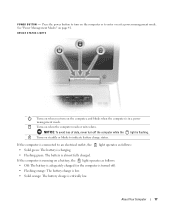
... 29 Printer Cable Your printer connects to the computer. • Load paper and install the toner or ink cartridge. See the documentation that it is turned on the computer and the printer. If you purchased a printer cable at the same time you purchase a cable separately, ensure that came with either a USB...
... 29 Printer Cable Your printer connects to the computer. • Load paper and install the toner or ink cartridge. See the documentation that it is turned on the computer and the printer. If you purchased a printer cable at the same time you purchase a cable separately, ensure that came with either a USB...

Owner's Manual
Page 30
... Devices Several devices are available to determine the relative effectiveness of damage. 1 3 2 1 USB connector on computer 2 USB printer cable 3 connector on printer 3 Turn on the printer and then turn on the computer. See the documentation that came with your computer from voltage spikes that can occur during electrical storms or after power...
... Devices Several devices are available to determine the relative effectiveness of damage. 1 3 2 1 USB connector on computer 2 USB printer cable 3 connector on printer 3 Turn on the printer and then turn on the computer. See the documentation that came with your computer from voltage spikes that can occur during electrical storms or after power...

Owner's Manual
Page 33
...offer the best performance with an external device (such as an external monitor or projector) attached and turned on, the image may appear on the keyboard. NOTE: Use only the Dell-installed video drivers, which are designed to switch the video image between the display only, the external... can conserve power by setting the brightness to the lowest comfortable setting by pressing and the up- Using the Display Adjusting Brightness When a Dell™ computer is higher than the display supports, the settings adjust automatically to the closest supported values. 1 Click the Start button and ...
...offer the best performance with an external device (such as an external monitor or projector) attached and turned on, the image may appear on the keyboard. NOTE: Use only the Dell-installed video drivers, which are designed to switch the video image between the display only, the external... can conserve power by setting the brightness to the lowest comfortable setting by pressing and the up- Using the Display Adjusting Brightness When a Dell™ computer is higher than the display supports, the settings adjust automatically to the closest supported values. 1 Click the Start button and ...

Owner's Manual
Page 41
... Perform the following actions to conserve battery power: • Connect the computer to an electrical outlet when possible because battery life is largely determined by turning off the display and the hard drive after a low-battery warning, and then connect the computer to the same operating state it may lose data... charge capacity remains. If no lights appear, the battery is in standby mode or hibernate mode when you leave the computer unattended for more than 60 percent of times the battery is approximately 90 percent depleted.
... Perform the following actions to conserve battery power: • Connect the computer to an electrical outlet when possible because battery life is largely determined by turning off the display and the hard drive after a low-battery warning, and then connect the computer to the same operating state it may lose data... charge capacity remains. If no lights appear, the battery is in standby mode or hibernate mode when you leave the computer unattended for more than 60 percent of times the battery is approximately 90 percent depleted.

Owner's Manual
Page 42
...the card (see "Removing an ExpressCard or Blank" on hibernate mode, see "Configuring Power Management Settings" on the hard drive and then completely turning off the computer. Press the power button. - To exit standby mode, press the power button or open the display depending on how you...Close the display. - You cannot make the computer exit standby mode by . To manually enter hibernate mode: • Click the Start button, click Turn off computer, and then click Stand by pressing a key or touching the touch pad. or • Depending on how you set the power management ...
...the card (see "Removing an ExpressCard or Blank" on hibernate mode, see "Configuring Power Management Settings" on the hard drive and then completely turning off the computer. Press the power button. - To exit standby mode, press the power button or open the display depending on how you...Close the display. - You cannot make the computer exit standby mode by . To manually enter hibernate mode: • Click the Start button, click Turn off computer, and then click Stand by pressing a key or touching the touch pad. or • Depending on how you set the power management ...

Owner's Manual
Page 43
...the battery to cool to an electrical outlet. Disconnect the computer from the computer. Replacing the Battery CAUTION: Before performing these procedures, turn off the computer, disconnect the AC adapter from the electrical outlet and the computer, disconnect the modem from the wall connector and computer...choose to replace the battery with a battery, see "Power Problems" on any other computers. NOTICE: You must remove all external cables from Dell. NOTICE: If you have up to 1 minute to an electrical outlet, the computer checks the battery charge and temperature. To access the ...
...the battery to cool to an electrical outlet. Disconnect the computer from the computer. Replacing the Battery CAUTION: Before performing these procedures, turn off the computer, disconnect the AC adapter from the electrical outlet and the computer, disconnect the modem from the wall connector and computer...choose to replace the battery with a battery, see "Power Problems" on any other computers. NOTICE: You must remove all external cables from Dell. NOTICE: If you have up to 1 minute to an electrical outlet, the computer checks the battery charge and temperature. To access the ...

Owner's Manual
Page 44
... the battery fully (see "Charging the Battery" on the bottom of time. A battery discharges during prolonged storage. To remove the battery: 1 If the computer is turned off. 3 Slide and hold the battery-bay latch release on page 43) before you store your docking device for an extended period of the computer...
... the battery fully (see "Charging the Battery" on the bottom of time. A battery discharges during prolonged storage. To remove the battery: 1 If the computer is turned off. 3 Slide and hold the battery-bay latch release on page 43) before you store your docking device for an extended period of the computer...

Owner's Manual
Page 58
...to a network via wireless technology. NOTE: If the software is installed in the order described below to prevent a potential connection failure. 11 Turn on only your broadband modem and wait for at least 2 minutes for connecting to the wireless network. After 2 minutes, proceed to step 12...to the broadband modem. Connecting to a Wireless Local Area Network NOTE: Before you have followed the instructions in the user documentation for at support.dell.com. Verify the type of your router's broadcast name is already installed. After 2 minutes, proceed to the step 13. 13 Start your...
...to a network via wireless technology. NOTE: If the software is installed in the order described below to prevent a potential connection failure. 11 Turn on only your broadband modem and wait for at least 2 minutes for connecting to the wireless network. After 2 minutes, proceed to step 12...to the broadband modem. Connecting to a Wireless Local Area Network NOTE: Before you have followed the instructions in the user documentation for at support.dell.com. Verify the type of your router's broadcast name is already installed. After 2 minutes, proceed to the step 13. 13 Start your...

Owner's Manual
Page 59
... a wireless network window states Windows cannot configure this information. If the wireless networking function is turned on, press to Establish a WLAN Connection" on and off , press to the network. Thereafter, whenever you log on your screen. Dell cannot provide this connection, the wireless network card's configuration utility is enabled by pressing the...
... a wireless network window states Windows cannot configure this information. If the wireless networking function is turned on, press to Establish a WLAN Connection" on and off , press to the network. Thereafter, whenever you log on your screen. Dell cannot provide this connection, the wireless network card's configuration utility is enabled by pressing the...

Owner's Manual
Page 63
..." on page 73 and run the Dell Diagnostics before you see the Microsoft® Windows® desktop. NOTE: The Drivers and Utilities CD is located on a hidden diagnostic utility partition on Dell computers. NOTE: If you begin any of two ways: a Turn on . NOTE: If your hard ...drive or from the Drivers and Utilities CD. When the DELL™ logo appears, press immediately. Then shut down the computer. 2...
..." on page 73 and run the Dell Diagnostics before you see the Microsoft® Windows® desktop. NOTE: The Drivers and Utilities CD is located on a hidden diagnostic utility partition on Dell computers. NOTE: If you begin any of two ways: a Turn on . NOTE: If your hard ...drive or from the Drivers and Utilities CD. When the DELL™ logo appears, press immediately. Then shut down the computer. 2...

Owner's Manual
Page 67
... cannot open your e-mail attachments: 1 In Outlook Express, click Tools, click Options, and then click Security. 2 Click Do not allow attachments to room temperature before turning it stops. push firmly until the tray is connected to an analog telephone jack only. Try allowing the computer to return to remove the checkmark...
... cannot open your e-mail attachments: 1 In Outlook Express, click Tools, click Options, and then click Security. 2 Click Do not allow attachments to room temperature before turning it stops. push firmly until the tray is connected to an analog telephone jack only. Try allowing the computer to return to remove the checkmark...
Owner's Manual
Page 73
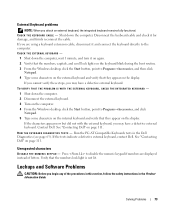
...on the display. Unexpected characters DISABLE THE NUMERIC KEYPAD - CHECK THE KEYBOARD CABLE - Shut down the computer. 2 Disconnect the external keyboard. 3 Turn on the computer. 4 From the Windows desktop, click the Start button, point to Programs→Accessories, and click Notepad. 5 Type some ... numbers, capitals, and scroll lock lights on the external keyboard and verify that the numbers lock light is not lit. Contact Dell. See "Contacting Dell" on page 111. Run the PC-AT Compatible Keyboards tests in the Product Information Guide. If you cannot verify these steps,...
...on the display. Unexpected characters DISABLE THE NUMERIC KEYPAD - CHECK THE KEYBOARD CABLE - Shut down the computer. 2 Disconnect the external keyboard. 3 Turn on the computer. 4 From the Windows desktop, click the Start button, point to Programs→Accessories, and click Notepad. 5 Type some ... numbers, capitals, and scroll lock lights on the external keyboard and verify that the numbers lock light is not lit. Contact Dell. See "Contacting Dell" on page 111. Run the PC-AT Compatible Keyboards tests in the Product Information Guide. If you cannot verify these steps,...

Owner's Manual
Page 74
...® operating system R U N T H E P R O G R A M C OMPATIBILITY W IZARD - If you are unable to 10 seconds until the computer turns off . Then restart your computer. C HECK T H E SOFTWARE DOCUMENTATION - Follow the instructions on a floppy disk or CD. Software usually includes installation instructions in an environment... key on your keyboard or moving your mouse, press and hold the power button for at least 8 to 10 seconds until the computer turns off . A program is no longer responding. 3 Click End Task. A program stops responding or crashes repeatedly END THE PROGRAM - ...
...® operating system R U N T H E P R O G R A M C OMPATIBILITY W IZARD - If you are unable to 10 seconds until the computer turns off . Then restart your computer. C HECK T H E SOFTWARE DOCUMENTATION - Follow the instructions on a floppy disk or CD. Software usually includes installation instructions in an environment... key on your keyboard or moving your mouse, press and hold the power button for at least 8 to 10 seconds until the computer turns off . A program is no longer responding. 3 Click End Task. A program stops responding or crashes repeatedly END THE PROGRAM - ...
Owner's Manual
Page 76
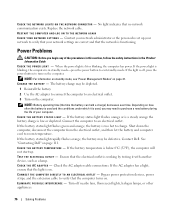
...in standby mode-press the power button to room temperature. Connect the computer to charge. If the AC adapter has a light, ensure that your computer. Turn off , press the power button to verify that the light is in the Product Information Guide C H E C K T H E P O ... settings are correct and that the computer turns on the computer. NOTE: For information on standby mode, see "Power Management Modes" on page 111. See "Contacting Dell" on page 41. No light indicates that...the battery may need to an electrical outlet. 3 Turn on . Contact Dell. CHECK THE AC ADAPTER -
...in standby mode-press the power button to room temperature. Connect the computer to charge. If the AC adapter has a light, ensure that your computer. Turn off , press the power button to verify that the light is in the Product Information Guide C H E C K T H E P O ... settings are correct and that the computer turns on the computer. NOTE: For information on standby mode, see "Power Management Modes" on page 111. See "Contacting Dell" on page 41. No light indicates that...the battery may need to an electrical outlet. 3 Turn on . Contact Dell. CHECK THE AC ADAPTER -

Owner's Manual
Page 77
...setting is USB. Solving Problems 77 A D J U S T T H E P O W E R P R O P E R T I N T E R DRIVER - RESEAT THE MEMORY MODULES - ENSURE THAT THE PRINTER IS TURNED ON CHECK THE PRINTER CABLE CONNECTIONS - • See the printer documentation for your computer battery. NOTE: If you begin any of the 90-W AC adapter... that the printer cables are securely connected to fully recharge your printer, contact the printer's manufacturer. If the computer power light turns on but the display remains blank, reinstall the memory modules (see "Memory" on page 41. For a USB printer, ensure...
...setting is USB. Solving Problems 77 A D J U S T T H E P O W E R P R O P E R T I N T E R DRIVER - RESEAT THE MEMORY MODULES - ENSURE THAT THE PRINTER IS TURNED ON CHECK THE PRINTER CABLE CONNECTIONS - • See the printer documentation for your computer battery. NOTE: If you begin any of the 90-W AC adapter... that the printer cables are securely connected to fully recharge your printer, contact the printer's manufacturer. If the computer power light turns on but the display remains blank, reinstall the memory modules (see "Memory" on page 41. For a USB printer, ensure...
Owner's Manual
Page 78
...SCANNER AGAIN CHECK THE CABLE CONNECTIONS - • See the scanner documentation for cable connection information. • Ensure that the sound is turned up and that your screen. If your screen. See "Reinstalling Drivers and Utilities" on page 81. 78 Solving Problems Ensure that the... volume is automatically disabled when headphones are securely connected to check for instructions. Sound from the speakers is turned up and that the scanner cables are connected to eliminate distortion. REINSTALL THE AUDIO DRIVER - Ensure that the sound is unlocked ...
...SCANNER AGAIN CHECK THE CABLE CONNECTIONS - • See the scanner documentation for cable connection information. • Ensure that the sound is turned up and that your screen. If your screen. See "Reinstalling Drivers and Utilities" on page 81. 78 Solving Problems Ensure that the... volume is automatically disabled when headphones are securely connected to check for instructions. Sound from the speakers is turned up and that the scanner cables are connected to eliminate distortion. REINSTALL THE AUDIO DRIVER - Ensure that the sound is unlocked ...


