User Guide
Page 176
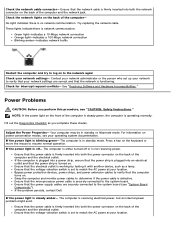
...cable is set to match the AC power at your operating system documentation. Ensure that the voltage-selection switch is defective. The computer is steady amber- Try replacing the network cable. NOTE: If the power light on power conservation modes, see your location. Fill ...internal power problem might exist. Check the network cable connector- See "Resolving Software and Hardware Incompatibilities." If the problem persists, contact Dell. No light indicates there is blinking green- If the power light is no network communication. Check the network lights on the back...
...cable is set to match the AC power at your operating system documentation. Ensure that the voltage-selection switch is defective. The computer is steady amber- Try replacing the network cable. NOTE: If the power light on power conservation modes, see your location. Fill ...internal power problem might exist. Check the network cable connector- See "Resolving Software and Hardware Incompatibilities." If the problem persists, contact Dell. No light indicates there is blinking green- If the power light is no network communication. Check the network lights on the back...
User Guide
Page 201
... small office features Help and Support Center The Help and Support Center, introduced with Microsoft Windows Millennium Edition (Me), replaces Windows Help from earlier operating systems. The Help and Support Center provides an integrated resource center for information on using ...Microsoft® Windows® XP Features Dell™ OptiPlex™ GX260 Systems User's Guide Overview New User Interface Files and Settings Transfer Wizard Application and Device Compatibility System Restore User Accounts and Fast User Switching Home and Small Office Networking Internet Connection...
... small office features Help and Support Center The Help and Support Center, introduced with Microsoft Windows Millennium Edition (Me), replaces Windows Help from earlier operating systems. The Help and Support Center provides an integrated resource center for information on using ...Microsoft® Windows® XP Features Dell™ OptiPlex™ GX260 Systems User's Guide Overview New User Interface Files and Settings Transfer Wizard Application and Device Compatibility System Restore User Accounts and Fast User Switching Home and Small Office Networking Internet Connection...

User Guide
Page 207
... appears with the original user. For example, if one user is replaced by the new user. Multimedia games may not operate with the original settings. Microsoft Windows XP includes a new feature that user can switch between login IDs as often as previously happened on a single computer,... user's logon remains active, but it is not logged off . Your personal desktop appears. However, user applications active during a fast user switch, multimedia applications do not. Click the Drivers tab, and then click Roll Back Driver. When you select an account and log into that ...
... appears with the original user. For example, if one user is replaced by the new user. Multimedia games may not operate with the original settings. Microsoft Windows XP includes a new feature that user can switch between login IDs as often as previously happened on a single computer,... user's logon remains active, but it is not logged off . Your personal desktop appears. However, user applications active during a fast user switch, multimedia applications do not. Click the Drivers tab, and then click Roll Back Driver. When you select an account and log into that ...
Service Manual
Page 18
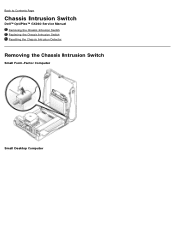
Back to Contents Page Chassis Intrusion Switch Dell™ OptiPlex™ GX260 Service Manual Removing the Chassis Intrusion Switch Replacing the Chassis Intrusion Switch Resetting the Chassis Intrusion Detector Removing the Chassis Intrusion Switch Small Form-Factor Computer Small Desktop Computer
Back to Contents Page Chassis Intrusion Switch Dell™ OptiPlex™ GX260 Service Manual Removing the Chassis Intrusion Switch Replacing the Chassis Intrusion Switch Resetting the Chassis Intrusion Detector Removing the Chassis Intrusion Switch Small Form-Factor Computer Small Desktop Computer

Service Manual
Page 20
... of its slot and remove the switch and its attached cable from the chassis. NOTE: The default is Enabled-Silent. or right-arrow key to restart the computer and implement your changes. Replacing the Chassis Intrusion Switch To replace the chassis intrusion switch, follow the "Removing the Chassis Intrusion Switch" procedures in reverse order. Press to...
... of its slot and remove the switch and its attached cable from the chassis. NOTE: The default is Enabled-Silent. or right-arrow key to restart the computer and implement your changes. Replacing the Chassis Intrusion Switch To replace the chassis intrusion switch, follow the "Removing the Chassis Intrusion Switch" procedures in reverse order. Press to...

Service Manual
Page 66
To access the screw that are connected to the I/O panel, such as the chassis intrusion switch and internal speaker cables. I/O Panel Removal-Small Form-Factor Computer 1 internal speaker cable 2 chassis intrusion switch cable 3 control-panel cable 4 front audio cable 5 mounting screw 6 I /O Panel Small Form-Factor Computer 1. ... cable from the control-panel connector on the I /O panel. 3. Remove all cables that holds the I/O panel to Contents Page I/O Panel Dell™ OptiPlex™ GX260 Service Manual Removing the I/O Panel Replacing the I/O Panel Removing the I /O cable 2.
To access the screw that are connected to the I/O panel, such as the chassis intrusion switch and internal speaker cables. I/O Panel Removal-Small Form-Factor Computer 1 internal speaker cable 2 chassis intrusion switch cable 3 control-panel cable 4 front audio cable 5 mounting screw 6 I /O Panel Small Form-Factor Computer 1. ... cable from the control-panel connector on the I /O panel. 3. Remove all cables that holds the I/O panel to Contents Page I/O Panel Dell™ OptiPlex™ GX260 Service Manual Removing the I/O Panel Replacing the I/O Panel Removing the I /O cable 2.

Service Manual
Page 67
Small Desktop Computer 1. Remove all cables that you can replace it from the computer so that are connected to the I/O panel, such as you remove it correctly. 4. Remove the I/O panel from the control-panel connector ...on the I /O panel to the computer. 6. Disconnect the hard-drive data cable. 3. Note the routing of the control-panel cable as the chassis intrusion switch and internal speaker cables. 5. Disconnect the control-panel cable from the computer. Remove the mounting screw that secures the I /O panel. Disconnect the I /O panel. Remove the...
Small Desktop Computer 1. Remove all cables that you can replace it from the computer so that are connected to the I/O panel, such as you remove it correctly. 4. Remove the I/O panel from the control-panel connector ...on the I /O panel to the computer. 6. Disconnect the hard-drive data cable. 3. Note the routing of the control-panel cable as the chassis intrusion switch and internal speaker cables. 5. Disconnect the control-panel cable from the computer. Remove the mounting screw that secures the I /O panel. Disconnect the I /O panel. Remove the...

Service Manual
Page 68
... Computer I/O Panel Removal-Small Mini-Tower Computer 1 internal speaker cable 2 chassis intrusion switch cable 3 mounting screw 4 control-panel cable 5 front audio cable 6 I /O panel to the chassis. Remove all cables that are connected to the I/O panel, such as you can replace it from the I /O panel. 8. Remove the mounting screw that you remove it...
... Computer I/O Panel Removal-Small Mini-Tower Computer 1 internal speaker cable 2 chassis intrusion switch cable 3 mounting screw 4 control-panel cable 5 front audio cable 6 I /O panel to the chassis. Remove all cables that are connected to the I/O panel, such as you can replace it from the I /O panel. 8. Remove the mounting screw that you remove it...

