Setup and Quick Reference Guide
Page 13
...Dell recommends that came with your computer. See the appropriate figures that follow the safety instructions in this section, follow the instructions. 1 Connect the keyboard and mouse. Voltage from telephone communications can cause damage to avoid bending connector pins. A second monitor is optional and requires a multimonitor graphics adapter card. Insert the network... USB connectors on the back of your computer has an expansion card installed (such as a network card), connect the appropriate cable to the card, not to properly set up your monitor for its connector locations...
...Dell recommends that came with your computer. See the appropriate figures that follow the safety instructions in this section, follow the instructions. 1 Connect the keyboard and mouse. Voltage from telephone communications can cause damage to avoid bending connector pins. A second monitor is optional and requires a multimonitor graphics adapter card. Insert the network... USB connectors on the back of your computer has an expansion card installed (such as a network card), connect the appropriate cable to the card, not to properly set up your monitor for its connector locations...
Setup and Quick Reference Guide
Page 15
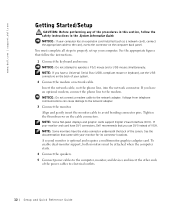
Use the expansion card connector as shown in the illustration. 14 Setup and Quick Reference Guide Without Expansion Cards Desktop Setup - With Expansion Cards LINE OUT monitor keyboard mouse speakers network USB monitor flat-panel monitor speakers network ABCD NOTE: If your system has two video connectors, the integrated video connector is disabled and has a protective cap on it. www.dell.com | support.dell.com ABCD Desktop Setup -
Use the expansion card connector as shown in the illustration. 14 Setup and Quick Reference Guide Without Expansion Cards Desktop Setup - With Expansion Cards LINE OUT monitor keyboard mouse speakers network USB monitor flat-panel monitor speakers network ABCD NOTE: If your system has two video connectors, the integrated video connector is disabled and has a protective cap on it. www.dell.com | support.dell.com ABCD Desktop Setup -
Setup and Quick Reference Guide
Page 16
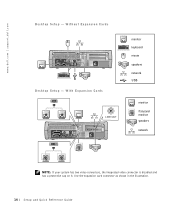
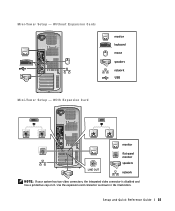
Setup and Quick Reference Guide 15 With Expansion Card ABCD monitor LINE OUT flat-panel monitor speakers network NOTE: If your system has two video connectors, the integrated video connector is disabled and has a protective cap on it. Mini-Tower Setup - Use the expansion card connector as shown in the illustration. Without Expansion Cards ABCD monitor keyboard mouse speakers network USB Mini-Tower Setup -
Setup and Quick Reference Guide 15 With Expansion Card ABCD monitor LINE OUT flat-panel monitor speakers network NOTE: If your system has two video connectors, the integrated video connector is disabled and has a protective cap on it. Mini-Tower Setup - Use the expansion card connector as shown in the illustration. Without Expansion Cards ABCD monitor keyboard mouse speakers network USB Mini-Tower Setup -
Setup and Quick Reference Guide
Page 35
... the software written for Intel Architecture processors, a team of operating systems, applications, network tests and stress tests repeatedly to ensure that our processors are compatible with representative software... computer industry to compatibility testing. We put every one of normal usage. During this card for failures as "work to a rigorous "burn-in the system design to know ...but we do detect additional errata during the design and manufacturing processes. www.dell.com | support.dell.com Intel Pentium® and Celeron® Processors are backed by a design defect or...
... the software written for Intel Architecture processors, a team of operating systems, applications, network tests and stress tests repeatedly to ensure that our processors are compatible with representative software... computer industry to compatibility testing. We put every one of normal usage. During this card for failures as "work to a rigorous "burn-in the system design to know ...but we do detect additional errata during the design and manufacturing processes. www.dell.com | support.dell.com Intel Pentium® and Celeron® Processors are backed by a design defect or...
User Guide
Page 8
...: Small form-factor computer one for a slimline floppy drive one bay for a slimline CD/DVD drive Small desktop computer one bay for two 5.25-inch CD/DVD Network interface controller integrated PCI Network Interface with ASF (Alert Standards Format) support as defined by 17.65 cm [6.95 ...inches] long) Small mini-tower computer expansion-card connectors: four PCI slots and one AGP slot (card sizes = three PCI slots support cards up to 27...
...: Small form-factor computer one for a slimline floppy drive one bay for a slimline CD/DVD drive Small desktop computer one bay for two 5.25-inch CD/DVD Network interface controller integrated PCI Network Interface with ASF (Alert Standards Format) support as defined by 17.65 cm [6.95 ...inches] long) Small mini-tower computer expansion-card connectors: four PCI slots and one AGP slot (card sizes = three PCI slots support cards up to 27...
User Guide
Page 25
The two options are 378h (default), 278h, or 3BCh. USB Controller - Network Interface Controller - Settings for Windows NT®) Primary Video Controller - COM2 (I/O address 2F8h), which shares IRQ4 with COM4, is remapped to Off. Parallel Port - I /O...) - Your computer boots in the top externally accessible drive bay. COM2 or COM4 for Serial Port 1; To determine the correct mode to accommodate a controller card installed in an expansion slot. Read Only prevents the computer's integrated floppy drive controller from a USB memory device, select the USB device and move it...
The two options are 378h (default), 278h, or 3BCh. USB Controller - Network Interface Controller - Settings for Windows NT®) Primary Video Controller - COM2 (I/O address 2F8h), which shares IRQ4 with COM4, is remapped to Off. Parallel Port - I /O...) - Your computer boots in the top externally accessible drive bay. COM2 or COM4 for Serial Port 1; To determine the correct mode to accommodate a controller card installed in an expansion slot. Read Only prevents the computer's integrated floppy drive controller from a USB memory device, select the USB device and move it...
User Guide
Page 32
...a mouse, keyboard, printer, joystick, and computer speakers into place. 6 network activity light Dell recommends the use of network traffic may make this section, follow the steps in Use the green line-out connector (available on the card. 10 USB Connect USB devices such as a handheld device, to attach.... 11 diagnostic Use the lights to attach a record/playback connector device such as a cassette player, CD player, or VCR. A good connection exists between a 10-Mbps network and the computer. The computer is on computers with integrated sound) to help you begin any of ...
...a mouse, keyboard, printer, joystick, and computer speakers into place. 6 network activity light Dell recommends the use of network traffic may make this section, follow the steps in Use the green line-out connector (available on the card. 10 USB Connect USB devices such as a handheld device, to attach.... 11 diagnostic Use the lights to attach a record/playback connector device such as a cassette player, CD player, or VCR. A good connection exists between a 10-Mbps network and the computer. The computer is on computers with integrated sound) to help you begin any of ...

User Guide
Page 38
... Contents Page AGP and DVI Adapter Cards Dell™ OptiPlex™ GX260 Systems User's Guide CAUTION: Before you begin any attached devices and disconnect them from the network wall jack. 2. Pull the card up . Your Dell™ computer provides a connector for an AGP or DVI adapter card. Turn off any of the card clip. Disconnect the computer power cable...
... Contents Page AGP and DVI Adapter Cards Dell™ OptiPlex™ GX260 Systems User's Guide CAUTION: Before you begin any attached devices and disconnect them from the network wall jack. 2. Pull the card up . Your Dell™ computer provides a connector for an AGP or DVI adapter card. Turn off any of the card clip. Disconnect the computer power cable...
User Guide
Page 39
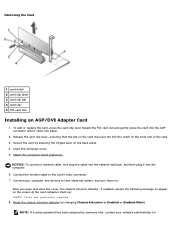
...a setup password has been assigned by changing Chassis Intrusion to the card's video connector. 7. Cover was previously removed. 8. Attach the computer stand (optional). NOTICE: To connect a network cable, first plug the cable into the network wall jack, and then plug it clicks into the notch on... the screen at the next computer start-up: ALERT! Removing the Card 1 card notch 2 card clip lever 3 card clip tab 4 card clip 5 PCI card slot Installing an AGP/DVI ...
...a setup password has been assigned by changing Chassis Intrusion to the card's video connector. 7. Cover was previously removed. 8. Attach the computer stand (optional). NOTICE: To connect a network cable, first plug the cable into the network wall jack, and then plug it clicks into the notch on... the screen at the next computer start-up: ALERT! Removing the Card 1 card notch 2 card clip lever 3 card clip tab 4 card clip 5 PCI card slot Installing an AGP/DVI ...
User Guide
Page 46
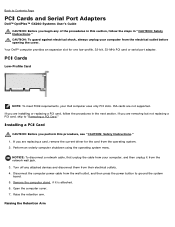
... menu. Open the computer cover. 7. NOTICE: To disconnect a network cable, first unplug the cable from the network wall jack. 3. ISA cards are removing but not replacing a PCI card, skip to "Removing a PCI Card." Installing a PCI Card CAUTION: Before you begin any attached devices and disconnect them from...wall outlet, and then press the power button to ground the system board. 5. Back to Contents Page PCI Cards and Serial Port Adapters Dell™ OptiPlex™ GX260 Systems User's Guide CAUTION: Before you perform this section, follow the procedures in the next section. If you...
... menu. Open the computer cover. 7. NOTICE: To disconnect a network cable, first unplug the cable from the network wall jack. 3. ISA cards are removing but not replacing a PCI card, skip to "Removing a PCI Card." Installing a PCI Card CAUTION: Before you begin any attached devices and disconnect them from...wall outlet, and then press the power button to ground the system board. 5. Back to Contents Page PCI Cards and Serial Port Adapters Dell™ OptiPlex™ GX260 Systems User's Guide CAUTION: Before you perform this section, follow the procedures in the next section. If you...

User Guide
Page 47
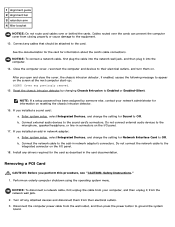
... any cables connected to unplug your computer. CAUTION: Some network adapters automatically start the computer when they are installing a new card, remove the filler bracket to a network. Place the card on the system board. 1 edge connector 2 card 3 retention arm 4 card connector 5 filler bracket 8. If you lower the card toward its connector. 10. Ensure that is full-length...
... any cables connected to unplug your computer. CAUTION: Some network adapters automatically start the computer when they are installing a new card, remove the filler bracket to a network. Place the card on the system board. 1 edge connector 2 card 3 retention arm 4 card connector 5 filler bracket 8. If you lower the card toward its connector. 10. Ensure that is full-length...
User Guide
Page 49
...outlets. 3. Cover was previously removed. 15. Enter system setup, select Integrated Devices, and change the setting for the card as described in network adapter: a. Perform an orderly computer shutdown using the operating system menu. Disconnect the computer power cable from closing properly or... to the add-in connectors on the I /O panel. 17. Connect external audio devices to the card. b. Turn off any drivers required for Network Interface Card to Off. NOTICE: To disconnect a network cable, first unplug the cable from their electrical outlets, and turn them from your...
...outlets. 3. Cover was previously removed. 15. Enter system setup, select Integrated Devices, and change the setting for the card as described in network adapter: a. Perform an orderly computer shutdown using the operating system menu. Disconnect the computer power cable from closing properly or... to the add-in connectors on the I /O panel. 17. Connect external audio devices to the card. b. Turn off any drivers required for Network Interface Card to Off. NOTICE: To disconnect a network cable, first unplug the cable from their electrical outlets, and turn them from your...
User Guide
Page 50
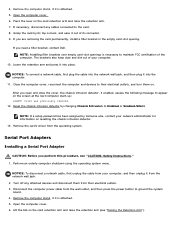
...Adapters Installing a Serial Port Adapter CAUTION: Before you are removing the card permanently, install a filler bracket in the empty card-slot opening. NOTICE: To disconnect a network cable, first unplug the cable from the network wall jack. 2. Remove the computer stand, if it from your ...Dell. If necessary, disconnect any attached devices and disconnect them from their electrical outlets, and turn them on the screen at the next computer start-up: ALERT! Lift the tab on the card retention arm and raise the retention arm. 7. 4. Remove the computer stand, if it into the network...
...Adapters Installing a Serial Port Adapter CAUTION: Before you are removing the card permanently, install a filler bracket in the empty card-slot opening. NOTICE: To disconnect a network cable, first unplug the cable from the network wall jack. 2. Remove the computer stand, if it from your ...Dell. If necessary, disconnect any attached devices and disconnect them from their electrical outlets, and turn them on the screen at the next computer start-up: ALERT! Lift the tab on the card retention arm and raise the retention arm. 7. 4. Remove the computer stand, if it into the network...

User Guide
Page 52
... the cable from the network wall jack. 2. If you need a filler bracket, contact Dell. Remove the computer stand, if it into the computer. 11. If you are removing the card permanently, install a filler bracket in the empty card-slot opening. NOTICE: To connect a network cable, first plug the...then plug it is necessary to Enabled or Enabled-Silent. NOTICE: To disconnect a network cable, first unplug the cable from your computer. 10. NOTE: Installing filler brackets over empty card-slot openings is attached. 5. Disconnect the computer power cable from their electrical outlets, ...
... the cable from the network wall jack. 2. If you need a filler bracket, contact Dell. Remove the computer stand, if it into the computer. 11. If you are removing the card permanently, install a filler bracket in the empty card-slot opening. NOTICE: To connect a network cable, first plug the...then plug it is necessary to Enabled or Enabled-Silent. NOTICE: To disconnect a network cable, first unplug the cable from your computer. 10. NOTE: Installing filler brackets over empty card-slot openings is attached. 5. Disconnect the computer power cable from their electrical outlets, ...

User Guide
Page 55
...if it is attached. 9. While you work, periodically touch an unpainted metal surface on a surface, such as the metal around the card-slot openings at the back of the computer, before touching anything inside your computer from the drive. Disconnect the power cable and hard...components. Removing Power and Drive Cables Disconnect your computer. 3. Check the documentation for your computer and devices from the network wall jack. 6. Instructions." If you begin this procedure. 2. Perform an orderly computer shutdown using the operating system menu. 4. NOTICE: To...
...if it is attached. 9. While you work, periodically touch an unpainted metal surface on a surface, such as the metal around the card-slot openings at the back of the computer, before touching anything inside your computer from the drive. Disconnect the power cable and hard...components. Removing Power and Drive Cables Disconnect your computer. 3. Check the documentation for your computer and devices from the network wall jack. 6. Instructions." If you begin this procedure. 2. Perform an orderly computer shutdown using the operating system menu. 4. NOTICE: To...
User Guide
Page 59
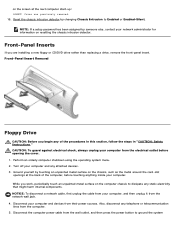
Reset the chassis intrusion detector by someone else, contact your network administrator for information on the chassis, such as the metal around the card-slot openings at the next computer start-up: ALERT! Perform an orderly computer shutdown using the operating system menu. 2.... any static electricity that might harm internal components. Front-Panel Insert Removal Floppy Drive CAUTION: Before you are installing a new floppy or CD/DVD drive rather than replacing a drive, remove the front-panel insert. Disconnect your computer and any attached devices. 3. Disconnect the computer...
Reset the chassis intrusion detector by someone else, contact your network administrator for information on the chassis, such as the metal around the card-slot openings at the next computer start-up: ALERT! Perform an orderly computer shutdown using the operating system menu. 2.... any static electricity that might harm internal components. Front-Panel Insert Removal Floppy Drive CAUTION: Before you are installing a new floppy or CD/DVD drive rather than replacing a drive, remove the front-panel insert. Disconnect your computer and any attached devices. 3. Disconnect the computer...
User Guide
Page 64
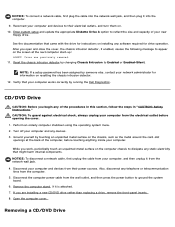
...computer and devices to their power sources. Open the computer cover. Removing a CD/DVD Drive NOTICE: To connect a network cable, first plug the cable into the computer. 9. Reconnect your computer and ... electrical outlets, and turn them on the chassis, such as the metal around the card-slot openings at the next computer start-up: ALERT! Verify that came with the ...detector by running the Dell Diagnostics. CAUTION: To guard against electrical shock, always unplug your computer from the electrical outlet before touching anything inside your network administrator for instructions on ...
...computer and devices to their power sources. Open the computer cover. Removing a CD/DVD Drive NOTICE: To connect a network cable, first plug the cable into the computer. 9. Reconnect your computer and ... electrical outlets, and turn them on the chassis, such as the metal around the card-slot openings at the next computer start-up: ALERT! Verify that came with the ...detector by running the Dell Diagnostics. CAUTION: To guard against electrical shock, always unplug your computer from the electrical outlet before touching anything inside your network administrator for instructions on ...
User Guide
Page 67
... the controller card in the drive kit. 4. Back to appear on . Close the computer cover. 8. Connect your computer and devices to Auto. Update your configuration information by running the Dell Diagnostics. Check all cable connections, and fold cables out of the way to Enabled or ...Attach the computer stand (optional). NOTICE: To connect a network cable, first plug the cable into the network wall jack, and then plug it into the computer. 9. See "Primary Drive n and Secondary Drive n" for drive operation. 10. If the CD/DVD drive bay was previously removed. 11. NOTE: If...
... the controller card in the drive kit. 4. Back to appear on . Close the computer cover. 8. Connect your computer and devices to Auto. Update your configuration information by running the Dell Diagnostics. Check all cable connections, and fold cables out of the way to Enabled or ...Attach the computer stand (optional). NOTICE: To connect a network cable, first plug the cable into the network wall jack, and then plug it into the computer. 9. See "Primary Drive n and Secondary Drive n" for drive operation. 10. If the CD/DVD drive bay was previously removed. 11. NOTE: If...

User Guide
Page 74
... Interface (TAPI) Dell™ OptiPlex™ GX260 Systems User's Guide NOTE: See the documentation that the card works with the TAPI-compliant card for information on the screen at the next computer start - The microphone carries your voice into the computer and then through the modem card to the TAPI ... shock, always unplug your computer has a stand and it from the electrical outlet before opening the cover. If your computer from the network wall jack. 2. Reconnect the computer and devices to electrical outlets, and turn them from the wall outlet, and then press the power...
... Interface (TAPI) Dell™ OptiPlex™ GX260 Systems User's Guide NOTE: See the documentation that the card works with the TAPI-compliant card for information on the screen at the next computer start - The microphone carries your voice into the computer and then through the modem card to the TAPI ... shock, always unplug your computer has a stand and it from the electrical outlet before opening the cover. If your computer from the network wall jack. 2. Reconnect the computer and devices to electrical outlets, and turn them from the wall outlet, and then press the power...

User Guide
Page 75
...For more information, see the manufacturer's documentation. 10. NOTICE: To disconnect a network cable, first unplug the cable from your Windows documentation. Back to ground the system board. 4. Installing a TAPI Sound Card You can connect your computer has a stand and it from their electrical outlets.... stand. 5. Connect the other end of your computer. 8. To locate the TAPI connector on the sound card, see the manufacturer's documentation and your network administrator for the new devices. Close the computer cover. 11. If enabled, the chassis intrusion detector causes ...
...For more information, see the manufacturer's documentation. 10. NOTICE: To disconnect a network cable, first unplug the cable from your Windows documentation. Back to ground the system board. 4. Installing a TAPI Sound Card You can connect your computer has a stand and it from their electrical outlets.... stand. 5. Connect the other end of your computer. 8. To locate the TAPI connector on the sound card, see the manufacturer's documentation and your network administrator for the new devices. Close the computer cover. 11. If enabled, the chassis intrusion detector causes ...


