
Dell Color Multifunction Printer Users Guide
Page 15
... the Machine 302 11 Routine Maintenance 307 Replace Supplies 307 Learn About The Toner Cartridge 309 Replace the Toner Cartridge 309 Learn About The Drum Unit 312 Replace the Drum Unit 313 Reset the Drum Counter 315 Clean the Machine 316 Clean the Scanner 318 Clean the Corona Wire 318 Clean the... Drum Unit 320 Clean the Paper Pick-up Rollers 324 Check the Remaining Life of Parts 325 Pack and Ship Your Dell Machine 325 12 Machine Settings 331 General Settings 331 Change the Default Mode 332 Set...
... the Machine 302 11 Routine Maintenance 307 Replace Supplies 307 Learn About The Toner Cartridge 309 Replace the Toner Cartridge 309 Learn About The Drum Unit 312 Replace the Drum Unit 313 Reset the Drum Counter 315 Clean the Machine 316 Clean the Scanner 318 Clean the Corona Wire 318 Clean the... Drum Unit 320 Clean the Paper Pick-up Rollers 324 Check the Remaining Life of Parts 325 Pack and Ship Your Dell Machine 325 12 Machine Settings 331 General Settings 331 Change the Default Mode 332 Set...

Dell Color Multifunction Printer Users Guide
Page 268
...Dial Tone detect pause. 2. Set Telephone Line Compatibility for Interference and VoIP Systems Related Models:Dell E515dn / Dell E515dw Problems sending and receiving faxes due to minimize errors in the drum unit. Vertical black lines when sending. Printing received faxes Difficulties • Condensed print •...Ask the other party to display the Dial Tone option, and then press OK. 5. Set Dial Tone Detection Related Models:Dell E515dn / Dell E515dw 1. When using the scanner glass, the document should be dirty. Vertical black lines when receiving Received faxes appear as ...
...Dial Tone detect pause. 2. Set Telephone Line Compatibility for Interference and VoIP Systems Related Models:Dell E515dn / Dell E515dw Problems sending and receiving faxes due to minimize errors in the drum unit. Vertical black lines when sending. Printing received faxes Difficulties • Condensed print •...Ask the other party to display the Dial Tone option, and then press OK. 5. Set Dial Tone Detection Related Models:Dell E515dn / Dell E515dw 1. When using the scanner glass, the document should be dirty. Vertical black lines when receiving Received faxes appear as ...
Dell Color Multifunction Printer Users Guide
Page 274
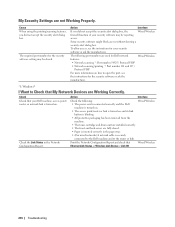
... its link button is blinking. • All protective packaging has been removed from the machine. • The toner cartridge and drum unit are installed correctly. • The front and back covers are not Working Properly. Print the Network Configuration Report and check ... for the security software setting may be closed . • Paper is inserted correctly in the Network Configuration Report. The required port number for Dell network Wired/Wireless features: • Network scanning *1: Port number 54925 / Protocol UDP • Network scanning/printing *1: Port number 161 and...
... its link button is blinking. • All protective packaging has been removed from the machine. • The toner cartridge and drum unit are installed correctly. • The front and back covers are not Working Properly. Print the Network Configuration Report and check ... for the security software setting may be closed . • Paper is inserted correctly in the Network Configuration Report. The required port number for Dell network Wired/Wireless features: • Network scanning *1: Port number 54925 / Protocol UDP • Network scanning/printing *1: Port number 161 and...
Dell Color Multifunction Printer Users Guide
Page 277
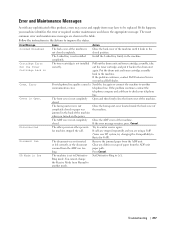
...ADF unit scanned from the ADF was not inserted Remove the jammed paper from Manual to another mode. If this happens, your local Dell dealer. telephone line. Ring mode. Troubleshooting 277 Error Message 2-sided Disabled Cartridge Error Put the Toner Cartridge back in the table. ...tray firmly in the machine. closed . The toner cartridge is Close the back cover of the machine is not installed Pull out the drum unit and toner cartridge assembly, take correctly. Poor telephone line quality caused a Send the fax again or connect the machine to another...
...ADF unit scanned from the ADF was not inserted Remove the jammed paper from Manual to another mode. If this happens, your local Dell dealer. telephone line. Ring mode. Troubleshooting 277 Error Message 2-sided Disabled Cartridge Error Put the Toner Cartridge back in the table. ...tray firmly in the machine. closed . The toner cartridge is Close the back cover of the machine is not installed Pull out the drum unit and toner cartridge assembly, take correctly. Poor telephone line quality caused a Send the fax again or connect the machine to another...
Dell Color Multifunction Printer Users Guide
Page 278
... did not receive calls or you telephone company. Close the back cover, and put the paper tray and the 2-sided tray firmly back in the drum unit. The paper is jammed in the back of paper, or • Refill paper in the paper tray. have not subscribed to use the Caller.... The paper is jammed in the manual feed slot. must be cleaned. Open the front cover and remove the toner cartridge and drum unit assembly. Then reinstall cartridge and drum unit assembly is out of Open the fusing unit cover and remove the jammed paper. Manual was no incoming call your telephone...
... did not receive calls or you telephone company. Close the back cover, and put the paper tray and the 2-sided tray firmly back in the drum unit. The paper is jammed in the back of paper, or • Refill paper in the paper tray. have not subscribed to use the Caller.... The paper is jammed in the manual feed slot. must be cleaned. Open the front cover and remove the toner cartridge and drum unit assembly. Then reinstall cartridge and drum unit assembly is out of Open the fusing unit cover and remove the jammed paper. Manual was no incoming call your telephone...

Dell Color Multifunction Printer Users Guide
Page 279
... counter was installed. not reset when a new drum was Reset the drum unit counter. Leave the machine idle for 15 minutes with the power on again. • If the problem continues, contact Dell Customer Service. The machine's memory is too hot. The machine has a mechanical problem.... then turn it on again. • If the problem continues, contact Dell Customer Service. The fusing unit is full. The machine has a mechanical problem. • Press and hold to replace the drum unit. It is Remove the toner cartridge from the memory. Troubleshooting 279 ...
... counter was installed. not reset when a new drum was Reset the drum unit counter. Leave the machine idle for 15 minutes with the power on again. • If the problem continues, contact Dell Customer Service. The machine's memory is too hot. The machine has a mechanical problem.... then turn it on again. • If the problem continues, contact Dell Customer Service. The fusing unit is full. The machine has a mechanical problem. • Press and hold to replace the drum unit. It is Remove the toner cartridge from the memory. Troubleshooting 279 ...

Dell Color Multifunction Printer Users Guide
Page 288
Switch off the product promptly and contact your local Dell representative for 10 minutes. 6. Remove the toner cartridge and drum unit assembly. 288 Troubleshooting Close the back cover until it may cause injuries or burns, and even worse, may generate smoke if you keep operating ...
Switch off the product promptly and contact your local Dell representative for 10 minutes. 6. Remove the toner cartridge and drum unit assembly. 288 Troubleshooting Close the back cover until it may cause injuries or burns, and even worse, may generate smoke if you keep operating ...

Dell Color Multifunction Printer Users Guide
Page 289
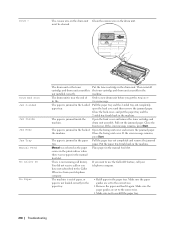
Pull out the jammed paper slowly. 5. Troubleshooting 289 WARNING HOT SURFACE The machine's internal parts will be extremely hot. Wait for the machine to cool down before touching them. 4. Install the toner cartridge and drum unit assembly into the machine.
Pull out the jammed paper slowly. 5. Troubleshooting 289 WARNING HOT SURFACE The machine's internal parts will be extremely hot. Wait for the machine to cool down before touching them. 4. Install the toner cartridge and drum unit assembly into the machine.
Dell Color Multifunction Printer Users Guide
Page 293
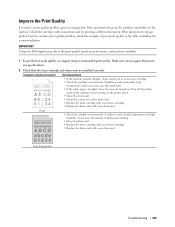
...8226; Replace the toner cartridge with a new toner cartridge. • Replace the drum unit with a new drum unit. If the printout looks good, the problem is too light, Toner Save may be turned on. IMPORTANT Using non-Dell supplies may cause this print fault. • If the whole page is probably ...not the machine. To get the best print quality, we suggest using recommended print media. Improve the Print Quality If you use paper that the toner cartridge and drum unit are installed ...
...8226; Replace the toner cartridge with a new toner cartridge. • Replace the drum unit with a new drum unit. If the printout looks good, the problem is too light, Toner Save may be turned on. IMPORTANT Using non-Dell supplies may cause this print fault. • If the whole page is probably ...not the machine. To get the best print quality, we suggest using recommended print media. Improve the Print Quality If you use paper that the toner cartridge and drum unit are installed ...
Dell Color Multifunction Printer Users Guide
Page 294
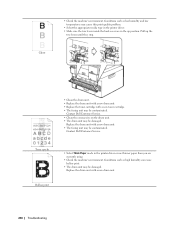
.... Conditions such as high humidity can cause hollow print. • The drum unit may be damaged. Contact Dell Customer Service. Pull up position. Replace the drum unit with a new toner cartridge. • The fusing unit may be contaminated. Replace the drum unit with a new drum unit. 294 Troubleshooting Ghost • Check the machine's environment. Toner...
.... Conditions such as high humidity can cause hollow print. • The drum unit may be damaged. Contact Dell Customer Service. Pull up position. Replace the drum unit with a new toner cartridge. • The fusing unit may be contaminated. Replace the drum unit with a new drum unit. 294 Troubleshooting Ghost • Check the machine's environment. Toner...
Dell Color Multifunction Printer Users Guide
Page 295
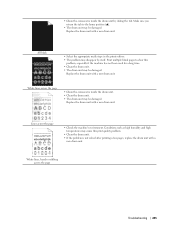
... the machine has not been used for a long time. • Clean the drum unit. • The drum unit may be damaged. • Clean the corona wire inside the drum unit. • Clean the drum unit. • The drum unit may be damaged. Make sure you return the tab to clear this print ...in the printer driver. • The problem may be damaged. Replace the drum unit with a new drum unit. White lines across the page • Clean the corona wire inside the drum unit by itself. Replace the drum unit with a new drum unit. White lines, bands or ribbing across the page • Check ...
... the machine has not been used for a long time. • Clean the drum unit. • The drum unit may be damaged. • Clean the corona wire inside the drum unit. • Clean the drum unit. • The drum unit may be damaged. Make sure you return the tab to clear this print ...in the printer driver. • The problem may be damaged. Replace the drum unit with a new drum unit. White lines across the page • Clean the corona wire inside the drum unit by itself. Replace the drum unit with a new drum unit. White lines, bands or ribbing across the page • Check ...

Dell Color Multifunction Printer Users Guide
Page 296
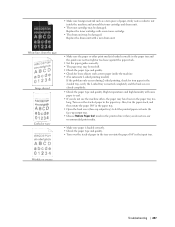
... may be damaged. Replace the toner cartridge with a new drum unit. • The fusing unit may be damaged. Replace the drum unit with a new toner cartridge. • The drum unit may be contaminated. Contact Dell Customer Service. Replace the drum unit with a new drum unit. If the problem is in . (94 mm) intervals Black toner marks...
... may be damaged. Replace the toner cartridge with a new drum unit. • The fusing unit may be damaged. Replace the drum unit with a new toner cartridge. • The drum unit may be contaminated. Contact Dell Customer Service. Replace the drum unit with a new drum unit. If the problem is in . (94 mm) intervals Black toner marks...
Dell Color Multifunction Printer Users Guide
Page 297
... only occurs during 2-sided printing, check for loose objects such as a torn piece of paper in the paper tray. Replace the drum unit with a new toner cartridge. • The drum unit may be damaged. White lines down the page Image skewed Curled or wavy • Make sure the paper or other print... the 2-sided tray, verify the 2-sided tray is inserted completely and the back cover is not inside the machine and around the toner cartridge and drum unit. • The toner cartridge may be damaged. Wrinkles or creases Troubleshooting 297 Replace the toner cartridge with a new...
... only occurs during 2-sided printing, check for loose objects such as a torn piece of paper in the paper tray. Replace the drum unit with a new toner cartridge. • The drum unit may be damaged. White lines down the page Image skewed Curled or wavy • Make sure the paper or other print... the 2-sided tray, verify the 2-sided tray is inserted completely and the back cover is not inside the machine and around the toner cartridge and drum unit. • The toner cartridge may be damaged. Wrinkles or creases Troubleshooting 297 Replace the toner cartridge with a new...
Dell Color Multifunction Printer Users Guide
Page 305
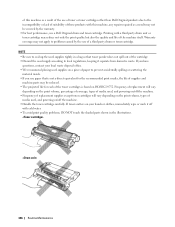
... in the cartridge may affect the print quality, hardware performance, and machine reliability. Dell cannot guarantee this optimum performance if toner or toner cartridges of empty cartridges with toner from other specifications are designed to work to the drum unit or other specifications correctly but may want to buy spare supplies to...
... in the cartridge may affect the print quality, hardware performance, and machine reliability. Dell cannot guarantee this optimum performance if toner or toner cartridges of empty cartridges with toner from other specifications are designed to work to the drum unit or other specifications correctly but may want to buy spare supplies to...
Dell Color Multifunction Printer Users Guide
Page 306
...in the illustrations. 306 Routine Maintenance Warranty coverage may not apply to problems caused by the warranty. • For best performance, use a Dell Original drum and toner cartridge. If you have questions, contact your local waste disposal office. • We recommend placing used supplies on a piece of... out of those products with this machine, any repairs required as a result of the use of toner or toner cartridges other than Dell Original products due to the incompatibility or lack of suitability of the cartridge. • Discard the used supply according to local regulations,...
...in the illustrations. 306 Routine Maintenance Warranty coverage may not apply to problems caused by the warranty. • For best performance, use a Dell Original drum and toner cartridge. If you have questions, contact your local waste disposal office. • We recommend placing used supplies on a piece of... out of those products with this machine, any repairs required as a result of the use of toner or toner cartridges other than Dell Original products due to the incompatibility or lack of suitability of the cartridge. • Discard the used supply according to local regulations,...

Dell Color Multifunction Printer Users Guide
Page 308
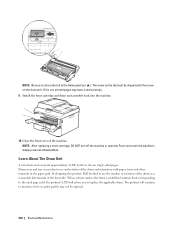
Remove the toner cartridge and drum unit assembly from the machine. 4. 3. Push down the lock lever and take the toner cartridge out of the drum unit. 308 Routine Maintenance
Remove the toner cartridge and drum unit assembly from the machine. 4. 3. Push down the lock lever and take the toner cartridge out of the drum unit. 308 Routine Maintenance

Dell Color Multifunction Printer Users Guide
Page 309
Remove the protective cover. 7. Clean the corona wire inside the drum unit by gently sliding the tab from the drum unit. 8. Routine Maintenance 309 Unpack the new toner cartridge. 6. 5. NOTE: Make sure you hear it may separate from left to right and right to left several times. Put the new toner cartridge firmly into the drum unit until you put the toner cartridge in correctly or it lock into place.
Remove the protective cover. 7. Clean the corona wire inside the drum unit by gently sliding the tab from the drum unit. 8. Routine Maintenance 309 Unpack the new toner cartridge. 6. 5. NOTE: Make sure you hear it may separate from left to right and right to left several times. Put the new toner cartridge firmly into the drum unit until you put the toner cartridge in correctly or it lock into place.
Dell Color Multifunction Printer Users Guide
Page 310
... can print approximately 12,000 Letter or A4 size single-sided pages. In designing this product, Dell decided to function; Drum wear and tear occurs due to replace the applicable drum. Close the front cover of the drum life. NOTE: After replacing a toner cartridge, DO NOT turn off the machine or open the Front... cover until the machine's display returns to the Home position ( p ). Install the toner cartridge and drum unit assembly back into the machine. 10. The product will advise you to use the number of rotations of the...
... can print approximately 12,000 Letter or A4 size single-sided pages. In designing this product, Dell decided to function; Drum wear and tear occurs due to replace the applicable drum. Close the front cover of the drum life. NOTE: After replacing a toner cartridge, DO NOT turn off the machine or open the Front... cover until the machine's display returns to the Home position ( p ). Install the toner cartridge and drum unit assembly back into the machine. 10. The product will advise you to use the number of rotations of the...
Dell Color Multifunction Printer Users Guide
Page 311
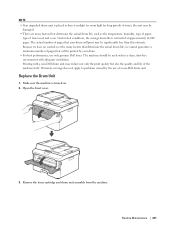
.... • There are many factors that determine the actual drum life, we have no control over the many factors that your drum will be printed by your drum. • For best performance, use only genuine Dell toner. Make sure the machine is estimated at approximately 12,000... pages. Replace the Drum Unit 1. Open the front cover. 3. Remove the toner cartridge and drum unit assembly from the machine. Because we cannot guarantee a minimum number of a non-Dell drum unit. Under ideal conditions, the average drum life is turned on . Routine Maintenance ...
.... • There are many factors that determine the actual drum life, we have no control over the many factors that your drum will be printed by your drum. • For best performance, use only genuine Dell toner. Make sure the machine is estimated at approximately 12,000... pages. Replace the Drum Unit 1. Open the front cover. 3. Remove the toner cartridge and drum unit assembly from the machine. Because we cannot guarantee a minimum number of a non-Dell drum unit. Under ideal conditions, the average drum life is turned on . Routine Maintenance ...

Dell Color Multifunction Printer Users Guide
Page 312
NOTE: Make sure you hear it may separate from left to right and right to left several times. 312 Routine Maintenance 4. Put the toner cartridge firmly into the new drum unit until you put the toner cartridge in correctly or it lock into place. Clean the corona wire inside the drum unit by gently sliding the tab from the drum unit. 7. Unpack the new drum unit. 6. Push down the lock lever and take the toner cartridge out of the drum unit. 5.
NOTE: Make sure you hear it may separate from left to right and right to left several times. 312 Routine Maintenance 4. Put the toner cartridge firmly into the new drum unit until you put the toner cartridge in correctly or it lock into place. Clean the corona wire inside the drum unit by gently sliding the tab from the drum unit. 7. Unpack the new drum unit. 6. Push down the lock lever and take the toner cartridge out of the drum unit. 5.


