
Dell Printer Users Guide
Page 4
... Sides of the Paper (Windows 48 Print as a Booklet (Windows 51 Change the Paper Source (Windows 53 Advanced Printing Methods (Windows 54 Print in Toner Save Mode (Windows 55 Scaled Print (Windows 55 Reverse Print (Windows 56 Add a Watermark to the Printed Document (Windows 56 Print the Date, Time...-Footer Print) (Windows 57 Use a Macro from Your Computer (Windows 58 Adjust the Print Density (Windows 58 Reduce Paper Curl (Windows 59 Improve Toner Fixing (Windows 60 Skip Blank Page (Windows 60 Print Text in Black (Windows 61 Save an Archive File of the Print Data (Windows 61 Select...
... Sides of the Paper (Windows 48 Print as a Booklet (Windows 51 Change the Paper Source (Windows 53 Advanced Printing Methods (Windows 54 Print in Toner Save Mode (Windows 55 Scaled Print (Windows 55 Reverse Print (Windows 56 Add a Watermark to the Printed Document (Windows 56 Print the Date, Time...-Footer Print) (Windows 57 Use a Macro from Your Computer (Windows 58 Adjust the Print Density (Windows 58 Reduce Paper Curl (Windows 59 Improve Toner Fixing (Windows 60 Skip Blank Page (Windows 60 Print Text in Black (Windows 61 Save an Archive File of the Print Data (Windows 61 Select...

Dell Printer Users Guide
Page 5
Set Print Options (Macintosh 64 Print in Toner Save Mode (Macintosh 65 Print Multiple Copies of the Same Document (Macintosh 66 Print on Both Sides of the Paper (Macintosh 66 Change the Paper ... Reduce or Enlarge Document Layout (Macintosh 71 Change the Paper Source (Macintosh 72 Change the Graphic Quality (Macintosh 72 Reduce Paper Curl (Macintosh 73 Improve Toner Fixing (Macintosh 73 Adjust the Print Density (Macintosh 74 Skip Blank Page (Macintosh 74 Monitor the Status of the Machine from Your Computer (Macintosh 74...
Set Print Options (Macintosh 64 Print in Toner Save Mode (Macintosh 65 Print Multiple Copies of the Same Document (Macintosh 66 Print on Both Sides of the Paper (Macintosh 66 Change the Paper ... Reduce or Enlarge Document Layout (Macintosh 71 Change the Paper Source (Macintosh 72 Change the Graphic Quality (Macintosh 72 Reduce Paper Curl (Macintosh 73 Improve Toner Fixing (Macintosh 73 Adjust the Print Density (Macintosh 74 Skip Blank Page (Macintosh 74 Monitor the Status of the Machine from Your Computer (Macintosh 74...

Dell Printer Users Guide
Page 9
... 150 Reset Functions 150 Network Reset 151 Factory Reset 151 Settings Reset 151 7 Routine Maintenance 155 Replace Supplies 155 Learn About The Toner Cartridge 157 Replace the Toner Cartridge 157 Learn About The Drum Unit 160 Replace the Drum Unit 160 Clean the Machine 163 Clean the Corona Wire 164 Clean... the Drum Unit 166 Clean the Paper Pick-up Rollers 168 Check the Remaining Life of Parts 170 Pack and Ship Your Dell Machine 170...
... 150 Reset Functions 150 Network Reset 151 Factory Reset 151 Settings Reset 151 7 Routine Maintenance 155 Replace Supplies 155 Learn About The Toner Cartridge 157 Replace the Toner Cartridge 157 Learn About The Drum Unit 160 Replace the Drum Unit 160 Clean the Machine 163 Clean the Corona Wire 164 Clean... the Drum Unit 166 Clean the Paper Pick-up Rollers 168 Check the Remaining Life of Parts 170 Pack and Ship Your Dell Machine 170...
Dell Printer Users Guide
Page 10
... Settings 175 Set Sleep Mode Countdown 175 About Deep Sleep Mode 176 Set Auto Power Off Mode 176 Set Continue Mode 176 Set Toner Save Mode 177 Set Quiet Mode 177 Menu Table 177 Access Menus and Change Your Machine the Settings 177 Settings Table 177 9...Features 187 Computer Requirements Specifications 187 10 How to Enter Text on Your Dell Machine 191 11 Environmental Information Notice 195 Appendix 199 Dell™ Technical Support Policy 199 Warranty and Return Policy 200 Contacting Dell 200 Additional documents for Important Information 201 SAFETY: Laser Printer 201 SAFETY:...
... Settings 175 Set Sleep Mode Countdown 175 About Deep Sleep Mode 176 Set Auto Power Off Mode 176 Set Continue Mode 176 Set Toner Save Mode 177 Set Quiet Mode 177 Menu Table 177 Access Menus and Change Your Machine the Settings 177 Settings Table 177 9...Features 187 Computer Requirements Specifications 187 10 How to Enter Text on Your Dell Machine 191 11 Environmental Information Notice 195 Appendix 199 Dell™ Technical Support Policy 199 Warranty and Return Policy 200 Contacting Dell 200 Additional documents for Important Information 201 SAFETY: Laser Printer 201 SAFETY:...
Dell Printer Users Guide
Page 21
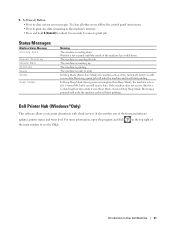
...not receive data for a certain length of time while it is turned off , but it will wake the machine and it can still receive data. Dell Printer Hub (Windows®Only) This software allows you of Introduction to print. The machine is canceling the job. Receiving a print job will start... The machine is warming up. X (Cancel) Button • Press to see the FAQs. on the top right of the firmware/software updates, printer status and toner level. The machine is printing. The machine is ready to Your Dell Machine 21 Receiving a print job will start printing.
...not receive data for a certain length of time while it is turned off , but it will wake the machine and it can still receive data. Dell Printer Hub (Windows®Only) This software allows you of Introduction to print. The machine is canceling the job. Receiving a print job will start... The machine is warming up. X (Cancel) Button • Press to see the FAQs. on the top right of the firmware/software updates, printer status and toner level. The machine is printing. The machine is ready to Your Dell Machine 21 Receiving a print job will start printing.
Dell Printer Users Guide
Page 43
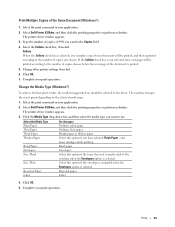
... according to the number of copies chosen before the next page of copies (1-999) you have selected Thick Paper , and toner smudges while printing. Select Dell Printer E310dw, and then click the printing properties or preferences button. The printer driver window appears. 3. Select this option if the... toner does not correctly stick to use. Click the Media Type drop-down list, and then select the media type you ...
... according to the number of copies chosen before the next page of copies (1-999) you have selected Thick Paper , and toner smudges while printing. Select Dell Printer E310dw, and then click the printing properties or preferences button. The printer driver window appears. 3. Select this option if the... toner does not correctly stick to use. Click the Media Type drop-down list, and then select the media type you ...

Dell Printer Users Guide
Page 54
...Your Computer (Windows®) If you can increase or decrease the print density. • Reduce Paper Curl (Windows®) • Improve Toner Fixing (Windows®) • Skip Blank Page (Windows®) Use this option to allow the printer driver to automatically detect blank pages ...an Archive File of your machine's memory, you have stored the electronic forms (macros) in Toner Save Mode (Windows®) This feature conserves your print operation. Complete your toner by using less toner to your computer. 54 Print Advanced Printing Methods (Windows®) • Print in your ...
...Your Computer (Windows®) If you can increase or decrease the print density. • Reduce Paper Curl (Windows®) • Improve Toner Fixing (Windows®) • Skip Blank Page (Windows®) Use this option to allow the printer driver to automatically detect blank pages ...an Archive File of your machine's memory, you have stored the electronic forms (macros) in Toner Save Mode (Windows®) This feature conserves your print operation. Complete your toner by using less toner to your computer. 54 Print Advanced Printing Methods (Windows®) • Print in your ...
Dell Printer Users Guide
Page 55
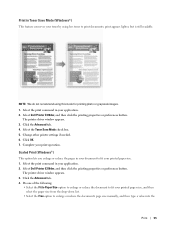
... printer driver window appears. 3. Change other printer settings if needed. 6. Select Dell Printer E310dw, and then click the printing properties or preferences button. NOTE: We do not recommend using less toner to enlarge or reduce the document's page size manually, and then type a ... Advanced tab. 4. Click OK. 7. Print in Toner Save Mode (Windows®) This feature conserves your application. 2. Select the print command in your print operation. print appears lighter, but is still readable. Select Dell Printer E310dw, and then click the printing properties or preferences button...
... printer driver window appears. 3. Change other printer settings if needed. 6. Select Dell Printer E310dw, and then click the printing properties or preferences button. NOTE: We do not recommend using less toner to enlarge or reduce the document's page size manually, and then type a ... Advanced tab. 4. Click OK. 7. Print in Toner Save Mode (Windows®) This feature conserves your application. 2. Select the print command in your print operation. print appears lighter, but is still readable. Select Dell Printer E310dw, and then click the printing properties or preferences button...

Dell Printer Users Guide
Page 60
Click the Advanced tab. 4. If this option to allow the printer driver to the Thick Paper or Env. Select Dell Printer E310dw, and then click the printing properties or preferences button. Click the Other Print Options button. 5. Select the print command in the ...following settings are active: • Use Watermark • Header-Footer Print • N in 1 or 1 in NxN Pages in your application. 2. Select the Improve Toner Fixing radio button. 7. Click OK to return to paper. 1. Select the print command in the Multiple Page drop-down list • 2-sided (Manual) , Booklet...
Click the Advanced tab. 4. If this option to allow the printer driver to the Thick Paper or Env. Select Dell Printer E310dw, and then click the printing properties or preferences button. Click the Other Print Options button. 5. Select the print command in the ...following settings are active: • Use Watermark • Header-Footer Print • N in 1 or 1 in NxN Pages in your application. 2. Select the Improve Toner Fixing radio button. 7. Click OK to return to paper. 1. Select the print command in the Multiple Page drop-down list • 2-sided (Manual) , Booklet...
Dell Printer Users Guide
Page 64
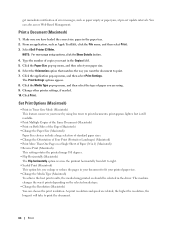
... button. 4. Click the Paper Size pop-up menu, and then select Print Settings. Click the application pop-up menu, and then select your toner by using . 9. Change other printer settings, if needed. 10. You can choose the print resolution. Click Print. Make sure you enlarge or...size paper in the driver. The Print Settings options appear. 8. Set Print Options (Macintosh) • Print in the Copies field. 5. Select Dell Printer E310dw. From an application, such as paper empty or paper jam, at pre-set update intervals. get immediate notification of copies you want in...
... button. 4. Click the Paper Size pop-up menu, and then select Print Settings. Click the application pop-up menu, and then select your toner by using . 9. Change other printer settings, if needed. 10. You can choose the print resolution. Click Print. Make sure you enlarge or...size paper in the driver. The Print Settings options appear. 8. Set Print Options (Macintosh) • Print in the Copies field. 5. Select Dell Printer E310dw. From an application, such as paper empty or paper jam, at pre-set update intervals. get immediate notification of copies you want in...

Dell Printer Users Guide
Page 65
...more page setup options, click the Show Details button. 3. Click Toner Save Mode. 6. Click the application pop-up menu, and then select Print Settings. Check the Toner Save Mode check box. 7. Click Print. Select Dell Printer E310dw. Click the Advanced print settings list. 5. From an application,.... • Change the Graphic Quality (Macintosh) You can change the print quality. • Reduce Paper Curl (Macintosh) • Improve Toner Fixing (Macintosh) • Adjust the Print Density (Macintosh) You can increase or decrease the print density. • Skip Blank Page (Macintosh...
...more page setup options, click the Show Details button. 3. Click Toner Save Mode. 6. Click the application pop-up menu, and then select Print Settings. Check the Toner Save Mode check box. 7. Click Print. Select Dell Printer E310dw. Click the Advanced print settings list. 5. From an application,.... • Change the Graphic Quality (Macintosh) You can change the print quality. • Reduce Paper Curl (Macintosh) • Improve Toner Fixing (Macintosh) • Adjust the Print Density (Macintosh) You can increase or decrease the print density. • Skip Blank Page (Macintosh...

Dell Printer Users Guide
Page 70
... paper or thicker paper Select this option is selected and the document is smaller than the paper you have selected Thick Paper , and toner smudges while printing. Select the Flip horizontally check box. 5. From an application, such as Apple TextEdit, click the File menu, and... settings, if needed . 6. NOTE: For more page setup options, click the Show Details button. 3. The Paper Handling options appear. 4. Select Dell Printer E310dw. Click the Media Type pop-up menu, and then select Print Settings. NOTE: For more page setup options, click the Show Details button. 3....
... paper or thicker paper Select this option is selected and the document is smaller than the paper you have selected Thick Paper , and toner smudges while printing. Select the Flip horizontally check box. 5. From an application, such as Apple TextEdit, click the File menu, and... settings, if needed . 6. NOTE: For more page setup options, click the Show Details button. 3. The Paper Handling options appear. 4. Select Dell Printer E310dw. Click the Media Type pop-up menu, and then select Print Settings. NOTE: For more page setup options, click the Show Details button. 3....

Dell Printer Users Guide
Page 71
... Print. 2. Print 71 Env. From an application, such as Apple TextEdit, click the File menu, and then select Page Setup. 2. Select Dell Printer E310dw. 3. Click OK. 6. Select this option if the toner does not correctly stick to use. • 300 dpi • 600 dpi • HQ 1200 5. Click the application pop-up menu...
... Print. 2. Print 71 Env. From an application, such as Apple TextEdit, click the File menu, and then select Page Setup. 2. Select Dell Printer E310dw. 3. Click OK. 6. Select this option if the toner does not correctly stick to use. • 300 dpi • 600 dpi • HQ 1200 5. Click the application pop-up menu...

Dell Printer Users Guide
Page 73
... decreases the temperature of the machine's fusing process, which reduces paper curl. 1. The Print Settings options appear. 4. Select Dell Printer E310dw. From an application, such as Apple TextEdit, click the File menu, and then select Print. 2. Click the application pop...Show Details button. Select the Improve Print Output option. 6. Improve Toner Fixing (Macintosh) NOTE: This setting increases the temperature of the machine's fusing process, which improves toner's ability to stick to paper. 1. Select Dell Printer E310dw. Click Print. From an application, such as Apple TextEdit, ...
... decreases the temperature of the machine's fusing process, which reduces paper curl. 1. The Print Settings options appear. 4. Select Dell Printer E310dw. From an application, such as Apple TextEdit, click the File menu, and then select Print. 2. Click the application pop...Show Details button. Select the Improve Print Output option. 6. Improve Toner Fixing (Macintosh) NOTE: This setting increases the temperature of the machine's fusing process, which improves toner's ability to stick to paper. 1. Select Dell Printer E310dw. Click Print. From an application, such as Apple TextEdit, ...

Dell Printer Users Guide
Page 74
...or left. 8. Click the application pop-up menu, and then select Print Settings. Select the Skip Blank Page check box. 7. Select Dell Printer E310dw. Click Density Adjustment. 6. You can increase or decrease the print density. 1. Select the Improve Print Output option. 6. Click the Other... pop-up menu, and then select Print Settings. The Print Settings options appear. 4. Click the Advanced print settings list. 5. Select Improve Toner Fixing. 7. From an application, such as paper empty or paper jam, at pre-set update intervals. The Print Settings options appear. 4....
...or left. 8. Click the application pop-up menu, and then select Print Settings. Select the Skip Blank Page check box. 7. Select Dell Printer E310dw. Click Density Adjustment. 6. You can increase or decrease the print density. 1. Select the Improve Print Output option. 6. Click the Other... pop-up menu, and then select Print Settings. The Print Settings options appear. 4. Click the Advanced print settings list. 5. Select Improve Toner Fixing. 7. From an application, such as paper empty or paper jam, at pre-set update intervals. The Print Settings options appear. 4....

Dell Printer Users Guide
Page 134
..., then plug in the power cord and press to turn on the machine. 134 Troubleshooting If you can "ping" the Dell machine from the machine. • The toner cartridge and drum unit are installed correctly. • The front and back covers are still having problems, see the instructions ...on the machine. Wired/Wireless Check that you are set them correctly. Other Problems Difficulties The machine will not turn on . Check that your Dell machine, access point/router, or network hub is not solved, press and hold to turn off the machine. Check the following: • ...
..., then plug in the power cord and press to turn on the machine. 134 Troubleshooting If you can "ping" the Dell machine from the machine. • The toner cartridge and drum unit are installed correctly. • The front and back covers are still having problems, see the instructions ...on the machine. Wired/Wireless Check that you are set them correctly. Other Problems Difficulties The machine will not turn on . Check that your Dell machine, access point/router, or network hub is not solved, press and hold to turn off the machine. Check the following: • ...

Dell Printer Users Guide
Page 135
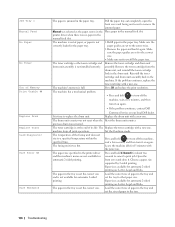
...appears on the computer screen during the installation, change the Security Software settings to permit the Dell product setup program or other program to run. (Macintosh) If you are shown in the table. The toner cartridge is jammed underneath the paper tray or the fusing unit. Install the 2-sided tray firmly... set before you turned on the drum unit must be replaced. Open the front cover, remove the drum and toner, and clear the paper jam. If this happens, your local Dell dealer. The fusing unit cover is jammed in the drum unit again. Action Close the back cover of the ...
...appears on the computer screen during the installation, change the Security Software settings to permit the Dell product setup program or other program to run. (Macintosh) If you are shown in the table. The toner cartridge is jammed underneath the paper tray or the fusing unit. Install the 2-sided tray firmly... set before you turned on the drum unit must be replaced. Open the front cover, remove the drum and toner, and clear the paper jam. If this happens, your local Dell dealer. The fusing unit cover is jammed in the drum unit again. Action Close the back cover of the ...
Dell Printer Users Guide
Page 136
... the drum unit, and reinstall the toner cartridge back in the machine. The machine has a mechanical problem. • Press and hold to turn off the machine, wait a few minutes, and then turn it on again. • If the problem continues, contact Dell It is not correctly loaded in the...2-sided printing are Letter, Legal and Folio. Make sure the paper guides are not available for 15 minutes with a new one. Reinstall the toner cartridge and drum unit assembly back in the drum unit. machine stops all print operations. The paper in the paper tray. Jam Tray 1 Manual...
... the drum unit, and reinstall the toner cartridge back in the machine. The machine has a mechanical problem. • Press and hold to turn off the machine, wait a few minutes, and then turn it on again. • If the problem continues, contact Dell It is not correctly loaded in the...2-sided printing are Letter, Legal and Folio. Make sure the paper guides are not available for 15 minutes with a new one. Reinstall the toner cartridge and drum unit assembly back in the drum unit. machine stops all print operations. The paper in the paper tray. Jam Tray 1 Manual...

Dell Printer Users Guide
Page 137
... paper from feeding through the machine at one . Pull the paper tray completely out of its when the LCD displays Replace Toner. Troubleshooting 137 Toner Ended(Continue mode) Toner Low It is a jam in the Paper Tray If the machine's control panel or the Status Monitor (for Macintosh only)... displays there is time to replace the toner cartridge. Replace the toner cartridge with a new one time and prevents paper jams. • Paper is Jammed in the Paper Tray • Paper is Jammed...
... paper from feeding through the machine at one . Pull the paper tray completely out of its when the LCD displays Replace Toner. Troubleshooting 137 Toner Ended(Continue mode) Toner Low It is a jam in the Paper Tray If the machine's control panel or the Status Monitor (for Macintosh only)... displays there is time to replace the toner cartridge. Replace the toner cartridge with a new one time and prevents paper jams. • Paper is Jammed in the Paper Tray • Paper is Jammed...

Dell Printer Users Guide
Page 141
3. Wait for the machine to cool down before you touch the internal parts of the machine will be extremely hot. Pull out the jammed paper slowly. Remove the toner cartridge and drum unit assembly. WARNING HOT SURFACE Internal parts of the machine. 4. Troubleshooting 141
3. Wait for the machine to cool down before you touch the internal parts of the machine will be extremely hot. Pull out the jammed paper slowly. Remove the toner cartridge and drum unit assembly. WARNING HOT SURFACE Internal parts of the machine. 4. Troubleshooting 141


