Users Guide
Page 3
Contents About Your Monitor 5 Package Contents 5 Product Features 7 Identifying Parts and Controls 7 Monitor Specifications 10 Plug and Play Capability 16 LCD Monitor Quality and Pixel Policy 17 Maintenance Guidelines 17 Setting Up the Monitor 18 Attaching the Stand 18 Connecting Your Monitor 19 Organizing Your Cables 20 Removing the Monitor Stand 20 Wall Mounting (Optional 21 Operating the Monitor 22 Power On the Monitor 22 Using the Front-Panel Controls 22 Using the On-Screen Display (OSD) Menu 24 Setting the Maximum Resolution 36 Contents | 3
Contents About Your Monitor 5 Package Contents 5 Product Features 7 Identifying Parts and Controls 7 Monitor Specifications 10 Plug and Play Capability 16 LCD Monitor Quality and Pixel Policy 17 Maintenance Guidelines 17 Setting Up the Monitor 18 Attaching the Stand 18 Connecting Your Monitor 19 Organizing Your Cables 20 Removing the Monitor Stand 20 Wall Mounting (Optional 21 Operating the Monitor 22 Power On the Monitor 22 Using the Front-Panel Controls 22 Using the On-Screen Display (OSD) Menu 24 Setting the Maximum Resolution 36 Contents | 3
Users Guide
Page 7
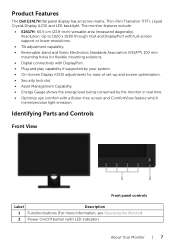
... the Monitor) 2 Power On/Off button (with a flicker-free screen and ComfortView feature which minimizes blue light emission. The monitor features include: • E2417H: 60.5 cm (23.8-inch) viewable area (measured diagonally). Resolution: Up to 1920 x 1080 through VGA and DisplayPort with full-screen support or lower resolutions. • Tilt adjustment capability. • Removable stand and Video Electronics Standards Association (VESA™) 100 mm mounting holes for flexible mounting solutions. • Digital connectivity with DisplayPort. • Plug...
... the Monitor) 2 Power On/Off button (with a flicker-free screen and ComfortView feature which minimizes blue light emission. The monitor features include: • E2417H: 60.5 cm (23.8-inch) viewable area (measured diagonally). Resolution: Up to 1920 x 1080 through VGA and DisplayPort with full-screen support or lower resolutions. • Tilt adjustment capability. • Removable stand and Video Electronics Standards Association (VESA™) 100 mm mounting holes for flexible mounting solutions. • Digital connectivity with DisplayPort. • Plug...
Users Guide
Page 8
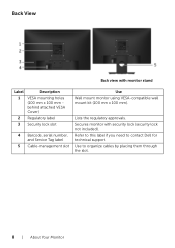
Use to contact Dell for technical support. Back View Back view with security lock (security lock not included). Lists the regulatory approvals. Secures monitor with monitor stand Label Description 1 VESA mounting holes (100 mm x 100 mm behind attached VESA Cover) 2 Regulatory label 3 Security lock slot 4 Barcode, serial number, and Service Tag label 5 Cable-management slot Use Wall mount monitor using VESA-compatible wall mount kit (100 mm x 100 mm). Refer to this label if you need to organize cables by placing them through the slot. 8 | About Your Monitor
Use to contact Dell for technical support. Back View Back view with security lock (security lock not included). Lists the regulatory approvals. Secures monitor with monitor stand Label Description 1 VESA mounting holes (100 mm x 100 mm behind attached VESA Cover) 2 Regulatory label 3 Security lock slot 4 Barcode, serial number, and Service Tag label 5 Cable-management slot Use Wall mount monitor using VESA-compatible wall mount kit (100 mm x 100 mm). Refer to this label if you need to organize cables by placing them through the slot. 8 | About Your Monitor
Users Guide
Page 9
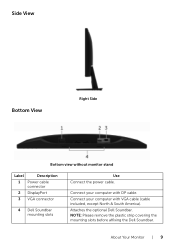
Connect your computer with VGA cable (cable included, except North & South America). About Your Monitor | 9 Attaches the optional Dell Soundbar. NOTE: Please remove the plastic strip covering the mounting slots before affixing the Dell Soundbar. Connect your computer with DP cable. Side View Bottom View Right Side Bottom view without monitor stand Label Description 1 Power cable connector 2 DisplayPort 3 VGA connector 4 Dell Soundbar mounting slots Use Connect the power cable.
Connect your computer with VGA cable (cable included, except North & South America). About Your Monitor | 9 Attaches the optional Dell Soundbar. NOTE: Please remove the plastic strip covering the mounting slots before affixing the Dell Soundbar. Connect your computer with DP cable. Side View Bottom View Right Side Bottom view without monitor stand Label Description 1 Power cable connector 2 DisplayPort 3 VGA connector 4 Dell Soundbar mounting slots Use Connect the power cable.
Users Guide
Page 10
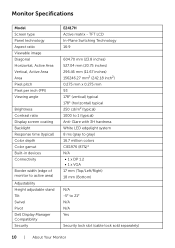
Monitor Specifications Model Screen type Panel technology Aspect ratio Viewable image Diagonal Horizontal, Active Area Vertical, Active Area Area Pixel pitch Pixel per inch (PPI) Viewing angle Brightness Contrast ratio Display screen coating Backlight Response time (typical) Color depth Color gamut Built-in devices Connectivity Border width (edge of monitor to 21° N/A N/A Yes Security lock slot (cable lock sold separately) 10 | About Your Monitor TFT LCD In-Plane Switching Technology 16:9 604.70 mm (23.8 inches) 527.04 mm...
Monitor Specifications Model Screen type Panel technology Aspect ratio Viewable image Diagonal Horizontal, Active Area Vertical, Active Area Area Pixel pitch Pixel per inch (PPI) Viewing angle Brightness Contrast ratio Display screen coating Backlight Response time (typical) Color depth Color gamut Built-in devices Connectivity Border width (edge of monitor to 21° N/A N/A Yes Security lock slot (cable lock sold separately) 10 | About Your Monitor TFT LCD In-Plane Switching Technology 16:9 604.70 mm (23.8 inches) 527.04 mm...
Users Guide
Page 14
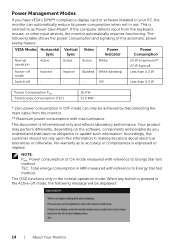
.... The OSD functions only in your PC, the monitor can only be displayed: 14 | About Your Monitor The following message will be achieved by disconnecting the main cable from the keyboard, mouse, or other input devices, the monitor automatically resumes functioning. VESA Modes Horizontal Vertical Video Sync Sync Power Indicator Power Consumption Normal operation Active Active Active White 25 W (maximum)** 22 W (typical) Active-off mode Inactive Inactive Blanked White (blinking...
.... The OSD functions only in your PC, the monitor can only be displayed: 14 | About Your Monitor The following message will be achieved by disconnecting the main cable from the keyboard, mouse, or other input devices, the monitor automatically resumes functioning. VESA Modes Horizontal Vertical Video Sync Sync Power Indicator Power Consumption Normal operation Active Active Active White 25 W (maximum)** 22 W (typical) Active-off mode Inactive Inactive Blanked White (blinking...

Users Guide
Page 17
... best practices, follow the Safety Instructions before cleaning the monitor. Do not use benzene, thinner, ammonia, abrasive cleaners, or compressed air. • Use a lightly-dampened, warm cloth to see Dell Support site at: http://www.dell.com/support/monitors. If possible, use a special screen-cleaning tissue or solution suitable for one or more pixels to become fixed in use a dynamically changing screen saver and turn Off your anti-static screen, lightly dampen a soft, clean...
... best practices, follow the Safety Instructions before cleaning the monitor. Do not use benzene, thinner, ammonia, abrasive cleaners, or compressed air. • Use a lightly-dampened, warm cloth to see Dell Support site at: http://www.dell.com/support/monitors. If possible, use a special screen-cleaning tissue or solution suitable for one or more pixels to become fixed in use a dynamically changing screen saver and turn Off your anti-static screen, lightly dampen a soft, clean...
Users Guide
Page 23
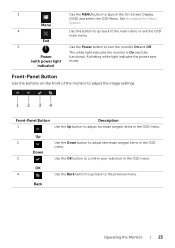
... 5 Use the Power button to adjust the image settings. Front-Panel Button Use the buttons on the front of the monitor to turn the monitor On and Off. Up 2 Use the Down button to confirm your selection in the OSD menu. Back Operating the Monitor | 23 A blinking white light indicates the power save mode. Down 3 Use the OK button to adjust (decrease ranges) items in the OSD menu. OK 4 Use the Back button to go back to the previous menu. Power (with power light indicator) The white light...
... 5 Use the Power button to adjust the image settings. Front-Panel Button Use the buttons on the front of the monitor to turn the monitor On and Off. Up 2 Use the Down button to confirm your selection in the OSD menu. Back Operating the Monitor | 23 A blinking white light indicates the power save mode. Down 3 Use the OK button to adjust (decrease ranges) items in the OSD menu. OK 4 Use the Back button to go back to the previous menu. Power (with power light indicator) The white light...

Users Guide
Page 28
Color Use Color to a computer (or DVD player) using the DP cable. Input Color Format Allows you to set the video input mode to: RGB: Select this option if your monitor is connected to adjust the color setting mode. YPbPr: Select this option if your DVD player supports only YPbPr output. 28 | Operating the Monitor
Color Use Color to a computer (or DVD player) using the DP cable. Input Color Format Allows you to set the video input mode to: RGB: Select this option if your monitor is connected to adjust the color setting mode. YPbPr: Select this option if your DVD player supports only YPbPr output. 28 | Operating the Monitor
Users Guide
Page 29
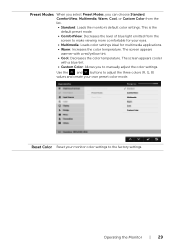
Reset Color Reset your own preset color mode. Use the and buttons to adjust the three colors (R, G, B) values and create your monitor color settings to the factory settings. Operating the Monitor | 29 The screen appears cooler with a red/yellow tint. • Cool: Decreases the color temperature. The screen appears warmer with a blue tint. • Custom Color: Allows you can choose Standard, ComfortView, Multimedia, Warm, Cool, or Custom Color from the screen to make viewing more comfortable...
Reset Color Reset your own preset color mode. Use the and buttons to adjust the three colors (R, G, B) values and create your monitor color settings to the factory settings. Operating the Monitor | 29 The screen appears cooler with a red/yellow tint. • Cool: Decreases the color temperature. The screen appears warmer with a blue tint. • Custom Color: Allows you can choose Standard, ComfortView, Multimedia, Warm, Cool, or Custom Color from the screen to make viewing more comfortable...

Users Guide
Page 30
... "VGA" input. Horizontal Use or to restore default display settings. 30 | Operating the Monitor Time Reset Display Select this option to adjust the image left or right. Position Maximum is '0' (-). Minimum is '100' (+). Sharpness This feature can make the image look sharper or softer. Vertical Position Use or to adjust image. NOTE: Pixel Clock and Phase adjustments are not obtained using the Phase adjustment, use the Pixel Clock (coarse) adjustment and then use Phase (fine), again. Display Use Display to adjust the image...
... "VGA" input. Horizontal Use or to restore default display settings. 30 | Operating the Monitor Time Reset Display Select this option to adjust the image left or right. Position Maximum is '0' (-). Minimum is '100' (+). Sharpness This feature can make the image look sharper or softer. Vertical Position Use or to adjust image. NOTE: Pixel Clock and Phase adjustments are not obtained using the Phase adjustment, use the Pixel Clock (coarse) adjustment and then use Phase (fine), again. Display Use Display to adjust the image...

Users Guide
Page 32
... Lock is selected, no user adjustments are locked. NOTE: Unlock function- Lock function - Users can choose a feature from Preset Modes, Brightness/Contrast, Auto Adjust, Input Source,or Aspect Ratio and set it as a shortcut key. 32 | Operating the Monitor Reset all OSD settings to adjustments. Lock Reset Menu Personalize Controls user access to the factory preset values. All buttons are allowed. Only hard unlock (press and hold the button beside the power button for 6 seconds). Either soft lock (through the OSD menu) or hard lock...
... Lock is selected, no user adjustments are locked. NOTE: Unlock function- Lock function - Users can choose a feature from Preset Modes, Brightness/Contrast, Auto Adjust, Input Source,or Aspect Ratio and set it as a shortcut key. 32 | Operating the Monitor Reset all OSD settings to adjustments. Lock Reset Menu Personalize Controls user access to the factory preset values. All buttons are allowed. Only hard unlock (press and hold the button beside the power button for 6 seconds). Either soft lock (through the OSD menu) or hard lock...
Users Guide
Page 36
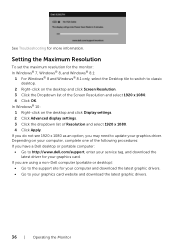
...; Go to http://www.dell.com/support, enter your service tag, and download the latest driver for the monitor: In Windows® 7, Windows® 8, and Windows® 8.1: 1 For Windows® 8 and Windows® 8.1 only, select the Desktop tile to switch to classic desktop. 2 Right-click on the desktop and click Display settings. 2 Click Advanced display settings. 3 Click the dropdown list of the Screen Resolution and select 1920 x 1080...
...; Go to http://www.dell.com/support, enter your service tag, and download the latest driver for the monitor: In Windows® 7, Windows® 8, and Windows® 8.1: 1 For Windows® 8 and Windows® 8.1 only, select the Desktop tile to switch to classic desktop. 2 Right-click on the desktop and click Display settings. 2 Click Advanced display settings. 3 Click the dropdown list of the Screen Resolution and select 1920 x 1080...

Users Guide
Page 38
... | Troubleshooting If your monitor screen remains blank after you use the previous procedure, check your video controller and computer, because your computer and the monitor. 2 Unplug the video cable from the back of the computer. 3 Turn on -screen (against a black background), if the monitor cannot sense a video signal and is working correctly. While in this section, follow the Safety Instructions. then turn On both your monitor is functioning properly. Troubleshooting WARNING...
... | Troubleshooting If your monitor screen remains blank after you use the previous procedure, check your video controller and computer, because your computer and the monitor. 2 Unplug the video cable from the back of the computer. 3 Turn on -screen (against a black background), if the monitor cannot sense a video signal and is working correctly. While in this section, follow the Safety Instructions. then turn On both your monitor is functioning properly. Troubleshooting WARNING...

Users Guide
Page 39
... mode. Check the video card and computer. A gray screen appears. 4 Carefully inspect the screen for 5 seconds. The color of the computer or monitor. The monitor then goes into the self-test mode. 3 Press and hold Button 1 for abnormalities. 5 Press Button 1 again. To exit, press Button 1 again. Troubleshooting | 39 To run the built-in diagnostics only when the video cable is unplugged and the monitor is in green, blue, black, white, and text screens...
... mode. Check the video card and computer. A gray screen appears. 4 Carefully inspect the screen for 5 seconds. The color of the computer or monitor. The monitor then goes into the self-test mode. 3 Press and hold Button 1 for abnormalities. 5 Press Button 1 again. To exit, press Button 1 again. Troubleshooting | 39 To run the built-in diagnostics only when the video cable is unplugged and the monitor is in green, blue, black, white, and text screens...
Users Guide
Page 40
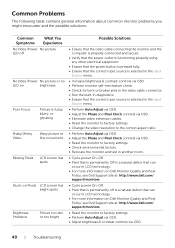
... the Input Source menu. • Increase brightness & contrast controls via OSD. • Perform monitor self-test feature check. • Check for bent or broken pins in the video cable connector. • Run the built-in diagnostics. • Ensure that the correct input source is selected in the Input Source menu. • Perform Auto Adjust via OSD. • Adjust the Phase and Pixel Clock controls via OSD. • Eliminate video extension cables. • Reset the monitor to factory settings. • Change the video resolution to...
... the Input Source menu. • Increase brightness & contrast controls via OSD. • Perform monitor self-test feature check. • Check for bent or broken pins in the video cable connector. • Run the built-in diagnostics. • Ensure that the correct input source is selected in the Input Source menu. • Perform Auto Adjust via OSD. • Adjust the Phase and Pixel Clock controls via OSD. • Eliminate video extension cables. • Reset the monitor to factory settings. • Change the video resolution to...
Users Guide
Page 41
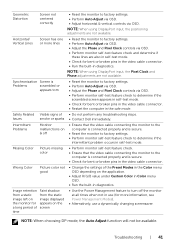
... Dell immediately. Missing Color Picture missing color • Perform monitor self-test feature check. • Ensure that the video cable connecting the monitor to the computer is connected properly and is secure. • Reset the monitor to factory settings. • Perform monitor self-test feature check to factory settings. • Perform Auto Adjust via OSD. • Adjust horizontal & vertical controls via OSD. NOTE: When choosing DP mode, the Auto Adjust function will not be available. NOTE: When using DisplayPort input, the positioning adjustments are...
... Dell immediately. Missing Color Picture missing color • Perform monitor self-test feature check. • Ensure that the video cable connecting the monitor to the computer is connected properly and is secure. • Reset the monitor to factory settings. • Perform monitor self-test feature check to factory settings. • Perform Auto Adjust via OSD. • Adjust horizontal & vertical controls via OSD. NOTE: When choosing DP mode, the Auto Adjust function will not be available. NOTE: When using DisplayPort input, the positioning adjustments are...
Users Guide
Page 42
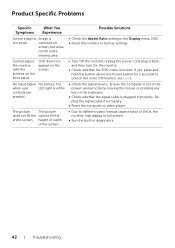
...; Check the Aspect Ratio setting in the Display menu OSD. • Reset the monitor to factory settings. • Turn Off the monitor, unplug the power cord, plug it back, and then turn On the monitor. • Check whether the OSD menu is plugged in diagnostics. 42 | Troubleshooting Product Specific Problems Specific Symptoms What You Experience Screen image is Image is too small centered on screen, but does not fill entire viewing area Cannot adjust the monitor with the buttons on the front panel OSD...
...; Check the Aspect Ratio setting in the Display menu OSD. • Reset the monitor to factory settings. • Turn Off the monitor, unplug the power cord, plug it back, and then turn On the monitor. • Check whether the OSD menu is plugged in diagnostics. 42 | Troubleshooting Product Specific Problems Specific Symptoms What You Experience Screen image is Image is too small centered on screen, but does not fill entire viewing area Cannot adjust the monitor with the buttons on the front panel OSD...

Monitor Display Manager Users Guide
Page 1
... installed, Dell Display Manager runs each time the system starts and places its icon in the notification tray. The Quick Settings dialog box allows you to enable automatic switching between preset modes or to easily adjust the brightness, contrast, resolution, window layout, and so on select Dell monitors. It also allows you to select a preset mode manually. When more than one supported Dell monitors are connected to the system is used to...
... installed, Dell Display Manager runs each time the system starts and places its icon in the notification tray. The Quick Settings dialog box allows you to enable automatic switching between preset modes or to easily adjust the brightness, contrast, resolution, window layout, and so on select Dell monitors. It also allows you to select a preset mode manually. When more than one supported Dell monitors are connected to the system is used to...

Monitor Display Manager Users Guide
Page 2
... a different preset mode to be the same on each connected monitor, or it can select Auto Mode that applies a preset mode based on the active application. The Preset Mode assigned to associate a specific Preset Mode with a specific application, and apply it . 2 | Dell Display Manager User's Guide Setting Basic Display Functions You can manually select a preset mode or you to a particular application may be used whenever a Direct3D application runs in full-screen mode.
... a different preset mode to be the same on each connected monitor, or it can select Auto Mode that applies a preset mode based on the active application. The Preset Mode assigned to associate a specific Preset Mode with a specific application, and apply it . 2 | Dell Display Manager User's Guide Setting Basic Display Functions You can manually select a preset mode or you to a particular application may be used whenever a Direct3D application runs in full-screen mode.


