
User's Guide
Page 1
...efficiency. As an ENERGY STAR partner, Dell Inc. Model E2010Hc/E2210Hc/E2310Hc/E2010Ht/E2210Hf/E2310Hf May 2009 Rev. is a registered trademark of the U.S. Trademarks used in this document to refer to hardware or loss of your computer. A00 Reproduction of these materials in ...any proprietary interest in the United States and/or other than its own. Dell Inc. ENERGY STAR is strictly forbidden. Environmental Protection Agency. has determined...
...efficiency. As an ENERGY STAR partner, Dell Inc. Model E2010Hc/E2210Hc/E2310Hc/E2010Ht/E2210Hf/E2310Hf May 2009 Rev. is a registered trademark of the U.S. Trademarks used in this document to refer to hardware or loss of your computer. A00 Reproduction of these materials in ...any proprietary interest in the United States and/or other than its own. Dell Inc. ENERGY STAR is strictly forbidden. Environmental Protection Agency. has determined...

User's Guide
Page 5
Power Management Modes If you information about the various power management modes and pin assignments for the various connectors of your computer to the monitor using a VGA cable. This is referred to the monitor using a DVI cable Disable stand release button and... Active Blank - To connect your monitor. To connect your PC, the monitor automatically reduces its power consumption when not in your computer to as the computer detects input from keyboard, mouse, or other input devices, the monitor automatically resumes functioning. Vertical Sync Active Inactive - The following ...
Power Management Modes If you information about the various power management modes and pin assignments for the various connectors of your computer to the monitor using a VGA cable. This is referred to the monitor using a DVI cable Disable stand release button and... Active Blank - To connect your monitor. To connect your PC, the monitor automatically reduces its power consumption when not in your computer to as the computer detects input from keyboard, mouse, or other input devices, the monitor automatically resumes functioning. Vertical Sync Active Inactive - The following ...

User's Guide
Page 6
... except power button is TC003 and ENERGY STAR®-compliant. Zero power consumption in OFF mode can only be displayed: Activate the computer and monitor to gain access to the OSD. VESA Modes Normal operation Active-off mode Switch off mode, the following messages will only... function in the normal operation mode. NOTE: Dell E2010H/E2210H/E2310H Flat Panel monitor is pressed in Active-off Horizontal Sync Active Inactive - Vertical Sync Active Inactive - Pin Assignments 15-pin...
... except power button is TC003 and ENERGY STAR®-compliant. Zero power consumption in OFF mode can only be displayed: Activate the computer and monitor to gain access to the OSD. VESA Modes Normal operation Active-off mode Switch off mode, the following messages will only... function in the normal operation mode. NOTE: Dell E2010H/E2210H/E2310H Flat Panel monitor is pressed in Active-off Horizontal Sync Active Inactive - Vertical Sync Active Inactive - Pin Assignments 15-pin...
User's Guide
Page 7
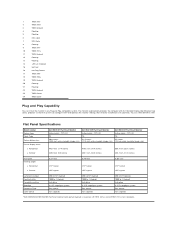
...computer with its Extended Display Identification Data (EDID) using Display Da (DDC) protocols so that the system can install the monitor in any Plug and Play-compatible system. Flat Panel Specifications Model number Screen type Panel Type Screen dimensions Preset display area: l Horizontal l Vertical Dell...and Play Capability You can configure itself and optimize the monitor settings. TFT LCD TN 21.5 inches (21.5-inch wide viewable image size) Dell E2310H Flat Panel Monitor Active matrix - You can select different settings if required. 1 TMDS RX2- 2 TMDS RX2+ 3 TMDS Ground...
...computer with its Extended Display Identification Data (EDID) using Display Da (DDC) protocols so that the system can install the monitor in any Plug and Play-compatible system. Flat Panel Specifications Model number Screen type Panel Type Screen dimensions Preset display area: l Horizontal l Vertical Dell...and Play Capability You can configure itself and optimize the monitor settings. TFT LCD TN 21.5 inches (21.5-inch wide viewable image size) Dell E2310H Flat Panel Monitor Active matrix - You can select different settings if required. 1 TMDS RX2- 2 TMDS RX2+ 3 TMDS Ground...
User's Guide
Page 12
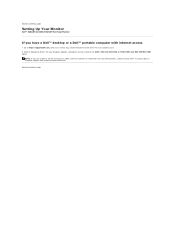
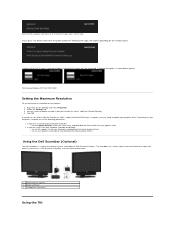
NOTE: If you have a Dell™ desktop or a Dell™ portable computer with internet access 1. After installing the drivers for your graphics card. 2. Back to Contents Page Setting Up Your Monitor Dell™ E2010H/E2210H/E2310H Flat Panel Monitor If you are unable to set the resolution to 1600 x 900 (for E2010H) or 1920x1080 (for...
NOTE: If you have a Dell™ desktop or a Dell™ portable computer with internet access 1. After installing the drivers for your graphics card. 2. Back to Contents Page Setting Up Your Monitor Dell™ E2010H/E2210H/E2310H Flat Panel Monitor If you are unable to set the resolution to 1600 x 900 (for E2010H) or 1920x1080 (for...
User's Guide
Page 13
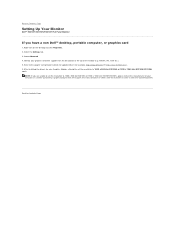
..., attempt to set the resolution to 1600 x 900 (for E2010H) or 1920 x 1080 (for E2210H/E2310H), please contact the manufacturer of your computer or consider purchasing a graphics adapter that will support the video resolution of 1600 x 900 (for E2010H) or 1920 x 1080 (for your graphics ...the desktop and click Properties. 2. Select Advanced. 4. NOTE: If you have a non Dell™ desktop, portable computer, or graphics card 1. Back to Contents Page Back to Contents Page Setting Up Your Monitor Dell™ E2010H/E2210H/E2310H Flat Panel Monitor If you are unable to set the resolution to...
..., attempt to set the resolution to 1600 x 900 (for E2010H) or 1920 x 1080 (for E2210H/E2310H), please contact the manufacturer of your computer or consider purchasing a graphics adapter that will support the video resolution of 1600 x 900 (for E2010H) or 1920 x 1080 (for your graphics ...the desktop and click Properties. 2. Select Advanced. 4. NOTE: If you have a non Dell™ desktop, portable computer, or graphics card 1. Back to Contents Page Back to Contents Page Setting Up Your Monitor Dell™ E2010H/E2210H/E2310H Flat Panel Monitor If you are unable to set the resolution to...
User's Guide
Page 16
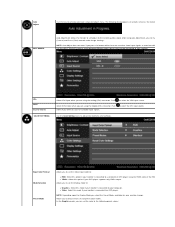
... this option if your DVD player supports only YPbPr output. NOTE: Auto Adjust does not occur if you select the Preset Modes available for your computer. VGA DVI-D Scan for available input signals. Allows you to set the display mode to: l Graphics: Select this mode if your monitor is ...the monitor to self-adjust to choose from a list of preset color modes. Use the Color Setting menu to your monitor is connected to a computer or DVD player using the Digital (DVI) connector. NOTE: Depending upon the Display Mode you press the button while there are using the HDMI cable...
... this option if your DVD player supports only YPbPr output. NOTE: Auto Adjust does not occur if you select the Preset Modes available for your computer. VGA DVI-D Scan for available input signals. Allows you to set the display mode to: l Graphics: Select this mode if your monitor is ...the monitor to self-adjust to choose from a list of preset color modes. Use the Color Setting menu to your monitor is connected to a computer or DVD player using the Digital (DVI) connector. NOTE: Depending upon the Display Mode you press the button while there are using the HDMI cable...

User's Guide
Page 19
... Power On/Off control for : 1. DDC/CI (Display Data Channel/Command Interface) allows a software on the monitor. LCD Conditioning Helps reduce minor cases of your computer to adjust the monitor display settings like the brightnes balance etc. Input Source Menu Timer Menu Lock DDC/CI Allows you to set the time...
... Power On/Off control for : 1. DDC/CI (Display Data Channel/Command Interface) allows a software on the monitor. LCD Conditioning Helps reduce minor cases of your computer to adjust the monitor display settings like the brightnes balance etc. Input Source Menu Timer Menu Lock DDC/CI Allows you to set the time...
User's Guide
Page 20
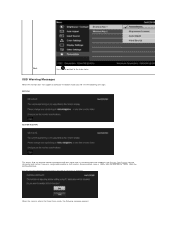
... you will see the following message: E2010H: E2210H/E2310H: This means that the monitor cannot synchronize with the signal that it is receiving from the computer.
... you will see the following message: E2010H: E2210H/E2310H: This means that the monitor cannot synchronize with the signal that it is receiving from the computer.
User's Guide
Page 21
... to your graphics card website and download the latest graphic drivers. Headphone connectors Using the Tilt Click OK. l If you have a Dell desktop or portable computer: ¡ Go to support.dell.com, enter your service tag, and download the latest driver for E2210H/E2310H). 4. Power indicator 3. Depending on your...selected input: If either VGA or DVI-D input is a stereo two channel system, mountable on Dell Flat Panel Displays. or See Solving Problems for the monitor: 1. Activate the computer and wake up the monitor to gain access to the OSD If you may need to update ...
... to your graphics card website and download the latest graphic drivers. Headphone connectors Using the Tilt Click OK. l If you have a Dell desktop or portable computer: ¡ Go to support.dell.com, enter your service tag, and download the latest driver for E2210H/E2310H). 4. Power indicator 3. Depending on your...selected input: If either VGA or DVI-D input is a stereo two channel system, mountable on Dell Flat Panel Displays. or See Solving Problems for the monitor: 1. Activate the computer and wake up the monitor to gain access to the OSD If you may need to update ...
User's Guide
Page 23
... 1920 x 1080 (for E2210H/E2310H) (Maximum) For optimal display performance while using , and follow the provided directions: 1: If you have a Dell™ desktop or a Dell™ portable computer with internet access. 2: If you may need to Contents Page Click OK. If you do not see 1600 x900 (for E2010H) or 1920... x 1080 (for E2210H/E2310H) as an option, you have a non Dell™ desktop, portable computer, or graphics card. Right-click on the desktop and click Properties. 2. Please choose the scenario below that best describes the...
... 1920 x 1080 (for E2210H/E2310H) (Maximum) For optimal display performance while using , and follow the provided directions: 1: If you have a Dell™ desktop or a Dell™ portable computer with internet access. 2: If you may need to Contents Page Click OK. If you do not see 1600 x900 (for E2010H) or 1920... x 1080 (for E2210H/E2310H) as an option, you have a non Dell™ desktop, portable computer, or graphics card. Right-click on the desktop and click Properties. 2. Please choose the scenario below that best describes the...

User's Guide
Page 25
... the corresponding video port on the back of the monitor. 2. Use both cables on it. 1. Fit two tabs on the back of your computer and disconnect the power cable. 2. To connect your monitor to the groove on the upper part of the procedures in this section, follow the ... connect both the cables only when they are connected to Contents Page Setting Up the Monitor Dell™ E2010H/E2210H/E2310H Flat Panel Monitor User's Guide Attaching the Stand Connecting Your Monitor Attaching the Dell Soundbar (Optional) Removing the Stand Base Wall mounting (Optional) Attaching the Stand NOTE: The...
... the corresponding video port on the back of the monitor. 2. Use both cables on it. 1. Fit two tabs on the back of your computer and disconnect the power cable. 2. To connect your monitor to the groove on the upper part of the procedures in this section, follow the ... connect both the cables only when they are connected to Contents Page Setting Up the Monitor Dell™ E2010H/E2210H/E2310H Flat Panel Monitor User's Guide Attaching the Stand Connecting Your Monitor Attaching the Dell Soundbar (Optional) Removing the Stand Base Wall mounting (Optional) Attaching the Stand NOTE: The...

User's Guide
Page 26
...(Optional) NOTICE: Do not use with the DC power connector from the back of the monitor. 2. Connect the Soundbar with any device other than the Dell Soundbar. Lift the stand up and away from the rear of the monitor, attach Soundbar by aligning the two slots with the two tabs along... cushion. Working from the monitor . Insert the mini stereo plug from the Soundbar Power Adaptor. 4. CAUTION: The Graphics are used for the purpose of the computer may vary. Slide the Soundbar to the left until it snaps into the...
...(Optional) NOTICE: Do not use with the DC power connector from the back of the monitor. 2. Connect the Soundbar with any device other than the Dell Soundbar. Lift the stand up and away from the rear of the monitor, attach Soundbar by aligning the two slots with the two tabs along... cushion. Working from the monitor . Insert the mini stereo plug from the Soundbar Power Adaptor. 4. CAUTION: The Graphics are used for the purpose of the computer may vary. Slide the Soundbar to the left until it snaps into the...

User's Guide
Page 28
...Turn on both your computer and the monitor. 2. The floating dialog box should appear on-screen (against a black background) if the monitor cannot sense a video signal and is functioning properly. If your monitor screen remains blank after you to Contents Page Troubleshooting Dell™ E2010H/E2210H/...properly. then turn on the monitor. NOTE: Self-test feature check is in diagnostics: Also, depending upon the selected input, one of computer. 3. Unplug the video cable from the back of the dialogs shown below will continuously scroll through the screen. or 4. Back to ...
...Turn on both your computer and the monitor. 2. The floating dialog box should appear on-screen (against a black background) if the monitor cannot sense a video signal and is functioning properly. If your monitor screen remains blank after you to Contents Page Troubleshooting Dell™ E2010H/E2210H/...properly. then turn on the monitor. NOTE: Self-test feature check is in diagnostics: Also, depending upon the selected input, one of computer. 3. Unplug the video cable from the back of the dialogs shown below will continuously scroll through the screen. or 4. Back to ...
User's Guide
Page 29
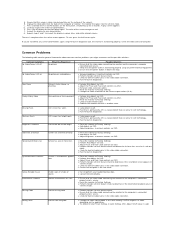
...Auto Adjust via OSD. l Adjust Phase and Pixel Clock controls via OSD. Safety Related Issues Visible signs of the screen). l Contact Dell immediately. l Try different Color Preset Settings in diagnostics. Press and hold the 1st and 4th buttons on & off What You Experience No... to determine if the intermittent problem occurs in self-test mode. Repeat steps E and F to Factory Settings. Check the video card and computer. l Check for abnormalities. l Auto Adjust via OSD. Synchronization Problems Screen is clean (no brightness l Increase brightness & contrast controls via ...
...Auto Adjust via OSD. l Adjust Phase and Pixel Clock controls via OSD. Safety Related Issues Visible signs of the screen). l Contact Dell immediately. l Try different Color Preset Settings in diagnostics. Press and hold the 1st and 4th buttons on & off What You Experience No... to determine if the intermittent problem occurs in self-test mode. Repeat steps E and F to Factory Settings. Check the video card and computer. l Check for abnormalities. l Auto Adjust via OSD. Synchronization Problems Screen is clean (no brightness l Increase brightness & contrast controls via ...

User's Guide
Page 30
Using this option may display in diagnostics. l NOTE: Image Burn-in use a dynamically changing screensaver. l Check the signal source. l Reset the computer or video player. Back to Factory Settings, select Enable LCD Conditioning. l Alternatively, use (for a image displayed appears on long period of time the screen Settings ...", "down" or "Menu" key, the message " No input signal " will appear. Possible Solutions l Reset the monitor to PC RGB or YPbPr in properly. Ensure the Computer is plugged in the Advance Setting OSD.
Using this option may display in diagnostics. l NOTE: Image Burn-in use a dynamically changing screensaver. l Check the signal source. l Reset the computer or video player. Back to Factory Settings, select Enable LCD Conditioning. l Alternatively, use (for a image displayed appears on long period of time the screen Settings ...", "down" or "Menu" key, the message " No input signal " will appear. Possible Solutions l Reset the monitor to PC RGB or YPbPr in properly. Ensure the Computer is plugged in the Advance Setting OSD.


