
User's Guide
Page 1
... be used in this document to refer to either potential damage to hardware or loss of Microsoft Corporation in the United States and/or other than its own. NOTICE: A NOTICE indicates either the entities claiming the marks and names or their products. Dell™ E1909W Flat Panel Monitor User's Guide About Your Monitor Setting Up the Monitor Operating the Monitor Troubleshooting Appendix...
... be used in this document to refer to either potential damage to hardware or loss of Microsoft Corporation in the United States and/or other than its own. NOTICE: A NOTICE indicates either the entities claiming the marks and names or their products. Dell™ E1909W Flat Panel Monitor User's Guide About Your Monitor Setting Up the Monitor Operating the Monitor Troubleshooting Appendix...
User's Guide
Page 3
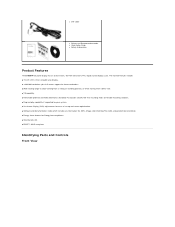
l DVI Cable l Drivers and Documentation media l Quick Setup Guide l Safety Information Product Features The E1909W flat panel display has an active matrix, thin-film transistor (TFT), liquid crystal display (LCD). Identifying Parts and Controls Front View The monitor features include: ■ 19-inch (481.4 mm) viewable area display. ■ 1440x900 resolution, plus full-screen support for lower resolutions. ■ Wide viewing angle to allow viewing from a sitting or standing position, or while moving from side-to-side. ■...
l DVI Cable l Drivers and Documentation media l Quick Setup Guide l Safety Information Product Features The E1909W flat panel display has an active matrix, thin-film transistor (TFT), liquid crystal display (LCD). Identifying Parts and Controls Front View The monitor features include: ■ 19-inch (481.4 mm) viewable area display. ■ 1440x900 resolution, plus full-screen support for lower resolutions. ■ Wide viewing angle to allow viewing from a sitting or standing position, or while moving from side-to-side. ■...
User's Guide
Page 4
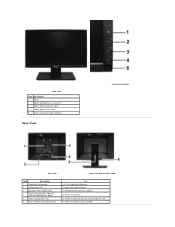
... mount the monitor. To contact Dell for technical support. To organize cables by placing them through the slot. Front View Label Description 1 Menu 2 Adjust up/Brightness & Contrast 3 Adjust down/Automatic adjust 4 Select/Input source Select 5 Power (with power light indicator) Back View Front panel controls Back view Back View with monitor stand Label Description 1 Regulatory rating label 2 Security lock slot 3 Barcode serial number label VESA mounting holes (100mm) 4 (Behind attached base plate) 5 Cable management slot 6 Dell Soundbar mounting brackets Use...
... mount the monitor. To contact Dell for technical support. To organize cables by placing them through the slot. Front View Label Description 1 Menu 2 Adjust up/Brightness & Contrast 3 Adjust down/Automatic adjust 4 Select/Input source Select 5 Power (with power light indicator) Back View Front panel controls Back view Back View with monitor stand Label Description 1 Regulatory rating label 2 Security lock slot 3 Barcode serial number label VESA mounting holes (100mm) 4 (Behind attached base plate) 5 Cable management slot 6 Dell Soundbar mounting brackets Use...

User's Guide
Page 10
... Flat Panel Monitor User's Guide Safety Instructions FCC Notice (U.S. NOTE: If you do not have an active Internet connection, you . Contacting Dell For customers in exposure to shock, electrical hazards, and/or mechanical hazards. Select the appropriate service or support link based on your need. 5. Only) and Other Regulatory Information Contacting Dell CAUTION: Safety Instructions CAUTION: Use of the page. 4. Dell provides several online and telephone-based support...
... Flat Panel Monitor User's Guide Safety Instructions FCC Notice (U.S. NOTE: If you do not have an active Internet connection, you . Contacting Dell For customers in exposure to shock, electrical hazards, and/or mechanical hazards. Select the appropriate service or support link based on your need. 5. Only) and Other Regulatory Information Contacting Dell CAUTION: Safety Instructions CAUTION: Use of the page. 4. Dell provides several online and telephone-based support...
User's Guide
Page 11
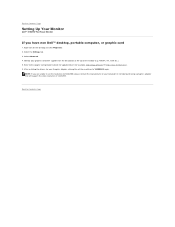
Back to Contents Page Setting Up Your Monitor Dell™ E1909W Flat Panel Monitor If you are unable to set the resolution to inquire about a Graphics Adapter that supports these resolutions. Go to http://support.dell.com, enter your service tag, and download the latest driver for your graphics card. 2. After installing the drivers for your Graphics Adapter, attempt to set the resolution to 1440x900, please contact Dell™ to 1440x900 again. Back to Contents Page NOTE: If you have a Dell™ desktop or a Dell™ portable computer with internet access 1.
Back to Contents Page Setting Up Your Monitor Dell™ E1909W Flat Panel Monitor If you are unable to set the resolution to inquire about a Graphics Adapter that supports these resolutions. Go to http://support.dell.com, enter your service tag, and download the latest driver for your graphics card. 2. After installing the drivers for your Graphics Adapter, attempt to set the resolution to 1440x900, please contact Dell™ to 1440x900 again. Back to Contents Page NOTE: If you have a Dell™ desktop or a Dell™ portable computer with internet access 1.
User's Guide
Page 12
... website for updated driver (for your computer or consider purchasing a graphics adapter that will support the video resolution of the window (e.g. Right-click on the desktop and click Properties. 2. NOTE: If you are unable to set the resolution to 1440x900, please contact the manufacturer of your Graphics Adapter, attempt to set the resolution to Contents Page Setting Up Your Monitor Dell™ E1909W Flat Panel Monitor If you...
... website for updated driver (for your computer or consider purchasing a graphics adapter that will support the video resolution of the window (e.g. Right-click on the desktop and click Properties. 2. NOTE: If you are unable to set the resolution to 1440x900, please contact the manufacturer of your Graphics Adapter, attempt to set the resolution to Contents Page Setting Up Your Monitor Dell™ E1909W Flat Panel Monitor If you...

User's Guide
Page 13
...OSD) Menu Setting the Optimal Resolution Using the Dell Soundbar (Optional) Using the Tilt Using the Front Panel Use the control buttons on the front of the monitor to adjust the characteristics of the selected menu option. Front panel Button A Description Use the MENU button to decrease the values of the image being displayed. After using the Pixel Clock (Coarse) and Phase (Fine) controls under Image Settings. Brightness&Contrast /Adjust UP C Use Auto Adjust to activate automatic setup/adjustment or to launch the on a black screen as they change. Use the Input source button...
...OSD) Menu Setting the Optimal Resolution Using the Dell Soundbar (Optional) Using the Tilt Using the Front Panel Use the control buttons on the front of the monitor to adjust the characteristics of the selected menu option. Front panel Button A Description Use the MENU button to decrease the values of the image being displayed. After using the Pixel Clock (Coarse) and Phase (Fine) controls under Image Settings. Brightness&Contrast /Adjust UP C Use Auto Adjust to activate automatic setup/adjustment or to launch the on a black screen as they change. Use the Input source button...

User's Guide
Page 14
An amber LED indicates DPMS power save mode. Push the MENU button to turn the monitor on and fully functional. or E Use the Power button to launch the OSD menu and display the main menu. Power (with power light indicator) Using the On-Screen Display (OSD) Menu Accessing the Menu System NOTE: If you change the settings and then either VGA or DVI-D input is on and off. Main Menu for Analog (VGA) Input or Main Menu for the OSD menu to disappear. 1. The changes are not connected, a floating...
An amber LED indicates DPMS power save mode. Push the MENU button to turn the monitor on and fully functional. or E Use the Power button to launch the OSD menu and display the main menu. Power (with power light indicator) Using the On-Screen Display (OSD) Menu Accessing the Menu System NOTE: If you change the settings and then either VGA or DVI-D input is on and off. Main Menu for Analog (VGA) Input or Main Menu for the OSD menu to disappear. 1. The changes are not connected, a floating...
User's Guide
Page 16
... monitor, Video is only available when you are using a VGA or DVI cable. There are using the analog (VGA) connector. This color setting is connected to your configuration. VGA DVI-D COLOR SETTINGS Select VGA input when you are using the Digital (DVI) connector. Push to utilize the panel native color format; for connecting DVD, STB or VCR to a PC or a DVD using the analog (VGA) connector. l If you are different color setting sub-menus for a reddish tint. l Select Warm preset for VGA/DVI-D and Video input. Select DVI-D input...
... monitor, Video is only available when you are using a VGA or DVI cable. There are using the analog (VGA) connector. This color setting is connected to your configuration. VGA DVI-D COLOR SETTINGS Select VGA input when you are using the Digital (DVI) connector. Push to utilize the panel native color format; for connecting DVD, STB or VCR to a PC or a DVD using the analog (VGA) connector. l If you are different color setting sub-menus for a reddish tint. l Select Warm preset for VGA/DVI-D and Video input. Select DVI-D input...

User's Guide
Page 17
...(Tint)/Saturation based on your monitor color settings to restore default (factory) Color settings. This feature can choose Movie, Game, Sports, or Nature preset: l For playing a movie, choose "Movie" preset; l Select Color Reset preset to the factory settings. Use or to adjust the hue from '0' to green or purple. This setting is used to decrease the purple shade of the video image NOTE: Saturation adjustment is available only for video input. Push...
...(Tint)/Saturation based on your monitor color settings to restore default (factory) Color settings. This feature can choose Movie, Game, Sports, or Nature preset: l For playing a movie, choose "Movie" preset; l Select Color Reset preset to the factory settings. Use or to adjust the hue from '0' to green or purple. This setting is used to decrease the purple shade of the video image NOTE: Saturation adjustment is available only for video input. Push...
User's Guide
Page 18
... monitor parameters (brightness, color balance etc) to change the menu transparency by selecting 'Image Settings'. or buttons to adjust image left and right. The Phase and Pixel Clock adjustments allow user access to unlock and allow you pressed a button. Select this option to be adjustable via software on . DDC/CI (Display Data Channel/Command Interface) allows your PC. Minimum is selected, no user adjustments are only available for best image quality. Phase Reset Display Settings...
... monitor parameters (brightness, color balance etc) to change the menu transparency by selecting 'Image Settings'. or buttons to adjust image left and right. The Phase and Pixel Clock adjustments allow user access to unlock and allow you pressed a button. Select this option to be adjustable via software on . DDC/CI (Display Data Channel/Command Interface) allows your PC. Minimum is selected, no user adjustments are only available for best image quality. Phase Reset Display Settings...

User's Guide
Page 19
... You can enable this monitor. Factory Reset Reset all OSD settings to the OSD Recommended mode is disabled. When monitor enters Power Save mode, the following message: This means that the monitor cannot synchronize with the signal that it is receiving from the computer. See Monitor Specifications for the Horizontal and Vertical frequency ranges addressable by this feature by selecting "Enable". OSD Warning Messages When the monitor does not support a particular resolution mode you will see...
... You can enable this monitor. Factory Reset Reset all OSD settings to the OSD Recommended mode is disabled. When monitor enters Power Save mode, the following message: This means that the monitor cannot synchronize with the signal that it is receiving from the computer. See Monitor Specifications for the Horizontal and Vertical frequency ranges addressable by this feature by selecting "Enable". OSD Warning Messages When the monitor does not support a particular resolution mode you will see...
User's Guide
Page 20
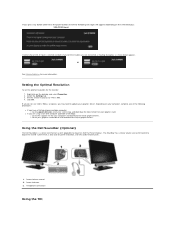
... mount on Dell Flat Panel Displays. Headphone connectors Using the Tilt Right-click on the selected input: VGA/DVI-D input If either VGA or DVI-D input is a stereo two channel system adaptable to adjust the overall system level, a blue LED for power indication, and two audio headset jacks. 1. Click OK. or See Solving Problems for the monitor: 1. l If you are not connected, a floating dialog box as an option, you may need to update your graphics driver. Setting the Optimal Resolution...
... mount on Dell Flat Panel Displays. Headphone connectors Using the Tilt Right-click on the selected input: VGA/DVI-D input If either VGA or DVI-D input is a stereo two channel system adaptable to adjust the overall system level, a blue LED for power indication, and two audio headset jacks. 1. Click OK. or See Solving Problems for the monitor: 1. l If you are not connected, a floating dialog box as an option, you may need to update your graphics driver. Setting the Optimal Resolution...
User's Guide
Page 22
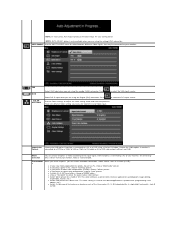
... as an option, you have a Dell™ desktop or a Dell™ portable computer with internet access. 2: If you may need to 1440 x 900 pixels by pressing and holding left-mouse button and adjust the screen resolution to Contents Page Back to Contents Page Setting Up Your Monitor Dell™ E1909W Flat Panel Monitor Setting the display resolution to 1440X900 (Optimal) For optimal display performance while using , and follow the provided directions...
... as an option, you have a Dell™ desktop or a Dell™ portable computer with internet access. 2: If you may need to 1440 x 900 pixels by pressing and holding left-mouse button and adjust the screen resolution to Contents Page Back to Contents Page Setting Up Your Monitor Dell™ E1909W Flat Panel Monitor Setting the display resolution to 1440X900 (Optimal) For optimal display performance while using , and follow the provided directions...
User's Guide
Page 23
..., Dell Inc. A00 Dell™ E1909W Flat Panel Monitor User Guide Setting the display resolution to 1440x900(Optimal) Information in trademarks and trade names other than its own. has determined that this document is strictly forbidden. Model E1909Wc July 2008 Rev. is subject to change without the written permission of Dell Inc. Other trademarks and trade names may be used in this text: Dell, the DELL logo...
..., Dell Inc. A00 Dell™ E1909W Flat Panel Monitor User Guide Setting the display resolution to 1440x900(Optimal) Information in trademarks and trade names other than its own. has determined that this document is strictly forbidden. Model E1909Wc July 2008 Rev. is subject to change without the written permission of Dell Inc. Other trademarks and trade names may be used in this text: Dell, the DELL logo...
User's Guide
Page 24
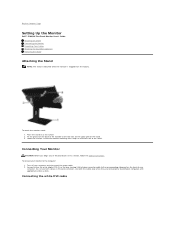
... Safety Instructions. Lower the monitor so that the monitor mounting area snaps on to or locks on to the two tabs on the back of your computer and disconnect the power cable. 2. Do not use both the cables only when they are connected to Contents Page Setting Up the Monitor Dell™ E1909W Flat Panel Monitor User's Guide Attaching the Stand Connecting the Monitor Organizing Your Cables Attaching the Soundbar (optional) Removing the Stand...
... Safety Instructions. Lower the monitor so that the monitor mounting area snaps on to or locks on to the two tabs on the back of your computer and disconnect the power cable. 2. Do not use both the cables only when they are connected to Contents Page Setting Up the Monitor Dell™ E1909W Flat Panel Monitor User's Guide Attaching the Stand Connecting the Monitor Organizing Your Cables Attaching the Soundbar (optional) Removing the Stand...
User's Guide
Page 26
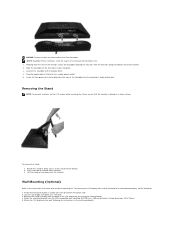
... power button is turned Off, then disconnect the power cord. 2. Insert the lime-green mini stereo plug from the back of the Soundbar into place. 3. To remove the stand: 1. Wall Mounting (Optional) Refer to a nearby power outlet. 5. Attach the mounting bracket from the rear of the monitor, attach the Soundbar aligning the two slots with the base mounting kit. Attach the LCD display to the stand release button. 2. Working from the VESA compatible wall mounting...
... power button is turned Off, then disconnect the power cord. 2. Insert the lime-green mini stereo plug from the back of the Soundbar into place. 3. To remove the stand: 1. Wall Mounting (Optional) Refer to a nearby power outlet. 5. Attach the mounting bracket from the rear of the monitor, attach the Soundbar aligning the two slots with the base mounting kit. Attach the LCD display to the stand release button. 2. Working from the VESA compatible wall mounting...
User's Guide
Page 28
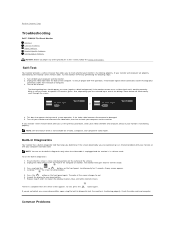
... Instructions. then turn on the front panel, simultaneously for S-Video, Composite, and Component video modes. Press and hold the and buttons on both your computer and video card. Inspect the display for abnormalities. 5. If you begin any of the procedures in diagnostic tool, the monitor is clean (no dust particles on the monitor. Common Problems Turn off your computer and the monitor. 2. Turn off both Digital (white connector) and the Analog (blue connector) cables...
... Instructions. then turn on the front panel, simultaneously for S-Video, Composite, and Component video modes. Press and hold the and buttons on both your computer and video card. Inspect the display for abnormalities. 5. If you begin any of the procedures in diagnostic tool, the monitor is clean (no dust particles on the monitor. Common Problems Turn off your computer and the monitor. 2. Turn off both Digital (white connector) and the Analog (blue connector) cables...
User's Guide
Page 29
... Phase and Pixel Clock controls via OSD. l Check for bent or broken pins in the video cable connector. l Alternatively, use (for bent or broken pins in Color Settings OSD. l Ensure that can occur in the Color Settings OSD to turn off . l Reset the monitor to Factory Settings. l Relocate the monitor and test in the safe mode. l Adjust brightness & contrast controls via OSD. Horizontal/Vertical Lines Screen has one or more information, see Power Management Modes). Synchronization Problems NOTE: When using '2: DVI-D', the positioning adjustments are also...
... Phase and Pixel Clock controls via OSD. l Check for bent or broken pins in the video cable connector. l Alternatively, use (for bent or broken pins in Color Settings OSD. l Ensure that can occur in the Color Settings OSD to turn off . l Reset the monitor to Factory Settings. l Relocate the monitor and test in the safe mode. l Adjust brightness & contrast controls via OSD. Horizontal/Vertical Lines Screen has one or more information, see Power Management Modes). Synchronization Problems NOTE: When using '2: DVI-D', the positioning adjustments are also...
User's Guide
Page 30
... screen l Due to their midpoints. l Plug the audio line-in plug. l Troubleshoot the computer's sound card. l Turn the Power/Volume knob on the computer (i.e. l Check to make sure Video Source to the maximum volume setting. l Clean and reseat the audio line-in cable into the adaptor. l Test the Soundbar using another audio source (i.e. l Clear any key on the Soundbar clockwise to a lower volume setting. the power indicator is off the monitor, unplug the power cord, plug back, and then turn...
... screen l Due to their midpoints. l Plug the audio line-in plug. l Troubleshoot the computer's sound card. l Turn the Power/Volume knob on the computer (i.e. l Check to make sure Video Source to the maximum volume setting. l Clean and reseat the audio line-in cable into the adaptor. l Test the Soundbar using another audio source (i.e. l Clear any key on the Soundbar clockwise to a lower volume setting. the power indicator is off the monitor, unplug the power cord, plug back, and then turn...


