Owner's Manual
Page 7
... the Computer Cover 101 5 Appendix Specifications 103 System Setup 107 Overview 107 Entering System Setup 108 System Setup Options 109 Boot Sequence 113 Clearing Forgotten Passwords 115 Clearing CMOS Settings 116 Cleaning Your Computer 116 Computer, Keyboard, and Monitor 116 Mouse... 117 Floppy Drive 117 CDs and DVDs 117 Dell Technical Support Policy (U.S. Only 118 Definition of "Dell-Installed" Software and Peripherals 118 Definition of "Third-Party" Software and Peripherals 118 FCC Notices (U.S. Only 119...
... the Computer Cover 101 5 Appendix Specifications 103 System Setup 107 Overview 107 Entering System Setup 108 System Setup Options 109 Boot Sequence 113 Clearing Forgotten Passwords 115 Clearing CMOS Settings 116 Cleaning Your Computer 116 Computer, Keyboard, and Monitor 116 Mouse... 117 Floppy Drive 117 CDs and DVDs 117 Dell Technical Support Policy (U.S. Only 118 Definition of "Dell-Installed" Software and Peripherals 118 Definition of "Third-Party" Software and Peripherals 118 FCC Notices (U.S. Only 119...

Owner's Manual
Page 30
... Mode 1 Enter system setup (see "System Setup Options" on page 107). 2 Press the up - and right-arrow keys to exit system setup and resume the boot process. 30 Setting Up and Using Your Computer and down -arrow keys to highlight Drives, and press . 3 Press the up -
... Mode 1 Enter system setup (see "System Setup Options" on page 107). 2 Press the up - and right-arrow keys to exit system setup and resume the boot process. 30 Setting Up and Using Your Computer and down -arrow keys to highlight Drives, and press . 3 Press the up -
Owner's Manual
Page 47
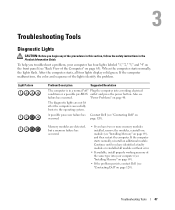
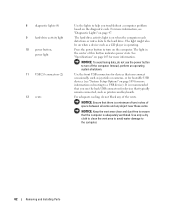
... all four lights display solid green. Also see "Installing Memory" on page 63). Memory modules are not lit after the computer successfully boots to the operating system. When the computer starts normally, the lights flash. After the computer starts, all modules without error. •... malfunctions, the color and sequence of the Computer" on page 69), and then restart the computer. A possible processor failure has Contact Dell (see "Back View of the lights identify the problem. If the computer starts normally, reinstall an additional module. Continue until you have...
... all four lights display solid green. Also see "Installing Memory" on page 63). Memory modules are not lit after the computer successfully boots to the operating system. When the computer starts normally, the lights flash. After the computer starts, all modules without error. •... malfunctions, the color and sequence of the Computer" on page 69), and then restart the computer. A possible processor failure has Contact Dell (see "Back View of the lights identify the problem. If the computer starts normally, reinstall an additional module. Continue until you have...
Owner's Manual
Page 49
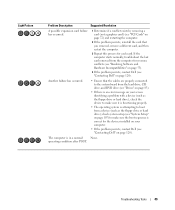
... boot from the computer for each card. Another failure has occurred. • Ensure that the cables are properly connected to make sure it is functioning properly. • The operating system is correct for the devices installed on your computer. • If the problem persists, contact Dell .... 3 Repeat this process for resource conflicts (see "Resolving Software and Hardware Incompatibilities" on page 53). 4 If the problem persists, contact Dell (see "Contacting Dell" on page 120). check system setup (see "System Setup" on page 107) to the system board from the hard drive, CD drive...
... boot from the computer for each card. Another failure has occurred. • Ensure that the cables are properly connected to make sure it is functioning properly. • The operating system is correct for the devices installed on your computer. • If the problem persists, contact Dell .... 3 Repeat this process for resource conflicts (see "Resolving Software and Hardware Incompatibilities" on page 53). 4 If the problem persists, contact Dell (see "Contacting Dell" on page 120). check system setup (see "System Setup" on page 107) to the system board from the hard drive, CD drive...
Owner's Manual
Page 50
... your computer. 2 When the DELL™ logo appears, press immediately. If you wait too long and the operating system logo appears, continue to wait until you see "Turning Off Your Computer" on page 59) and try again. 3 When the boot device list appears, highlight Boot to Utility Partition and press .... 4 When the Dell Diagnostics Main Menu appears, select the test you want to run. If you experience a problem with an error ...
... your computer. 2 When the DELL™ logo appears, press immediately. If you wait too long and the operating system logo appears, continue to wait until you see "Turning Off Your Computer" on page 59) and try again. 3 When the boot device list appears, highlight Boot to Utility Partition and press .... 4 When the Dell Diagnostics Main Menu appears, select the test you want to run. If you experience a problem with an error ...
Owner's Manual
Page 55
...and Maintenance. 3 Click System. 4 Click the System Restore tab. 5 Ensure that appears, click Restore. 4 On the next screen, click Confirm. NOTE: Dell PC Restore by Symantec is complete. 1 Click the Start button, point to All Programs→ Accessories→ System Tools, and then click System Restore. 2 ...Click Undo my last restoration and click Next. Use Dell PC Restore by Symantec NOTICE: Using Dell PC Restore permanently deletes all data on . During the boot process, a blue bar with PC Restore, click Reboot in all countries or on the computer...
...and Maintenance. 3 Click System. 4 Click the System Restore tab. 5 Ensure that appears, click Restore. 4 On the next screen, click Confirm. NOTE: Dell PC Restore by Symantec is complete. 1 Click the Start button, point to All Programs→ Accessories→ System Tools, and then click System Restore. 2 ...Click Undo my last restoration and click Next. Use Dell PC Restore by Symantec NOTICE: Using Dell PC Restore permanently deletes all data on . During the boot process, a blue bar with PC Restore, click Reboot in all countries or on the computer...
Owner's Manual
Page 62
... to help you connect occasionally, such as joysticks or cameras, or for bootable USB devices (see "Diagnostic Lights" on page 103 for more information on booting to a USB device).
... to help you connect occasionally, such as joysticks or cameras, or for bootable USB devices (see "Diagnostic Lights" on page 103 for more information on booting to a USB device).

Owner's Manual
Page 83
... for information on configuring devices for the cable select setting, the device attached to the last connector on the interface cable is the master or boot device (drive 0), and the device attached to a single IDE interface cable and configure them for the cable select setting. IDE Drive Addressing When you connect...
... for information on configuring devices for the cable select setting, the device attached to the last connector on the interface cable is the master or boot device (drive 0), and the device attached to a single IDE interface cable and configure them for the cable select setting. IDE Drive Addressing When you connect...
Owner's Manual
Page 106
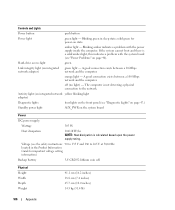
... dissipation 1041 BTU/hr NOTE: Heat dissipation is a solid amber light, this indicates a problem with the power supply inside the computer. If the system cannot boot and there is calculated based upon the power supply rating. The computer is not detecting a physical connection to 265 V at 50/60 Hz located in...
... dissipation 1041 BTU/hr NOTE: Heat dissipation is a solid amber light, this indicates a problem with the power supply inside the computer. If the system cannot boot and there is calculated based upon the power supply rating. The computer is not detecting a physical connection to 265 V at 50/60 Hz located in...
Owner's Manual
Page 109
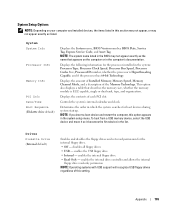
...computer, this setting. enables the internal floppy drive • Read Only - System System Info Processor Info Memory Info PCI Info Date/Time Boot Sequence (Diskette drive default) Displays the System name, BIOS Version number, BIOS Date, Service Tag, Express Service Code, and Asset Tag.... Displays the following information for boot devices during system startup. enables the USB floppy drive • Internal - NOTE: The system name listed in the system: Processor Type, Processor...
...computer, this setting. enables the internal floppy drive • Read Only - System System Info Processor Info Memory Info PCI Info Date/Time Boot Sequence (Diskette drive default) Displays the System name, BIOS Version number, BIOS Date, Service Tag, Express Service Code, and Asset Tag.... Displays the following information for boot devices during system startup. enables the USB floppy drive • Internal - NOTE: The system name listed in the system: Processor Type, Processor...
Owner's Manual
Page 110
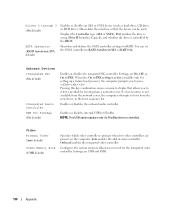
... (On default) Integrated Audio Controller USB for FlexBay. When the On w/PXE setting is active (available only for setting up a future boot process), the computer prompts you to press . Pressing this key combination causes a menu to display that the device can set the SATA controller ...to boot from a network server. Enables or disables the onboard audio controller. If a boot routine is primary when two video controllers are 1MB and 8MB. 110 Appendix Enables or disables internal USB...
... (On default) Integrated Audio Controller USB for FlexBay. When the On w/PXE setting is active (available only for setting up a future boot process), the computer prompts you to press . Pressing this key combination causes a menu to display that the device can set the SATA controller ...to boot from a network server. Enables or disables the onboard audio controller. If a boot routine is primary when two video controllers are 1MB and 8MB. 110 Appendix Enables or disables internal USB...

Owner's Manual
Page 113
...sign-on the right side of the screen, press . If no CD is bootable, check the device documentation. NOTE: To boot to change the boot sequence for devices. commands the right keypad keys to function as arrows • On - displays the Quickboot message only (F12...Insert the memory device into a USB port and restart the computer. POST Behavior Fastboot (On default) Numlock Key (On default) POST Hotkeys (Setup & Boot Menu default) Keyboard Errors (Report default) When enabled, this feature reduces computer startup time by bypassing some compatibility steps. • Off - starts the ...
...sign-on the right side of the screen, press . If no CD is bootable, check the device documentation. NOTE: To boot to change the boot sequence for devices. commands the right keypad keys to function as arrows • On - displays the Quickboot message only (F12...Insert the memory device into a USB port and restart the computer. POST Behavior Fastboot (On default) Numlock Key (On default) POST Hotkeys (Setup & Boot Menu default) Keyboard Errors (Report default) When enabled, this feature reduces computer startup time by bypassing some compatibility steps. • Off - starts the ...
Owner's Manual
Page 114
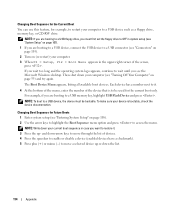
... appears in the upper-right corner of the screen, press . The Boot Device Menu appears, listing all available boot devices. Changing Boot Sequence for Future Boots 1 Enter system setup (see "Turning Off Your Computer" on page 107). 1 If you are booting to a USB device, connect the USB device to move a selected device up -... NOTE: Write down your computer (see "Entering System Setup" on (or restart) your device is to access the menu. For example, if you are booting to a USB floppy drive, you see "Connectors" on page 105). 2 Turn on page 108). 2 Use the arrow keys to highlight the...
... appears in the upper-right corner of the screen, press . The Boot Device Menu appears, listing all available boot devices. Changing Boot Sequence for Future Boots 1 Enter system setup (see "Turning Off Your Computer" on page 107). 1 If you are booting to a USB device, connect the USB device to move a selected device up -... NOTE: Write down your computer (see "Entering System Setup" on (or restart) your device is to access the menu. For example, if you are booting to a USB floppy drive, you see "Connectors" on page 105). 2 Turn on page 108). 2 Use the arrow keys to highlight the...
Owner's Manual
Page 139
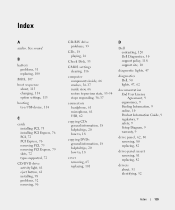
See sound B battery problems, 31 replacing, 100 BIOS, 107 boot sequence about, 113 changing, 114 option settings, 113 booting to a USB device, 114 C cards installing PCI, 73 installing PCI Express, 76 PCI, 72 PCI Express, 76 removing PCI, 75 removing PCI...to, 18 copying DVDs general information, 18 helpful tips, 20 how to, 18 cover removing, 65 replacing, 101 D Dell contacting, 120 Dell Diagnostics, 50 support policy, 118 support site, 10 diagnostic lights, 47 diagnostics Dell, 50 lights, 47, 62 documentation End User License Agreement, 9 ergonomics, 9 Finding Information, 9 online, 10 Product ...
See sound B battery problems, 31 replacing, 100 BIOS, 107 boot sequence about, 113 changing, 114 option settings, 113 booting to a USB device, 114 C cards installing PCI, 73 installing PCI Express, 76 PCI, 72 PCI Express, 76 removing PCI, 75 removing PCI...to, 18 copying DVDs general information, 18 helpful tips, 20 how to, 18 cover removing, 65 replacing, 101 D Dell contacting, 120 Dell Diagnostics, 50 support policy, 118 support site, 10 diagnostic lights, 47 diagnostics Dell, 50 lights, 47, 62 documentation End User License Agreement, 9 ergonomics, 9 Finding Information, 9 online, 10 Product ...
Owner's Manual
Page 142
...107 expansion bus, 104 memory, 103 specifications (continued) physical, 106 power, 106 processor, 103 technical, 103 video, 104 standby mode, 25 support contacting Dell, 120 policy, 118 support website, 10 system board, 67 System Restore, 53-54 system setup about, 107 entering, 108 options, 109 screens, 108 ...47 Hardware Troubleshooter, 53 Help and Support Center, 11 restore to previous state, 53-54 tips, 31 TV connect to computer, 21, 23 U USB booting to devices, 114 connectors, 62 V vents, 62 front panel, 62 volume adjusting, 43 W warranty information, 9 Windows XP Device Driver Rollback, 52...
...107 expansion bus, 104 memory, 103 specifications (continued) physical, 106 power, 106 processor, 103 technical, 103 video, 104 standby mode, 25 support contacting Dell, 120 policy, 118 support website, 10 system board, 67 System Restore, 53-54 system setup about, 107 entering, 108 options, 109 screens, 108 ...47 Hardware Troubleshooter, 53 Help and Support Center, 11 restore to previous state, 53-54 tips, 31 TV connect to computer, 21, 23 U USB booting to devices, 114 connectors, 62 V vents, 62 front panel, 62 volume adjusting, 43 W warranty information, 9 Windows XP Device Driver Rollback, 52...

Service Manual
Page 7
... is transmitting or receiving light network data. On computers with a sound card, the microphone connector is on computers with a sound card, use the connector on booting to attach a personal computer microphone for your monitor has a VGA connector, plug it into a sound or telephony program. Inside View of Your Computer CAUTION: Before...
... is transmitting or receiving light network data. On computers with a sound card, the microphone connector is on computers with a sound card, use the connector on booting to attach a personal computer microphone for your monitor has a VGA connector, plug it into a sound or telephony program. Inside View of Your Computer CAUTION: Before...
Service Manual
Page 15
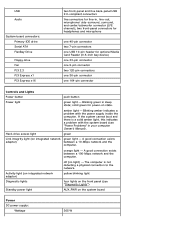
.../subwoofer connector (LFE channel); amber light - Activity light (on state. solid green for power-on integrated network adapter) off (no light) - If the system cannot boot and there is not detecting a physical connection to the network. Blinking amber indicates a problem with the system board (see "Diagnostic Lights") AUX_PWR on integrated network...
.../subwoofer connector (LFE channel); amber light - Activity light (on state. solid green for power-on integrated network adapter) off (no light) - If the system cannot boot and there is not detecting a physical connection to the network. Blinking amber indicates a problem with the system board (see "Diagnostic Lights") AUX_PWR on integrated network...

Service Manual
Page 34
... drives 1 CD/DVD drive(s) 2 FlexBay for the cable select setting, the device attached to the last connector on the interface cable is the master or boot device (drive 0), and the device attached to the connectors labeled "SATA0" or "SATA2" on the system board.
... drives 1 CD/DVD drive(s) 2 FlexBay for the cable select setting, the device attached to the last connector on the interface cable is the master or boot device (drive 0), and the device attached to the connectors labeled "SATA0" or "SATA2" on the system board.
Service Manual
Page 60
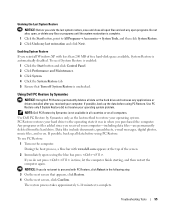
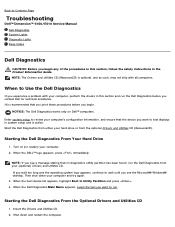
... your computer's configuration information, and ensure that you print these procedures before you contact Dell for technical assistance. When the boot device list appears, highlight Boot to review your (optional) Drivers and Utilities CD. Insert the Drivers and Utilities CD...and restart the computer. Starting the Dell Diagnostics From the Optional Drivers and Utilities CD 1. Back to Contents Page Troubleshooting Dell™ Dimension™ 5150/E510 Service Manual Dell Diagnostics System Lights Diagnostic Lights Beep Codes Dell Diagnostics CAUTION: Before you begin any...
... your computer's configuration information, and ensure that you print these procedures before you contact Dell for technical assistance. When the boot device list appears, highlight Boot to review your (optional) Drivers and Utilities CD. Insert the Drivers and Utilities CD...and restart the computer. Starting the Dell Diagnostics From the Optional Drivers and Utilities CD 1. Back to Contents Page Troubleshooting Dell™ Dimension™ 5150/E510 Service Manual Dell Diagnostics System Lights Diagnostic Lights Beep Codes Dell Diagnostics CAUTION: Before you begin any...

Service Manual
Page 61
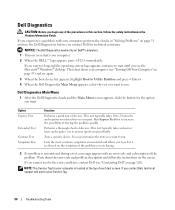
... to select a test based on the symptom of tracing the problem quickly. When the DELL logo appears, press immediately. On the next start-up, the computer boots according to increase the possibility of the Tree problem you want to answer Test questions periodically... the ResourceCD menu. 7. Type 2 to start the Dell Diagnostics. 8. If multiple versions are having. 2. Dell Diagnostics Main Menu 1. Option Function Express Performs a quick test of the problem. This test typically takes 10 to run a test from the CD boot menu. 5. Custom Tests a specific device. You can...
... to select a test based on the symptom of tracing the problem quickly. When the DELL logo appears, press immediately. On the next start-up, the computer boots according to increase the possibility of the Tree problem you want to answer Test questions periodically... the ResourceCD menu. 7. Type 2 to start the Dell Diagnostics. 8. If multiple versions are having. 2. Dell Diagnostics Main Menu 1. Option Function Express Performs a quick test of the problem. This test typically takes 10 to run a test from the CD boot menu. 5. Custom Tests a specific device. You can...

