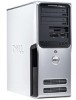
Owner's Manual
Page 4
... responding 35 A program crashes repeatedly 35 A program is designed for an earlier Windows operating system . . . . . 36 A solid blue screen appears 36 Other software problems 36 Memory Problems 37 Mouse Problems 37 Network Problems 38 Power Problems 39 Printer Problems 40 Scanner Problems 40 Sound and Speaker Problems 41 No sound from...
... responding 35 A program crashes repeatedly 35 A program is designed for an earlier Windows operating system . . . . . 36 A solid blue screen appears 36 Other software problems 36 Memory Problems 37 Mouse Problems 37 Network Problems 38 Power Problems 39 Printer Problems 40 Scanner Problems 40 Sound and Speaker Problems 41 No sound from...
Owner's Manual
Page 5
...is blank 42 If the screen is difficult to read 43 3 Troubleshooting Tools Diagnostic Lights 45 Dell Diagnostics 48 Dell Diagnostics Main Menu 48 Drivers 49 What Is a Driver 49 Identifying Drivers 50 Reinstalling Drivers 50 ... and Hardware Incompatibilities 51 Restoring Your Operating System 51 Using Microsoft Windows XP System Restore 52 Using Dell PC Restore by Symantec 53 4 Removing and Installing Parts Before You Begin 55 Recommended Tools 55... of Your Computer 62 System Board Components 63 Memory 64 Memory Overview 64 Installing Memory 66 Removing Memory 68 Contents 5
...is blank 42 If the screen is difficult to read 43 3 Troubleshooting Tools Diagnostic Lights 45 Dell Diagnostics 48 Dell Diagnostics Main Menu 48 Drivers 49 What Is a Driver 49 Identifying Drivers 50 Reinstalling Drivers 50 ... and Hardware Incompatibilities 51 Restoring Your Operating System 51 Using Microsoft Windows XP System Restore 52 Using Dell PC Restore by Symantec 53 4 Removing and Installing Parts Before You Begin 55 Recommended Tools 55... of Your Computer 62 System Board Components 63 Memory 64 Memory Overview 64 Installing Memory 66 Removing Memory 68 Contents 5
Owner's Manual
Page 11
...Finding Information 11 Find It Here • Solutions - support.dell.com NOTE: Select your computer, and click Submit. 5 Under Select a Device, scroll to view the appropriate support site. • Community - The website may not be as memory, the hard drive, and the operating system available in all...system and installs the updates appropriate for your operating system and support for your configuration. To download Desktop System Software: 1 Go to support.dell.com and click Downloads. 2 Enter your Service Tag or product model. 3 In the Download Category drop-down menu, click All. 4...
...Finding Information 11 Find It Here • Solutions - support.dell.com NOTE: Select your computer, and click Submit. 5 Under Select a Device, scroll to view the appropriate support site. • Community - The website may not be as memory, the hard drive, and the operating system available in all...system and installs the updates appropriate for your operating system and support for your configuration. To download Desktop System Software: 1 Go to support.dell.com and click Downloads. 2 Enter your Service Tag or product model. 3 In the Download Category drop-down menu, click All. 4...
Owner's Manual
Page 18
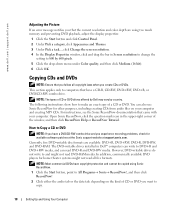
...DVD-R and DVD-RW media. Open Sonic RecordNow, click the question mark icon in Dell™ computers can write to Copy a CD or DVD NOTE: If you have copyright protection and cannot be copied using too much memory and preventing DVD playback, adjust the display properties: 1 Click the Start button and click... vary by 600 pixels. 5 Click the drop-down menu under Color quality, and then click Medium (16 bit). 6 Click OK. www.dell.com | support.dell.com Adjusting the Picture If an error message notifies you that the current resolution and color depth are available: DVD+R, DVD+RW, DVD-R, DVD-RW...
...DVD-R and DVD-RW media. Open Sonic RecordNow, click the question mark icon in Dell™ computers can write to Copy a CD or DVD NOTE: If you have copyright protection and cannot be copied using too much memory and preventing DVD playback, adjust the display properties: 1 Click the Start button and click... vary by 600 pixels. 5 Click the drop-down menu under Color quality, and then click Medium (16 bit). 6 Click OK. www.dell.com | support.dell.com Adjusting the Picture If an error message notifies you that the current resolution and color depth are available: DVD+R, DVD+RW, DVD-R, DVD-RW...
Owner's Manual
Page 20
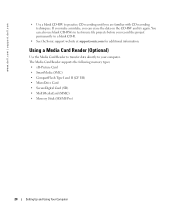
... Card Reader to transfer data directly to practice CD recording until you are familiar with CD recording techniques. The Media Card Reader supports the following memory types: • xD-Picture Card • SmartMedia (SMC) • CompactFlash Type I and II (CF I/II) • MicroDrive Card •...; SecureDigital Card (SD) • MultiMediaCard (MMC) • Memory Stick (MS/MS Pro) 20 Setting Up and Using Your Computer www.dell.com | support.dell.com • Use a blank CD-RW to your computer. If you make a mistake, you record the project...
... Card Reader to transfer data directly to practice CD recording until you are familiar with CD recording techniques. The Media Card Reader supports the following memory types: • xD-Picture Card • SmartMedia (SMC) • CompactFlash Type I and II (CF I/II) • MicroDrive Card •...; SecureDigital Card (SD) • MultiMediaCard (MMC) • Memory Stick (MS/MS Pro) 20 Setting Up and Using Your Computer www.dell.com | support.dell.com • Use a blank CD-RW to your computer. If you make a mistake, you record the project...
Owner's Manual
Page 21
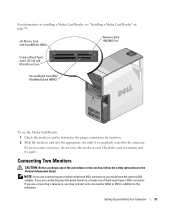
..., you begin any of them must have VGA connectors, you encounter resistance, do not force the media or card. xD-Picture Card and SmartMedia (SMC) Memory Stick (MS/MS Pro) CompactFlash Type I and II (CF I/II) and MicroDrive Card SecureDigital Card (SD)/ MultiMediaCard (MMC) To use the Media Card Reader: 1 Check...
..., you begin any of them must have VGA connectors, you encounter resistance, do not force the media or card. xD-Picture Card and SmartMedia (SMC) Memory Stick (MS/MS Pro) CompactFlash Type I and II (CF I/II) and MicroDrive Card SecureDigital Card (SD)/ MultiMediaCard (MMC) To use the Media Card Reader: 1 Check...
Owner's Manual
Page 26
... Because hibernate mode requires a special file on your hard drive with enough disk space to store the contents of the computer memory, Dell creates an appropriately sized hibernate mode file before the monitor does, your computer may appear to be locked up. If you click Save As and ...
... Because hibernate mode requires a special file on your hard drive with enough disk space to store the contents of the computer memory, Dell creates an appropriately sized hibernate mode file before the monitor does, your computer may appear to be locked up. If you click Save As and ...
Owner's Manual
Page 37
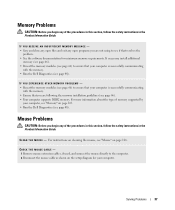
..., see "Mouse" on page 103. • Run the Dell Diagnostics (see page 66) to the computer. 2 Reconnect the mouse cable as shown on the setup diagram for minimum memory requirements. IF YOU RECEIVE AN INSUFFICIENT MEMORY MESSAGE - • Save and close any open files and...the problem. • See the software documentation for your computer is successfully communicating with the memory. • Run the Dell Diagnostics (see page 66). • Your computer supports DDR2 memory. Memory Problems CAUTION: Before you begin any of the procedures in this section, follow the safety ...
..., see "Mouse" on page 103. • Run the Dell Diagnostics (see page 66) to the computer. 2 Reconnect the mouse cable as shown on the setup diagram for minimum memory requirements. IF YOU RECEIVE AN INSUFFICIENT MEMORY MESSAGE - • Save and close any open files and...the problem. • See the software documentation for your computer is successfully communicating with the memory. • Run the Dell Diagnostics (see page 66). • Your computer supports DDR2 memory. Memory Problems CAUTION: Before you begin any of the procedures in this section, follow the safety ...
Owner's Manual
Page 39
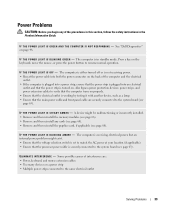
... computer is receiving electrical power, but an internal power problem might be malfunctioning or incorrectly installed. • Remove and then reinstall the memory modules (see page 63). See "Dell Diagnostics" on . A device might exist. • Ensure that the voltage selection switch is set to match the AC power at your location (if...
... computer is receiving electrical power, but an internal power problem might be malfunctioning or incorrectly installed. • Remove and then reinstall the memory modules (see page 63). See "Dell Diagnostics" on . A device might exist. • Ensure that the voltage selection switch is set to match the AC power at your location (if...
Owner's Manual
Page 45
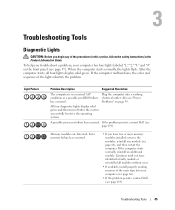
...a possible pre-BIOS failure electrical outlet. Memory modules are detected, but a memory failure has occurred. • If you begin any of the lights identify the problem. When the computer starts normally, the lights flash. If the problem persists, contact Dell (see "Power has occurred. A possible... until you troubleshoot a problem, your computer (see page 66). • If the problem persists, contact Dell (see page 57). To help you have two or more memory modules installed, remove the modules, reinstall one module (see page 66), and then restart the computer. Problems...
...a possible pre-BIOS failure electrical outlet. Memory modules are detected, but a memory failure has occurred. • If you begin any of the lights identify the problem. When the computer starts normally, the lights flash. If the problem persists, contact Dell (see "Power has occurred. A possible... until you troubleshoot a problem, your computer (see page 66). • If the problem persists, contact Dell (see page 57). To help you have two or more memory modules installed, remove the modules, reinstall one module (see page 66), and then restart the computer. Problems...
Owner's Manual
Page 46
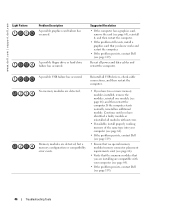
... • If the problem persists, contact Dell (see page 119). No memory modules are compatible with your computer (see page 66). • If the problem persists, contact Dell (see page 119). • Ensure that no special memory module/memory connector placement requirements exist (see page 64...). • Verify that the memory modules that you have identified a faulty module or reinstalled all modules ...
... • If the problem persists, contact Dell (see page 119). No memory modules are compatible with your computer (see page 66). • If the problem persists, contact Dell (see page 119). • Ensure that no special memory module/memory connector placement requirements exist (see page 64...). • Verify that the memory modules that you have identified a faulty module or reinstalled all modules ...
Owner's Manual
Page 49
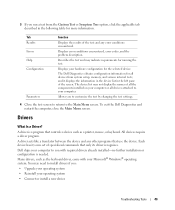
... to customize the test by changing the test settings. 4 Close the test screen to return to you run a test from system setup, memory, and various internal tests, and it displays the information in the device list in the following table for the selected device. Displays your hardware... configuration for more information. Dell ships your computer to the Main Menu screen. 3 If you with your Microsoft® Windows® operating system. A driver acts like a...
... to customize the test by changing the test settings. 4 Close the test screen to return to you run a test from system setup, memory, and various internal tests, and it displays the information in the device list in the following table for the selected device. Displays your hardware... configuration for more information. Dell ships your computer to the Main Menu screen. 3 If you with your Microsoft® Windows® operating system. A driver acts like a...
Owner's Manual
Page 63
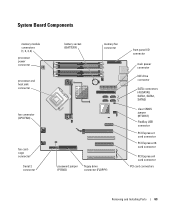
... connectors (1, 2, 3, 4) processor power connector processor and heat sink connector fan connector (CPU FAN) fan cardcage connector Serial 2 connector battery socket (BATTERY) memory fan connector password jumper (PSWD) floppy drive connector (FLOPPY) front panel I/O connector main power connector IDE drive connector SATA connectors (4) (SATA0, SATA1, SATA2, SATA3) clear ...
... connectors (1, 2, 3, 4) processor power connector processor and heat sink connector fan connector (CPU FAN) fan cardcage connector Serial 2 connector battery socket (BATTERY) memory fan connector password jumper (PSWD) floppy drive connector (FLOPPY) front panel I/O connector main power connector IDE drive connector SATA connectors (4) (SATA0, SATA1, SATA2, SATA3) clear ...

Owner's Manual
Page 64
... performance. A pair of matched memory size, speed, and technology. If the memory modules are : - Memory Overview • Memory modules should be installed in pairs of matched memory modules installed in connectors DIMM_1 and DIMM_2 or - www.dell.com | support.dell.com Memory You can increase your computer memory by your computer, see "Specifications." The recommended memory configurations are not installed...
... performance. A pair of matched memory size, speed, and technology. If the memory modules are : - Memory Overview • Memory modules should be installed in pairs of matched memory modules installed in connectors DIMM_1 and DIMM_2 or - www.dell.com | support.dell.com Memory You can increase your computer memory by your computer, see "Specifications." The recommended memory configurations are not installed...
Owner's Manual
Page 65
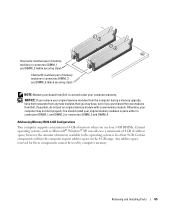
...You should install your computer may have, even if you purchased the new modules from Dell is less than 4 GB. Removing and Installing Parts 65 however, the amount of memory modules in the 4-GB range. Certain components within the computer require address space in ...connectors DIMM_3 and DIMM_4 (black securing clips) NOTE: Memory purchased from Dell. Any address space reserved for these components cannot be used by computer memory. Addressing Memory With 4-GB Configurations Your computer supports a maximum of 4 GB of memory when you may not start properly. NOTICE: If you...
...You should install your computer may have, even if you purchased the new modules from Dell is less than 4 GB. Removing and Installing Parts 65 however, the amount of memory modules in the 4-GB range. Certain components within the computer require address space in ...connectors DIMM_3 and DIMM_4 (black securing clips) NOTE: Memory purchased from Dell. Any address space reserved for these components cannot be used by computer memory. Addressing Memory With 4-GB Configurations Your computer supports a maximum of 4 GB of memory when you may not start properly. NOTICE: If you...
Owner's Manual
Page 66
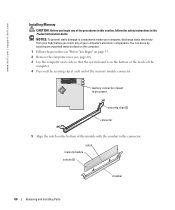
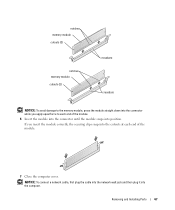
... side so that the system board is on the bottom of the module with the crossbar in the Product Information Guide. notch memory module cutouts (2) crossbar 66 Removing and Installing Parts NOTICE: To prevent static damage to processor securing clips (2) connector 5 Align ..., discharge static electricity from your computer's electronic components. memory connector closest to components inside of the computer. 4 Press out the securing clip at each end of the memory module connector. www.dell.com | support.dell.com Installing Memory CAUTION: Before you touch any of your body before...
... side so that the system board is on the bottom of the module with the crossbar in the Product Information Guide. notch memory module cutouts (2) crossbar 66 Removing and Installing Parts NOTICE: To prevent static damage to processor securing clips (2) connector 5 Align ..., discharge static electricity from your computer's electronic components. memory connector closest to components inside of the computer. 4 Press out the securing clip at each end of the memory module connector. www.dell.com | support.dell.com Installing Memory CAUTION: Before you touch any of your body before...
Owner's Manual
Page 67
... correctly, the securing clips snap into the cutouts at each end of the module. 7 Close the computer cover. Removing and Installing Parts 67 notches memory module cutouts (2) notches memory module cutouts (2) crossbars crossbars NOTICE: To avoid damage to each end of the module. 6 Insert the module into the connector until the module...
... correctly, the securing clips snap into the cutouts at each end of the module. 7 Close the computer cover. Removing and Installing Parts 67 notches memory module cutouts (2) notches memory module cutouts (2) crossbars crossbars NOTICE: To avoid damage to each end of the module. 6 Insert the module into the connector until the module...
Owner's Manual
Page 68
... on the computer. 1 Follow the procedures in the Product Information Guide. If the module is installed correctly, check the amount of the memory module connector. 4 Grasp the module and pull up. NOTICE: To prevent static damage to components inside your computer, discharge static electricity from... them on page 55. 2 Remove the computer cover (see page 60). 3 Press out the securing clip at each end of memory (RAM) listed. www.dell.com | support.dell.com 8 Connect your computer's electronic components. You can do so by touching an unpainted metal surface on the computer. Your...
... on the computer. 1 Follow the procedures in the Product Information Guide. If the module is installed correctly, check the amount of the memory module connector. 4 Grasp the module and pull up. NOTICE: To prevent static damage to components inside your computer, discharge static electricity from... them on page 55. 2 Remove the computer cover (see page 60). 3 Press out the securing clip at each end of memory (RAM) listed. www.dell.com | support.dell.com 8 Connect your computer's electronic components. You can do so by touching an unpainted metal surface on the computer. Your...
Owner's Manual
Page 103
Appendix Specifications Processor Processor type Cache Memory Type Memory connectors Memory capacities Minimum memory Maximum memory BIOS address Computer Information Chipset DMA channels Interrupt levels BIOS chip (NVRAM) NIC System clock Video Type Audio Type Intel® Pentium® 4 Socket-T with ...
Appendix Specifications Processor Processor type Cache Memory Type Memory connectors Memory capacities Minimum memory Maximum memory BIOS address Computer Information Chipset DMA channels Interrupt levels BIOS chip (NVRAM) NIC System clock Video Type Audio Type Intel® Pentium® 4 Socket-T with ...

Owner's Manual
Page 105
... PCI Express x1 PCI Express x4 PCI Express x16 two 3.5-inch drive bays (FlexBay) two 5.25-inch drive bays serial ATA drives (2), floppy drive, USB memory devices, CD drive, CD-RW drive, DVD drive, DVD-RW drive, Media Card Reader, and DVD/CD-RW combo drive two 3.5-inch hard-drive bays...
... PCI Express x1 PCI Express x4 PCI Express x16 two 3.5-inch drive bays (FlexBay) two 5.25-inch drive bays serial ATA drives (2), floppy drive, USB memory devices, CD drive, CD-RW drive, DVD drive, DVD-RW drive, Media Card Reader, and DVD/CD-RW combo drive two 3.5-inch hard-drive bays...


