

Dell Dimension 4300S Owner's Manual
Page 5
... 53 Restoring the Computer to an Earlier Operating State 54 Undoing the Last System Restore 55 Reinstalling Windows XP 55 Reinstalling Windows 2000 57 3 Adding Parts Front and Back View of the Computer 60 Opening the Computer Cover 61 Looking Inside Your Computer 63 System Board 64 Adding Cards 65 Adding...
... 53 Restoring the Computer to an Earlier Operating State 54 Undoing the Last System Restore 55 Reinstalling Windows XP 55 Reinstalling Windows 2000 57 3 Adding Parts Front and Back View of the Computer 60 Opening the Computer Cover 61 Looking Inside Your Computer 63 System Board 64 Adding Cards 65 Adding...

Dell Dimension 4300S Owner's Manual
Page 49
...Roll Back Driver. To view other contents on the screen. Otherwise, your computer. If you cannot reinstall your previous driver with that are not part of your operating system. HINT: The ResourceCD displays drivers only for hardware that driver is not required by your computer. If you select Drivers in... the Topic list and a particular driver is not listed, then that Dell installed at the time of device in the Topic list. If you install a new device driver that driver is not required by the ResourceCD...
...Roll Back Driver. To view other contents on the screen. Otherwise, your computer. If you cannot reinstall your previous driver with that are not part of your operating system. HINT: The ResourceCD displays drivers only for hardware that driver is not required by your computer. If you select Drivers in... the Topic list and a particular driver is not listed, then that Dell installed at the time of device in the Topic list. If you install a new device driver that driver is not required by the ResourceCD...
Dell Dimension 4300S Owner's Manual
Page 60
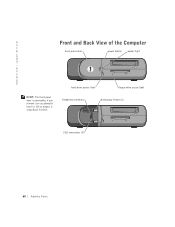
www.dell.com | support.dell.com front-panel door power button power light HINT: The front-panel door is removable; hard-drive access light floppy-drive access light headphone connector breakaway hinges (2) USB connectors (2) 60 Adding Parts if you remove it or accidentally knock it off its hinges, it snaps back in place.
www.dell.com | support.dell.com front-panel door power button power light HINT: The front-panel door is removable; hard-drive access light floppy-drive access light headphone connector breakaway hinges (2) USB connectors (2) 60 Adding Parts if you remove it or accidentally knock it off its hinges, it snaps back in place.
Dell Dimension 4300S Owner's Manual
Page 61
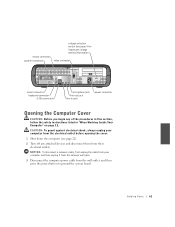
... electrical shock, always unplug your computer and then unplug it from the network wall jack. 3 Disconnect the computer power cable from their electrical outlets. Adding Parts 61 NOTICE: To disconnect a network cable, first unplug the cable from your computer from the electrical outlet before opening the cover. 1 Shut down the computer...
... electrical shock, always unplug your computer and then unplug it from the network wall jack. 3 Disconnect the computer power cable from their electrical outlets. Adding Parts 61 NOTICE: To disconnect a network cable, first unplug the cable from your computer from the electrical outlet before opening the cover. 1 Shut down the computer...
Dell Dimension 4300S Owner's Manual
Page 62
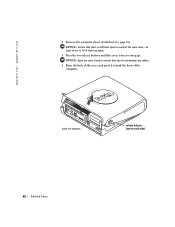
back of the computer. NOTICE: Open the cover slowly to swing up. NOTICE: Ensure that there is sufficient space to support the open cover-at least 30 cm (1 ft) of desk top space. 5 Press the two release buttons until the cover is free to ensure that you do not damage any cables. 6 Raise the back of the cover, and pivot it toward the front of computer release buttons (one on each side) 62 Adding Parts www.dell.com | support.dell.com 4 Remove the computer stand, if attached (see page 16).
back of the computer. NOTICE: Open the cover slowly to swing up. NOTICE: Ensure that there is sufficient space to support the open cover-at least 30 cm (1 ft) of desk top space. 5 Press the two release buttons until the cover is free to ensure that you do not damage any cables. 6 Raise the back of the cover, and pivot it toward the front of computer release buttons (one on each side) 62 Adding Parts www.dell.com | support.dell.com 4 Remove the computer stand, if attached (see page 16).
Dell Dimension 4300S Owner's Manual
Page 63
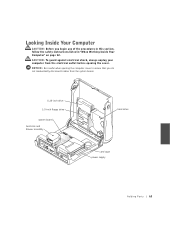
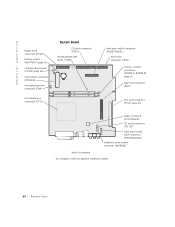
NOTICE: Be careful when opening the cover. CAUTION: To guard against electrical shock, always unplug your computer from the system board. 5.25-inch drive 3.5-inch floppy drive system board heat sink and blower assembly hard drive card cage power supply Adding Parts 63 CAUTION: Before you do not inadvertently disconnect cables from the electrical outlet before opening the computer cover to ensure that you begin any of the procedures in this section, follow the safety instructions listed in "When Working Inside Your Computer" on page 12.
NOTICE: Be careful when opening the cover. CAUTION: To guard against electrical shock, always unplug your computer from the system board. 5.25-inch drive 3.5-inch floppy drive system board heat sink and blower assembly hard drive card cage power supply Adding Parts 63 CAUTION: Before you do not inadvertently disconnect cables from the electrical outlet before opening the computer cover to ensure that you begin any of the procedures in this section, follow the safety instructions listed in "When Working Inside Your Computer" on page 12.
Dell Dimension 4300S Owner's Manual
Page 64
www.dell.com | support.dell.com floppy drive connector (DSKT) battery socket (BATTERY) page 81 configuration jumper (PSWD) page 80 main power connector (POWER) microprocessor fan connector (FAN) microprocessor connector (... (CD IN)* front panel audio cable connector (FRONTAUDIO) telephony voice modem connector (MODEM)* back of computer * On computers with the optional telephony modem 64 Adding Parts
www.dell.com | support.dell.com floppy drive connector (DSKT) battery socket (BATTERY) page 81 configuration jumper (PSWD) page 80 main power connector (POWER) microprocessor fan connector (FAN) microprocessor connector (... (CD IN)* front panel audio cable connector (FRONTAUDIO) telephony voice modem connector (MODEM)* back of computer * On computers with the optional telephony modem 64 Adding Parts
Dell Dimension 4300S Owner's Manual
Page 65
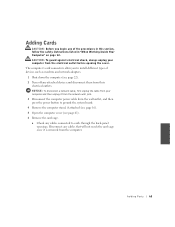
..., if attached (see page 16). 5 Open the computer cover (see page 22). 2 Turn off any attached devices and disconnect them from their electrical outlets. Adding Parts 65 CAUTION: Before you to install different types of the procedures in this section, follow the safety instructions listed in "When Working Inside Your Computer...
..., if attached (see page 16). 5 Open the computer cover (see page 22). 2 Turn off any attached devices and disconnect them from their electrical outlets. Adding Parts 65 CAUTION: Before you to install different types of the procedures in this section, follow the safety instructions listed in "When Working Inside Your Computer...
Dell Dimension 4300S Owner's Manual
Page 66
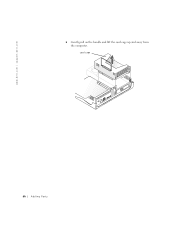
www.dell.com | support.dell.com b Gently pull on the handle and lift the card cage up and away from the computer. card cage 66 Adding Parts
www.dell.com | support.dell.com b Gently pull on the handle and lift the card cage up and away from the computer. card cage 66 Adding Parts
Dell Dimension 4300S Owner's Manual
Page 67
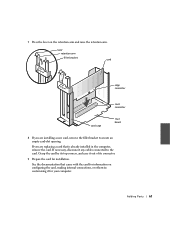
... filler bracket card edge connector card connector card cage riser board 8 If you are installing a new card, remove the filler bracket to the card. Adding Parts 67 7 Press the lever on configuring the card, making internal connections, or otherwise customizing it out of its top corners, and ease it for your...
... filler bracket card edge connector card connector card cage riser board 8 If you are installing a new card, remove the filler bracket to the card. Adding Parts 67 7 Press the lever on configuring the card, making internal connections, or otherwise customizing it out of its top corners, and ease it for your...
Dell Dimension 4300S Owner's Manual
Page 68
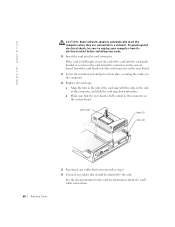
...the riser board. 11 Lower the retention arm and press it into the card connector. card cage tabs (2) slots (2) 68 Adding Parts 13 Reconnect any cables that you lower the card toward its electrical outlet before installing any cables that the riser board is full-length,... for the card for information about the card's cable connections. To guard against electrical shock, be attached to the card. www.dell.com | support.dell.com CAUTION: Some network adapters automatically start the computer when they are connected to unplug your computer from its connector on the system...
...the riser board. 11 Lower the retention arm and press it into the card connector. card cage tabs (2) slots (2) 68 Adding Parts 13 Reconnect any cables that you lower the card toward its electrical outlet before installing any cables that the riser board is full-length,... for the card for information about the card's cable connections. To guard against electrical shock, be attached to the card. www.dell.com | support.dell.com CAUTION: Some network adapters automatically start the computer when they are connected to unplug your computer from its connector on the system...
Dell Dimension 4300S Owner's Manual
Page 69
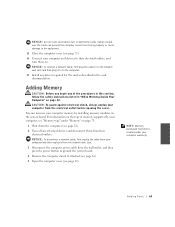
... the electrical outlet before opening the cover. HINT: Memory purchased from their electrical outlets, and turn them from Dell is covered under "Memory" on page 75. 1 Shut down the computer (see page 61). Adding Parts 69 NOTICE: To connect a network cable, first plug the cable in to the network wall jack and...
... the electrical outlet before opening the cover. HINT: Memory purchased from their electrical outlets, and turn them from Dell is covered under "Memory" on page 75. 1 Shut down the computer (see page 61). Adding Parts 69 NOTICE: To connect a network cable, first plug the cable in to the network wall jack and...
Dell Dimension 4300S Owner's Manual
Page 70
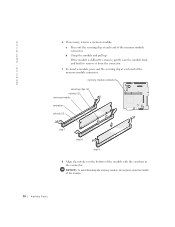
... module connectors securing clips (2) notches (2) memory module connector cutouts (2) step 7 step 8 step 9 8 Align the notches on the bottom of the module. 70 Adding Parts www.dell.com | support.dell.com 6 If necessary, remove a memory module: a Press out the securing clip at each end of the memory module connector. b Grasp the module and pull...
... module connectors securing clips (2) notches (2) memory module connector cutouts (2) step 7 step 8 step 9 8 Align the notches on the bottom of the module. 70 Adding Parts www.dell.com | support.dell.com 6 If necessary, remove a memory module: a Press out the securing clip at each end of the memory module connector. b Grasp the module and pull...
Dell Dimension 4300S Owner's Manual
Page 71
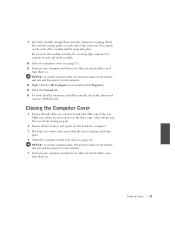
... cable, first plug the cable in to the network wall jack and then plug it in to their electrical outlets, and turn them on. Adding Parts 71 NOTICE: To connect a network cable, first plug the cable in to the network wall jack and then plug it in to the computer. 5 Connect... on . Make sure cables are not routed over the drive cage-they will prevent the cover from closing properly. 2 Ensure that no tools or extra parts are left inside the computer. 3 Pivot the cover down into the connector, ensuring that the release buttons click into place. 4 Attach the computer stand, if...
... cable, first plug the cable in to the network wall jack and then plug it in to their electrical outlets, and turn them on. Adding Parts 71 NOTICE: To connect a network cable, first plug the cable in to the network wall jack and then plug it in to the computer. 5 Connect... on . Make sure cables are not routed over the drive cage-they will prevent the cover from closing properly. 2 Ensure that no tools or extra parts are left inside the computer. 3 Pivot the cover down into the connector, ensuring that the release buttons click into place. 4 Attach the computer stand, if...
Dell Dimension 4300S Owner's Manual
Page 83
..., mice, speakers, microphones for the duration of the product. Definition of the application software that is provided by Dell not under the Dell brand (printers, scanners, cameras, games, and so on ). However, Dell also extends a parts replacement program to the terms and conditions of your computer. In addition, any optional support service contract purchased...
..., mice, speakers, microphones for the duration of the product. Definition of the application software that is provided by Dell not under the Dell brand (printers, scanners, cameras, games, and so on ). However, Dell also extends a parts replacement program to the terms and conditions of your computer. In addition, any optional support service contract purchased...
Dell Dimension 4300S Owner's Manual
Page 97
... educational institutions): Customer Service and Technical Support (Return material authorization numbers) toll free: 1-800-234-1490 Dell Sales toll free: 1-800-289-3355 or toll free: 1-800-879-3355 Spare Parts Sales toll free: 1-800-357-3355 Desktop and Portable Fee-Based Technical Support toll free: 1-800-433...-9005 Sales (Catalogs) toll free: 1-800-426-5150 Fax toll free: 1-800-727-8320 TechFax toll free: 1-800-950-1329 Dell Services for the Deaf, ...
... educational institutions): Customer Service and Technical Support (Return material authorization numbers) toll free: 1-800-234-1490 Dell Sales toll free: 1-800-289-3355 or toll free: 1-800-879-3355 Spare Parts Sales toll free: 1-800-357-3355 Desktop and Portable Fee-Based Technical Support toll free: 1-800-433...-9005 Sales (Catalogs) toll free: 1-800-426-5150 Fax toll free: 1-800-727-8320 TechFax toll free: 1-800-950-1329 Dell Services for the Deaf, ...
Dell Dimension 4300S Owner's Manual
Page 100
... carry an FCC Class B rating as Class B digital devices. This device complies with Part 15 of certain options can be a Class A digital device. www.dell.com | support.dell.com Most Dell computers are classified by the Federal Communications Commission (FCC) as distinguished by either an FCC...(U.S. However, the inclusion of the FCC Rules. If any interference received, including interference that changes or modifications not expressly approved by Dell could void your computer, on card-mounting brackets, and on the bottom or back panel of your authority to Class A. Each ...
... carry an FCC Class B rating as Class B digital devices. This device complies with Part 15 of certain options can be a Class A digital device. www.dell.com | support.dell.com Most Dell computers are classified by the Federal Communications Commission (FCC) as distinguished by either an FCC...(U.S. However, the inclusion of the FCC Rules. If any interference received, including interference that changes or modifications not expressly approved by Dell could void your computer, on card-mounting brackets, and on the bottom or back panel of your authority to Class A. Each ...
Dell Dimension 4300S Owner's Manual
Page 101
... protection against harmful interference in a particular installation. Appendix 101 However, there is no guarantee that to which can be required to Part 15 of the following measures: • Reorient or relocate the receiving antenna. • Increase the separation between the equipment and the... in accordance with the manufacturer's instruction manual, may cause interference with the limits for a Class A digital device pursuant to Part 15 of this equipment does cause harmful interference to radio or television reception, which the receiver is operated in which case you...
... protection against harmful interference in a particular installation. Appendix 101 However, there is no guarantee that to which can be required to Part 15 of the following measures: • Reorient or relocate the receiving antenna. • Increase the separation between the equipment and the... in accordance with the manufacturer's instruction manual, may cause interference with the limits for a Class A digital device pursuant to Part 15 of this equipment does cause harmful interference to radio or television reception, which the receiver is operated in which case you...
Dell Dimension 4300S Owner's Manual
Page 105
...not cover any items that are not covered. Monitors, keyboards, and mice that are Dell-branded or that are included on the date of parts and components not supplied by Dell, usage not in accordance with product instructions, failure to external causes, including accident, ...limited warranty (U.S. and Canada. One-Year Limited Warranty (U.S. external devices (except as further described in the U.S. accessories or parts added to a Dell system after the system is covered under this limited warranty does not cover damage due to perform required preventive maintenance, and ...
...not cover any items that are not covered. Monitors, keyboards, and mice that are Dell-branded or that are included on the date of parts and components not supplied by Dell, usage not in accordance with product instructions, failure to external causes, including accident, ...limited warranty (U.S. and Canada. One-Year Limited Warranty (U.S. external devices (except as further described in the U.S. accessories or parts added to a Dell system after the system is covered under this limited warranty does not cover damage due to perform required preventive maintenance, and ...
Dell Dimension 4300S Owner's Manual
Page 106
... THIS LIMITED WARRANTY STATEMENT. Remove any other locations will be made by various manufacturers in performing warranty repairs and building replacement products. Dell uses new and reconditioned parts made freight collect. Dell will ship the repaired or replacement products to other storage device(s) in the product(s). Shipments to you (freight prepaid) if you...
... THIS LIMITED WARRANTY STATEMENT. Remove any other locations will be made by various manufacturers in performing warranty repairs and building replacement products. Dell uses new and reconditioned parts made freight collect. Dell will ship the repaired or replacement products to other storage device(s) in the product(s). Shipments to you (freight prepaid) if you...

