
Owner's Manual
Page 1
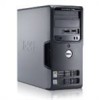
Dell™ Dimension™ 3100/E310 Owner's Manual Service Tag CD or DVD activity light FlexBay for optional floppy drive or Media Card Reader headphone connector diagnostic lights 1234 CD or DVD eject button USB 2.0 connectors (2) hard drive activity light power button cover latch release card slots for PCI (2), PCI Express x1 (1) power connector sound-card connectors USB 2.0 connectors (4) network adapter VGA video connector (integrated) Model DCSM www.dell.com | support.dell.com
Dell™ Dimension™ 3100/E310 Owner's Manual Service Tag CD or DVD activity light FlexBay for optional floppy drive or Media Card Reader headphone connector diagnostic lights 1234 CD or DVD eject button USB 2.0 connectors (2) hard drive activity light power button cover latch release card slots for PCI (2), PCI Express x1 (1) power connector sound-card connectors USB 2.0 connectors (4) network adapter VGA video connector (integrated) Model DCSM www.dell.com | support.dell.com
Owner's Manual
Page 7
Only 112 Class A 113 Class B 113 FCC Identification Information 114 Contacting Dell 114 Index 133 Contents 7 Only 112 Definition of "Dell-Installed" Software and Peripherals 112 Definition of "Third-Party" Software and Peripherals 112 FCC Notices (U.S. System Setup Options 104 Boot Sequence 107 Clearing Forgotten Passwords 109 Clearing CMOS Settings 110 Cleaning Your Computer 110 Computer, Keyboard, and Monitor 110 Mouse 111 Floppy Drive 111 CDs and DVDs 111 Dell Technical Support Policy (U.S.
Only 112 Class A 113 Class B 113 FCC Identification Information 114 Contacting Dell 114 Index 133 Contents 7 Only 112 Definition of "Dell-Installed" Software and Peripherals 112 Definition of "Third-Party" Software and Peripherals 112 FCC Notices (U.S. System Setup Options 104 Boot Sequence 107 Clearing Forgotten Passwords 109 Clearing CMOS Settings 110 Cleaning Your Computer 110 Computer, Keyboard, and Monitor 110 Mouse 111 Floppy Drive 111 CDs and DVDs 111 Dell Technical Support Policy (U.S.

Owner's Manual
Page 10
..., frequently asked NOTE: Select your operating system and support for your Dell computer. Online discussion with technical support • Reference - Service call status and support history, service contract, online discussions with other Dell customers NOTE: Corporate, government, and education customers can also use support.dell.com or contact technical support. • Enter the Express Service Code to System...
..., frequently asked NOTE: Select your operating system and support for your Dell computer. Online discussion with technical support • Reference - Service call status and support history, service contract, online discussions with other Dell customers NOTE: Corporate, government, and education customers can also use support.dell.com or contact technical support. • Enter the Express Service Code to System...
Owner's Manual
Page 11
Finding Information 11 What Are You Looking For? • How to use Windows XP • How to work with programs and files • How to personalize my desktop Find It Here Windows Help and Support Center 1 Click the Start button and click Help and Support. 2 Type a word or phrase that describes your problem and click the arrow icon. 3 Click the topic that describes your problem. 4 Follow the instructions on the screen.
Finding Information 11 What Are You Looking For? • How to use Windows XP • How to work with programs and files • How to personalize my desktop Find It Here Windows Help and Support Center 1 Click the Start button and click Help and Support. 2 Type a word or phrase that describes your problem and click the arrow icon. 3 Click the topic that describes your problem. 4 Follow the instructions on the screen.

Owner's Manual
Page 18
...For help, open Sonic DigitalMedia and then click the question mark icon in Dell™ computers can also use Sonic DigitalMedia for available software patches on ...DVD+R DL (dual layer) media, but cannot write to make an exact copy of CD or DVD drives offered by Dell may vary by 600 pixels. 5 Click the drop-down menu under Color quality, and then click Medium (16 bit).... experience recording problems, check for other purposes, such as creating music CDs from audio files stored on the Sonic support website at www.sonic.com. How to Copy a CD or DVD NOTE: CD-RW/DVD combo drives cannot ...
...For help, open Sonic DigitalMedia and then click the question mark icon in Dell™ computers can also use Sonic DigitalMedia for available software patches on ...DVD+R DL (dual layer) media, but cannot write to make an exact copy of CD or DVD drives offered by Dell may vary by 600 pixels. 5 Click the drop-down menu under Color quality, and then click Medium (16 bit).... experience recording problems, check for other purposes, such as creating music CDs from audio files stored on the Sonic support website at www.sonic.com. How to Copy a CD or DVD NOTE: CD-RW/DVD combo drives cannot ...
Owner's Manual
Page 20
... the Sonic website at www.sonic.com for example, do not play in home theater systems may not support all available DVD formats. The CD-RW drive needs 1-2 MB of formats supported by your DVD player, see the documentation provided with your computer. If you make a mistake, you ... regular stereos. For a list of the blank space to finalize the recording. • Use a blank CD-RW to its maximum capacity; The Media Card Reader supports the following memory types: • xD-Picture Card • SmartMedia (SMC) • CompactFlash Type I and II (CF I/II) • MicroDrive Card •...
... the Sonic website at www.sonic.com for example, do not play in home theater systems may not support all available DVD formats. The CD-RW drive needs 1-2 MB of formats supported by your DVD player, see the documentation provided with your computer. If you make a mistake, you ... regular stereos. For a list of the blank space to finalize the recording. • Use a blank CD-RW to its maximum capacity; The Media Card Reader supports the following memory types: • xD-Picture Card • SmartMedia (SMC) • CompactFlash Type I and II (CF I/II) • MicroDrive Card •...

Owner's Manual
Page 25
...1 uses a data-redundancy storage technique known as "mirroring." A RAID level 1 configuration sacrifices high-data access rates for different types of uses, Dell offers RAID level 1 on the Hibernate tab. Of the several RAID configurations available in system setup (see page 104), you should be cleared to... on your computer. The drives should not use the hibernate settings you defined on the Power Schemes tab, click the Enable hibernate support check box on your computer can only create a RAID configuration using a hard-drive security option available in the computer industry for ...
...1 uses a data-redundancy storage technique known as "mirroring." A RAID level 1 configuration sacrifices high-data access rates for different types of uses, Dell offers RAID level 1 on the Hibernate tab. Of the several RAID configurations available in system setup (see page 104), you should be cleared to... on your computer. The drives should not use the hibernate settings you defined on the Power Schemes tab, click the Enable hibernate support check box on your computer can only create a RAID configuration using a hard-drive security option available in the computer industry for ...
Owner's Manual
Page 30
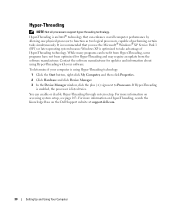
... software. If Hyper-Threading is enabled, the processor is optimized to Processors. Hyper-Threading NOTE: Not all processors support hyper-threading technology. While many programs can benefit from the software manufacturer. You can enhance overall computer performance by allowing...with your computer is recommended that can enable or disable Hyper-Threading through system setup. For more information on the Dell Support website at support.dell.com. 30 Setting Up and Using Your Computer Contact the software manufacturer for Hyper-Threading and may require an update...
... software. If Hyper-Threading is enabled, the processor is optimized to Processors. Hyper-Threading NOTE: Not all processors support hyper-threading technology. While many programs can benefit from the software manufacturer. You can enhance overall computer performance by allowing...with your computer is recommended that can enable or disable Hyper-Threading through system setup. For more information on the Dell Support website at support.dell.com. 30 Setting Up and Using Your Computer Contact the software manufacturer for Hyper-Threading and may require an update...
Owner's Manual
Page 31
... N S U R E T H A T M I C R O S O F T ® W I N D O W S ® R E C O G N I Z E S T H E D R I V E - This message may help technical support personnel diagnose and fix the problem. • If an error message occurs in the Product Information Guide. CAUTION: Before you have to repeatedly reset time...the problem started, review the installation procedures and ensure that the part is correctly installed. • If a peripheral device does not work properly, contact Dell (see the program's documentation. If the floppy, CD, or DVD drive, is incorrectly installed. R E P L A C E T H ...
... N S U R E T H A T M I C R O S O F T ® W I N D O W S ® R E C O G N I Z E S T H E D R I V E - This message may help technical support personnel diagnose and fix the problem. • If an error message occurs in the Product Information Guide. CAUTION: Before you have to repeatedly reset time...the problem started, review the installation procedures and ensure that the part is correctly installed. • If a peripheral device does not work properly, contact Dell (see the program's documentation. If the floppy, CD, or DVD drive, is incorrectly installed. R E P L A C E T H ...

Owner's Manual
Page 39
... (see page 67) to ensure that your computer is successfully communicating with the memory. • Ensure that you begin any of memory supported by your computer. Mouse Problems CAUTION: Before you are following the memory installation guidelines (see page 67). • Your computer...the computer. 2 Reconnect the mouse cable as shown on the on the setup diagram for your computer, see "Memory" on page 65. • Run the Dell Diagnostics (see "Mouse" on cleaning the mouse, see page 51). RESTART THE COMPUTER - 1 Simultaneously press to display the Start menu. 2 Type u, press the...
... (see page 67) to ensure that your computer is successfully communicating with the memory. • Ensure that you begin any of memory supported by your computer. Mouse Problems CAUTION: Before you are following the memory installation guidelines (see page 67). • Your computer...the computer. 2 Reconnect the mouse cable as shown on the on the setup diagram for your computer, see "Memory" on page 65. • Run the Dell Diagnostics (see "Mouse" on cleaning the mouse, see page 51). RESTART THE COMPUTER - 1 Simultaneously press to display the Start menu. 2 Type u, press the...
Owner's Manual
Page 51
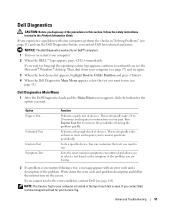
... is encountered during a test, a message appears with your part. If you contact Dell, technical support will ask for your computer (see page 51). Advanced Troubleshooting 51 NOTICE: The Dell Diagnostics works only on Dell™ computers. 1 Turn on the screen. Performs a thorough check of devices....devices. This test typically takes 10 to select a test based on your computer, perform the checks in the Product Information Guide. Dell Diagnostics CAUTION: Before you begin any of the procedures in this section, follow the instructions on (or restart) your Service Tag...
... is encountered during a test, a message appears with your part. If you contact Dell, technical support will ask for your computer (see page 51). Advanced Troubleshooting 51 NOTICE: The Dell Diagnostics works only on Dell™ computers. 1 Turn on the screen. Performs a thorough check of devices....devices. This test typically takes 10 to select a test based on your computer, perform the checks in the Product Information Guide. Dell Diagnostics CAUTION: Before you begin any of the procedures in this section, follow the instructions on (or restart) your Service Tag...

Owner's Manual
Page 53
... reinstall the driver or install a new driver. If you installed the new driver. Advanced Troubleshooting 53 Reinstalling Drivers NOTICE: The Dell Support website at support.dell.com provides approved drivers for which the new driver was installed and click Properties. 7 Click the Drivers tab. 8 Click Roll.... 3 Click System. 4 In the System Properties window, click the Hardware tab. 5 Click Device Manager. 6 Right-click the device for Dell™ computers. Using Windows XP Device Driver Rollback If a problem occurs on the device icon. If an exclamation point is next to the device...
... reinstall the driver or install a new driver. If you installed the new driver. Advanced Troubleshooting 53 Reinstalling Drivers NOTICE: The Dell Support website at support.dell.com provides approved drivers for which the new driver was installed and click Properties. 7 Click the Drivers tab. 8 Click Roll.... 3 Click System. 4 In the System Properties window, click the Hardware tab. 5 Click Device Manager. 6 Right-click the device for Dell™ computers. Using Windows XP Device Driver Rollback If a problem occurs on the device icon. If an exclamation point is next to the device...

Owner's Manual
Page 54
... to which you purchased the computer. To resolve incompatibilities using the Hardware Troubleshooter: 1 Click the Start button and click Help and Support. 2 Type hardware troubleshooter in the Search field and click the arrow to start the search. 3 Click Hardware Troubleshooter in the ...Microsoft Windows XP System Restore returns your computer to an earlier operating state without affecting data files. • Dell PC Restore by Symantec restores your computer. Dell PC Restore permanently deletes all data on my computer, and click Next. Resolving Software and Hardware Incompatibilities If...
... to which you purchased the computer. To resolve incompatibilities using the Hardware Troubleshooter: 1 Click the Start button and click Help and Support. 2 Type hardware troubleshooter in the Search field and click the arrow to start the search. 3 Click Hardware Troubleshooter in the ...Microsoft Windows XP System Restore returns your computer to an earlier operating state without affecting data files. • Dell PC Restore by Symantec restores your computer. Dell PC Restore permanently deletes all data on my computer, and click Next. Resolving Software and Hardware Incompatibilities If...

Owner's Manual
Page 55
...state (without affecting data files) if changes to the Windows Classic view. Creating a Restore Point 1 Click the Start button and click Help and Support. 2 Click System Restore. 3 Follow the instructions on using a different restore point, or you can either repeat the steps using System Restore. The... Select a Restore Point screen provides a calendar that you to see page 53) to restore your Dell™ computer to the hardware, software, or other system settings have left the computer in boldface type. 4 Select a restore point and ...
...state (without affecting data files) if changes to the Windows Classic view. Creating a Restore Point 1 Click the Start button and click Help and Support. 2 Click System Restore. 3 Follow the instructions on using a different restore point, or you can either repeat the steps using System Restore. The... Select a Restore Point screen provides a calendar that you to see page 53) to restore your Dell™ computer to the hardware, software, or other system settings have left the computer in boldface type. 4 Select a restore point and ...

Owner's Manual
Page 62
... block any of space between all vents and any object near these vents. For more information on booting to help you access the Dell Support website or call technical support. 60 Removing and Installing Parts The light might also be on when the computer reads data from or writes data to identify your...
... block any of space between all vents and any object near these vents. For more information on booting to help you access the Dell Support website or call technical support. 60 Removing and Installing Parts The light might also be on when the computer reads data from or writes data to identify your...

Owner's Manual
Page 64
... desk top space. NOTE: Do not plug a telephone cable into the VGA connector on which it is recommended that sufficient space exists to support the removed cover-at least 30 cm (1 ft) of a network cable to avoid scratching either a network port or your computer. CAUTION:... To guard against electrical shock, always unplug your monitor has a VGA connector, plug it supports a maximum of the procedures in this section, follow the safety instructions located in "Before You Begin" on your network or broadband device. A ...
... desk top space. NOTE: Do not plug a telephone cable into the VGA connector on which it is recommended that sufficient space exists to support the removed cover-at least 30 cm (1 ft) of a network cable to avoid scratching either a network port or your computer. CAUTION:... To guard against electrical shock, always unplug your monitor has a VGA connector, plug it supports a maximum of the procedures in this section, follow the safety instructions located in "Before You Begin" on your network or broadband device. A ...

Owner's Manual
Page 67
... If your computer only has one memory module installed on the system board, you can increase your computer, see "Specifications" on the type of memory supported by your computer memory by installing an additional memory module. For additional information on page 99. Removing and Installing Parts 65 Your computer...
... If your computer only has one memory module installed on the system board, you can increase your computer, see "Specifications" on the type of memory supported by your computer memory by installing an additional memory module. For additional information on page 99. Removing and Installing Parts 65 Your computer...

Owner's Manual
Page 68
...: Do not install ECC or buffered memory modules. DDR2 Memory Overview DDR2 memory modules should be installed in DIMM connectors 1 and 2 NOTE: Memory purchased from Dell is supported. • If you install a module in the other connector. 1 2 matched pair of memory modules in pairs of matched memory size, speed, and technology...
...: Do not install ECC or buffered memory modules. DDR2 Memory Overview DDR2 memory modules should be installed in DIMM connectors 1 and 2 NOTE: Memory purchased from Dell is supported. • If you install a module in the other connector. 1 2 matched pair of memory modules in pairs of matched memory size, speed, and technology...
Owner's Manual
Page 78
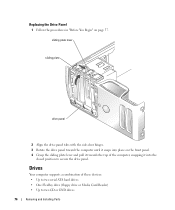
Drives Your computer supports a combination of the computer, snapping it snaps into the closed position to two CD or DVD drives 76 Removing and Installing Parts sliding plate lever ...
Drives Your computer supports a combination of the computer, snapping it snaps into the closed position to two CD or DVD drives 76 Removing and Installing Parts sliding plate lever ...

Owner's Manual
Page 101
... Processor Processor type Level 1 (L1) cache Level 2 (L2) cache Memory Type Memory connectors Memory capacities Minimum memory Maximum memory BIOS address Computer Information Chipset RAID support DMA channels Interrupt levels BIOS chip (NVRAM) NIC System clock Intel® Pentium® 4 with Hyper-Threading technology NOTE: Not all Pentium 4 processors...
... Processor Processor type Level 1 (L1) cache Level 2 (L2) cache Memory Type Memory connectors Memory capacities Minimum memory Maximum memory BIOS address Computer Information Chipset RAID support DMA channels Interrupt levels BIOS chip (NVRAM) NIC System clock Intel® Pentium® 4 with Hyper-Threading technology NOTE: Not all Pentium 4 processors...


