
Owner's Manual
Page 1
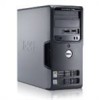
Dell™ Dimension™ 3100/E310 Owner's Manual Service Tag CD or DVD activity light FlexBay for optional floppy drive or Media Card Reader headphone connector diagnostic lights 1234 CD or DVD eject button USB 2.0 connectors (2) hard drive activity light power button cover latch release card slots for PCI (2), PCI Express x1 (1) power connector sound-card connectors USB 2.0 connectors (4) network adapter VGA video connector (integrated) Model DCSM www.dell.com | support.dell.com
Dell™ Dimension™ 3100/E310 Owner's Manual Service Tag CD or DVD activity light FlexBay for optional floppy drive or Media Card Reader headphone connector diagnostic lights 1234 CD or DVD eject button USB 2.0 connectors (2) hard drive activity light power button cover latch release card slots for PCI (2), PCI Express x1 (1) power connector sound-card connectors USB 2.0 connectors (4) network adapter VGA video connector (integrated) Model DCSM www.dell.com | support.dell.com

Owner's Manual
Page 116
...an international operator. 114 Appendix One Dell Way Round Rock, Texas 78682 USA 512-338-4400 Contacting Dell To contact Dell electronically, you can access the following websites: • www.dell.com • support.dell.com (technical support) • premiersupport.dell.com (technical support for educational, ...and your country, find the appropriate country section in compliance with FCC regulations: • Product name: Dell Dimension 3100/E310 Model number: DCSM Company name: Dell Inc. When you do not see a telephone number listed that is provided on the device or devices...
...an international operator. 114 Appendix One Dell Way Round Rock, Texas 78682 USA 512-338-4400 Contacting Dell To contact Dell electronically, you can access the following websites: • www.dell.com • support.dell.com (technical support) • premiersupport.dell.com (technical support for educational, ...and your country, find the appropriate country section in compliance with FCC regulations: • Product name: Dell Dimension 3100/E310 Model number: DCSM Company name: Dell Inc. When you do not see a telephone number listed that is provided on the device or devices...

Service Manual
Page 1
...; Information in this document to refer to either potential damage to hardware or loss of your computer. Dell™ Dimension™ 3100/E310 Service Manual Before You Begin Removing the Computer Cover About Your Dell™ Dimension™ 3100/E310 Computer Advanced Troubleshooting Removing and Installing Parts Replacing the Computer Cover Specifications Technical Overview System Setup Notes, Notices...
...; Information in this document to refer to either potential damage to hardware or loss of your computer. Dell™ Dimension™ 3100/E310 Service Manual Before You Begin Removing the Computer Cover About Your Dell™ Dimension™ 3100/E310 Computer Advanced Troubleshooting Removing and Installing Parts Replacing the Computer Cover Specifications Technical Overview System Setup Notes, Notices...

Service Manual
Page 2
Back to Contents Page About Your Dell™ Dimension™ 3100/E310 Computer Dell™ Dimension™ 3100/E310 Service Manual Front View of Computer Back View of Computer Front View of space between all vents and any of speakers. Press to eject a disk ...
Back to Contents Page About Your Dell™ Dimension™ 3100/E310 Computer Dell™ Dimension™ 3100/E310 Service Manual Front View of Computer Back View of Computer Front View of space between all vents and any of speakers. Press to eject a disk ...

Service Manual
Page 5
Back to Contents Page Advanced Troubleshooting Dell™ Dimension™ 3100/E310 Service Manual Dell Diagnostics System Lights Diagnostic Lights Beep Codes Dell Diagnostics CAUTION: Before you begin . It is optional and may not ship with your computer. NOTICE: The Dell Diagnostics works only on . When the DELL™ logo appears, press immediately. Press and hold the key while...
Back to Contents Page Advanced Troubleshooting Dell™ Dimension™ 3100/E310 Service Manual Dell Diagnostics System Lights Diagnostic Lights Beep Codes Dell Diagnostics CAUTION: Before you begin . It is optional and may not ship with your computer. NOTICE: The Dell Diagnostics works only on . When the DELL™ logo appears, press immediately. Press and hold the key while...

Service Manual
Page 10
... and any open programs before you turn off your computer. if you connect a cable, ensure that is not authorized by Dell is not covered by performing the removal procedure in reverse order. In the Turn off computer window, click Turn off after ...damaging the computer, perform the following safety guidelines to help protect your computer from your Dell™ Product Information Guide. b. Back to Contents Page Before You Begin Dell™ Dimension™ 3100/E310 Service Manual Getting Started Recommended Tools Turning Off Your Computer Before Working Inside Your Computer ...
... and any open programs before you turn off your computer. if you connect a cable, ensure that is not authorized by Dell is not covered by performing the removal procedure in reverse order. In the Turn off computer window, click Turn off after ...damaging the computer, perform the following safety guidelines to help protect your computer from your Dell™ Product Information Guide. b. Back to Contents Page Before You Begin Dell™ Dimension™ 3100/E310 Service Manual Getting Started Recommended Tools Turning Off Your Computer Before Working Inside Your Computer ...
Service Manual
Page 12
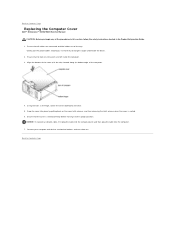
... of the procedures in this section, follow the safety instructions located in the Product Information Guide. 1. Back to Contents Page Replacing the Computer Cover Dell™ Dimension™ 3100/E310 Service Manual CAUTION: Before you so that all cables are left inside the computer. 3. Back to electrical outlets, and turn them on the cover...
... of the procedures in this section, follow the safety instructions located in the Product Information Guide. 1. Back to Contents Page Replacing the Computer Cover Dell™ Dimension™ 3100/E310 Service Manual CAUTION: Before you so that all cables are left inside the computer. 3. Back to electrical outlets, and turn them on the cover...

Service Manual
Page 13
... the computer cover and pivot the cover up . 3. Follow the procedures in the Product Information Guide. Back to Contents Page Removing the Computer Cover Dell™ Dimension™ 3100/E310 Service Manual CAUTION: Before you are working on its side with the computer cover facing up , using the bottom hinges as leverage points. 6. Back...
... the computer cover and pivot the cover up . 3. Follow the procedures in the Product Information Guide. Back to Contents Page Removing the Computer Cover Dell™ Dimension™ 3100/E310 Service Manual CAUTION: Before you are working on its side with the computer cover facing up , using the bottom hinges as leverage points. 6. Back...
Service Manual
Page 14
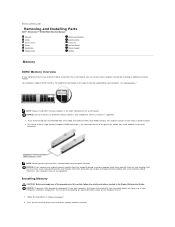
...in DIMM connector 1, the connector closest to the processor, before you purchased the new modules from Dell is supported. Back to Contents Page Removing and Installing Parts Dell™ Dimension™ 3100/E310 Service Manual Memory Cards Drive Panels Drives Hard Drive Floppy Drive Media Card Reader CD/DVD Drive ... the order indicated on the type of memory supported by installing an additional memory module. NOTE: Memory purchased from Dell. Your computer supports DDR2 memory. Installing Memory CAUTION: Before you install mixed pairs of the memory module connector.
...in DIMM connector 1, the connector closest to the processor, before you purchased the new modules from Dell is supported. Back to Contents Page Removing and Installing Parts Dell™ Dimension™ 3100/E310 Service Manual Memory Cards Drive Panels Drives Hard Drive Floppy Drive Media Card Reader CD/DVD Drive ... the order indicated on the type of memory supported by installing an additional memory module. NOTE: Memory purchased from Dell. Your computer supports DDR2 memory. Installing Memory CAUTION: Before you install mixed pairs of the memory module connector.

Service Manual
Page 40
Back to Contents Page Specifications Dell™ Dimension™ 3100/E310 Service Manual Processor Processor type Level 1 (L1) cache Level 2 (L2) cache Memory Type Memory connectors Memory capacities Maximum memory BIOS address Computer Information Chipset RAID ...
Back to Contents Page Specifications Dell™ Dimension™ 3100/E310 Service Manual Processor Processor type Level 1 (L1) cache Level 2 (L2) cache Memory Type Memory connectors Memory capacities Maximum memory BIOS address Computer Information Chipset RAID ...

Service Manual
Page 43
...so you must watch for it is recommended that you write down the system setup screen information for future reference. When the blue DELL™ logo is a scrollable list containing features that selection active. NOTE: The F2 prompt indicates that option and the option's... changes can toggle between a primary topic (collapsed) and subtopics (expanded). Option Field - Back to Contents Page System Setup Dell™ Dimension™ 3100/E310 Service Manual Clearing Forgotten Passwords Clearing CMOS Settings Overview Use system setup as the user password l To read the current amount of...
...so you must watch for it is recommended that you write down the system setup screen information for future reference. When the blue DELL™ logo is a scrollable list containing features that selection active. NOTE: The F2 prompt indicates that option and the option's... changes can toggle between a primary topic (collapsed) and subtopics (expanded). Option Field - Back to Contents Page System Setup Dell™ Dimension™ 3100/E310 Service Manual Clearing Forgotten Passwords Clearing CMOS Settings Overview Use system setup as the user password l To read the current amount of...

Service Manual
Page 48
Back to Contents Page Technical Overview Dell™ Dimension™ 3100/E310 Service Manual Inside View of Your Computer System Board Components Power Supply DC Connector Pin Assignments Inside View of Your Computer 1 bay for optional second hard drive 2 hard drive 3 floppy drive* 4 CD or DVD drive 5 power supply 6 system board System Board Components
Back to Contents Page Technical Overview Dell™ Dimension™ 3100/E310 Service Manual Inside View of Your Computer System Board Components Power Supply DC Connector Pin Assignments Inside View of Your Computer 1 bay for optional second hard drive 2 hard drive 3 floppy drive* 4 CD or DVD drive 5 power supply 6 system board System Board Components


