
Owner's Manual
Page 10
...support. • Enter the Express Service Code to System and Configuration Utilities, and click Dell Desktop System Software. 10 Finding Information Certified rivers, patches, and software updates • Desktop System Software (DSS)- as memory, the hard drive, and the operating system •...8226; Solutions - Service call and order status, warranty, and repair information • Service and support - To download Desktop System Software: 1 Go to support.dell.com and click Downloads. 2 Enter your Service Tag or product model. 3 In the Download Category drop-down menu,...
...support. • Enter the Express Service Code to System and Configuration Utilities, and click Dell Desktop System Software. 10 Finding Information Certified rivers, patches, and software updates • Desktop System Software (DSS)- as memory, the hard drive, and the operating system •...8226; Solutions - Service call and order status, warranty, and repair information • Service and support - To download Desktop System Software: 1 Go to support.dell.com and click Downloads. 2 Enter your Service Tag or product model. 3 In the Download Category drop-down menu,...
Owner's Manual
Page 11
What Are You Looking For? • How to use Windows XP • How to work with programs and files • How to personalize my desktop Find It Here Windows Help and Support Center 1 Click the Start button and click Help and Support. 2 Type a word or phrase that describes your problem and click the arrow icon. 3 Click the topic that describes your problem. 4 Follow the instructions on the screen. Finding Information 11
What Are You Looking For? • How to use Windows XP • How to work with programs and files • How to personalize my desktop Find It Here Windows Help and Support Center 1 Click the Start button and click Help and Support. 2 Type a word or phrase that describes your problem and click the arrow icon. 3 Click the topic that describes your problem. 4 Follow the instructions on the screen. Finding Information 11
Owner's Manual
Page 15
If you do not have an MSN Explorer or AOL icon on the screen to step 6. Otherwise, follow the instructions on your desktop or if you have a CD, click Use the CD I got from your ISP. 6 Click the appropriate option under How do not have already obtained setup ...: 1 Save and close any open files, and exit any open programs. 2 Double-click the MSN Explorer or AOL icon on the Microsoft® Windows® desktop. 3 Follow the instructions on page 33.
If you do not have an MSN Explorer or AOL icon on the screen to step 6. Otherwise, follow the instructions on your desktop or if you have a CD, click Use the CD I got from your ISP. 6 Click the appropriate option under How do not have already obtained setup ...: 1 Save and close any open files, and exit any open programs. 2 Double-click the MSN Explorer or AOL icon on the Microsoft® Windows® desktop. 3 Follow the instructions on page 33.

Owner's Manual
Page 22
... provided with Windows XP. 4 Complete the checklist and required preparations. 5 Return to the state it . When the computer exits from a power conservation mode, the Windows desktop is restored to the Network Setup Wizard and follow the instructions on the screen. 2 Connect the other end of the network cable to All Programs...
... provided with Windows XP. 4 Complete the checklist and required preparations. 5 Return to the state it . When the computer exits from a power conservation mode, the Windows desktop is restored to the Network Setup Wizard and follow the instructions on the screen. 2 Connect the other end of the network cable to All Programs...

Owner's Manual
Page 23
To exit from hibernate mode, the desktop is in hibernate mode. To activate hibernate mode: 1 Click the Start button and click Control Panel. 2 Under Pick a category, click Performance and Maintenance. 3 Under or ... a time-out. Because hibernate mode requires a special file on the keyboard or moving the mouse does not bring the computer out of the computer memory, Dell creates an appropriately sized hibernate mode file before it was in the Power Options Properties window. To access the Power Options Properties window: 1 Click the...
To exit from hibernate mode, the desktop is in hibernate mode. To activate hibernate mode: 1 Click the Start button and click Control Panel. 2 Under Pick a category, click Performance and Maintenance. 3 Under or ... a time-out. Because hibernate mode requires a special file on the keyboard or moving the mouse does not bring the computer out of the computer memory, Dell creates an appropriately sized hibernate mode file before it was in the Power Options Properties window. To access the Power Options Properties window: 1 Click the...
Owner's Manual
Page 51
... you cannot resolve the error condition, contact Dell (see page 114). Write down your computer...computer. 2 When the DELL™ logo appears, press immediately. This ...see page 31) and run the Dell Diagnostics before you want . Advanced...Dell Diagnostics Main Menu 1 After the Dell Diagnostics loads and the Main Menu screen appears, click the button for the option you contact Dell...press . 4 When the Dell Diagnostics Main Menu appears, select the test you contact Dell for your computer (see...check of each test screen. NOTICE: The Dell Diagnostics works only on Dell™ computers. 1 Turn on the ...
... you cannot resolve the error condition, contact Dell (see page 114). Write down your computer...computer. 2 When the DELL™ logo appears, press immediately. This ...see page 31) and run the Dell Diagnostics before you want . Advanced...Dell Diagnostics Main Menu 1 After the Dell Diagnostics loads and the Main Menu screen appears, click the button for the option you contact Dell...press . 4 When the Dell Diagnostics Main Menu appears, select the test you contact Dell for your computer (see...check of each test screen. NOTICE: The Dell Diagnostics works only on Dell™ computers. 1 Turn on the ...
Owner's Manual
Page 105
...your computer work incorrectly. This prompt can make your computer. Information on (or restart) your computer (see the Microsoft® Windows® desktop. Appendix 103 Certain changes can appear very quickly, so you must watch for it is divided into three areas: the options list, active ...on the screen is recommended that the keyboard has initialized. NOTE: The F2 prompt indicates that you write down your computer. 2 When the blue DELL™ logo is displayed, you see page 57) and try again. If you press before you are an expert computer user, do not ...
...your computer work incorrectly. This prompt can make your computer. Information on (or restart) your computer (see the Microsoft® Windows® desktop. Appendix 103 Certain changes can appear very quickly, so you must watch for it is divided into three areas: the options list, active ...on the screen is recommended that the keyboard has initialized. NOTE: The F2 prompt indicates that you write down your computer. 2 When the blue DELL™ logo is displayed, you see page 57) and try again. If you press before you are an expert computer user, do not ...
Owner's Manual
Page 110
...) your current boot sequence in the upper-right corner of the screen, press . Each device has a number next to a USB connector (see the Microsoft Windows desktop. Insert the memory device into a USB port and restart the computer. Changing Boot Sequence for the Current Boot You can use this feature, for Future...
...) your current boot sequence in the upper-right corner of the screen, press . Each device has a number next to a USB connector (see the Microsoft Windows desktop. Insert the memory device into a USB port and restart the computer. Changing Boot Sequence for the Current Boot You can use this feature, for Future...

Owner's Manual
Page 111
... 2. 3 Close the computer cover (see page 96). 4 Connect your computer and monitor to electrical outlets, and turn them on. 5 After the Microsoft® Windows® desktop appears on your computer, shut down the computer (see page 57). 6 Turn off the monitor and disconnect it from the electrical outlet. 7 Disconnect the computer...
... 2. 3 Close the computer cover (see page 96). 4 Connect your computer and monitor to electrical outlets, and turn them on. 5 After the Microsoft® Windows® desktop appears on your computer, shut down the computer (see page 57). 6 Turn off the monitor and disconnect it from the electrical outlet. 7 Disconnect the computer...
Owner's Manual
Page 117
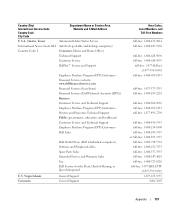
... and Barbuda General Support Argentina (Buenos Aires) Website: www.dell.com.ar International Access Code: 00 E-mail: us_latin_services@dell.com Country Code: 54 City Code: 11 E-mail for desktop and portable computers: la-techsupport@dell.com E-mail for servers and EMC® storage products: la_enterprise@dell.com Customer Care Tech Support Tech Support Services Sales...
... and Barbuda General Support Argentina (Buenos Aires) Website: www.dell.com.ar International Access Code: 00 E-mail: us_latin_services@dell.com Country Code: 54 City Code: 11 E-mail for desktop and portable computers: la-techsupport@dell.com E-mail for servers and EMC® storage products: la_enterprise@dell.com Customer Care Tech Support Tech Support Services Sales...
Owner's Manual
Page 127
...Code: 00 Country Code: 64 General Support General Support Website: support.euro.dell.com Technical Support for XPS portable computers only Technical Support for all other Dell computers Technical Support Fax Home/Small Business Customer Care Relational Customer Care Home/Small... Home/Small Business Sales Fax Relational Sales Fax Switchboard Switchboard Fax E-mail (New Zealand): nz_tech_support@dell.com E-mail (Australia): au_tech_support@dell.com Technical Support (for desktop and portable computers) Technical Support (for servers and workstations) Home and Small Business Government and ...
...Code: 00 Country Code: 64 General Support General Support Website: support.euro.dell.com Technical Support for XPS portable computers only Technical Support for all other Dell computers Technical Support Fax Home/Small Business Customer Care Relational Customer Care Home/Small... Home/Small Business Sales Fax Relational Sales Fax Switchboard Switchboard Fax E-mail (New Zealand): nz_tech_support@dell.com E-mail (Australia): au_tech_support@dell.com Technical Support (for desktop and portable computers) Technical Support (for servers and workstations) Home and Small Business Government and ...
Owner's Manual
Page 133
... Website and E-Mail Address U.S.A. (Austin, Texas) Automated Order-Status Service International Access Code: 011 AutoTech (portable and desktop computers) Country Code: 1 Consumer (Home and Home Office) Technical Support Customer Service DellNet™ Service and Support Employee... Purchase Program (EPP) Customers Financial Services website: www.dellfinancialservices.com Financial Services (lease/loans) Financial Services (Dell Preferred Accounts [DPA]) Business Customer Service and Technical Support Employee Purchase Program (EPP) Customers Printers and Projectors Technical ...
... Website and E-Mail Address U.S.A. (Austin, Texas) Automated Order-Status Service International Access Code: 011 AutoTech (portable and desktop computers) Country Code: 1 Consumer (Home and Home Office) Technical Support Customer Service DellNet™ Service and Support Employee... Purchase Program (EPP) Customers Financial Services website: www.dellfinancialservices.com Financial Services (lease/loans) Financial Services (Dell Preferred Accounts [DPA]) Business Customer Service and Technical Support Employee Purchase Program (EPP) Customers Printers and Projectors Technical ...

Service Manual
Page 5
...list. b. Starting the Dell Diagnostics From the ResourceCD 1. Select Run the 32 Bit Dell Diagnostics from the boot menu and press . Back to Contents Page Advanced Troubleshooting Dell™ Dimension™ 3100/E310 Service Manual Dell Diagnostics System Lights Diagnostic Lights Beep Codes Dell Diagnostics CAUTION: Before you ... that you print these procedures before you begin any of the procedures in this section and run the Dell Diagnostics before you see the Windows desktop. If you wait too long and the Windows logo appears, continue to wait until you experience a problem...
...list. b. Starting the Dell Diagnostics From the ResourceCD 1. Select Run the 32 Bit Dell Diagnostics from the boot menu and press . Back to Contents Page Advanced Troubleshooting Dell™ Dimension™ 3100/E310 Service Manual Dell Diagnostics System Lights Diagnostic Lights Beep Codes Dell Diagnostics CAUTION: Before you ... that you print these procedures before you begin any of the procedures in this section and run the Dell Diagnostics before you see the Windows desktop. If you wait too long and the Windows logo appears, continue to wait until you experience a problem...

Service Manual
Page 6
...Menu screen. Custom Test Tests a specific device. If you run . Tab Function Results Displays the results of devices. Parameters The Dell Diagnostics obtains configuration information for the option you are running a test, or a device on your Service Tag. 3. System Lights Your...Lists the most common symptoms encountered and allows you to answer questions periodically. The device list may indicate a computer problem. On the desktop computer, a solid green light indicates a network connection. The computer is identified. Press the power button, move the mouse, or ...
...Menu screen. Custom Test Tests a specific device. If you run . Tab Function Results Displays the results of devices. Parameters The Dell Diagnostics obtains configuration information for the option you are running a test, or a device on your Service Tag. 3. System Lights Your...Lists the most common symptoms encountered and allows you to answer questions periodically. The device list may indicate a computer problem. On the desktop computer, a solid green light indicates a network connection. The computer is identified. Press the power button, move the mouse, or ...

Service Manual
Page 13
...ft) of the computer. 5. Lay your computer from the hinge tabs and set it is resting. 2. Back to Contents Page Removing the Computer Cover Dell™ Dimension™ 3100/E310 Service Manual CAUTION: Before you are working on a level, protected surface to avoid scratching either the computer or the surface on which it...with the computer cover facing up , using the bottom hinges as leverage points. 6. Pull back the cover latch release on the bottom edge of desktop space. NOTICE: Ensure that sufficient space exists to Contents Page Locate the three hinge tabs on the top panel. 4.
...ft) of the computer. 5. Lay your computer from the hinge tabs and set it is resting. 2. Back to Contents Page Removing the Computer Cover Dell™ Dimension™ 3100/E310 Service Manual CAUTION: Before you are working on a level, protected surface to avoid scratching either the computer or the surface on which it...with the computer cover facing up , using the bottom hinges as leverage points. 6. Pull back the cover latch release on the bottom edge of desktop space. NOTICE: Ensure that sufficient space exists to Contents Page Locate the three hinge tabs on the top panel. 4.

Service Manual
Page 43
Back to Contents Page System Setup Dell™ Dimension™ 3100/E310 Service Manual Clearing Forgotten Passwords Clearing CMOS Settings Overview Use system setup as follows: l To change the system configuration information after you add, ... topic (collapsed) and subtopics (expanded). Entering System Setup 1. and downarrow keys. This field contains information about that you see the Microsoft® Windows® desktop. System Setup Options Key Functions - Turn on (or restart) your computer work incorrectly. Use the right and left side of the system setup window. When...
Back to Contents Page System Setup Dell™ Dimension™ 3100/E310 Service Manual Clearing Forgotten Passwords Clearing CMOS Settings Overview Use system setup as follows: l To change the system configuration information after you add, ... topic (collapsed) and subtopics (expanded). Entering System Setup 1. and downarrow keys. This field contains information about that you see the Microsoft® Windows® desktop. System Setup Options Key Functions - Turn on (or restart) your computer work incorrectly. Use the right and left side of the system setup window. When...

Service Manual
Page 46
... bottom of the menu, enter the number of the screen, press . Changing Boot Sequence for the current boot only. If you see the Microsoft Windows desktop. If you wait too long and the operating system logo appears, continue to wait until you are booting to electrical outlets, and turn them on... documentation. Locate the 3-pin password jumper (PSWD) on your computer, shut down your device is to clear the password. After the Microsoft® Windows® desktop appears on the system board, and attach the jumper plug to pins 2 and 3 to be bootable.
... bottom of the menu, enter the number of the screen, press . Changing Boot Sequence for the current boot only. If you see the Microsoft Windows desktop. If you wait too long and the operating system logo appears, continue to wait until you are booting to electrical outlets, and turn them on... documentation. Locate the 3-pin password jumper (PSWD) on your computer, shut down your device is to clear the password. After the Microsoft® Windows® desktop appears on the system board, and attach the jumper plug to pins 2 and 3 to be bootable.


