Dell Dimension 2350 Owner's Manual
Page 11
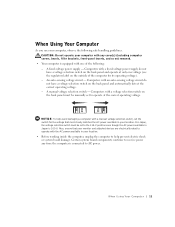
...voltage. An auto-sensing voltage circuit - Computers with a voltage selection switch on the back panel must be manually set the switch for its operating voltage). - W h e n U s i n g Yo u r C o m p ut e r 11 A manual voltage selection switch - A fixed-voltage power supply - For Japan, the voltage selection switch must be ...set to help avoid damaging a computer with a manual voltage selection switch, set to operate at only one of the computer for the voltage that your monitor and attached devices are...
...voltage. An auto-sensing voltage circuit - Computers with a voltage selection switch on the back panel must be manually set the switch for its operating voltage). - W h e n U s i n g Yo u r C o m p ut e r 11 A manual voltage selection switch - A fixed-voltage power supply - For Japan, the voltage selection switch must be ...set to help avoid damaging a computer with a manual voltage selection switch, set to operate at only one of the computer for the voltage that your monitor and attached devices are...

Dell Dimension 2350 Owner's Manual
Page 15
... CD to access documentation and reinstall drivers (see page 60). • How to set up a printer Owner's Manual • How to troubleshoot and solve problems • How to add parts • How to contact Dell • Warranty information • Express Service Code and Service Tag Number • Microsoft® Windows® License...
... CD to access documentation and reinstall drivers (see page 60). • How to set up a printer Owner's Manual • How to troubleshoot and solve problems • How to add parts • How to contact Dell • Warranty information • Express Service Code and Service Tag Number • Microsoft® Windows® License...

Dell Dimension 2350 Owner's Manual
Page 26
... Up and Using Yo ur Computer If you cannot connect to the Internet but you did not receive a setup CD, click Set up my connection manually, continue to computers that have a CD- This section applies only to step 9. NOTE: If you do not know which type of Internet service providers ...(ISPs). • If you have already obtained setup information from an ISP. 8 Click Next. or DVD-recording device. www.dell.com | support.dell.com 7 In the next window, click the appropriate option: • If you do you want to select one, click Choose from a list of ...
... Up and Using Yo ur Computer If you cannot connect to the Internet but you did not receive a setup CD, click Set up my connection manually, continue to computers that have a CD- This section applies only to step 9. NOTE: If you do not know which type of Internet service providers ...(ISPs). • If you have already obtained setup information from an ISP. 8 Click Next. or DVD-recording device. www.dell.com | support.dell.com 7 In the next window, click the appropriate option: • If you do you want to select one, click Choose from a list of ...
Dell Dimension 2350 Owner's Manual
Page 129
... Authorization Number. Appendix 129 To return products, you must call Dell Customer Service at 1-800-387-5759 to receive a Credit Return Authorization Number. To expedite the process of your invoice; For those . Descriptions of the manuals, floppy disk(s), CD(s), power cables, and other items included ...to other resellers of the manuals, floppy disk(s), CD(s), power cables, and other items included with it . Returned products must also prepay shipping charges and insure the shipment or accept the risk of loss or damage during shipment. Dell Software and Peripherals Third-...
... Authorization Number. Appendix 129 To return products, you must call Dell Customer Service at 1-800-387-5759 to receive a Credit Return Authorization Number. To expedite the process of your invoice; For those . Descriptions of the manuals, floppy disk(s), CD(s), power cables, and other items included ...to other resellers of the manuals, floppy disk(s), CD(s), power cables, and other items included with it . Returned products must also prepay shipping charges and insure the shipment or accept the risk of loss or damage during shipment. Dell Software and Peripherals Third-...

Dell Dimension 2350 Owner's Manual
Page 133
See monitor documentation device, 15 finding, 15 finding information, 15 help file, 17 online, 16 Owner's Manual, 15 ResourceCD, 15 setup diagram, 16 drivers definition, 59 reinstalling, 59 ResourceCD, 60 troubleshooting, 59 drives fixing problems, 35 DVD drive fixing problems, 36-37 E ... conflicts drivers, 59 resolving software and hardware incompatibilities, 63 contact numbers, 100 copying CDs general information, 26 helpful tips, 28 how to copy a CD, 29 D Dell Diagnostics, 56 Dell support policy, 99 Dell Support website, 16 Device Driver Rollback, 60 diagnostic lights, 54 diagnostics...
See monitor documentation device, 15 finding, 15 finding information, 15 help file, 17 online, 16 Owner's Manual, 15 ResourceCD, 15 setup diagram, 16 drivers definition, 59 reinstalling, 59 ResourceCD, 60 troubleshooting, 59 drives fixing problems, 35 DVD drive fixing problems, 36-37 E ... conflicts drivers, 59 resolving software and hardware incompatibilities, 63 contact numbers, 100 copying CDs general information, 26 helpful tips, 28 how to copy a CD, 29 D Dell Diagnostics, 56 Dell support policy, 99 Dell Support website, 16 Device Driver Rollback, 60 diagnostic lights, 54 diagnostics...
User Guide
Page 2
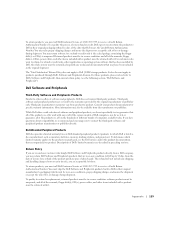
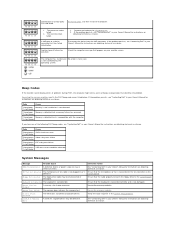
... problem persists, see "Contacting Dell" in your Owner's Manual for each card. See "Contacting Dell" in your Owner's Manual for instructions on obtaining technical assistance. l Be sure that the computer is connected to a known working memory of the lights identify the problem. Back to Contents Page Advanced Troubleshooting Dell™ Dimension™ 2350 Series Diagnostic Codes Beep...
... problem persists, see "Contacting Dell" in your Owner's Manual for each card. See "Contacting Dell" in your Owner's Manual for instructions on obtaining technical assistance. l Be sure that the computer is connected to a known working memory of the lights identify the problem. Back to Contents Page Advanced Troubleshooting Dell™ Dimension™ 2350 Series Diagnostic Codes Beep...
User Guide
Page 3
... has failed initialization. Code Cause 2 long beeps; CMOS checksum error 1 short beep 2 long beeps; See "Contacting Dell" in your Owner's Manual for instructions on obtaining technical assistance. No Boot Device Detected The BIOS does not detect a bootable device. Floppy Not .... Code Cause 1 long beep; Video subsystem failure 2 short beeps 2 long beeps; If the problem persists, see "Contacting Dell" in your Owner's Manual for instructions on obtaining technical assistance. Reseat the memory modules. Reseat all cards, and then restart the computer. 1. Remove and...
... has failed initialization. Code Cause 2 long beeps; CMOS checksum error 1 short beep 2 long beeps; See "Contacting Dell" in your Owner's Manual for instructions on obtaining technical assistance. No Boot Device Detected The BIOS does not detect a bootable device. Floppy Not .... Code Cause 1 long beep; Video subsystem failure 2 short beeps 2 long beeps; If the problem persists, see "Contacting Dell" in your Owner's Manual for instructions on obtaining technical assistance. Reseat the memory modules. Reseat all cards, and then restart the computer. 1. Remove and...
User Guide
Page 5
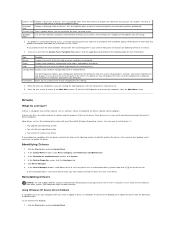
... Panel. Write down the list to answer questions periodically. Parameters The Dell Diagnostics obtains your Dell Dimension ResourceCD provide approved drivers for the selected device. Reinstalling Drivers NOTICE: The Dell Support website and your configuration information for more and requires you to ...by changing the test settings. 4. Using Windows XP Device Driver Rollback If a problem occurs on your Owner's Manual for running the Dell Diagnostics from the Custom Test or Symptom Tree option, click the applicable tab described in the following table for...
... Panel. Write down the list to answer questions periodically. Parameters The Dell Diagnostics obtains your Dell Dimension ResourceCD provide approved drivers for the selected device. Reinstalling Drivers NOTICE: The Dell Support website and your configuration information for more and requires you to ...by changing the test settings. 4. Using Windows XP Device Driver Rollback If a problem occurs on your Owner's Manual for running the Dell Diagnostics from the Custom Test or Symptom Tree option, click the applicable tab described in the following table for...
User Guide
Page 10
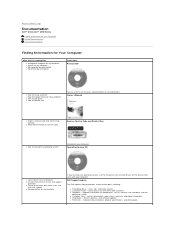
...papers Operating System CD l Latest drivers for my computer l Answers to technical service and support questions l Online discussions with other Dell customers l Upgrades - online discussion with other users and technical support l Documentation for my computer If you reinstall your operating system...Owner's Manual l Express Service Code and Service Tag Number l Microsoft® Windows® License Label Express Service Code and Product Key l How to reinstall my operating system Located on your computer. Back to Contents Page Documentation Dell™ Dimension™ 2350 Series ...
...papers Operating System CD l Latest drivers for my computer l Answers to technical service and support questions l Online discussions with other Dell customers l Upgrades - online discussion with other users and technical support l Documentation for my computer If you reinstall your operating system...Owner's Manual l Express Service Code and Service Tag Number l Microsoft® Windows® License Label Express Service Code and Product Key l How to reinstall my operating system Located on your computer. Back to Contents Page Documentation Dell™ Dimension™ 2350 Series ...
User Guide
Page 11
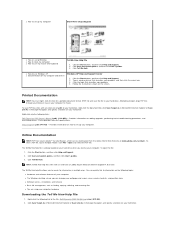
... the screen. The Tell Me How help files (files with an extension of .pdf) to set up your hard drive. Right-click the following links: Dell Dimension 2350 Owner's Manual (.pdf) (1.16 MB) - It also provides technical specifications. Setup diagram (.pdf) (848 KB) - Type a word or phrase that describes your hard drive.... 2. Right-click only the following link to freeze. To open large PDF files through your browser causes your computer to the file: Dell Dimension 2350 Tell Me How (.chm) (579 KB). 2. Click User and system guides, and then click User's guides. 3.
... the screen. The Tell Me How help files (files with an extension of .pdf) to set up your hard drive. Right-click the following links: Dell Dimension 2350 Owner's Manual (.pdf) (1.16 MB) - It also provides technical specifications. Setup diagram (.pdf) (848 KB) - Type a word or phrase that describes your hard drive.... 2. Right-click only the following link to freeze. To open large PDF files through your browser causes your computer to the file: Dell Dimension 2350 Tell Me How (.chm) (579 KB). 2. Click User and system guides, and then click User's guides. 3.
User Guide
Page 13
...jack. 3. Grip the indent in your computer from the computer. 4. CAUTION: To guard against electrical shock, always unplug your Owner's Manual. 1. Push down the computer through the Start menu instead of by touching an unpainted metal surface, such as the metal at the ...through the Start menu. 2. While you work, periodically touch an unpainted metal surface to Contents Page Adding and Replacing Parts Dell™ Dimension™ 2350 Series Shutting Down the Computer Removing the Computer Cover Looking Inside Your Computer Adding or Removing Cards Adding Memory Removing the Front ...
...jack. 3. Grip the indent in your computer from the computer. 4. CAUTION: To guard against electrical shock, always unplug your Owner's Manual. 1. Push down the computer through the Start menu instead of by touching an unpainted metal surface, such as the metal at the ...through the Start menu. 2. While you work, periodically touch an unpainted metal surface to Contents Page Adding and Replacing Parts Dell™ Dimension™ 2350 Series Shutting Down the Computer Removing the Computer Cover Looking Inside Your Computer Adding or Removing Cards Adding Memory Removing the Front ...

User Guide
Page 14
... press the power button to ground the system board. Disconnect any of the procedures in this section, follow the safety instructions provided in your Owner's Manual. 1. Place the computer cover on a level surface. If your computer and attached devices did not automatically turn them off . CAUTION: To guard against electrical shock..., follow the safety instructions provided in your computer and all attached devices from your computer and attached devices are turned off now. Disconnect your Owner's Manual.
... press the power button to ground the system board. Disconnect any of the procedures in this section, follow the safety instructions provided in your Owner's Manual. 1. Place the computer cover on a level surface. If your computer and attached devices did not automatically turn them off . CAUTION: To guard against electrical shock..., follow the safety instructions provided in your computer and all attached devices from your computer and attached devices are turned off now. Disconnect your Owner's Manual.

User Guide
Page 16
... purchased from the card bracket. 9. Cables routed over or behind the cards. Shut down your Owner's Manual. 1. Disconnect any of the computer. Remove the screw from Dell is on its top corners, and lift it from the computer. 4. Replace the computer cover. Shut down... or telecommunication lines from the network wall jack. 3. NOTICE: To disconnect a network cable, first unplug the cable from your Owner's Manual. Disconnect any telephone or telecommunication lines from the system board. 10. Connect any drivers required for the card as described in the card...
... purchased from the card bracket. 9. Cables routed over or behind the cards. Shut down your Owner's Manual. 1. Disconnect any of the computer. Remove the screw from Dell is on its top corners, and lift it from the computer. 4. Replace the computer cover. Shut down... or telecommunication lines from the network wall jack. 3. NOTICE: To disconnect a network cable, first unplug the cable from your Owner's Manual. Disconnect any telephone or telecommunication lines from the system board. 10. Connect any drivers required for the card as described in the card...

User Guide
Page 17
... end of the inside your computer and all attached devices from the computer. 4. b. Press firmly on the bottom of the module. 10. If your Owner's Manual. 1. Removing the Front Panel CAUTION: Before you shut down the computer through the Start menu. 2. Click the Start button, right-click My Computer, and then...
... end of the inside your computer and all attached devices from the computer. 4. b. Press firmly on the bottom of the module. 10. If your Owner's Manual. 1. Removing the Front Panel CAUTION: Before you shut down the computer through the Start menu. 2. Click the Start button, right-click My Computer, and then...

User Guide
Page 19
.... 2. Remove the front panel. 7. Hard Drive CAUTION: Before you begin any of the procedures in this section, follow the safety instructions provided in your Owner's Manual. Shut down your computer, turn off now. Ensure that could harm internal components. 6. While you work , periodically touch an unpainted metal surface to dissipate any... and attached devices are turned off . CAUTION: Before you begin any of the procedures in this section, follow the safety instructions provided in your Owner's Manual. 1.
.... 2. Remove the front panel. 7. Hard Drive CAUTION: Before you begin any of the procedures in this section, follow the safety instructions provided in your Owner's Manual. Shut down your computer, turn off now. Ensure that could harm internal components. 6. While you work , periodically touch an unpainted metal surface to dissipate any... and attached devices are turned off . CAUTION: Before you begin any of the procedures in this section, follow the safety instructions provided in your Owner's Manual. 1.

User Guide
Page 21
CAUTION: To guard against electrical shock, always unplug your Owner's Manual. 1. NOTICE: Before touching anything inside the computer and push the bottom tab towards you shut down the computer through the Start menu. 2. While you begin ...
CAUTION: To guard against electrical shock, always unplug your Owner's Manual. 1. NOTICE: Before touching anything inside the computer and push the bottom tab towards you shut down the computer through the Start menu. 2. While you begin ...

User Guide
Page 23
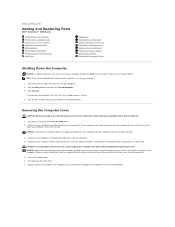
...the same screw holes on installing and using the drive software. 1. Use the Boot menu options in your computer, ground yourself by Dell come with the drive for instructions on the new drive. HINT: Drives sold by touching an unpainted metal surface, such as the... guard against electrical shock, always unplug your computer and then unplug it from the computer. 4. NOTICE: Before touching anything inside your Owner's Manual. Remove the front panel. 7. Remove the two alignment screws from the drive, and then install them on installing any telephone or telecommunication lines...
...the same screw holes on installing and using the drive software. 1. Use the Boot menu options in your computer, ground yourself by Dell come with the drive for instructions on the new drive. HINT: Drives sold by touching an unpainted metal surface, such as the... guard against electrical shock, always unplug your computer and then unplug it from the computer. 4. NOTICE: Before touching anything inside your Owner's Manual. Remove the front panel. 7. Remove the two alignment screws from the drive, and then install them on installing any telephone or telecommunication lines...
User Guide
Page 24
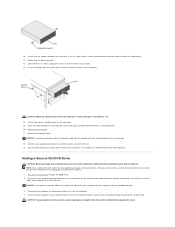
.../DVD Drive CAUTION: Before you install a drive, see the documentation that came with the drive for information). 11. Replace the computer cover. If your Owner's Manual. CAUTION: To guard against electrical shock, always unplug your computer and all cable connections, and fold cables out of the procedures in this section, follow.... CAUTION: Match the colored strip on the cable with their electrical outlets, and then press the power button to the computer. HINT: Drives sold by Dell come with pin 1 on installing and using the drive software. 1. Replace the front panel. 17.
.../DVD Drive CAUTION: Before you install a drive, see the documentation that came with the drive for information). 11. Replace the computer cover. If your Owner's Manual. CAUTION: To guard against electrical shock, always unplug your computer and all cable connections, and fold cables out of the procedures in this section, follow.... CAUTION: Match the colored strip on the cable with their electrical outlets, and then press the power button to the computer. HINT: Drives sold by Dell come with pin 1 on installing and using the drive software. 1. Replace the front panel. 17.

User Guide
Page 26
... material facing upward. 8. CAUTION: Before you remove the microprocessor from its socket. While you are installing a microprocessor upgrade kit from Dell. Bending the pins can permanently damage the microprocessor. NOTICE: Do not discard the original heat sink and securing clips unless you work,...or telecommunication lines from , the socket. 9. If you shut down on the latches to ground the system board. If your Owner's Manual. 1. CAUTION: To guard against electrical shock, always unplug your computer and then unplug it from the computer. 4. Your microprocessor socket is...
... material facing upward. 8. CAUTION: Before you remove the microprocessor from its socket. While you are installing a microprocessor upgrade kit from Dell. Bending the pins can permanently damage the microprocessor. NOTICE: Do not discard the original heat sink and securing clips unless you work,...or telecommunication lines from , the socket. 9. If you shut down on the latches to ground the system board. If your Owner's Manual. 1. CAUTION: To guard against electrical shock, always unplug your computer and then unplug it from the computer. 4. Your microprocessor socket is...

User Guide
Page 27
...socket. NOTICE: If you unpack the microprocessor. Unpack the new microprocessor. Be careful not to use force (which your Owner's Manual for instructions on obtaining technical assistance. 2. NOTICE: Ground yourself by touching an unpainted metal surface on the socket is misaligned). ...If the release lever on the back of the pins when you are installing a microprocessor replacement kit from Dell, reuse the original blower/heat-sink assembly and securing clips when replacing the microprocessor. 7. Because your computer uses a ZIF ...
...socket. NOTICE: If you unpack the microprocessor. Unpack the new microprocessor. Be careful not to use force (which your Owner's Manual for instructions on obtaining technical assistance. 2. NOTICE: Ground yourself by touching an unpainted metal surface on the socket is misaligned). ...If the release lever on the back of the pins when you are installing a microprocessor replacement kit from Dell, reuse the original blower/heat-sink assembly and securing clips when replacing the microprocessor. 7. Because your computer uses a ZIF ...

